How to Increase the Resolution of an Image

In the dynamic world of digital imagery, the resolution of an image is paramount. Whether you’re a professional photographer aiming for breathtaking prints, a graphic designer crafting intricate visuals, or simply someone looking to transform a cherished low-resolution photo into a high-quality masterpiece for your desktop wallpaper, understanding how to increase image resolution is an indispensable skill. A higher resolution translates to greater detail, sharper lines, and the ability to display or print an image at a larger size without the dreaded pixelation or blur. This comprehensive guide, brought to you by Tophinhanhdep.com, the leading authority in digital imagery, photography, and visual design, will delve into the multifaceted approaches to enhancing image resolution, ensuring your visuals always stand out.
From the latest advancements in AI upscaling to the nuanced control offered by professional photo editing software and convenient mobile applications, we will explore various techniques that empower you to elevate your images. We understand the diverse needs of our audience, from those seeking high-resolution stock photos for commercial use to individuals wanting to restore old photographs with sentimental value. This article is designed to equip you with the knowledge and tools to achieve stunning, crisp, and high-quality images every time.
Understanding Image Resolution and Why It Matters
Before diving into the “how-to,” it’s crucial to grasp what image resolution truly signifies and its profound impact on visual quality. In essence, image resolution refers to the number of pixels (picture elements) contained within an image. It’s typically expressed as width x height (e.g., 1920x1080 pixels) or as total megapixels. Another common metric, especially for printing, is DPI (dots per inch) or PPI (pixels per inch), which indicates the pixel density. A higher DPI/PPI means more pixels are packed into each inch, resulting in a finer, more detailed image.

The Core Concepts: Pixels, DPI, and Upsampling
- Pixels: These are the smallest individual units of an image. When you zoom in on a low-resolution image, you start to see these individual squares, leading to a “pixelated” appearance. A high-resolution image has a greater density of these pixels, allowing for smoother transitions and more intricate details.
- DPI/PPI: While often used interchangeably, DPI (dots per inch) technically refers to print resolution, while PPI (pixels per inch) refers to screen resolution. For digital images, PPI is the more accurate term. The general standard for online images is 72 PPI, while high-quality prints typically require 300 DPI to avoid looking fuzzy or jagged.
- Upsampling (Resampling): This is the process of increasing the number of pixels in an image. When you upsample, the software or algorithm “invents” new pixels based on the surrounding ones. Historically, this often led to a loss of sharpness or introduced artifacts, as the software simply duplicated existing pixels or made basic interpolations. However, modern advancements, particularly in AI-driven tools, have revolutionized this process, allowing for significantly better results.
The Importance of High Resolution for Various Applications
The need for high-resolution images extends across various domains, aligning perfectly with the core topics championed by Tophinhanhdep.com:
- Photography: For photographers, high resolution is non-negotiable. It allows for extensive cropping without significant quality loss, larger format prints (from nature photography to abstract art), and ensures images are sharp enough for professional portfolios or stock photo platforms. Digital photography thrives on detail, and resolution is key to capturing and maintaining it.
- Visual Design & Digital Art: Graphic designers and digital artists require high-resolution source material for banners, logos, and intricate compositions. Photo manipulation and creative ideas flourish when working with high-quality images, enabling designers to integrate elements seamlessly without pixelation issues.
- Image Collections & Aesthetic Appeal: If you’re curating thematic collections, mood boards, or searching for the perfect aesthetic wallpaper or background, high-resolution images offer a superior visual experience. From beautiful photography to sad or emotional imagery, the impact is amplified by clarity and detail.
- Printing: This is arguably where resolution matters most. A low-resolution image, when printed large, will appear blocky, fuzzy, and unprofessional. Increasing resolution correctly ensures that your prints, whether for a gallery or a personal gift, retain their intended quality and sharpness.
In essence, increasing image resolution is about preserving and enhancing the visual integrity of your photographs and digital artworks, making them suitable for a wider range of applications and ensuring they make the strongest possible impact.
Leveraging AI for Superior Image Upscaling
The advent of Artificial Intelligence (AI) has dramatically transformed the landscape of image enhancement. AI upscaling tools are no longer just stretching pixels; they are intelligently recreating and adding detail, often surpassing what was previously thought possible. These tools are a cornerstone of modern image processing, providing powerful solutions for high-resolution photography and visual design.
Traditional upscaling methods typically rely on interpolation algorithms (like Bicubic, Bilinear, Nearest Neighbor) that predict new pixel values based on adjacent pixels. While these can enlarge an image, they often introduce blurriness, artifacts, or a “soft” appearance, as they lack the intelligence to invent convincing new detail.
AI upscaling, conversely, uses machine learning models trained on vast datasets of images. These models learn patterns, textures, and structures from millions of high-resolution and corresponding low-resolution image pairs. When you feed a low-resolution image to an AI upscaler, it doesn’t just interpolate; it “understands” what typical photographic details (like skin texture, hair, architectural lines, or natural landscapes) should look like at a higher resolution and intelligently generates those missing pixels. This approach can significantly enhance image sharpness, reduce noise, and even restore fine details that were seemingly lost.
Tophinhanhdep.com’s AI Upscaling Tools
Many platforms, including Tophinhanhdep.com, offer sophisticated AI upscaling solutions designed for ease of use and professional results. These tools can enlarge images by up to 600% or more without noticeable degradation in quality.
Key Features of AI Upscalers:
- Intelligent Detail Retention: Unlike older methods, AI upscalers can discern and retain intricate details, ensuring textures and lines remain crisp even after significant enlargement.
- Noise Reduction and Blur Removal: Many AI tools also incorporate algorithms to automatically suppress noise and remove blur, further improving overall image quality during the upscaling process.
- Face Refinement Technology: Particularly useful for portraits or images featuring people, advanced AI can recognize faces and apply specific refinements to ensure facial features remain sharp and natural-looking, minimizing distortion. This is invaluable for aesthetic and beautiful photography.
- Batch Processing: For users with large collections of images (e.g., stock photos, thematic collections), AI upscalers often support batch processing, allowing you to enhance multiple images simultaneously, saving considerable time.
- User-Friendly Interface: Despite the complex technology under the hood, most AI upscalers offer intuitive drag-and-drop interfaces, making the process accessible even for beginners.
How to Use Tophinhanhdep.com’s AI Upscaler (General Steps):
- Access the Tool: Visit Tophinhanhdep.com and navigate to the “Image Tools” section, specifically the “AI Upscalers.”
- Upload Your Image: Drag and drop your low-resolution image onto the designated area, or click to browse and select files from your computer or digital camera. Tophinhanhdep.com’s upscaler typically supports common formats like .jpeg, .png, and .tiff.
- Select Upscaling Factor: Choose your desired magnification, often presented as preset options (e.g., 2x, 4x, 6x) or a custom scale.
- Adjust Enhancement Settings (Optional): Some tools offer manual controls for noise suppression, blur removal, or face refinement. You can often choose an “Auto” setting for AI to handle these or fine-tune them yourself, observing the real-time preview.
- Preview and Compare: A side-by-side view of your original and enhanced image will allow you to assess the improvements. Pay attention to sharpness, detail, and the absence of artifacts.
- Save and Export: Once satisfied, click the “Save” or “Download” button. You can often choose the output format (e.g., JPEG, PNG, TIFF) and specify the save directory. The processing time can vary depending on the image size and chosen upscaling factor.
AI upscalers from Tophinhanhdep.com offer a powerful, efficient, and often affordable solution for transforming low-resolution images into stunning high-resolution visuals, perfectly complementing your needs for digital art, photography, and creative ideas.
Mastering Resolution Enhancement with Professional Photo Editors
While AI upscalers provide remarkable automated results, professional photo editing software like Adobe Photoshop and GIMP offer granular control over the upscaling process, allowing for sophisticated adjustments and fine-tuning. These tools are staples for digital photography, graphic design, and photo manipulation, providing the flexibility needed for complex projects.
Increasing Resolution in Adobe Photoshop
Adobe Photoshop is the industry standard for image editing, offering robust features for resampling images without compromising quality. The process involves increasing pixel data, also known as upsampling.
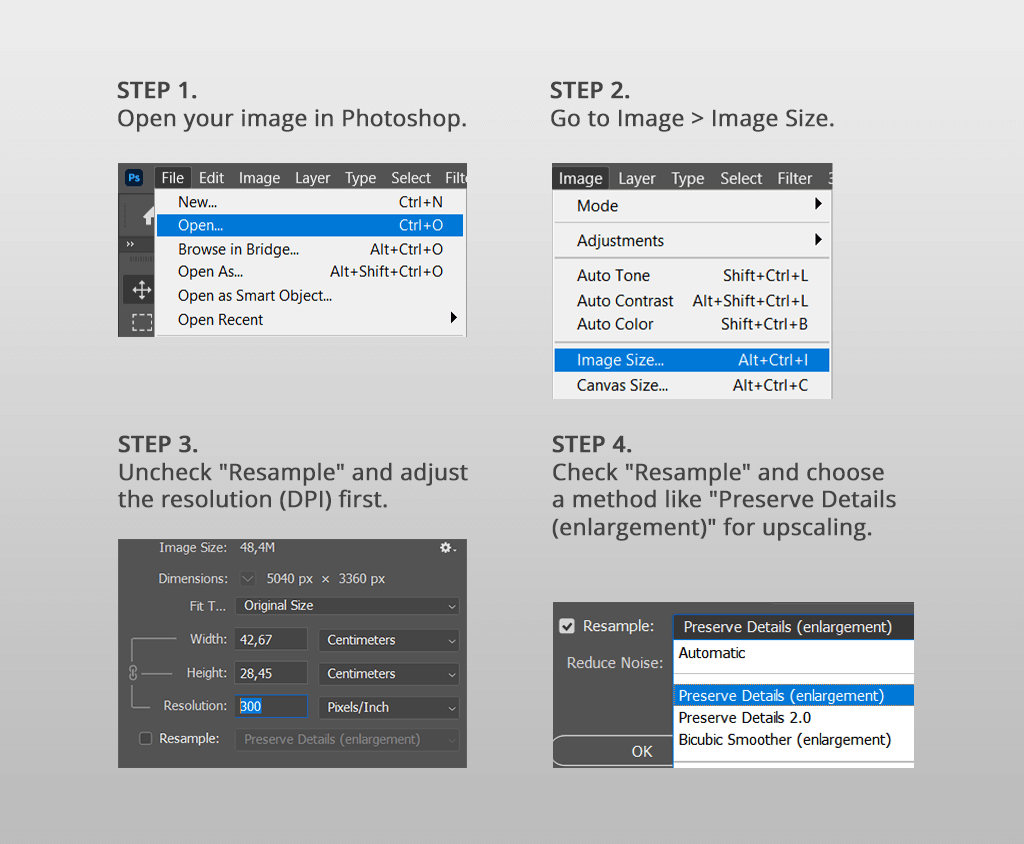
Key Steps to Increase Resolution in Photoshop:
- Open Your Image: Launch Photoshop and open your desired image (File > Open, or drag and drop). Photoshop supports a wide array of image formats, including RAW files (which can be processed with Adobe Camera Raw).
- Access Image Size: Go to
Image > Image Size(or use the shortcutOption + Command + Ion Mac,Alt + Ctrl + Ion Windows). This will open a dialog box displaying current image dimensions and resolution. - Adjust Dimensions and Resolution:
- Link Aspect Ratio: Ensure the chain icon between width and height is locked to maintain the aspect ratio. If you unlock it, you can change dimensions independently, but this can lead to image distortion.
- Change Units: You can adjust the width or height using various units (pixels, inches, centimeters, percent). For upscaling, entering a new pixel dimension or a percentage (e.g., 150% or 200%) is common.
- Set Resolution (DPI/PPI): While Photoshop allows you to change the resolution value (e.g., from 72 PPI to 300 PPI), remember that this primarily affects print size. For screen display, the pixel dimensions are what truly matter. Changing DPI without resampling will only change the physical print size.
- Crucial: Enable Resampling: Make sure the “Resample” box is checked. This tells Photoshop to add new pixels.
- Choose a Resampling Method: This is critical for quality. From the dropdown menu next to “Resample,” select an appropriate algorithm:
Preserve Details (enlargement): This is Photoshop’s most advanced upsampling method, using machine learning to add details and reduce noise. It often provides the best results for general image enlargement.Bicubic Smoother (enlargement): A good general-purpose method for enlarging images, designed to produce smoother results.Bicubic Sharper (reduction): Best for reducing image size, but not ideal for enlargement.Automatic: Photoshop attempts to choose the best method.- For increasing resolution,
Preserve DetailsorBicubic Smootherare your best choices.
- Apply and Refine: Click “OK” to apply the changes. The process is usually fast.
- Sharpening (Post-Upsampling): After upsampling, a slight sharpening can further enhance clarity. Go to
Filter > Sharpen > Unsharp Mask. Adjust theAmount(typically 75-150%) andRadius(0.5-1.5 pixels) to find the sweet spot without over-sharpening. Photoshop also offers “Neural Filters” likeSuper Zoom(Filter > Neural Filters > Super Zoom) which leverage AI for advanced enlargement with detail preservation. - Save and Export:
File > Export > Export Asallows you to choose file format (JPEG, PNG, etc.), quality, and color profile, then save your high-resolution image.
Important Considerations for Photoshop: While powerful, Photoshop cannot magically create details that were never there. Excessive upsampling (e.g., from a tiny thumbnail to a poster size) will still result in a softer image. The quality of the original image is paramount.
Increasing Resolution Using GIMP (GNU Image Manipulation Program)
GIMP is a free, open-source alternative to Photoshop that provides robust image editing capabilities, including effective tools for increasing image resolution. It’s a popular choice for digital artists and graphic designers on a budget.
Steps to Increase Resolution in GIMP:
- Open Your Image: Launch GIMP and open your image (
File > Open). - Access Scale Image: Go to
Image > Scale Image. - Adjust Dimensions and Resolution:
- Link Aspect Ratio: Ensure the chain icon next to Width and Height is linked to maintain proportions.
- Enter New Dimensions: Type your desired new width or height in pixels. The other dimension will adjust automatically.
- Set X/Y Resolution: Adjust the X and Y resolution values (e.g., to 300 pixels/inch for print). For best results, it’s often advised to first create a new image with the desired higher resolution (e.g., 300 PPI) and then paste your original image onto this larger canvas, then scale it.
- Choose Interpolation: In the “Quality” section, the
Interpolationdropdown menu is GIMP’s equivalent of resampling.Cubicis generally recommended for upscaling as it produces smoother results thanLinearorNone. - Scale and Export: Click
Scaleto apply changes. After scaling, you might need to useFilter > Enhance > Sharpen (Unsharp Mask)sparingly to add definition. Finally,File > Export Asto save your new high-resolution image in your preferred format.
Quick and Convenient Ways to Boost Resolution
Not every task requires the extensive power of professional desktop software. For quick adjustments or on-the-go editing, several built-in operating system tools and mobile applications can help increase image resolution. These methods are excellent for users seeking efficient image tools and practical photo ideas.
Using macOS Preview
For Mac users, the Preview application is a surprisingly capable tool for basic image manipulation, including resizing to increase resolution.
Steps to Increase Resolution in macOS Preview:
- Open with Preview: Right-click on your image file and select
Open with > Preview. - Access Adjust Size: From the top menu bar, go to
Tools > Adjust Size. - Adjust Dimensions:
- Scale Proportionally: Ensure
Scale proportionally(the lock icon) is checked to maintain the aspect ratio. - Resample Image: Make sure
Resample imageis also checked. This enables the addition of new pixels. - Enter New Dimensions: Change the
WidthorHeightto your desired larger values. The resolution field will update dynamically.
- Scale Proportionally: Ensure
- Save: Click
OKto apply the changes. Then,File > Saveto overwrite the original orFile > Exportto save a new copy.
Preview offers a straightforward method, though without the advanced AI or algorithmic choices of dedicated upscaling tools or professional editors.
Increasing Resolution on Mobile Devices (iOS/Android)
With smartphones becoming primary cameras for many, the need for mobile image enhancement is growing. Various apps cater to increasing image resolution directly on your phone, making them ideal for managing your image collections or quickly preparing photos for social media.
Popular Mobile Apps and General Steps:
- Adobe Lightroom Mobile: Offers comprehensive editing tools, including resizing options. While its primary focus isn’t upscaling in the AI sense, you can export images at larger dimensions.
- PicsArt AI Photo Editor: This popular app includes a “Resize” tool.
- Open PicsArt and upload your image.
- Tap on
Tools > Resize. - Enter your preferred new
WidthandHeightvalues. - Utilize other tools like “Adjust” or “Sharpen” for post-resize enhancement.
- Save your enhanced image.
- Remini: An AI-powered app specifically designed to enhance old, blurry, or low-resolution photos, particularly excelling at facial detail.
- Upload your image.
- Select an enhancement mode (e.g.,
Enhance). - Let the AI process the image.
- Save the high-resolution output.
- Image Size (iOS): A dedicated app for resizing images.
- Install and open the app.
- Select the image picker to upload your photo.
- Lock the
WidthandHeightvalues (chain icon). - Set your desired new
WidthorHeight. - Check
Output Quality(ensure it’s at 100%). - Save the image.
These mobile applications, particularly the AI-driven ones, bring powerful image tools to the palm of your hand, perfect for adjusting aesthetic images or enhancing beautiful photography on the go.
Best Practices for Achieving High-Resolution Images
While various tools and techniques can help increase image resolution, applying certain best practices will yield the most satisfactory results. These guidelines are crucial for any digital photography enthusiast or visual designer.
1. Start with the Best Possible Original Image
This is perhaps the most critical advice. Upscaling can enhance, but it cannot fundamentally create information that was never there.
- Original Quality: Always begin with the highest quality original image you have. If you have access to a RAW file or a TIFF, use that instead of a compressed JPEG.
- Avoid Excessive Cropping: While cropping is an essential editing style, severe cropping on a low-resolution image reduces the available pixels, making subsequent upscaling attempts more challenging and prone to pixelation.
- Good Lighting and Focus: Images captured with good lighting and sharp focus naturally have more detail, providing the upscaling algorithms with better data to work with. This is fundamental to high-resolution photography.
2. Understand the Limitations of Upscaling
Even with advanced AI, there are limits.
- No Magic: A severely pixelated or extremely small image (e.g., 60x60 pixels) cannot be flawlessly transformed into a large, print-quality image. The AI will do its best to interpolate, but the results might still be noticeable.
- Balance Between Size and Sharpness: While you can technically make an image incredibly large, the perceived sharpness might decrease if you push it too far. For printing, always consult with the print studio about their minimum resolution requirements for the desired print size.
3. Choose the Right Tool for the Job
- AI Upscalers (e.g., Tophinhanhdep.com’s AI Upscaler): Best for significant enlargements where retaining detail and sharpness automatically is key. They are especially effective for general photography, wallpapers, backgrounds, and thematic collections.
- Professional Editors (e.g., Photoshop, GIMP): Ideal when you need precise control over resampling algorithms, specific sharpening techniques, or when integrating upscaling into a larger photo manipulation or graphic design workflow. These offer unparalleled flexibility for digital art.
- Built-in OS/Mobile Tools (e.g., Preview, PicsArt): Convenient for quick resizing needs or when you’re working on a mobile device for simple photo ideas or social media.
4. Optimize Post-Upscaling
- Selective Sharpening: After increasing resolution, a light, subtle application of sharpening (e.g., using
Unsharp Mask) can often enhance perceived clarity. Be careful not to overdo it, as this can introduce halos or an unnatural look. - Noise Reduction: If upscaling introduces any digital noise, use noise reduction tools (often found in professional editors or integrated into AI upscalers) to clean up the image.
- Color and Tone Adjustments: Review your image for any shifts in color or tone that might have occurred during upscaling and make minor corrections if necessary.
5. Consider the Final Use Case
- For Web/Screen Display: Images for websites, social media, or digital wallpapers can tolerate lower PPI (e.g., 72-96 PPI) as long as their pixel dimensions (e.g., 1920x1080) are sufficient for the display size. File size is also a concern for web optimization (Image Tools like compressors and optimizers on Tophinhanhdep.com can help here).
- For Print: High DPI (typically 300 DPI) is crucial for print quality. Always aim for at least 300 PPI at the desired print dimensions. This ensures that your beautiful photography translates perfectly to paper.
By adhering to these best practices, you can confidently increase the resolution of your images, transforming them into high-quality visuals suitable for any purpose, whether it’s a stunning print, an engaging digital art piece, or a captivating background for your device. Tophinhanhdep.com is committed to providing you with the knowledge and tools to achieve your visual aspirations.
Conclusion
The journey to increasing the resolution of an image is an exciting blend of artistic intent and technological prowess. From salvaging cherished old photographs to preparing high-resolution stock photos for discerning clients or simply perfecting an aesthetic wallpaper, the ability to enhance image quality opens up a world of creative possibilities.
We’ve explored a spectrum of methods, starting with the revolutionary capabilities of AI upscaling tools, exemplified by Tophinhanhdep.com’s advanced offerings, which intelligently generate missing details to produce remarkably sharp and clear results. We then delved into the precision and control provided by professional software like Adobe Photoshop and GIMP, which, through careful resampling and post-processing, empower graphic designers and photographers to achieve meticulous enhancements. Finally, we touched upon convenient built-in tools like macOS Preview and versatile mobile applications, offering accessible solutions for on-the-go adjustments and managing your diverse image collections.
The key takeaway is that while no tool can create something from absolutely nothing, modern technologies have significantly narrowed the gap between low and high-resolution imagery. By understanding the principles of pixels, resolution, and resampling, and by choosing the right tool for your specific needs, you can transform your images, making them suitable for larger prints, more detailed visual design projects, or simply a more visually stunning digital experience.
Tophinhanhdep.com remains your trusted partner in navigating the complexities of digital imagery, offering not just “Image Tools” like AI upscalers, converters, and compressors, but also a wealth of “Photography Guides” and “Visual Design” insights. We encourage you to experiment with the techniques and tools discussed, empowering your “Creative Ideas” and helping you curate truly “Beautiful Photography.”
Take your images to the next level. Explore Tophinhanhdep.com today and unlock the full potential of your visual content.