How to Increase the Resolution of an Image in Photoshop

In the vibrant world of digital imagery, where every pixel contributes to the overall impact, understanding and mastering image resolution is paramount. Whether you’re a seasoned professional looking to prepare a stunning print, an aspiring photographer optimizing your portfolio for online display, or simply someone trying to breathe new life into an old, cherished photo, the ability to increase an image’s resolution effectively can transform your visual content. At Tophinhanhdep.com, we specialize in everything from captivating Images (Wallpapers, Backgrounds, Aesthetic, Nature, Abstract, Sad/Emotional, Beautiful Photography) to essential Image Tools (Converters, Compressors, Optimizers, AI Upscalers, Image-to-Text), all designed to enhance your Visual Design (Graphic Design, Digital Art, Photo Manipulation, Creative Ideas) endeavors. This comprehensive guide will walk you through the intricate process of increasing image resolution in Adobe Photoshop, a powerful tool at the heart of Digital Photography and Editing Styles, ensuring your images are always of the highest quality.
Photoshop offers robust features for manipulating image resolution, allowing you to achieve remarkable results, though with certain inherent limitations. The goal is to maximize detail and clarity without introducing unwanted pixelation or distortion. By following the techniques outlined below, you’ll learn to navigate Photoshop’s powerful capabilities to achieve the best possible resolution for your images, preparing them for everything from a high-resolution Image Gallery Print to a fast-loading social media post.

Understanding Image Resolution: The Foundation of Quality
Before diving into the technical steps, it’s crucial to grasp what “resolution” truly means in the context of digital images. Resolution fundamentally refers to the amount of detail an image holds. It’s measured in several ways, and understanding each is key to making informed editing decisions.
What Defines Image Resolution?

At its core, image resolution is determined by the number of pixels an image contains along its width and height dimensions. For instance, a camera might produce an image with a resolution of 8256 x 6192 pixels. Multiplying these dimensions (8256 * 6192) gives you the total number of pixels, which in this example, is over 51 million pixels. When divided by one million, this number represents the camera’s megapixel (MP) count – in this case, 51 MP. More pixels generally mean more detail and higher image quality, translating into smoother tones and color transitions. However, this also typically results in larger file sizes, a consideration for High-Resolution images on Tophinhanhdep.com.
When you crop an image, you are essentially removing pixels, thereby reducing its overall resolution. This is a common practice in Digital Photography and Photo Manipulation, but it means your cropped image will have a lower resolution than the original capture.
Pixels Per Inch (PPI) and Dots Per Inch (DPI)
The density of pixels or dots within a given area further defines resolution, especially when considering output.
- PPI (Pixels Per Inch): This refers to the number of pixels per inch in a digital image file. It’s the standard unit for screens and digital displays.
- DPI (Dots Per Inch): This refers to the number of ink dots per inch that a printer can place on a physical medium. It’s the standard for print.
While often used interchangeably, the distinction is important for output. The more dots or pixels you have per inch, the higher the resolution of your image, resulting in a sharper and more detailed appearance, crucial for Beautiful Photography in print.
How to Select the Appropriate Size
Choosing the right image size and resolution depends heavily on the image’s intended purpose. You can certainly increase the resolution of a low-pixel image, but there’s a critical limit. Push it too far, and the image will become “pixelated,” meaning you’ll start to see the individual squares that make up the image, diminishing its quality. This applies whether you’re working on Stock Photos or your personal collection.
For instance, if you’ve heavily cropped an image, its pixel count is lower. If you then want a large print of this image, you’ll need to increase its resolution. Conversely, if you’re preparing images for online platforms, you might want to decrease their resolution. This ensures faster loading times on Tophinhanhdep.com’s Backgrounds or social media, and also protects your full-resolution work from unauthorized use. A good rule of thumb for online posting is to aim for images no larger than 2000 pixels on their longest side and under 1MB in file size, though specific social media platforms might have their own recommendations.
Knowing how far you can push resolution adjustments without degrading quality comes with practice and experimentation, aligning with Tophinhanhdep.com’s focus on Photography and Image Editing Styles.
Mastering Photoshop’s Image Size Dialog Box: Your Primary Tool
Adobe Photoshop makes it straightforward to adjust image resolution. The “Image Size” dialog box is your central hub for these critical adjustments.
How to Change Resolution in Photoshop
Follow these steps to access and manipulate your image’s resolution within Photoshop:
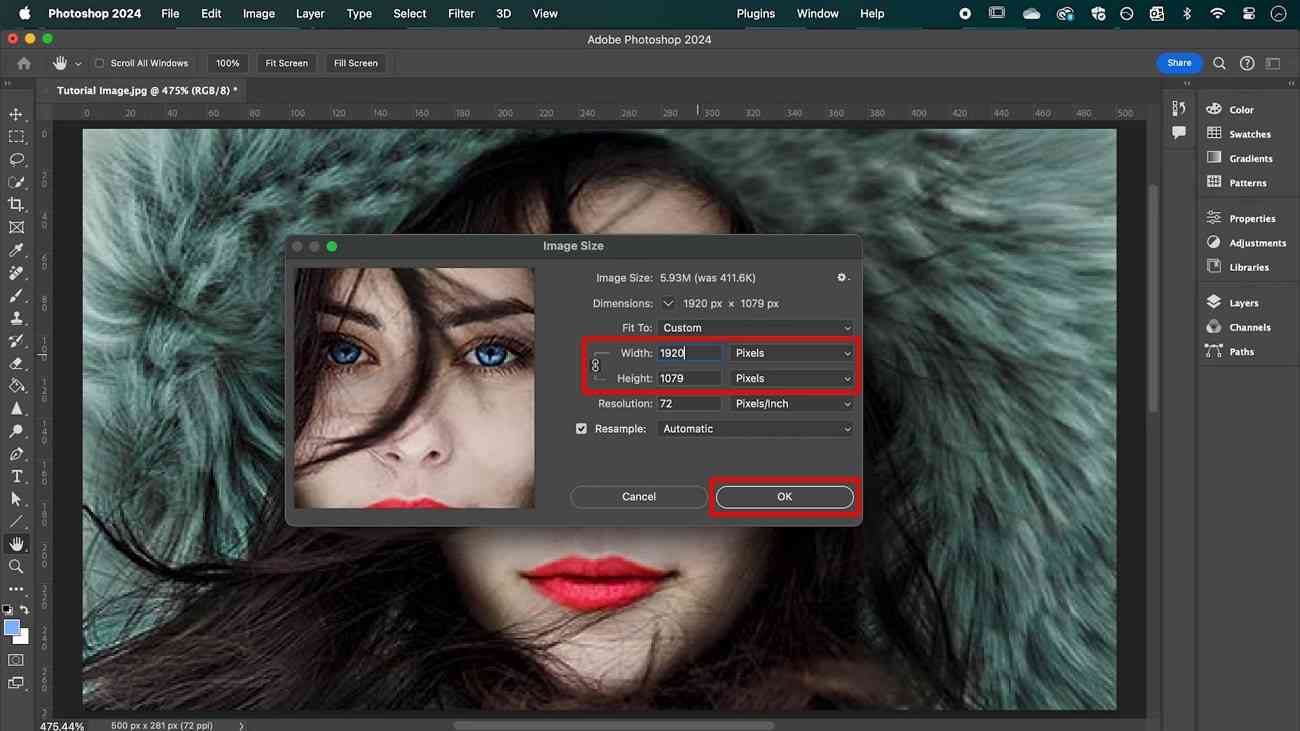
Step 1: Find the Image Size Dialogue Box
- Open your image in Adobe Photoshop.
- Navigate to Image > Image Size… in the top menu bar.
- Alternatively, use the keyboard shortcut: Option + Command + I (Mac) or Alt + Ctrl + I (Windows).
The “Image Size” dialog box will appear, displaying your image’s current dimensions in pixels, its resolution (PPI), and its estimated file size. By default, Photoshop shows dimensions in pixels, but you can change this to inches, centimeters, or even a percentage relative to the original image (100%).
Step 2: Change the Image Size
Within this dialogue box, you have several options to change your image’s dimensions:
- Presets: For printing purposes, you can select from a range of standard paper and print sizes using the “Fit To” drop-down menu. This simplifies preparation for physical outputs of your Aesthetic or Nature photography.
- Custom Sizing: For online images, where standard print sizes aren’t relevant, it’s often better to set the size manually. Simply type your desired width or height into the respective boxes.
- Constrain Aspect Ratio: By default, Photoshop maintains the image’s aspect ratio. If you change the width, the height will automatically adjust to prevent distortion. You’ll see a chain-link icon connecting the width and height fields. If you want to change these dimensions independently (and potentially distort the image), click this icon to unlink them.
- File Size Impact: As you adjust the width and height, observe the “Document Size” at the top of the dialog box. It will dynamically update to show the new estimated file size in megabytes (MB), a key consideration for Image Optimization.
Step 3: Determine Image Resolution (PPI/DPI)
The “Resolution” field within the “Image Size” dialog box allows you to set the pixels per inch (PPI). While 300 PPI (or DPI for print) is the industry standard for high-quality printing, it’s a common misconception that all images must be saved at this setting.
- Printing: For printed materials, 300 DPI is indeed the benchmark for sharp, detailed results. Always confirm minimum resolution requirements with your printing studio, especially for large format prints.
- Online Display: For images displayed on screens, the PPI value is less critical. Most computer screens display images at around 72 PPI. Changing an image from 300 PPI to 72 PPI for online use will not visually change its quality on screen, as screen resolution is dictated by the monitor itself, not the image’s embedded PPI metadata. The pixel dimensions (e.g., 2000 pixels wide) are what matter for online display.
- Impact of Changing PPI: Be aware that directly changing only the PPI value (e.g., from 300 to 150) without resampling will halve the physical size of the image if printed, and also change its document size.
Step 4: Selecting a Resampling Mode
Resampling is the core process by which Photoshop adds or removes pixels when you change an image’s dimensions. It uses algorithms to “guess” what new pixels should look like or which ones to discard. This step is critical for preserving quality, particularly when enlarging.
- Tick the “Resample” box: Ensure this box is checked to enable Photoshop to add or remove pixels. If unchecked, changing dimensions will only affect the print size, not the pixel count.
- Choose a Resample Mode: Photoshop offers several algorithms:
- Automatic: Photoshop attempts to intelligently choose the best method based on your image and desired changes.
- Bicubic Smoother (enlargement): Often produces excellent results when increasing image size, aiming for smooth tonal gradations. Many photographers find this to be a reliable choice.
- Preserve Details (enlargement): Introduced in newer versions of Photoshop, this mode (and its successor, Preserve Details 2.0) uses more advanced algorithms to maintain detail and sharpness while minimizing artifacts. It’s particularly effective for significant enlargements and often performs better than Bicubic Smoother in such scenarios.
- Bicubic Sharper (reduction): Best for reducing image size, as it sharpens the image slightly to compensate for detail loss.
Experimenting with “Bicubic Smoother” and “Preserve Details” will help you determine which works best for your specific image. These options are vital for maintaining the clarity of Beautiful Photography when resized.
Advanced Techniques for Quality Enhancement
Beyond simple resizing, Photoshop offers additional tools to refine image quality, especially after resolution adjustments. These methods ensure your Digital Art and Photo Manipulation appear crisp and professional.
Sharpening the Image
After increasing an image’s resolution, it’s almost always a good idea to apply some sharpening. Upsampling can sometimes lead to a slight softening of details.
- Go to Filter > Sharpen > Unsharp Mask…
- A good starting point when enlarging an image is to set the Amount slider to 100% and the Radius to 1.0 pixels.
- Adjust these sliders as needed, observing the preview. Too much sharpening can introduce halos or artifacts, so apply it judiciously.
For more advanced sharpening, consider Smart Sharpen (Filter > Sharpen > Smart Sharpen). This tool offers more control, allowing you to fine-tune sharpening based on different image areas and reduce halo effects. It is one of the best ways to enhance details and clarity.
Increasing Image Quality Through Filters and Effects
Newer versions of Photoshop incorporate advanced AI-powered features that can dramatically improve image quality and resolution.
Super Resolution (via Camera Raw)
Available since Photoshop 2019, the Super Resolution feature within Camera Raw uses AI to quadruple the number of pixels in an image (doubling both width and height), significantly boosting its detail and resolution. This is particularly useful for low-resolution or older photos.
- Prepare Preferences: Before importing, ensure Photoshop is set to automatically open supported JPEGs and HEICs in Camera Raw. Go to Edit > Preferences > Camera Raw (or File Handling…), then in the “JPEG/HEIC” drop-down menu, select “Automatically open all supported JPEGs and HEICs” and click “OK.”
- Open in Camera Raw: Open your image in Camera Raw (it might open automatically if preferences are set).
- Enhance: Right-click on the image within Camera Raw and choose Enhance….
- Select Super Resolution: In the “Enhance Preview” window, check the “Super Resolution” option. Photoshop’s AI will then process and create an enhanced, higher-resolution version of your image. Click “Enhance.”
This function significantly increases megapixels, making images more detailed, a boon for High-Resolution requirements.
Neural Filters (Photo Restoration)
Photoshop’s Neural Filters, particularly the “Photo Restoration” filter, can dramatically improve the quality of older or damaged images, which often suffer from low resolution and noise.
- Go to Filter > Neural Filters.
- In the right-side panel, enable the Photo Restoration filter.
- Adjust sliders like “Enhance Face” and “Photo Enhancement” to refine details.
- Within the “Adjustments” section, you can further fine-tune noise reduction and JPEG artifact reduction.
- Click “OK” to apply the changes.
Image Contrast and Color Correction
Adjusting contrast and color can significantly enhance the perceived quality of an image, even without changing its pixel dimensions. Increased contrast can make an image more impactful and visually appealing.
- Levels: Go to Image > Adjustments > Levels…. Use the sliders to adjust the black point, white point, and midtones to increase contrast and correct tonal range.
- Curves: Go to Image > Adjustments > Curves…. This powerful tool allows for precise control over tonal and color adjustments by manipulating a curve on a graph. By structuring the curve, you can adjust the contrast of the image exactly as desired.
- Camera Raw Filter: For raw images (RAW) or even JPEGs, the Camera Raw Filter (Filter > Camera Raw Filter…) offers comprehensive controls for basic adjustments like contrast, shadows, highlights, and colors, providing a non-destructive way to enhance quality.
When making these adjustments, always proceed gradually and carefully to ensure the final image appears natural and attractive, embodying Tophinhanhdep.com’s commitment to Beautiful Photography and Creative Ideas.
Noise Elimination
Digital noise, especially prevalent in low-light photos or those from older cameras, can severely degrade image quality. Reducing noise contributes to a cleaner, clearer image. Photoshop includes tools for this:
- Reduce Noise filter: (Older method) Go to Filter > Noise > Reduce Noise.
- Camera Raw Filter: The “Detail” panel in the Camera Raw Filter offers excellent noise reduction controls for both luminance and color noise.
- Neural Filters (Photo Restoration): As mentioned, this filter also includes noise reduction capabilities, especially useful for older photos.
Optimizing Images for Different Uses: Print vs. Web
The ultimate goal of increasing resolution often dictates the specific techniques and target values you should use. Understanding these differences is essential for effective Image Optimization.
Preparing Images for Print
For high-quality prints, particularly large formats, resolution is critical. As noted, 300 DPI is the standard. If your original image falls short, Photoshop’s resampling tools are your best bet. However, there are limits. A tiny, 100x100 pixel image at 72 PPI cannot be magically transformed into a crisp 3000x3000 pixel image at 300 PPI without significant quality loss. The more detail in your starting image, the better the upscaling results will be. Always consult with your printing studio about their minimum resolution requirements to avoid pixelated or blurry outcomes, ensuring your Thematic Collections are displayed perfectly.
Optimizing Images for Online Display
For Wallpapers, Backgrounds, or images destined for social media and websites, the priority shifts from sheer pixel density to file size and loading speed. While high resolution is generally good, overly large files can slow down website performance, leading to a poor user experience.
- Decrease Resolution: You’ll often decrease resolution for online use. The actual pixel dimensions (e.g., 1920 pixels on the longest side for a desktop wallpaper) are more important than the PPI value, as screen resolution handles the display.
- File Size: Aim for a reasonable file size, typically under 1MB for most web images.
- Saving for Web: Photoshop’s “File > Export > Save for Web (Legacy)…” dialog box (or “Export As…”) offers excellent controls for optimizing image quality vs. file size, allowing you to preview different compression settings and file formats (JPEG, PNG, GIF).
This careful balancing act is essential for Tophinhanhdep.com’s focus on delivering high-quality visual content that is also performant for users browsing Trending Styles and Mood Boards.
Beyond Photoshop: Alternative and AI Upscaling Solutions
While Photoshop is an incredibly powerful tool for resolution enhancement, its complexity and subscription model might not suit everyone. The advancements in artificial intelligence have also brought forth a new generation of Image Tools that offer simpler, often automated, solutions.
For users who may not be proficient with Photoshop, or who seek a quicker, more automated solution, Tophinhanhdep.com offers various Image Tools, including advanced AI Upscalers. These tools leverage machine learning to analyze and intelligently add pixels to your images, often with impressive results. They are particularly user-friendly, allowing you to upload an image and receive an enlarged, higher-resolution version with just a few clicks. These alternatives are a great way to enhance your Aesthetic images without needing deep editing expertise.
Such tools are designed to enlarge photos by a considerable percentage (e.g., up to 600% or even 1000%) without noticeable loss of quality or distortion, similar to the advanced algorithms Photoshop now incorporates. They are ideal for breathing new life into older, smaller images or preparing images for larger print projects where Photoshop’s manual resampling might require more expertise.
Conclusion
Increasing the resolution of an image in Photoshop is a nuanced process that combines technical understanding with artistic judgment. Whether you’re aiming for a pristine print or a perfectly optimized web image, Photoshop provides a robust suite of tools to help you achieve your goals. From understanding the basics of pixels and PPI to mastering the “Image Size” dialog box, selecting appropriate resampling modes, and employing advanced sharpening and AI-powered filters, you now have a comprehensive guide at your fingertips.
The quality of your starting image remains the most critical factor. Beginning with a high-quality capture will always yield the best results when attempting to increase resolution. As you gain skill and experience in Photoshop, you’ll find it easier to make your images more beautiful and realistic, aligning with the principles of Tophinhanhdep.com’s commitment to Image Inspiration & Collections.
Remember, while Photoshop is a formidable ally, Tophinhanhdep.com also offers Image Tools (AI Upscalers) for those seeking quicker, more automated solutions. We encourage you to explore our extensive collections of Images (Wallpapers, Backgrounds, Aesthetic, Nature, Abstract, Sad/Emotional, Beautiful Photography), delve into our Photography (High Resolution, Stock Photos, Digital Photography, Editing Styles) resources, and harness our powerful Image Tools (Converters, Compressors, Optimizers, AI Upscalers, Image-to-Text) to elevate your Visual Design (Graphic Design, Digital Art, Photo Manipulation, Creative Ideas). With these resources, you can confidently turn blurry, old, or pixelated pictures into stunning, high-resolution visuals that truly stand out.