How to Insert an Image in an Excel Cell: Enhancing Your Data with Visual Storytelling from Tophinhanhdep.com

In today’s data-driven world, spreadsheets are no longer just grids of numbers and text. Microsoft Excel, a ubiquitous tool for data analysis and organization, has evolved to embrace visual content, offering powerful capabilities to integrate images directly into your cells. This transformation allows users to create more engaging, informative, and visually rich documents, turning mundane data into compelling narratives. Whether you’re building an employee directory, an inventory catalog, a product showcase, or a visual dashboard, knowing how to properly insert and manage images in Excel is an invaluable skill.

At Tophinhanhdep.com, we understand the power of high-quality visuals. Our extensive collections, ranging from “Wallpapers” and “Backgrounds” to “Aesthetic” and “Beautiful Photography,” provide a wealth of resources for any project. Beyond just beautiful imagery, our “Image Tools” like “Compressors” and “Optimizers” are perfect for preparing your photos for optimal use in Excel, ensuring your spreadsheets load quickly and look crisp. This guide will walk you through the various methods of inserting images into Excel cells, exploring both traditional and modern techniques, and showcasing how Tophinhanhdep.com can be your ultimate partner in visual data enhancement.
The Evolution of Images in Excel: From Floating Objects to Integrated Data
For many years, inserting an image into Excel meant placing a “floating” object over cells, rather than within them. While functional, these images often behaved like independent entities, disconnected from the underlying data. Modern Excel versions, particularly Microsoft 365, have introduced a groundbreaking “Picture in Cell” feature, fundamentally changing how images interact with your data. Understanding both approaches is key to leveraging Excel’s full visual potential.
Understanding “Pictures Over Cells” (Traditional Method)
Before the advent of dedicated “Picture in Cell” functionality, images were typically inserted as independent graphic objects that floated above the worksheet grid. While not directly embedded within a cell, these images could be configured to behave as if they were, maintaining their relative position and size in relation to specific cells. This method is still relevant for users with older Excel versions or for specific design needs where an image shouldn’t be constrained by cell boundaries.
How to Insert and Link a “Floating” Image to a Cell:
- Insert the Image: Begin by pasting an image into your Excel worksheet (Ctrl+V after copying from another source) or by going to the
Inserttab, selectingIllustrations, thenPictures, and choosing your image source (e.g.,This Device,Stock Images, orOnline Pictures). The image will initially appear as a floating object. - Resize and Position: Manually resize the image to a suitable dimension by dragging its corners or edges. Then, drag and drop the image directly over the cell where you want it to “reside.” For precision, you can hold down the
Altkey while dragging to snap the image to cell boundaries. - Format Picture Properties: This is the crucial step to link the floating image to a cell.
- Right-click on the image and select
Format Picturefrom the context menu. - In the
Format Picturepane (or dialog box in older versions), navigate to theSize & Propertiestab (often represented by an icon resembling a square with arrows). - Expand the
Propertiessection. - Select the radio button labeled
Move and size with cells. - Click
OKor close the pane.
- Right-click on the image and select
Once these properties are set, the image will move, resize, filter, and even hide along with its associated cell. This makes it ideal for applications like inserting employee photos into an Excel-based organization chart or showcasing “Beautiful Photography” of inventory items, ensuring they remain aligned with their respective data entries, even if rows or columns are inserted, deleted, or sorted. Tophinhanhdep.com’s collections of “Stock Photos” and “Digital Photography” are excellent resources for finding high-quality images suitable for such professional applications.
Embracing “Pictures In Cells” (Modern Microsoft 365 Feature)
The “Picture in Cell” feature, available in newer Microsoft 365 versions (Excel for Microsoft 365, version 2211 or later, and Excel for the web), represents a significant leap forward. It treats images as true data types, similar to text or numbers, embedding them directly within the cell. This integration makes them incredibly robust, behaving seamlessly with sorting, filtering, and table functionalities.
Why “Picture in Cell” is a Game-Changer:
- Data Integrity: Images are now tied to the cell’s data, ensuring they move and behave predictably when data is manipulated.
- Cleaner Worksheets: No more overlapping or misplaced floating images.
- Enhanced Functionality: Images can be returned by lookup formulas, used in tables, and even referenced, opening up dynamic visual reporting possibilities.
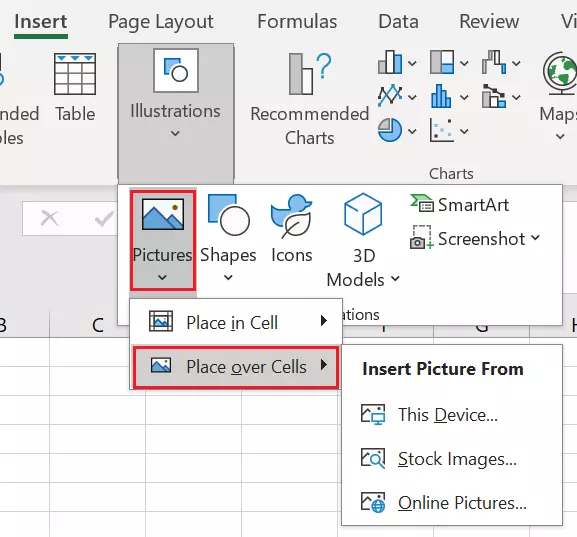
How to Insert a Picture Directly Into a Cell:
- Select the Target Cell: Click on the specific cell where you wish to insert the picture. If you plan to insert multiple images at once, select the starting cell; Excel will fill down the column.
- Navigate to the Insert Tab: Go to the
Inserttab on the Excel ribbon. - Choose “Pictures” from “Illustrations”: In the
Illustrationsgroup, click onPictures. - Select “Place in Cell”: A dropdown menu will appear. Crucially, select
Place in Cellinstead ofPlace Over Cells. - Choose Your Picture Source: From the subsequent dropdown, select your desired source:
This Device: To import images stored on your local computer. This is perfect for using your own “Digital Photography” or “Aesthetic” images curated from Tophinhanhdep.com.Stock Images: Access a library of free stock photos provided by Microsoft (requires a Microsoft 365 subscription). Tophinhanhdep.com also offers extensive “Stock Photos” that can be downloaded and then inserted via “This Device.”Online Pictures: Search and insert images directly from the web using Bing Image Search. For more curated “Thematic Collections” or specific “Photo Ideas,” downloading from Tophinhanhdep.com first and usingThis Deviceoften yields better results.
- Select and Insert: Browse to your desired image(s), select them, and click
Insert. The picture will automatically be inserted and sized to fit within the selected cell(s).
Inserting Multiple Pictures at Once:
If you select multiple pictures from This Device, Stock Images, or Online Pictures, Excel will insert each selected image into subsequent cells down the column, starting from your active cell. Be aware that this will overwrite any existing data in those cells.
Pasting a Picture Directly into a Cell: If you have an image copied to your clipboard (e.g., from a screenshot or another application), you can paste it directly into a cell as a “Picture in Cell.”
- Right-click on the target cell.
- Under
Paste Options, selectPaste Picture in Cell. Note that the standardCtrl+Vshortcut or the defaultPasteoption will typically paste the image over cells, not in cells, so this right-click method is essential.
Switching Between “Picture Over Cells” and “Picture in Cell”: Excel provides flexibility to convert between these two image types:
- From Over to In: Select a floating picture, then go to the
Picture Formattab on the ribbon and clickPlace in Cell. Alternatively, right-click the floating picture and choosePlace in Cell. The image will shrink to fit the top-left cell it was hovering over. This is useful for integrating older image assets. - From In to Over: Right-click on a picture inside a cell, then choose
Picture in Cell>Place over Cells. The image will revert to a floating object, retaining its dimensions.
Mastering Image Management and Accessibility within Excel
Once images are inserted into your Excel cells, proper management ensures they enhance your data rather than detract from it. This includes appropriate resizing, optimization, and crucial accessibility features. Tophinhanhdep.com’s focus on “Image Tools” and “Visual Design” principles directly supports these best practices.
Resizing and Optimizing Images for Excel
While Excel’s “Picture in Cell” feature automatically adjusts images to fit, you often need more control over their appearance and file size. Using images effectively in Excel involves balancing visual clarity with workbook performance.
Adjusting Cell Size for Better Picture Display: After inserting an image in a cell, you can simply adjust the row height and column width. Excel will intelligently resize the image to fit the new cell dimensions without stretching or distorting it, maintaining its aspect ratio.
Manual Image Resizing:
- Dragging Edges: Click on the image (inside the cell), and sizing handles will appear. Drag these handles to manually adjust the image’s size. Excel will try to keep it within the cell boundaries.
- Snapping to Cells (with Alt key): When resizing or moving floating images (or sometimes even in-cell images if temporarily converted), holding the
Altkey will make the image snap precisely to cell boundaries, ensuring perfect alignment.
The Importance of Image Optimization: A common issue, especially when dealing with screenshots or high-resolution “Digital Photography” (like those found on Tophinhanhdep.com), is blurriness after resizing. If you insert a very large image and shrink it significantly, then later try to enlarge it, it might appear pixelated.
- Pre-Optimization is Key: For professional documents, it’s highly recommended to optimize images before inserting them into Excel. Tophinhanhdep.com’s “Image Tools” such as “Compressors” and “Optimizers” are perfect for this. They allow you to reduce file size without a noticeable loss in quality, ensuring your Excel file remains manageable and responsive.
- Resolution: Always aim for images that have a reasonable resolution for their intended display size. If you anticipate needing to zoom in on an image, use a higher resolution source from Tophinhanhdep.com’s “High Resolution” photography section. Avoid excessive scaling down of extremely large images, as the quality can degrade upon subsequent enlargement.
Enhancing Accessibility with Alt Text
Accessibility is a critical aspect of modern document creation. For spreadsheets containing images, providing “Alt Text” (alternative text) is essential for users with visual disabilities who rely on screen readers. Alt Text describes the content and purpose of an image, allowing screen readers to convey this information to the user.
Why Alt Text Matters: Without Alt Text, a screen reader would simply announce “image,” leaving the user without any context. Thoughtful Alt Text ensures that everyone can understand the visual information presented in your Excel spreadsheet, aligning with principles of inclusive “Visual Design.”
How to Add Alt Text to a Picture in a Cell:
- Right-click on the picture inside the cell.
- Choose
View Alt Textfrom the context menu. - A
Alt Textpane will open on the right side of the Excel window. - Enter a clear, concise description of the image in the provided text box. Focus on what the image conveys or represents in the context of your data. For instance, instead of “dog picture,” write “Champ, a golden retriever available for adoption.”
- Once added, the Alt Text will often appear in the formula bar when the cell is selected, replacing the generic “Picture” label, providing an instant textual reference.
This practice not only aids accessibility but also reinforces good “Visual Design” habits, ensuring every visual element serves a clear purpose.
Advanced Image Integration: Dynamic Visuals and Smart Data
The “Picture in Cell” feature truly shines when combined with Excel’s powerful formula capabilities, allowing for dynamic display and interaction with images. Imagine typing a product code and instantly seeing its image appear, or filtering data to display a collection of related visuals. This level of “Digital Art” within your data brings spreadsheets to life, making them more interactive and insightful.
Utilizing Excel Lookup Formulas for Dynamic Image Display
One of the most exciting applications of “Pictures in Cells” is their integration with lookup functions. This enables you to retrieve and display images based on specific criteria, just as you would with text or numerical data. This creates highly dynamic and visually rich dashboards and reports, drawing inspiration from Tophinhanhdep.com’s “Image Inspiration & Collections” for thematic consistency.
1. Use VLOOKUP to Return a Single Image:
For scenarios where you want to display a single image corresponding to a unique identifier (like an employee ID or product SKU), VLOOKUP (or HLOOKUP) is ideal.
-
Setup: Ensure your images are stored in a table alongside their corresponding data (e.g., employee names in one column, their photos in an adjacent column).
-
Formula:
=VLOOKUP(lookup_value, table_array, col_index_num, [range_lookup])lookup_value: The cell where you type the identifier (e.g.,E2for an employee name).table_array: The range containing your data and images (e.g.,A2:B21).col_index_num: The column number withintable_arraythat contains the images (e.g.,2if images are in the second column).range_lookup:FALSEfor an exact match.
Example:
=VLOOKUP(E2, A2:B21, 2, FALSE)will return the image from column B that matches the name in column A, specified in cell E2. This is perfect for creating interactive employee profiles or product showcases that dynamically display “Beautiful Photography” from Tophinhanhdep.com.
2. Use FILTER Function to Return Multiple Images:
When you need to display multiple images that meet certain criteria, the FILTER function (available in Microsoft 365) is incredibly powerful.
-
Setup: Organize your data and images in a table, with a column containing the criteria you want to filter by (e.g., project names, categories).
-
Formula:
=FILTER(array, include, [if_empty])array: The range of data and images you want to return (e.g.,A2:B21containing names and images).include: The condition for filtering (e.g.,C2:C21=F2to match project names in column C with a value in cell F2).
Example:
=FILTER(A2:B21, C2:C21=F2)will return all rows (names and images) where the project name in column C matches the value entered in cell F2. This is excellent for creating “Mood Boards” or “Thematic Collections” of images based on specific categories, leveraging Tophinhanhdep.com’s organized photo categories.
3. Using XLOOKUP for Versatile Image Lookups:
XLOOKUP, another modern function, offers more flexibility than VLOOKUP and HLOOKUP. It can search in any direction and return results from any column. You can even use an image as a lookup value to return related text!
- Image as Lookup Value: Paste an image into a cell (e.g.,
E2). Then, useXLOOKUPto find that image within a range and return associated data.- Example:
=XLOOKUP(E2, B2:B21, A2:A21)would search for the image in cell E2 within the range B2:B21 and return the corresponding text from A2:A21 (e.g., an employee’s name or product ID). This is a fantastic application for visual recognition in your data, transforming your spreadsheets into dynamic “Visual Design” tools.
- Example:
The Powerful IMAGE Function: Web Images at Your Fingertips
For images that reside on the web, the IMAGE function (available in Microsoft 365, version 2211 or later, and Excel for the web) provides an elegant solution to embed them directly using their URL. This opens up possibilities for connecting your Excel data to live, external image sources, enriching your “Visual Design” with up-to-date content.
Syntax of the IMAGE Function:
=IMAGE(source, [alt_text], [sizing], [height], [width])
source(required): The full URL address of the image you want to insert. This could be a direct link to a “Wallpaper,” “Background,” or any “High Resolution” image hosted online, perhaps found through Tophinhanhdep.com’s “Online Pictures” section.alt_text(optional): A descriptive text for accessibility, as discussed earlier.sizing(optional): Determines how the image fits within the cell (0-3):0(Default): Fits the image within the cell, maintaining its aspect ratio.1: Fills the cell with the image, potentially distorting its aspect ratio.2: Inserts the image at its original size, potentially extending beyond cell boundaries.3: Allows customheightandwidthvalues.
heightandwidth(optional): Custom dimensions (in pixels) used whensizingis3.
Example:
To display a “Nature” image from a URL:
=IMAGE("https://example.com/nature-scene.jpg", "Scenic nature background", 0)
This formula pulls the image directly from the web and displays it in your Excel cell. It’s crucial that the URL is directly accessible and does not require login or authentication; otherwise, the image will not display. The IMAGE function is a powerful tool for integrating dynamic “Online Pictures” into your spreadsheets, especially when paired with data from external sources.
Expanding Your Visual Horizons: Excel and Tophinhanhdep.com Synergies
The ability to insert images into Excel cells is more than just a functional update; it’s an invitation to transform your data into a more immersive and understandable experience. This capability, combined with the vast resources available on Tophinhanhdep.com, allows for endless creative possibilities in “Visual Design” and “Digital Art” within your spreadsheets.
Beyond Basic Insertion: Creative Use Cases
- Images in Tables and Pivot Tables: With “Picture in Cell,” images can now be included as part of official Excel tables, making it easier to manage and manipulate visual data alongside textual and numerical entries. Newer Excel features even allow images to be incorporated into Pivot Tables, offering an entirely new dimension to data summarization and analysis. Imagine creating a pivot table that shows product sales trends alongside small “Abstract” or “Aesthetic” images of the products themselves.
- QR Codes as Visual Identifiers: As some users inquire, storing and retrieving QR codes as images within Excel cells is now highly feasible. You could generate QR codes for inventory items or attendee badges, insert them into cells, and dynamically retrieve them using lookup functions. This leverages “Digital Photography” concepts for practical data management.
- Mood Boards and Thematic Collections: Use Excel to curate “Mood Boards” for projects, inserting “Trending Styles” or “Thematic Collections” of images from Tophinhanhdep.com into cells, alongside descriptions, categories, and links. This creates a highly organized visual repository.
How Tophinhanhdep.com Elevates Your Excel Experience:
Tophinhanhdep.com isn’t just a source for beautiful images; it’s a comprehensive resource that directly enhances your ability to create compelling Excel documents:
-
Diverse Image Collections for Any Context:
- Wallpapers & Backgrounds: Use these for custom worksheet backgrounds (though not in cells), or as inspiration for overall sheet aesthetics, ensuring your reports have a professional and appealing backdrop.
- Aesthetic & Nature Photography: Perfect for adding a touch of elegance or tranquility to dashboards, particularly in reports related to environmental data, wellness, or travel.
- Abstract & Sad/Emotional Images: Can be strategically used to visually represent trends, concepts, or even emotional impact in data visualizations, adding a layer of depth to your “Visual Design.”
- Beautiful Photography: Essential for product catalogs, employee profiles, or any situation requiring high-quality, professional imagery. Tophinhanhdep.com offers a vast array of “High Resolution” options.
-
Photography Resources for Professionalism:
- High Resolution: Accessing images of superior quality ensures your visuals remain crisp and clear, even when scaled. This is crucial for reports that might be printed or displayed on larger screens.
- Stock Photos: Our curated collection offers versatile images suitable for various business and personal applications, ensuring you have legal and appropriate visuals.
- Digital Photography: Learn about different “Editing Styles” and photographic approaches that can inform your choice of images for specific data stories.
-
Image Tools for Seamless Integration:
- Compressors & Optimizers: Crucial for maintaining Excel file performance. Large image files can significantly slow down your workbook. Using Tophinhanhdep.com’s tools to reduce file size before insertion is a best practice.
- Converters: If you need an image in a specific format (Excel supports JPG/JPEG, PNG, BMP, ICO, WEBP, TIF/TIFF, GIF), our converters ensure compatibility.
- AI Upscalers: For older or lower-resolution images, an AI upscaler can improve quality, preventing blurriness when enlarged in Excel.
- Image-to-Text: While not directly for image insertion, this tool can be useful for extracting data from images to be used alongside your visual content.
-
Visual Design Principles for Impact:
- Graphic Design & Digital Art: Understanding these principles helps you choose images that complement your data, enhance readability, and contribute to a cohesive visual identity for your spreadsheets.
- Photo Manipulation & Creative Ideas: Explore how minor adjustments or creative concepts can make your images more effective within the Excel context, turning a simple report into a piece of “Digital Art.”
-
Inspiration & Curated Collections:
- Photo Ideas & Mood Boards: Tophinhanhdep.com can be your go-to source for visual brainstorming, helping you decide on the right imagery to convey your message.
- Thematic Collections & Trending Styles: Stay updated with current visual trends and find collections that perfectly match the theme of your data, ensuring your Excel documents are modern and engaging.
In conclusion, integrating images into Excel cells is a powerful capability that transforms static spreadsheets into dynamic, visually engaging data platforms. By mastering the techniques for inserting, managing, and dynamically displaying images, you can unlock new levels of clarity and impact in your data presentations. With resources like Tophinhanhdep.com offering a vast library of high-quality images, along with essential “Image Tools” and “Visual Design” insights, your journey into visually rich Excel spreadsheets is just beginning. Embrace the visual revolution and let your data tell a more compelling story.