How to Insert an Image in Canva: A Comprehensive Guide to Elevate Your Visual Designs

In today’s visually-driven world, compelling imagery is paramount to effective communication, branding, and creative expression. Whether you’re a seasoned graphic designer, a budding content creator, or a small business owner, the ability to seamlessly integrate images into your projects is a fundamental skill. Canva, with its intuitive interface and powerful design tools, has emerged as a go-to platform for millions looking to create stunning visuals without the steep learning curve of traditional design software. This guide will walk you through every aspect of inserting images into Canva, ensuring your designs truly stand out.
At Tophinhanhdep.com, we understand the power of visual content. Our extensive resources cover everything from high-resolution Images (including Wallpapers, Backgrounds, Aesthetic, Nature, Abstract, Sad/Emotional, and Beautiful Photography) to in-depth Photography guides (featuring insights into High Resolution, Stock Photos, Digital Photography, and various Editing Styles). We also provide essential Image Tools like Converters, Compressors, Optimizers, and AI Upscalers, alongside comprehensive advice on Visual Design and Image Inspiration & Collections. Integrating your own unique images, or carefully selected ones from a vast library, is often the first step in creating powerful Graphic Design, Digital Art, and Photo Manipulation that sparks Creative Ideas. This tutorial aims to empower you to harness the full potential of your visual assets within Canva, turning your Photo Ideas and Mood Boards into captivating realities.
The Essentials of Uploading Images to Canva
Canva offers multiple straightforward methods to bring your images into your designs, catering to various sources and preferences. From your personal collection of Beautiful Photography to specific Backgrounds you’ve curated from Tophinhanhdep.com, the process is designed for efficiency.
Step-by-Step Desktop/Web Upload Process
For most users, uploading images from their computer to Canva’s web-based platform or desktop application is the most common method. This process is seamless and supports popular image formats, making it ideal for incorporating your own Digital Photography or downloaded High Resolution stock photos.
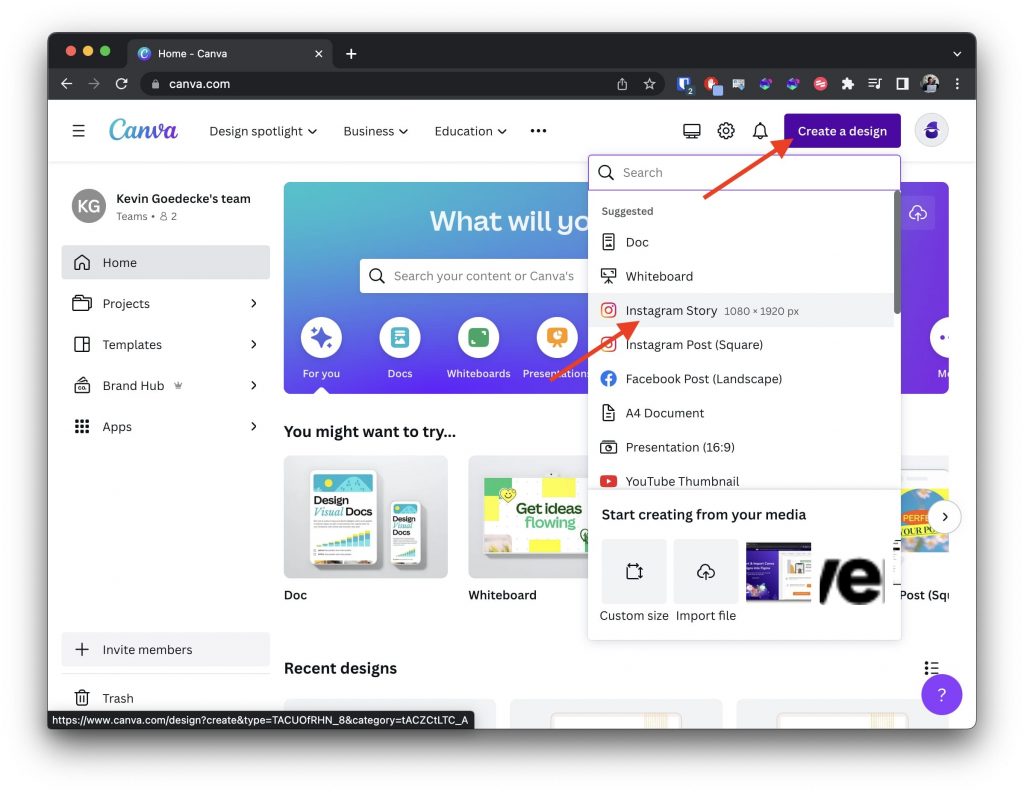
- Access Canva: Begin by opening your web browser and navigating to Canva.com, or launch the Canva desktop application. Log in to your account. Remember, a free Canva account is sufficient for most basic image upload needs, though premium features offer enhanced flexibility.
- Initiate a New or Open an Existing Design: To add images, you’ll need an active design canvas. You can either:
- Open an existing design: Simply click on the project you wish to modify from your Canva homepage.
- Create a new design: Click the “Create a design” button, then choose from a variety of templates (like “Social Media Post,” “Presentation,” etc.) or select “Custom dimensions” to define your own canvas size.
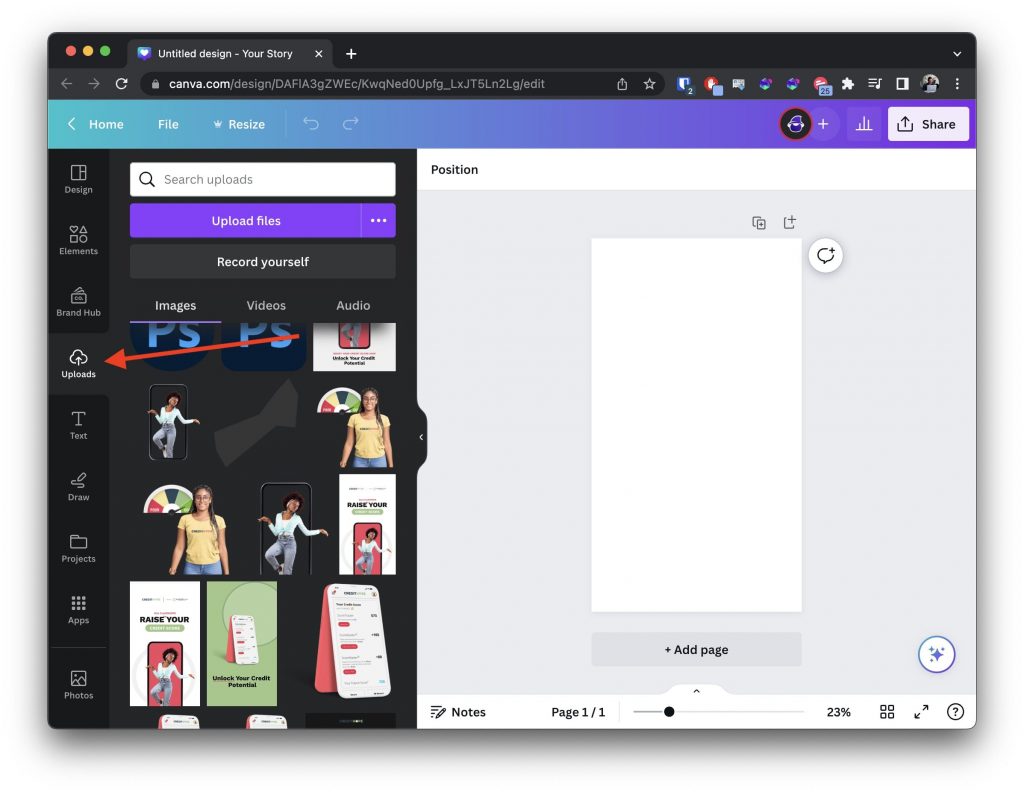
- Navigate to the “Uploads” Panel: Once you’re inside the Canva editor, look for the vertical menu on the left-hand side of your screen. Locate and click on the “Uploads” button. This panel is your central hub for managing all your personal images, videos, and audio files within Canva.
- Upload Your Files: Within the “Uploads” panel, you’ll see a prominent “Upload files” button. Click this. A file explorer window will pop up, allowing you to browse your computer’s folders. Select the image file(s) you want to import. You can select multiple images by holding down
Ctrl(Windows) orCmd(Mac) while clicking on individual files, then click “Open.”- Quick Tip: Canva also supports drag-and-drop functionality. You can simply drag image files directly from your computer’s folders and drop them anywhere onto the Canva interface (even if you’re not specifically in the “Uploads” tab), and they will automatically be added to your “Uploads” library.
- Utilize Uploaded Images: After your images have finished uploading (you’ll see progress indicators and then thumbnails appear in the “Uploads” panel), they are ready to be used.
- To add to your design: Simply click on the image thumbnail in the “Uploads” panel, and it will appear on your canvas. Alternatively, click and drag the image from the “Uploads” panel directly onto your design where you want to place it.
- Manipulation: Once on the canvas, you can easily resize the image by dragging its corner handles, rotate it using the rotation icon, or reposition it by clicking and dragging. Canva’s intuitive tools allow for quick Photo Manipulation to fit your Creative Ideas.
Importing Images from Mobile Devices and Cloud Services
Canva’s versatility extends to mobile devices and cloud storage, offering convenient ways to access your Photography on the go. This is especially useful for content creators who often capture Nature or Aesthetic shots with their smartphones.
- Canva Mobile App: The Canva app for iOS and Android offers a streamlined experience for uploading from your phone or tablet’s camera roll.
- Open the Canva app and select or create a design.
- On the bottom menu bar, you’ll typically find a “+” icon or a “Camera Roll” icon. Tap this to open your device’s photo gallery.
- Select one or multiple images or videos you wish to upload.
- You can then choose to “Add as New Pages” or “Add to Page” to immediately place them into your design. These images will also automatically be added to your “Uploads” section within the app for future use.
- This is perfect for quickly incorporating your latest Digital Photography directly into your Visual Design projects.
- Cloud Storage Integration: Canva integrates with popular cloud storage services, simplifying the process of importing images stored online.
- From the “Uploads” panel (on both desktop and mobile), look for options to connect to services like Google Drive, Dropbox, or OneDrive.
- Click on the relevant cloud service icon, authorize Canva’s access, and then you can browse and select images directly from your cloud folders. This is an excellent way to access curated Thematic Collections or Mood Boards stored centrally.
- Social Media Connections: For those who manage their visual content directly from social platforms, Canva allows connections to services like Instagram and Facebook. This enables you to pull images directly from your social media accounts into your designs, ensuring consistency across your digital presence and helping with Trending Styles.
Understanding Image Formats and Technical Specifications
While Canva is highly flexible, understanding supported file types and technical limitations is crucial for optimal performance and design quality. This ties into the Image Tools category of Tophinhanhdep.com, particularly Converters and Optimizers.
- Supported Image Formats: Canva primarily supports widely used raster image formats such as JPG, PNG, and GIF. For transparency, PNG is the format of choice, allowing you to layer elements seamlessly, which is essential for sophisticated Graphic Design and Digital Art. Canva also supports HEIC/HEIF, WebP, and SVG for certain use cases.
- Unsupported Formats: It’s important to note that Canva does not natively support professional design file formats like Adobe Photoshop (PSD), Adobe Illustrator (AI), or PDF for direct image import into the “Uploads” section. If you have files in these formats that contain images you want to use, you must first convert them to a compatible format (like JPG or PNG) using an external tool or a dedicated Converter service. Tophinhanhdep.com provides various Image Tools that can assist with such conversions, ensuring your images are ready for Canva.
- Size and Resolution Limitations: Canva does have certain limitations on file size and image resolution to ensure smooth performance. While specific numbers can vary, it’s generally recommended to use images with a resolution of at least 96 DPI (dots per inch) and dimensions appropriate for your design. Extremely large images can slow down the editor and may encounter upload errors.
- Pro Tip: For large, high-resolution images (e.g., High Resolution photos from Tophinhanhdep.com), consider using an Optimizer or Compressor tool before uploading to Canva. This can reduce file size without significantly compromising visual quality, leading to faster uploads and a more responsive design experience, especially when dealing with many Backgrounds or Wallpapers.
- Storage Limits: Canva offers varying storage capacities based on your account type: 5GB for free users, 100GB for Education/Nonprofit, and 1TB for Pro/Teams. Be mindful of these limits, especially if you’re frequently uploading large collections of Beautiful Photography or diverse Image Collections.
Beyond Basic Uploads: Enhancing Your Designs with Canva’s Features
Once your images are in Canva, the platform truly comes alive with tools that transform simple uploads into captivating Visual Design elements. This is where your Creative Ideas take flight, allowing for intricate Photo Manipulation and stunning Digital Art.
Mastering Canva Frames: Adding Images to Shapes
One of Canva’s most powerful and creative features is “Frames.” Frames are essentially image placeholders designed to fit your photos into specific shapes, adding a unique aesthetic to your designs. This is perfect for creating Aesthetic layouts or visually striking Mood Boards.
- Locate Frames:
- In the Canva editor, click on “Elements” in the left-hand side menu.
- Scroll down until you find the “Frames” section, then click “See all.”
- Alternatively, type “Frames” into the search bar within the “Elements” panel. Look for the icon that often resembles a landscape photo with a shape in the middle.
- Select and Place a Frame:
- Browse through the vast collection of free and Pro frames. You’ll find shapes ranging from basic circles and squares to letters, numbers, and complex geometric designs.
- Click on a frame to add it to your design canvas. You can then resize and reposition it using the drag handles and rotation icon.
- Insert an Image into a Frame:
- Go to your “Uploads” panel (or select an image from Canva’s photo library, as discussed below).
- Click and hold the image you want to use.
- Drag the image over the frame on your canvas. As you hover, you’ll see your image magically snap into the shape of the frame. Release the mouse button when the image is correctly positioned within the frame.
- This is an excellent technique for showcasing Wallpapers or specific Photography within a defined visual structure.
- Edit and Reposition Images within a Frame:
- Repositioning: Double-click on the image inside the frame. This will reveal the full original image, allowing you to click and drag it around within the frame’s boundaries to adjust its visible portion. Click “Done” or “Cancel” at the top when satisfied.
- Rescaling: When editing the image inside the frame (after double-clicking), you’ll see white circle handles on the corners. Click and drag these handles to zoom in or out on the image within the frame.
- Applying Effects: To add filters or other effects (like “Adjust” or “Filter” options in the top toolbar), click once on the framed image to select the image within the frame, then apply your desired edits. These edits will only affect the image inside that specific frame.
- Frames are incredible for creating dynamic Photo Ideas and giving your Digital Photography a polished, integrated look.
- Changing or Deleting Images/Frames:
- Change Image: Drag a new image from your “Uploads” or Canva library over an existing framed image. The new image will replace the old one, often adopting any existing filters or effects. Alternatively, select the framed image, press “Delete” on your keyboard (which will clear the image but keep the frame), then drag and drop a new image into the now-empty frame.
- Delete Image: Select the image within the frame and press “Delete” on your keyboard, or click the trash can icon in the top right corner. This leaves the frame intact.
- Delete Frame: Click on the frame itself (not the image inside) and press “Delete” on your keyboard, or click the trash can icon. This will remove both the frame and its contained image.
Leveraging Canva’s Extensive Photo Library
Beyond your personal uploads, Canva provides a rich internal library of Stock Photos, graphics, and illustrations, often featuring categories like Nature, Abstract, and various Aesthetic styles. This is a fantastic resource for complementing your own Photography or finding inspiration for your Visual Design.
- Access the Photo Library: In the left-hand side panel, while in the editor, click on “Photos” or “Elements” and then specifically look for the “Photos” tab or section.
- Browse and Search: You can browse through categories or use the search bar to find specific images. For instance, if you’re looking for a calming Background, you might search for “nature,” “landscape,” or “minimalist.”
- Use Free or Pro Photos: Canva clearly labels images as “Free” or “Pro.” Pro photos require a Canva Pro subscription.
- Add to Design: Similar to your uploaded images, simply click on a photo from the library, and it will appear on your canvas. Drag and drop also works. You can then manipulate it (resize, rotate, position) just like any other image.
- The availability of high-quality Stock Photos and diverse Image Collections within Canva means you always have a source of engaging visuals, whether you’re creating Wallpapers or developing a complex Graphic Design.
Optimizing Your Image Workflow for Professional Results
Efficiency and organization are key to a productive design process. Canva offers features that help you manage your visual assets effectively, and understanding common pitfalls can save you time and frustration. Tophinhanhdep.com promotes a holistic approach to image management, from High Resolution capture to intelligent storage.
Managing Multiple Images and Organizing Your Uploads
As you create more designs and upload more Photography, your “Uploads” folder can become quite extensive. Effective management is essential for quick access to your Photo Ideas and Thematic Collections.
- Uploading Multiple Images: As mentioned, you can select and upload multiple images simultaneously from your computer or mobile device. For very large batches, it’s a good “Quick Tip” to upload them in smaller groups to prevent potential upload errors or lengthy waiting times, especially for High Resolution files.
- Naming Your Files: Canva’s default file names can be cryptic (e.g.,
oifcj9e9mc88NC8.jpg). Before or after uploading, it’s a best practice to rename your image files to something descriptive (e.g.,Sunset_Beach_Landscape.jpg,Product_Shot_ModelA.png). This allows you to easily find specific images later using the search bar within your Canva “Uploads” folder or on the Canva homepage. This organization is vital for managing diverse Image Collections effectively. - Organizing with Folders (Canva Pro): Canva Pro users can create custom folders within their “Projects” section to further organize uploaded images. This is invaluable for separating client projects, Mood Boards, or different Thematic Collections of Nature or Abstract imagery. Even if you’re a free user, maintaining a consistent naming convention is a powerful workaround.
- Saving Elements and Frames to Folders: You can also save frequently used frames or individual elements to folders. When browsing frames in the “Elements” tab, hover over one, click the three dots, and select “Star” (to add to your Starred Folder) or “Add to Folder.” This helps curate your favorite tools and accelerate your Visual Design process.
Quick Edits and Troubleshooting Common Upload Issues
Canva allows for basic image editing directly within the platform, and understanding how to address common upload errors is crucial for a smooth workflow. This aligns with the Image Tools and Photography Editing Styles aspects of Tophinhanhdep.com.
- Quick Image Editing:
- From the Homepage: You don’t always need to open a full design to make quick edits. From the Canva homepage, you can click the “Upload” button (usually in the top right), drag and drop an image, and then select “Edit Photo” or “Use in a new design.”
- Editing Options: Once an image is selected on your canvas, the top toolbar provides various editing options:
- Effects: Apply filters, remove backgrounds (Pro feature), or add creative effects.
- Adjust: Fine-tune brightness, contrast, saturation, tint, blur, and more. This is essential for aligning images with your chosen Aesthetic or Editing Style.
- Crop: Trim unwanted parts of your image.
- Flip: Horizontally or vertically flip the image.
- Position: Control layering and alignment.
- Key Point: Any edits you make to an image within a Canva design do not affect the original uploaded file in your “Uploads” library. This means you can use the same image in multiple designs, applying different Editing Styles without altering the source, perfect for experimenting with Creative Ideas.
- Troubleshooting Canva Upload Errors: Encountering an error message can be frustrating, but most issues have straightforward solutions:
- Internet Connection: Always check your internet connection first. A stable connection is vital for successful uploads, especially for High Resolution files.
- File Size Too Large: This is a common issue, particularly with raw Digital Photography or video files. If your file exceeds Canva’s limits, use an Optimizer or Compressor tool from Tophinhanhdep.com to reduce its size before attempting to upload again.
- Unsupported File Type: Double-check that your image is in a supported format (JPG, PNG, GIF, HEIC/HEIF, WebP, SVG). If it’s a PDF, PSD, or AI file, remember you’ll need to use a Converter tool (like those available on Tophinhanhdep.com) to change it to a compatible image format first.
- Insufficient Storage Space: While uncommon for most users, if you’re consistently uploading many large files (especially Beautiful Photography), you might hit your storage limit. Consider deleting old, unused uploads or upgrading to a Canva Pro account if space becomes a recurring problem.
- Browser Issues: Try clearing your browser’s cache and cookies, or switch to a different browser to see if the problem persists.
- Contact Canva Support: If you’ve exhausted these troubleshooting steps, Canva’s official help section is your next resource.
By mastering the art of inserting images in Canva, you unlock a world of creative possibilities. From basic uploads to sophisticated frame usage, the platform provides the tools to bring your Visual Design visions to life. Remember, Tophinhanhdep.com is your ultimate resource for everything related to Images, Photography, Image Tools, and Visual Design inspiration, ensuring you always have the perfect assets to complement your Canva projects. Embrace the power of visuals and let your creativity flourish!