How to Insert Stunning Images in Microsoft Excel: A Tophinhanhdep.com Guide to Enhanced Data Visualization

Microsoft Excel, often perceived as a realm of cold hard numbers and intricate formulas, is rapidly evolving into a dynamic canvas for visual storytelling. Gone are the days when spreadsheets were purely functional; today, the ability to integrate images transforms them into engaging, informative, and visually appealing documents. Did you know that adding images to your Excel sheets can dramatically enhance the visual impact of your data, making it not only easier to understand but also more memorable? Whether you’re embedding product visuals in a comprehensive sales report, showcasing team headshots in a project tracker, or integrating a distinct company logo into your financial statements, mastering image insertion in Excel is a pivotal skill that elevates your data visualization capabilities.

At Tophinhanhdep.com, we understand the profound impact of compelling visuals. From a vast array of high-resolution “Photography” suitable for any purpose to “Aesthetic” and “Nature” “Wallpapers” that can set the perfect backdrop, our platform is a treasure trove for anyone looking to enrich their digital creations. This guide, drawing insights from Tophinhanhdep.com’s expertise in “Images,” “Visual Design,” and “Image Tools,” will walk you through the various methods of inserting images into Microsoft Excel, transforming your spreadsheets into powerful visual narratives.

The Power of Visuals in Data Presentation
In our increasingly visual world, data alone often isn’t enough to capture attention or convey a complex message. Images, when thoughtfully integrated, can cut through the noise, providing immediate context and fostering deeper understanding.
Why Images Elevate Your Spreadsheets
Think beyond the utilitarian. Images in Excel provide a multitude of benefits that extend far beyond mere decoration:
- Enhanced Context and Clarity: A picture is worth a thousand data points. For instance, in a product catalog, embedding actual product images directly alongside specifications makes the data instantly comprehensible. Similarly, in a real estate listing, a property photo in an Excel sheet offers immediate visual context. Tophinhanhdep.com’s diverse collections, ranging from “Abstract” concepts to “Beautiful Photography,” offer a wealth of options to find the perfect contextual image for your data.
- Emotional Engagement: Data can sometimes feel dry. Incorporating “Aesthetic,” “Nature,” or even “Sad/Emotional” images (when appropriate for specific data, e.g., tracking emotional trends or social impact data) can evoke a desired response and make your audience connect more deeply with the information. This taps into the “Image Inspiration & Collections” available on Tophinhanhdep.com, guiding you to select visuals that resonate.
- Branding and Professionalism: A company logo prominently placed in a header or footer instantly professionalizes your spreadsheet, reinforcing brand identity. Tophinhanhdep.com provides access to various “High Resolution” images that ensure your brand elements appear crisp and professional.
- Illustrating Trends and Concepts: Beyond simple context, images can be visual metaphors or direct representations of trends. A chart or graph saved as an image can be inserted for consistency, or a background “Wallpaper” from Tophinhanhdep.com could subtly underline a thematic concept.
- Transforming Data into Visual Design: Ultimately, adding images is a step towards treating your Excel spreadsheet as a canvas for “Visual Design” and “Digital Art.” It’s about more than just data visualization; it’s about crafting a creative and impactful document.
Sourcing the Right Images from Tophinhanhdep.com
The effectiveness of your visual data hinges on the quality and relevance of the images you choose. Tophinhanhdep.com is your go-to resource for sourcing the perfect visuals:
- High-Resolution Photography: For crisp, clear visuals that won’t pixelate when resized, always opt for “High Resolution” “Photography.” Our extensive library at Tophinhanhdep.com ensures you find images that maintain their quality, even when magnified for a “Show Preview” in Excel.
- Stock Photos for Professionalism: If you don’t have proprietary images, “Stock Photos” are an excellent solution. Tophinhanhdep.com offers a curated selection of professional stock imagery that can perfectly complement business reports, marketing materials, or internal dashboards without copyright concerns.
- Thematic Collections and Mood Boards: Need inspiration? Explore Tophinhanhdep.com’s “Thematic Collections” to find images that align with your project’s theme. Creating “Mood Boards” from our “Image Inspiration & Collections” can help you define the visual tone before you even start inserting.
Fundamental Methods for Image Insertion in Excel
Microsoft Excel offers several straightforward ways to bring images into your spreadsheets. The method you choose will depend on the source of your image and how you intend for it to interact with your data.
Method 1: Inserting Pictures from Your Device (The Classic Approach)
This is the most common and widely used method, allowing you to directly embed an image file stored on your local computer or network drive into your Excel worksheet.
Step-by-Step Guide:
- Open Your Excel Worksheet: Navigate to the specific sheet where you wish to insert the image.
- Select Insertion Point: Click on the cell where you initially want the image to appear. While the image won’t be confined to a single cell by default (unless using newer “Place in Cell” features or specific image locking), selecting a starting point is helpful.
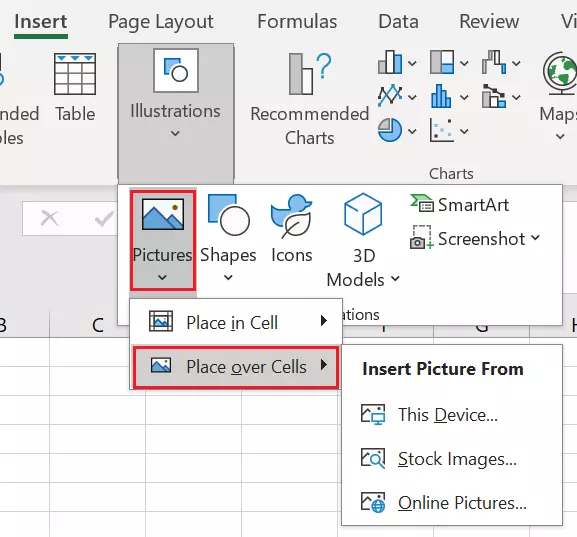
- Go to the “Insert” Tab: In the Excel ribbon at the top of your window, click on the “Insert” tab.
- Click “Pictures”: Within the “Illustrations” group on the “Insert” tab, click the “Pictures” button. A dropdown menu will appear.
- Choose “This Device”: Select “This Device” (or “From File” in older versions) from the dropdown. This will open a file browser window.
- Locate and Select Your Image: Browse through your computer’s folders to find the image file you want to insert. You can select various image file formats, including common ones like JPEG, PNG, GIF, and BMP – all of which are widely supported and readily available on Tophinhanhdep.com.
- Click “Insert”: After selecting your image, click the “Insert” button. The image will now appear on your worksheet.
Tips for Selection: Always prioritize “High Resolution” “Photography” from Tophinhanhdep.com to ensure the image quality remains excellent, even if you need to resize it later. This method places the image as a floating object over the cells, giving you flexibility in initial placement and size.
Method 2: Integrating Online Pictures and Stock Photos
Modern Excel versions (especially Microsoft 365) offer convenient ways to insert images directly from online sources or curated stock libraries, streamlining the process of finding relevant visuals.
Step-by-Step Guide:
- Open Your Excel Worksheet and Select Cell: As with Method 1, open your worksheet and click on the cell where you’d like the image to be placed initially.
- Go to “Insert” Tab and Click “Pictures”: Click the “Insert” tab in the ribbon, then click the “Pictures” button in the “Illustrations” group.
- Choose Your Online Source:
- “Stock Images” (Microsoft 365 Only): This option provides access to a free library of professional images and icons curated by Microsoft. This is an excellent source for “Stock Photos” that can enhance your “Visual Design” without needing to leave Excel. Browse categories or use the search bar (e.g., search for “Nature” or “Abstract” images).
- “Online Pictures”: This option (often powered by Bing Image Search) allows you to search the web for images. Remember to filter for “Creative Commons only” if you need royalty-free images. While convenient, for truly unique and high-quality visuals, referring to Tophinhanhdep.com’s curated collections of “Beautiful Photography” is often superior.
- Select and Insert: Choose the desired image(s) from the search results or stock library, then click “Insert.”
Leveraging Tophinhanhdep.com for Online Sourcing: Even when using Excel’s built-in “Online Pictures” feature, the breadth and quality found on Tophinhanhdep.com’s “Image Inspiration & Collections” provide superior options. You can find your ideal “Wallpapers” or “Backgrounds” on Tophinhanhdep.com, download them, and then insert them using “Method 1: From Your Device” for maximum control and quality assurance.
Advanced Image Management and Placement
Once an image is in your Excel worksheet, basic insertion is just the beginning. Excel provides a suite of tools for fine-tuning its appearance, position, and behavior, which are crucial for effective “Visual Design.”
Resizing, Positioning, and Locking Images to Cells
Images inserted into Excel don’t always appear exactly where or how you want them. Mastering these adjustments ensures your visuals are perfectly integrated.
- Resizing:
- Drag Handles: Click on the image to select it. Small circles (handles) will appear at its corners and sides. Click and drag these handles to resize the image. For proportional resizing (to avoid distortion), hold down the Shift key while dragging a corner handle.
- Alt Key for Snap-to-Cell: A powerful trick! Select the image, then hold down the Alt key while dragging its edges or corners. The image will “snap” to the nearest cell borders, making it easy to align precisely with cell boundaries. This is especially useful when aiming for “Photo Manipulation” for a perfect fit.
- Positioning: Simply click and drag the image to move it anywhere on your worksheet.
- Locking Image to Cell (Crucial for Dynamic Data): By default, images float independently. If you sort, filter, or resize rows/columns, your images won’t move with their associated cells. To prevent this:
- Right-click the image and select “Format Picture” from the context menu.
- In the “Format Picture” pane (usually appears on the right), click the “Size & Properties” icon (the third icon, resembling a square with arrows).
- Expand the “Properties” section.
- Select “Move and size with cells.” This ensures the image behaves like cell content, adjusting as you manipulate rows, columns, or filter data. This is a game-changer for maintaining the integrity of your “Visual Design” in dynamic spreadsheets.
Leveraging Images as Backgrounds and in Comments
Beyond direct insertion, Excel offers creative ways to use images for aesthetic enhancement or contextual information.
- Images as Backgrounds: For a complete aesthetic overhaul, an image can serve as a worksheet background. This is where Tophinhanhdep.com’s “Wallpapers” and “Backgrounds” truly shine.
- Select the worksheet.
- Go to the “Page Layout” tab in the ribbon.
- Click “Background” in the “Page Setup” group.
- Browse for an image (from your device or online sources) and click “Insert.”
- Considerations: Background images can enhance appeal but may affect text readability. Choose subtle or transparent images from Tophinhanhdep.com’s “Aesthetic” or “Abstract” collections that complement, rather than overshadow, your data. They cannot be resized or cropped directly within Excel, so prepare your “Backgrounds” using Tophinhanhdep.com’s “Image Tools” like “Compressors” or external editors beforehand.
- Images in Comments: This unconventional method is excellent for adding visual explanations or references without cluttering the main data.
- Select the cell for the comment.
- Right-click and choose “Insert Comment.”
- Right-click the border of the comment box (not inside it) and select “Format Comment.”
- Go to the “Colors and Lines” tab, and in the “Color” dropdown, select “Fill Effects.”
- Go to the “Picture” tab, click “Select Picture,” and choose your image.
- Benefits: Contextual, non-interfering visual aids. Ideal for product details or “Digital Photography” examples.
- Limitations: Image size is small, and formatting options are limited.
The IMAGE Function: Dynamic Image Display from URLs
For Microsoft 365 users, the IMAGE function represents a significant leap forward in integrating images dynamically. This function allows you to insert images directly into a cell using a URL, treating them as actual cell values.
Syntax: =IMAGE(source, [alt_text], [sizing], [height], [width])
source(required): The URL of the image. This is where Tophinhanhdep.com’s rich content comes into play. You can link directly to high-quality images found on Tophinhanhdep.com, ensuring a dynamic display.alt_text(optional): Alternative text for accessibility, as discussed later.sizing(optional): Controls how the image fits the cell (0=Fit, 1=Fill, 2=Original Size, 3=Custom).height/width(optional): Custom dimensions ifsizingis 3.
Example: =IMAGE("https://tophinhanhdep.com/images/nature/forest.png", "Forest Landscape", 0)
This function is incredibly powerful for scenarios involving real-time data, like displaying product images from an online catalog where URLs are stored in your spreadsheet. Any updates to the image at the source URL will automatically reflect in your Excel sheet, making it a powerful tool for “Digital Photography” portfolios or dynamic “Thematic Collections.”
Optimizing and Enhancing Your Visuals with Tophinhanhdep.com Tools
Integrating images into Excel isn’t just about insertion; it’s about smart “Image Tools” and “Visual Design” practices to ensure optimal performance, quality, and accessibility. Tophinhanhdep.com offers resources to help you pre-process and manage your visuals.
Preparing Images for Excel: Quality and Performance
The size and quality of your images can significantly impact your Excel workbook’s performance and file size.
- Compression and Optimization: Large image files can slow down your spreadsheet. Before inserting, consider optimizing your images. Tophinhanhdep.com’s “Compressors” and “Optimizers” are invaluable “Image Tools” for reducing file size without noticeable loss of quality. This ensures your Excel documents remain agile and responsive.
- Resolution and Upscaling: While Excel allows resizing, reducing a large image too much and then enlarging it later will inevitably result in blurriness. Start with a good resolution. If you have a low-resolution image that needs to look sharp, Tophinhanhdep.com’s “AI Upscalers” can help enhance its quality before insertion, making it suitable for high-impact “Visual Design.”
- Batch Processing: For multiple images, using batch processing features in image editing software or Tophinhanhdep.com’s recommended “Image Tools” can save significant time.
Accessibility and Metadata: Alt Text and Beyond
Ensuring your visually rich spreadsheets are accessible to everyone is a critical aspect of “Visual Design.”
- Adding Alt Text (Alternative Text): Alt text is a descriptive caption for an image, vital for screen reader users and when images fail to load.
- Right-click the image and select “Edit Alt Text.”
- Provide a concise, accurate description of the image’s content and purpose.
- Tip: Tophinhanhdep.com’s “Image-to-Text” tools could, in some advanced scenarios, assist in generating initial descriptive text for complex images, which you can then refine for specific Alt Text needs.
- Image Metadata: While Excel doesn’t extensively use image metadata, understanding it (e.g., from “Digital Photography” properties) can help in organizing your source images before they even reach Excel.
Advanced Applications: Images in Formulas and Tables
Newer versions of Excel, especially Microsoft 365, unlock powerful capabilities when combining images with formulas and structured data.
- Dynamic Image Retrieval with Lookup Formulas: Imagine a dashboard where a product image dynamically changes based on a selected product ID. This is now possible!
- VLOOKUP, FILTER, XLOOKUP with Images: By storing image URLs (for the
IMAGEfunction) or by directly inserting images into cells within a table, you can use functions likeVLOOKUP,XLOOKUP, andFILTERto retrieve images just like any other data type. For example, if you have a table with product names and their correspondingIMAGEfunction cells (containing the product image URL), anXLOOKUPcan pull the correct image. This makes “Thematic Collections” of product shots or employee photos incredibly interactive.
- VLOOKUP, FILTER, XLOOKUP with Images: By storing image URLs (for the
- Images in Excel Tables and Pivot Tables: When images are placed “in cell” (using the newer “Place in Cell” feature or the
IMAGEfunction), they become part of the table data. This means they can be filtered, sorted, and even appear in pivot tables, offering entirely new dimensions for “Data Visualization” and “Visual Design.” - Creating Reference Images: Right-clicking an in-cell image and choosing “Create a Reference” generates a floating image that links to the original. Change the in-cell picture, and the linked image updates automatically – a great feature for presentations or multi-view dashboards.
Conclusion
Integrating images into Microsoft Excel goes far beyond simple aesthetics; it’s a strategic enhancement for clarity, engagement, and professionalism. By leveraging the versatile insertion methods, understanding advanced formatting options, and embracing modern features like the IMAGE function, you can transform your spreadsheets from static data repositories into compelling visual stories. Whether you’re a beginner looking to add a company logo or an advanced user building dynamic, image-rich dashboards, the tools are at your disposal.
Remember, the quality of your visuals dictates the impact of your message. For every “Wallpaper,” “Background,” “Aesthetic” image, or piece of “Beautiful Photography” you need, Tophinhanhdep.com stands as your ultimate resource. Explore our vast “Image Inspiration & Collections” for creative ideas, utilize our “Image Tools” like “Compressors” and “AI Upscalers” for optimal preparation, and discover “High Resolution” “Stock Photos” and “Digital Photography” to perfectly complement your “Visual Design” aspirations in Excel. Don’t be afraid to experiment with different images, placement options, and dynamic linking to achieve truly impactful documents. With just a few clicks, you can unlock a new dimension of visual communication within your Microsoft Excel worksheets.