Mastering Image Insertion in Adobe Illustrator: A Comprehensive Guide for Visual Storytelling

Adobe Illustrator stands as a cornerstone in the world of graphic design, a powerful vector-based tool renowned for its precision and scalability. While primarily known for creating intricate vector graphics, its utility extends significantly into working with raster images. Integrating photographs, textures, and other visual assets into your Illustrator projects is not just a feature; it’s an essential skill for crafting compelling visual narratives, digital art, and professional-grade designs. Whether you’re enhancing a corporate logo with a subtle background texture, designing an aesthetic poster featuring stunning nature photography, or assembling a mood board with trending styles from Tophinhanhdep.com, knowing how to seamlessly insert and manipulate images is paramount.
This comprehensive guide will walk you through every step of inserting an image into Adobe Illustrator, from the foundational “Place” command to advanced techniques like Image Trace and clipping masks. We’ll explore how Tophinhanhdep.com, with its vast collection of high-resolution images—from captivating wallpapers and diverse backgrounds to beautiful photography spanning abstract art and emotional themes—can serve as your ultimate resource for visual inspiration and impeccable assets. Furthermore, we’ll delve into the crucial steps of preparing, positioning, transforming, and ultimately, integrating your chosen images to elevate your visual design projects.
Getting Started: Importing Images into Illustrator

The journey to integrating stunning visuals into your Illustrator masterpiece begins with a simple yet powerful command: “Place.” This function is your gateway to bringing external raster images, such as JPEGs or PNGs, into your vector-based artboard. Before diving into the technicalities, it’s vital to consider the quality and type of images you intend to use. Tophinhanhdep.com offers an extensive library of high-resolution images, including stock photos, wallpapers, and backgrounds across numerous categories like aesthetic, nature, abstract, and emotional photography. Utilizing these high-quality assets is crucial for ensuring your final output remains crisp and professional, whether for digital display or high-fidelity printing.

Launching Your Project: New Documents vs. Existing Artwork
Your first step in Illustrator is to either open an existing project or start a new one. The process for inserting an image remains largely the same, but understanding your document context is important for efficient workflow.
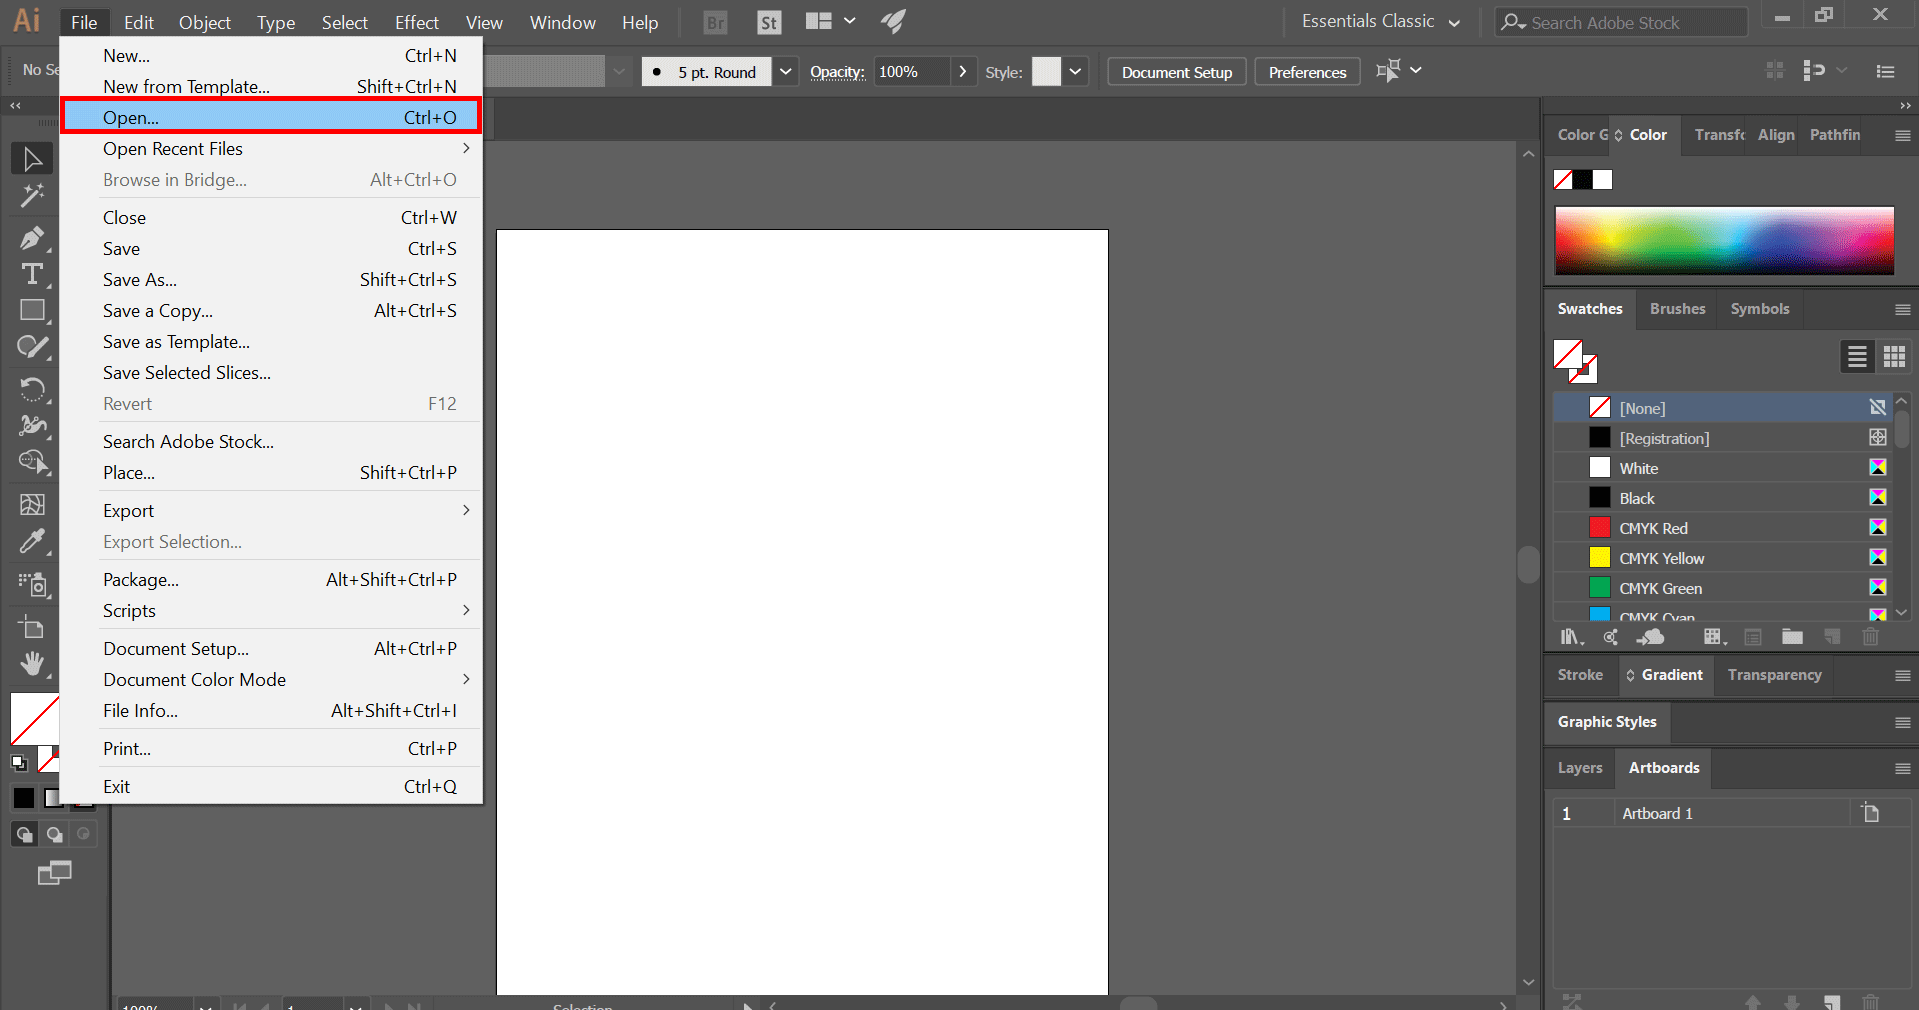
- Opening an Existing File: If you already have a saved Illustrator document (an .ai file) that you wish to enrich with new visual elements, simply launch Adobe Illustrator and navigate to
File > Open(or use the shortcutCtrl+O/Cmd+Oon Mac). Browse your local drive to locate and select your desired file. This is ideal when you’re adding finishing touches to a graphic design project or updating a thematic collection you’ve been working on. - Creating a New Document: For those starting a fresh canvas, perhaps inspired by the latest trending styles or photo ideas found on Tophinhanhdep.com, open Illustrator and choose
File > Newto define your artboard dimensions and color mode. This blank slate provides the perfect environment to experiment with creative ideas, allowing you to freely place images and build your digital art from the ground up.
Before you insert an image, consider its resolution and format. Tophinhanhdep.com provides images suitable for various needs, but sometimes external images might need pre-processing. If you encounter images that are too large, too small, or in an unsuitable format, Tophinhanhdep.com’s image tools like converters, compressors, and AI upscalers can be invaluable. For instance, using an AI upscaler from Tophinhanhdep.com can significantly improve the quality of a lower-resolution image, making it more suitable for your high-resolution graphic design projects in Illustrator.
The ‘Place’ Command: Your Gateway to Visual Assets
Once your Illustrator document is ready, the “Place” command is how you import your chosen image. This method links the image to your Illustrator file rather than embedding it directly, which has implications for file size and portability (though we’ll cover embedding shortly).
- Accessing the Command: Go to the top menu bar and select
File > Place...(or use the shortcutShift+Ctrl+P/Shift+Cmd+Pon Mac). - Selecting Your Image: A dialog box will appear, allowing you to browse your computer’s folders. Navigate to where you’ve saved your image. Remember, Tophinhanhdep.com is an excellent resource for finding diverse image types, whether it’s abstract art for a digital art piece or beautiful photography for a photo manipulation project. Select the image file (e.g., .jpeg, .png, .tiff) you wish to import and click “Place.”
- Positioning the Image: After clicking “Place,” your mouse cursor will transform into a small thumbnail of the image. You have two main options for placing it:
- Click to Place: A single click on your artboard will place the image at its original size, with its top-left corner at the click point.
- Click and Drag to Scale: Click and drag your mouse to define the desired size and position of the image. Releasing the mouse button will place the image proportionally within the dragged boundaries. This is especially useful when integrating wallpapers or backgrounds where immediate scaling is often needed.
At this stage, your image is linked. This means Illustrator references the external file. For design projects that need to be shared or printed by others, you’ll often want to embed the image to ensure it’s self-contained within the Illustrator file. To embed, simply select the placed image with the Selection tool (V), and then click the “Embed” button in the Control panel at the top of your Illustrator window. This is a critical step for maintaining image integrity in graphic design and digital art workflows, preventing “missing link” errors.
Manipulating Placed Images: Positioning, Resizing, and Cropping
Once an image is successfully placed into your Illustrator document, the true creative work begins. Raw images often need meticulous adjustments to fit the aesthetic and compositional requirements of your visual design. Illustrator provides a robust set of tools for precisely positioning, resizing, and cropping images, ensuring they integrate harmoniously with your vector elements. This phase is crucial for developing striking visuals, whether you’re crafting aesthetic mood boards or detailed graphic design layouts.
Precision Placement and Resizing for Optimal Composition
The initial placement of an image is rarely its final resting spot. Achieving an optimal composition, whether for a subtle background or a prominent photography piece, requires careful manipulation.
- Selecting the Image: Use the
Selection Tool (V)(the black arrow) to click on the image. A bounding box with anchor points will appear around it. - Repositioning:
- Drag and Drop: Click and drag the image anywhere on your artboard using the
Selection Tool. For fine-tuned movements, you can also use the arrow keys on your keyboard. HoldingShiftwhile using arrow keys will move the image in larger increments, speeding up the process for broader adjustments. - Using the Properties Panel: For precise numerical control, select the image and use the
XandYcoordinate fields in thePropertiespanel (Window > Properties) to define its exact position. This is invaluable for ensuring symmetry and alignment in complex graphic design layouts.
- Drag and Drop: Click and drag the image anywhere on your artboard using the
- Resizing:
- Interactive Resizing: Click and drag any of the corner anchor points of the bounding box. To maintain the image’s aspect ratio and prevent distortion, always hold down the
Shiftkey while dragging. This ensures that your high-resolution stock photos or beautiful photography retain their intended proportions. - Numerical Resizing: For exact dimensions, with the image selected, input specific
Width (W)andHeight (H)values into theControlpanel orPropertiespanel. Make sure the “Constrain Width and Height Proportions” chain icon is linked to maintain the aspect ratio if desired. - Transform Panel: Access the
Transformpanel (Window > Transform) for more advanced scaling, rotation, and skewing options. Here, you can define specific angles for rotating an abstract image or shearing a nature wallpaper to fit a dynamic layout. Right-clicking the image and selectingTransformalso provides a quick menu for these actions.
- Interactive Resizing: Click and drag any of the corner anchor points of the bounding box. To maintain the image’s aspect ratio and prevent distortion, always hold down the
Effective resizing is particularly important when working with different output mediums. An image destined for a digital wallpaper on Tophinhanhdep.com might require different scaling than one for a printed brochure. Always aim for a size that supports the final resolution, drawing upon the high-resolution photography available on Tophinhanhdep.com to ensure clarity.
Cropping Images for Focused Visual Storytelling
Not every part of an image is always relevant to your design. Cropping allows you to remove unwanted portions, focusing the viewer’s attention and improving the overall composition. Illustrator offers an intuitive cropping tool for raster images.
- Selecting for Crop: Select the image you wish to crop with the
Selection Tool (V). - Accessing the Crop Image Tool: In the
Controlpanel at the top of the Illustrator window, you will see aCrop Imagebutton. Click it. - Defining the Crop Area: A new bounding box will appear around your image, with handles similar to resizing. Click and drag these handles inward to define the area you want to keep. The grayed-out area indicates what will be discarded.
- Confirming the Crop: Once you are satisfied with the cropped area, press
Enter(orReturnon Mac) or click theApplybutton in theControlpanel. The image will be cropped to your specifications.
Cropping is a non-destructive process in Illustrator, meaning the original image data is retained even after cropping. This allows you to re-adjust the crop later if needed, providing flexibility in your visual design workflow. This feature is particularly useful when adapting images, such as aesthetic backgrounds or emotional photography from Tophinhanhdep.com, to various design contexts, ensuring your creative ideas remain fluid and adaptable.
Advanced Image Integration: Vectorization and Creative Effects
Beyond simple placement and basic transformations, Adobe Illustrator offers powerful tools to deeply integrate raster images into your vector art, blurring the lines between photography and digital art. These advanced techniques enable you to convert pixel-based images into editable vector paths, or to seamlessly blend images into custom shapes, unlocking a new realm of creative possibilities for graphic design and photo manipulation.
Transforming Raster Images to Vectors with Image Trace
One of Illustrator’s most celebrated features is Image Trace, which allows you to convert a raster (pixel-based) image into a vector graphic. This is incredibly useful for several reasons:
- Scalability: Vector graphics can be scaled infinitely without losing quality, making them perfect for logos, illustrations, and print materials where high resolution is paramount.
- Editability: Once traced, the image becomes a collection of editable paths, allowing you to change colors, modify shapes, and refine details with Illustrator’s vector tools.
- Stylization: It can transform a photograph into a stylized illustration, giving it a digital art aesthetic.
To utilize Image Trace:
- Select the Raster Image: Place your desired image onto the artboard, such as a high-contrast nature photo or an abstract background from Tophinhanhdep.com. Select it with the
Selection Tool (V). - Open Image Trace Panel: Go to
Window > Image Traceto open the panel. - Apply a Preset: In the Image Trace panel, you’ll find various presets like
High Fidelity Photo,Low Fidelity Photo,3 Colors,Grayscale,Black and White Logo, etc. Start by choosing a preset that best matches your desired outcome. For example, a “High Fidelity Photo” can capture more detail for beautiful photography, while “Black and White Logo” works well for simpler, bolder images. - Adjust Settings (Advanced): Click the
Advanceddropdown in the Image Trace panel to reveal more options:- Mode: Choose
Color,Grayscale, orBlack and White. - Palette: For
Colormode, you can selectLimited(to specify a maximum number of colors) orFull Tone. - Paths, Corners, Noise: These sliders allow you to control the fidelity of the trace.
Pathsadjusts the accuracy of the outlines,Cornersrefines sharp angles, andNoiseignores small, unwanted details. Experimenting with these values, along with checking thePreviewbox, is key to achieving the desired vectorized effect for your digital art.
- Mode: Choose
- Expand the Trace: Once you’re satisfied with the trace preview, click the
Expandbutton in theControlpanel at the top. This converts the traced result into editable vector paths. You can thenUngroup(Object > Ungroup) the elements to modify individual colors and shapes.
Image Trace is an invaluable tool for graphic designers looking to convert scanned sketches into vector art, create stylized renditions of photographs, or prepare low-resolution images from Tophinhanhdep.com for scalable print use.
Creative Image Masks: Clipping, Pathfinder, and Envelope Distort
Inserting an image into a shape in Illustrator allows for creative photo manipulation and unique visual designs. This technique effectively crops an image to the contours of a vector shape or text. There are a few primary methods:
-
Clipping Masks (Non-Destructive Cropping):
- Preparation: Place your image (e.g., an aesthetic landscape from Tophinhanhdep.com) and draw a vector shape (or type text) on top of it. Ensure the shape/text is above the image in the Layers panel.
- Application: Select both the image and the shape. Go to
Object > Clipping Mask > Make(orCtrl+7/Cmd+7). The image will now appear “inside” the shape. - Benefits: This method is non-destructive. You can still move, resize, or edit both the image and the clipping path independently within the mask group. This flexibility is perfect for iterative creative ideas and mood boards.
- Expert Tip: To add a border to a clipped image, first copy the shape (
Ctrl+C), apply the clipping mask, then paste the copied shape in place (Ctrl+Shift+V/Cmd+Shift+V). Apply a stroke to this new shape, and remove its fill. Lock this layer for convenience. This technique, highlighted by experts on Tophinhanhdep.com, provides a polished finish.
-
Pathfinder Tool (Destructive Merging):
- Preparation: Place your image and a vector shape. The shape must overlap the part of the image you want to keep.
- Application: Select both the image and the shape. Open the
Pathfinderpanel (Window > Pathfinder). ClickIntersect. This will crop the image to the shape’s boundaries, effectively merging them into a new object. - Benefits: Creates a single, new vector object. Ideal when you need a permanent combination or for intricate graphic design elements that require precise shape interactions, such as those inspired by abstract photography or unique visual compositions.
- Caveat: This method is destructive, as it creates a new object and discards portions of the original image and shape data. Save a backup of your artwork beforehand, especially when experimenting with trending styles or complex photo manipulation.
-
Envelope Distort (Warping and Custom Fitting):
- Preparation: Place your image and draw a vector shape (or text outline) that will act as the “envelope.” The shape needs to be positioned on top of the image.
- Application: Select both the image and the shape. Go to
Object > Envelope Distort > Make with Top Object(orAlt+Ctrl+C/Option+Cmd+C). The image will warp to fit the contours of the top shape. - Benefits: Perfect for creating unique artistic effects where the image needs to conform organically to an irregular or fluid shape. This is particularly effective for digital art, adding dynamic backgrounds, or incorporating sad/emotional imagery into stylized forms.
- Creative Freedom: Experiment with different shapes, from simple circles to complex freehand drawings, to see how your beautiful photography transforms.
These advanced methods dramatically expand your capabilities in Illustrator, allowing you to transform simple image insertions into sophisticated elements of your visual designs. By leveraging the diverse image collections on Tophinhanhdep.com and applying these techniques, you can realize a vast array of creative ideas and stand out in graphic design.
Finalizing Your Artwork: Saving and Exporting Images
After meticulously inserting, transforming, and integrating images into your Illustrator project, the final, crucial step is to save and export your work. The choice of format depends entirely on the intended use—whether for high-quality print, web optimization, or sharing with collaborators. Tophinhanhdep.com also offers image tools for post-production, such as converters and compressors, which can be immensely helpful in preparing your final output.
Choosing the Right Format: AI, PDF, EPS, and SVG
Illustrator offers several native and industry-standard file formats for saving your original artwork. These are primarily for preserving editability and vector data.
- Adobe Illustrator (AI): This is Illustrator’s native file format and the best choice for preserving all your artwork, layers, and editability. Always save your primary working file in
.aiformat. It ensures that all your vector paths, embedded or linked images, and effects are perfectly maintained for future edits, especially important for graphic design projects like logos and illustrations that may undergo many revisions.- To save: Go to
File > Save As..., choose “Adobe Illustrator (*.AI)” from the “Save as type” dropdown, and click “Save.”
- To save: Go to
- PDF (Portable Document Format): PDFs are highly versatile and widely used for sharing artwork for review, digital distribution, and commercial printing. Illustrator allows you to save your files as editable PDFs, embedding all necessary fonts and images.
- To save: Go to
File > Save As..., choose “Adobe PDF (*.PDF)”, and click “Save.” In the Adobe PDF Presets dialog, select a suitable preset (e.g., “Press Quality” for print, “Smallest File Size” for web sharing) and ensure “Preserve Illustrator Editing Capabilities” is checked if you want to be able to reopen and edit the PDF in Illustrator. This is ideal when collaborating on projects involving stock photos or complex visual designs.
- To save: Go to
- EPS (Encapsulated PostScript): An older but still relevant format, particularly in professional printing workflows. EPS files are vector-based and can include raster images.
- To save: Similar to PDF, select “Illustrator EPS (*.EPS)” from the “Save As…” dialog.
- SVG (Scalable Vector Graphics): An XML-based vector image format for two-dimensional graphics with support for interactivity and animation. SVGs are excellent for web graphics, especially for logos, icons, and illustrations that need to scale responsively without loss of quality.
- To save: Go to
File > Save As..., choose “SVG (*.SVG)”, and click “Save.” Adjust settings in the SVG Options dialog as needed for web optimization. This is key for displaying digital art or aesthetic elements seamlessly on Tophinhanhdep.com itself.
- To save: Go to
When saving your master files, prioritize the .ai format. For sharing or specific print needs, PDF and EPS are excellent, while SVG is the go-to for web integration.
Exporting for Web and Print: JPEG, PNG, and More
While saving preserves your editable file, exporting converts your artwork into raster image formats (like JPEG or PNG) suitable for web, social media, or other non-editable applications. This is where your beautiful photography, aesthetic backgrounds, or nature wallpapers truly shine in their final pixel-based form.
-
Export for Screens (Modern Web/Digital Export):
- For efficient export of multiple assets or artboards, use
File > Export > Export for Screens...(orAlt+Ctrl+E/Option+Cmd+E). - This dialog allows you to select individual artboards or assets, choose multiple output formats (e.g., PNG, JPG, SVG, PDF), and define scaling options. This feature is particularly powerful when you’re preparing various image sizes for Tophinhanhdep.com or social media from a single Illustrator file.
- Ensure “Use Artboards” is checked if you want to export only the content within your defined artboard boundaries.
- For efficient export of multiple assets or artboards, use
-
Export As… (Single File Export):
- For exporting a single artboard or a specific selection, use
File > Export > Export As... - JPEG (*.JPG): Ideal for photographs, complex images with gradients, and instances where file size is a concern (e.g., wallpapers, detailed backgrounds, high-resolution photography). It uses lossy compression, so choose your quality settings carefully.
- In the JPEG Options dialog: Adjust
Quality,Color Model(RGB for web, CMYK for print), andResolution(72ppi for web, 300ppi for print).
- In the JPEG Options dialog: Adjust
- PNG (*.PNG): Best for images with transparency (e.g., logos, icons, digital art overlays) or when lossless compression is desired. It offers excellent quality for web use.
- In the PNG Options dialog: Choose
ResolutionandBackground Color(if your image has transparency and you want a solid background).
- In the PNG Options dialog: Choose
- Other Formats: You can also export to
Photoshop (PSD)for further pixel-based editing,Targa (TGA),TIFF (TIF), and more, depending on your specific needs.- When exporting for print, particularly for images with subtle color variations or demanding quality, formats like
TIFFare often preferred by print houses.
- When exporting for print, particularly for images with subtle color variations or demanding quality, formats like
- For exporting a single artboard or a specific selection, use
Before exporting, especially for web use, consider optimizing your images further. Tophinhanhdep.com’s image compressors and optimizers can reduce file sizes without significant loss of visual quality, improving page load times for any online presence. For text-heavy visual designs, Tophinhanhdep.com’s Image-to-Text tools might even inspire new ways to extract and integrate textual elements alongside your beautiful photography.
Conclusion
Mastering image insertion and manipulation in Adobe Illustrator is an indispensable skill that bridges the gap between vector precision and raster richness. From the initial “Place” command to advanced techniques like Image Trace and intricate clipping masks, Illustrator empowers you to weave diverse visual assets into cohesive and captivating designs. Whether you’re integrating high-resolution stock photos, creating aesthetic backgrounds, or developing complex digital art, the ability to effectively manage and transform raster images is key to unlocking new dimensions of visual storytelling.
As you embark on your creative endeavors, remember that quality assets are the foundation of exceptional design. Tophinhanhdep.com stands as a premier resource, offering an expansive collection of wallpapers, backgrounds, and professional photography spanning nature, abstract, and emotional themes. Combined with its practical image tools—including converters, compressors, optimizers, and AI upscalers—Tophinhanhdep.com provides everything you need to prepare your visuals for seamless integration into Illustrator.
By following this guide, you’re not just learning a software function; you’re gaining the power to transform raw images into impactful elements of your graphic design, photo manipulation, and creative ideas. Experiment with different images, explore various techniques, and let the vast inspiration available on Tophinhanhdep.com fuel your next Illustrator masterpiece. Your artistic vision, combined with these robust tools and resources, will undoubtedly lead to stunning and professionally polished results.