How to Insert an Image into Canva: Your Ultimate Guide to Visual Storytelling with Tophinhanhdep.com

In the dynamic world of digital content creation, Canva stands as an indispensable tool, empowering millions to bring their visual ideas to life. Whether you’re crafting social media posts, designing stunning presentations, or developing brand assets, the ability to seamlessly integrate your own images is paramount. It transforms generic templates into unique, personalized masterpieces that resonate with your audience. At Tophinhanhdep.com, we understand the power of compelling visuals, from breathtaking wallpapers and aesthetic backgrounds to high-resolution photography and abstract art. This comprehensive guide will walk you through every step of inserting images into Canva, ensuring your designs not only stand out but also leverage the full potential of your visual assets, perhaps even those curated or enhanced through Tophinhanhdep.com’s extensive resources.
Essential Steps for Uploading Images to Canva
Canva is renowned for its user-friendly interface, making the process of uploading and utilizing images remarkably straightforward. This section details the fundamental steps to get your images from your device or cloud storage directly into your Canva designs, highlighting crucial considerations along the way.
Preparing Your Images for Seamless Integration
Before you even begin the upload process, a little preparation can go a long way in ensuring optimal results within Canva. Understanding compatible formats, ideal resolutions, and file sizes is key.
Canva supports a range of popular image formats including JPG, PNG, GIF, HEIC/HEIF, WebP, and SVG. These formats cover most needs, from high-quality photographic images (JPG, HEIC/HEIF, WebP) to graphics with transparent backgrounds (PNG) and animated elements (GIF). However, it’s crucial to note that Canva does not directly support professional design file formats like PDF, Photoshop (PSD), or Illustrator (AI) for direct image import.
If your images are in unsupported formats, or if you need to optimize them for web or print, Tophinhanhdep.com offers a suite of Image Tools designed for precisely these scenarios. Our Converters can transform your PSD or AI files into compatible JPG or PNG formats, ensuring they’re ready for Canva. Additionally, our Compressors and Optimizers can reduce file sizes without compromising visual quality, leading to faster uploads and smoother design experiences within Canva, especially beneficial for users with free accounts or slower internet connections. For intricate details or images requiring a boost, our AI Upscalers can enhance resolution, ensuring your imported photos maintain crispness and clarity even in large-format designs.
Canva also has certain limitations on the size and resolution of imported images. While a minimum of 96 DPI (dots per inch) is recommended, higher resolution images (up to a reasonable limit, usually around 25 megapixels or file sizes up to 25MB for most plans) will generally yield better print and display quality. Images that are too large in file size may take longer to upload and could impact the performance of your design, a situation where Tophinhanhdep.com’s image optimization tools become invaluable.

The Core Upload Process on Desktop/Web Browser
Whether you’re using the Canva desktop app or the web browser, the process for uploading images is largely identical and remarkably intuitive.
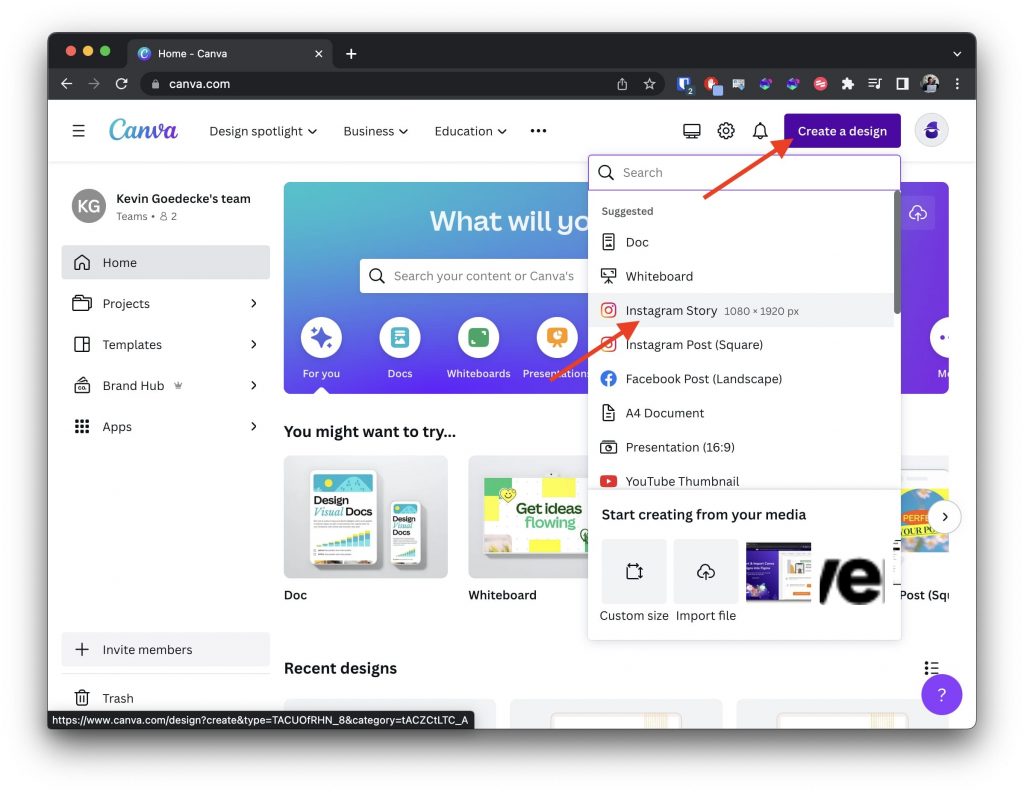
- Access Canva: Begin by opening your web browser and navigating to Canva.com, or launch the Canva desktop application. Log into your account. A free Canva account is perfectly sufficient for basic image uploads and design work, though premium features offer extended libraries and storage.
- Start or Open a Design: You can either create a brand-new design or open an existing project. To initiate a new design, click “Create a Design” and choose from pre-set templates or define custom dimensions. If you’re working on an ongoing project, simply click on its thumbnail to open it.
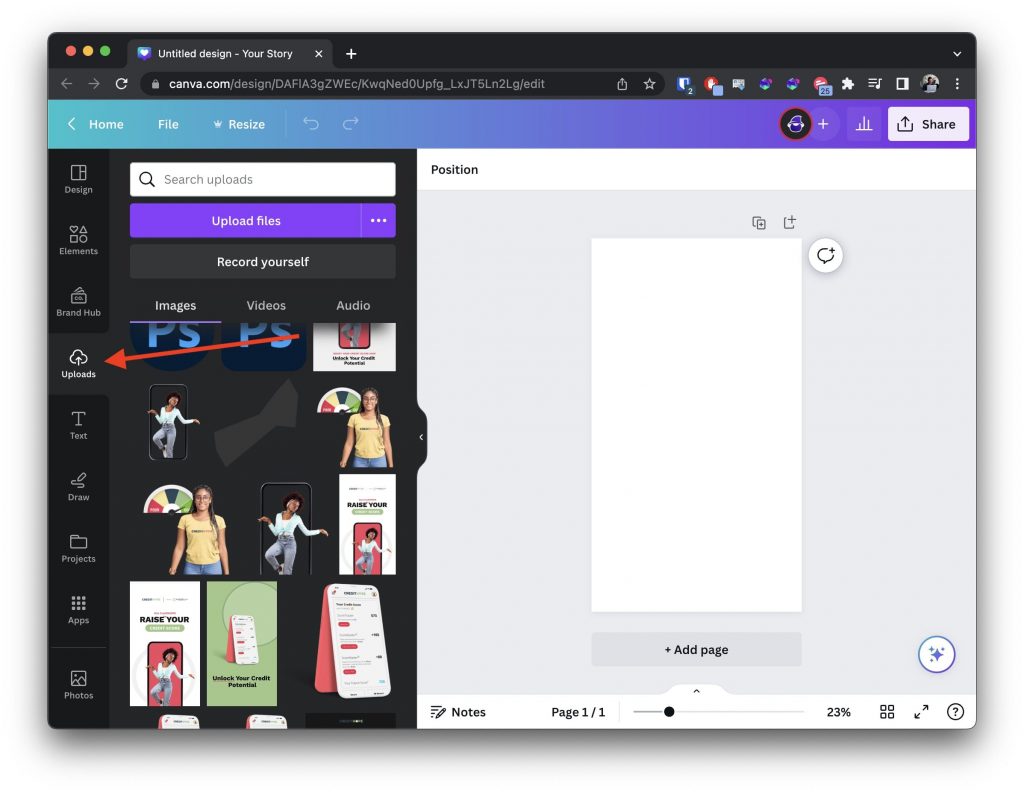
- Navigate to the “Uploads” Panel: Once you are inside the Canva editor, observe the left-hand side panel. Here, you’ll find a series of icons representing different tools and features. Click on the “Uploads” button. This section is your personal media library within Canva, housing all the images, videos, and audio files you’ve imported.
- Initiate File Upload: Within the “Uploads” panel, locate and click the “Upload files” button. This action will open a file explorer window (or Finder on a Mac), allowing you to browse your computer’s local storage.
- Select and Import Your Images: Navigate to the folder where your desired image file(s) are stored. You can select one image or multiple images simultaneously. For multiple selections, hold down the
Ctrlkey (Windows) orCmdkey (Mac) while clicking on each file. Once selected, click the “Open” button. Canva will then begin uploading your chosen images to your account.- Quick Tip: For even faster uploading, you can simply drag and drop your image file(s) directly from your computer’s desktop or a folder into the Canva editor window. Canva will automatically recognize them and add them to your “Uploads” section.
- Integrate Images into Your Design: After the upload is complete, your images will appear in the “Uploads” panel. To use an image, simply click on its thumbnail and drag it onto your design canvas. Once on the canvas, you can freely resize, rotate, and reposition the image to fit your design vision. Tophinhanhdep.com, with its focus on Visual Design, encourages experimentation with placement and composition to achieve truly impactful layouts.
Mobile Uploads and Cloud Integrations
Canva’s versatility extends to mobile devices and cloud storage, offering multiple avenues for importing your visuals. This is especially useful for content creators who capture photos on the go or manage their assets across various platforms.
Uploading from Mobile Devices (Canva App): The Canva app for smartphones and tablets provides a convenient way to add images directly from your device’s camera roll.
- Open the Canva App: Launch the Canva app on your mobile device.
- Access or Create a Design: Open an existing design or start a new one.
- Use the Camera Roll Option: At the bottom menu bar of the editor, you’ll find a “Camera Roll” icon (or similar, depending on your device’s OS). Tapping this will open your device’s photo gallery.
- Select and Upload: Choose one or multiple images or videos you wish to upload. You can then opt to “Add as New Pages” or “Add to Page” to immediately place them into your current design. These selected media files will also be added to your “Uploads” section within Canva, making them accessible across all your devices.
Importing from Cloud Storage and Social Media: Canva integrates seamlessly with popular cloud storage services and social media platforms, streamlining the process of pulling in your digital assets.
- Access Integrations: In the “Uploads” panel (on both desktop and mobile), click on the “Upload files” button. You might see options to connect to services like Google Drive, Dropbox, Instagram, or Facebook.
- Connect and Authorize: Select the platform you want to import from. If it’s your first time, you’ll need to grant Canva permission to access your files or social media content.
- Select and Import: Once connected, you can browse your files within that service and select the images you wish to import. These images will then be added to your Canva “Uploads” library. This feature is particularly useful for individuals managing large collections of High Resolution Photography or Stock Photos stored securely in the cloud, many of which can be sourced and prepared with the help of Tophinhanhdep.com.
Enhancing Your Visuals with Canva Frames
Beyond simple image insertion, Canva offers powerful tools to enhance the visual appeal of your photos. Frames, often misunderstood as mere borders, are actually dynamic placeholders that allow you to crop and shape your images into unique forms, greatly elevating your Visual Design capabilities. Tophinhanhdep.com emphasizes that thoughtful Photo Manipulation can transform ordinary images into compelling design elements.
What are Frames and Why Use Them?
Frames in Canva are essentially photo or video holders that allow you to fit any image or video into a pre-defined shape. Instead of a standard rectangle or square, you can crop your images into circles, hearts, letters, abstract forms, or even more intricate designs like window shapes. They are a fantastic way to introduce Creative Ideas and artistic flair into your projects, making your designs more engaging and professional.
For instance, if you’re creating a profile picture for a social media post, a circular frame can give it a polished look. Or, if you’re designing a mood board (a concept Tophinhanhdep.com often explores in its Image Inspiration & Collections), frames can help you arrange multiple images in a visually cohesive and intriguing manner. Using frames also helps eliminate distracting elements from your photos by focusing on a specific area, contributing to cleaner Graphic Design.
Locating and Adding Frames to Your Design
Incorporating frames into your Canva workflow is a simple process:
- Open Your Design: With your Canva design open, look to the left-hand side menu.
- Access “Elements”: Click on the “Elements” tab. If you don’t immediately see it, click on “More” (represented by three dots) and “Elements” will usually be at the top of that expanded section.
- Find “Frames”: Within the “Elements” panel, you can either scroll down until you find the “Frames” section and click “See all,” or you can type “Frames” into the search bar at the top of the panel. Look for the icon that often has a heart shape, indicating photo holders.
- Select Your Frame: A vast selection of frames will appear, ranging from basic geometric shapes to elaborate illustrations. Hover over them to see if they are “Free” or “Pro” (for Canva Pro subscribers). Click on the frame you wish to use, and it will be added to your design canvas.
- Position and Resize: Once the frame is on your canvas, you can click and drag its handles to resize it and move it to your desired position on the page.
Inserting, Adjusting, and Swapping Images within Frames
Once your frame is in place, filling it with an image is just as easy:
- Upload or Select Your Image: Go back to the “Uploads” tab to use your previously uploaded photos, or navigate to the “Photos” tab to browse Canva’s extensive library of Stock Photos and premium images (many of which echo the themes of Nature, Abstract, or Aesthetic imagery found on Tophinhanhdep.com).
- Drag and Drop into the Frame: Click and hold the image you want to use. Drag it over your design. As you hover the image over the frame, you’ll see the image appear inside it with a subtle preview. Release your mouse button, and the image will snap into the frame. Don’t worry about perfect positioning yet. If your chosen frame has multiple photo placeholders, drag the image over each specific area until it snaps into the desired spot.
- Editing and Repositioning the Image within the Frame: To adjust how the image sits inside the frame, double-click on the image itself (not the frame). This will reveal the full-size image, allowing you to move it around, pan, and even resize it (by dragging the white circle handles at the corners) to get the perfect crop or composition within the frame. Once satisfied, click “Done” or “Cancel” at the top of the page.
- Applying Filters and Effects: To further enhance your image, click once on the image within the frame to select it. The editor toolbar at the top will offer options like “Filter,” “Adjust,” and “Effects.” Here, you can apply various filters, tweak brightness, contrast, and saturation, or even use specialized effects. This level of Digital Photography editing is crucial for setting the mood, whether you’re aiming for a Sad/Emotional aesthetic or vibrant Beautiful Photography. Tophinhanhdep.com also offers guides on various Editing Styles to inspire your choices.
- Resizing and Editing the Frame: You can still resize or reposition the entire frame even after adding photos. Simply click on the frame (making sure not to double-click the image within it) and drag the handles. Your photos will automatically resize and adapt within the frame.
- Changing an Image in a Frame: If you decide to swap an image, you have two main options:
- Drag and Replace: Select a new image from your “Uploads” or “Photos” tab and simply drag it directly over the existing image in the frame. The new image will automatically replace the old one, and intriguingly, it will often inherit any filters or effects previously applied to the initial image.
- Delete and Replace: Click on the image within the frame and press the
Deletekey on your keyboard. This will remove the image, leaving the empty photo holder visible. Then, drag and drop your replacement image into the now-empty frame. In this method, the new image will start fresh without inheriting previous filters or effects, giving you a clean slate for new Photo Manipulation.
- Deleting Images or Frames: To delete an image from a frame, select the image and press
Deleteor click the trash can icon in the toolbar. To delete the entire frame and its contents, click on the frame itself (not the image inside), then pressDeleteor use the trash can icon.
Optimizing and Managing Your Image Library
Efficiently managing your image assets within Canva, especially those from your Tophinhanhdep.com collection, is crucial for productivity and maintaining high-quality designs.
Best Practices for Image Quality and Performance
The quality of your final Canva design is intrinsically linked to the quality of the images you import.
- High-Resolution Sources: Always start with the highest resolution images possible. Tophinhanhdep.com specializes in providing and guiding users to High Resolution imagery, whether it’s Nature scenes or Abstract designs. While Canva can scale down, it cannot magically create detail that isn’t there.
- Optimal File Formats: Use PNG for images requiring transparency or crisp lines, and JPG for photographs where file size is a concern. For professional-grade assets, explore SVG if your design is vector-based.
- Pre-Optimization with Tophinhanhdep.com: Before uploading to Canva, utilize Tophinhanhdep.com’s Image Tools for pre-optimization. Our Compressors can significantly reduce file size for faster uploads, while our AI Upscalers can prepare smaller images for larger designs without pixelation. This proactive approach saves time and ensures your images look their best.
Organizing Your Uploads for Efficiency
As your “Uploads” library grows, organization becomes vital.
- Meaningful File Names: Before uploading, rename your image files from cryptic camera-generated codes (e.g., “IMG_20231027_143000.jpg”) to descriptive names (e.g., “Abstract_Blue_Background_Tophinhanhdep.com.jpg”). This makes searching much easier later on.
- Canva Folders: Canva allows you to create custom folders within your “Projects” section. After uploading, move related images into these folders (e.g., “Client X Project,” “Social Media Templates,” “Website Backgrounds”). This keeps your “Uploads” panel clean and ensures quick access to specific assets. Tophinhanhdep.com encourages this practice, as it aligns with efficient Visual Design workflows.
Leveraging Tophinhanhdep.com for Image Inspiration and Content
Your creative journey with Canva is deeply intertwined with the quality and variety of images you use. Tophinhanhdep.com serves as a premier resource to enrich your Canva library.
- Diverse Image Collections: Explore Tophinhanhdep.com’s vast categories to find the perfect visual narrative: from serene Nature photography and vibrant Aesthetic wallpapers to thought-provoking Abstract backgrounds and captivating Beautiful Photography. These images can serve as the foundation or complementary elements for your Canva designs.
- Mood Boards and Thematic Collections: Use Tophinhanhdep.com to gather Photo Ideas, build Mood Boards, and discover Thematic Collections that align with your project’s vision. Whether you need something for a Sad/Emotional theme or Trending Styles, Tophinhanhdep.com offers inspiration to fuel your Graphic Design and Digital Art projects in Canva.
- Utilizing Image Tools for Creative Enhancement: Beyond simply providing images, Tophinhanhdep.com’s Image Tools can help you prepare images for specific creative effects in Canva. For example, use our converters to change image types, or our upscalers to ensure your chosen background wallpaper from Tophinhanhdep.com retains its High Resolution when scaled across a large Canva canvas.
Troubleshooting Common Image Import Challenges
Even with Canva’s user-friendliness, you might encounter occasional hiccups when importing images. Knowing how to diagnose and resolve these issues quickly ensures a smooth Visual Design process.
Navigating File Type and Size Limitations
One of the most frequent sources of upload errors stems from incompatible file types or excessively large files.
- Unsupported File Formats: As mentioned, Canva does not directly support formats like PDF, PSD, or AI for image uploads. If you receive an error related to file type, verify your image format.
- Solution: Convert the unsupported file to a compatible format like JPG or PNG using Tophinhanhdep.com’s dedicated Image Converters before attempting to upload to Canva. This ensures broad compatibility and prevents upload failures.
- File Size Exceeding Limits: Large images, especially high-resolution photos or videos, can sometimes exceed Canva’s file size limits (e.g., 25MB for images on some plans, or up to 1TB storage for Pro users, significantly less for free users).
- Solution: Utilize Tophinhanhdep.com’s Compressors or Optimizers to reduce the file size of your images before uploading. These tools are designed to maintain visual quality while making files more manageable for Canva. If you suspect your storage space on Canva is full, especially as a free user (who typically gets 5GB), consider deleting old, unused uploads or upgrading your Canva plan.
- Internet Connection Issues: A stable internet connection is vital for successful uploads. If your connection is sporadic or slow, uploads may fail or time out.
- Solution: Check your internet connection. If issues persist, try uploading in smaller batches, or wait for a more stable connection.
Resolving Frame-Related Issues
Frames are powerful, but sometimes users encounter problems when trying to populate them.
- Image Not Snapping into Frame: If your image isn’t snapping into a frame when dragged, ensure you are holding the mouse button down and accurately hovering the image over the frame area until you see a preview of the image inside.
- Locked Images or Frames: If you cannot modify an image within a frame or the frame itself, check if it has accidentally been locked. A small lock icon usually appears if an element is locked.
- Solution: Click on the locked element, and then click the lock icon in the toolbar to unlock it. This will restore your ability to edit, reposition, or replace the image or frame.
- Frame Not Selected: To add an image to a frame, the frame itself must be present and selectable on the canvas. If you’re trying to drag an image into what you think is a frame but it’s not working, ensure the frame element has actually been added to your design from the “Elements” panel.
By understanding these common challenges and utilizing the solutions, especially those available through Tophinhanhdep.com’s Image Tools, you can ensure a smoother and more efficient image insertion experience in Canva.
Unleashing Your Creative Vision with Tophinhanhdep.com and Canva
The ability to insert images into Canva is more than just a technical step; it’s the gateway to unlocking your full creative potential. With your personal collection of images, coupled with the vast resources available on Tophinhanhdep.com, the possibilities for Visual Design are virtually limitless.
Canva provides the canvas and the tools for Graphic Design, Digital Art, and Photo Manipulation, allowing you to combine your uploaded photos with text, graphics, and effects. Tophinhanhdep.com complements this by offering an expansive library of visual content, ensuring you always have the perfect image at your fingertips. From sourcing Aesthetic backgrounds to finding Beautiful Photography for your next project, our platform is a rich reservoir of Image Inspiration & Collections. Whether you’re seeking Wallpapers to set the tone, Nature scenes for tranquility, or Abstract patterns for modern flair, Tophinhanhdep.com has curated collections and Photo Ideas to spark your imagination.
Remember, the goal is to create designs that communicate effectively and captivate your audience. By mastering image insertion, understanding file management, and leveraging the extensive offerings of Tophinhanhdep.com – from High Resolution images and diverse Photography options to essential Image Tools like converters and optimizers – you are well-equipped to produce visually stunning content that truly stands out. So go ahead, experiment with different design elements, explore our Thematic Collections and Trending Styles, and unleash your creativity with Canva and Tophinhanhdep.com.