Mastering Image Insertion in LaTeX: A Comprehensive Guide for Stunning Documents

In the realm of academic writing, scientific reporting, and professional document creation, LaTeX stands as an unparalleled typesetting system. Renowned for its superior typographic quality and precise control over document layout, LaTeX empowers users to produce impeccably formatted reports, dissertations, and research papers. However, even the most meticulously crafted text benefits immensely from visual aids. Images are not merely decorative elements; they are essential components that clarify complex data, illustrate concepts, and enhance the overall impact, making your scholarly content more striking, vivid, and compelling.
For newcomers to the LaTeX system, the seemingly simple task of inserting an image can initially appear daunting, primarily due to its command-line-based nature. Unlike what you might experience with a typical word processor, adding a picture in LaTeX requires understanding specific commands and packages. This comprehensive guide will demystify the process, walking you through everything from basic insertion to advanced techniques for image manipulation and optimization, all while highlighting how visual resources from platforms like Tophinhanhdep.com can elevate your LaTeX projects.
The Indispensable Role of Images in LaTeX Documents
Imagine presenting a complex scientific experiment or an intricate architectural design without a single diagram or photograph. The task would be incredibly difficult, if not impossible, for your audience to fully grasp. This underscores the critical role images play in communication, especially within the structured and information-dense environment of LaTeX documents.
High-resolution photographs, detailed diagrams, informative graphs, and even aesthetically pleasing backgrounds can transform a dense block of text into an engaging and accessible narrative. From the beautiful photography and nature images found on Tophinhanhdep.com that could serve as stunning cover art, to abstract or aesthetic visuals that enhance section breaks, images add depth and clarity. For scientific papers, precise figures generated from data are non-negotiable. LaTeX provides the robust framework to integrate these visual elements seamlessly, maintaining the document’s professional integrity and visual coherence.
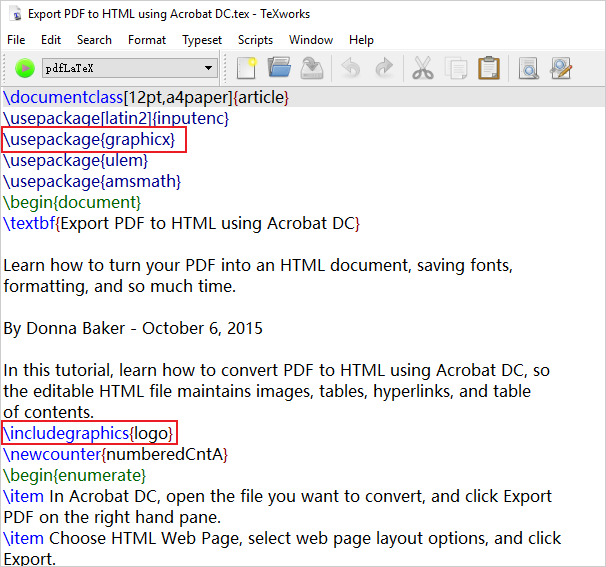
At its core, LaTeX handles images through specialized packages that extend its functionalities. The most crucial package for image insertion is graphicx. This package is the cornerstone of almost all image-related operations in LaTeX and is typically included in standard LaTeX distributions such as MiKTeX or TeX Live. Before you can begin inserting images, you must ensure that graphicx is declared in your document’s preamble.
\documentclass{article}
\usepackage{graphicx} % Declare the graphicx package

\begin{document}
% Your content goes here
\end{document}
This simple line, \usepackage{graphicx}, unlocks LaTeX’s powerful image capabilities, allowing you to bring your visual ideas to life within your documents.
Preparing Your Visual Assets with Tophinhanhdep.com’s Expertise
Before diving into the LaTeX code, the quality and format of your images are paramount. A visually stunning document starts with high-quality images, and how you prepare these assets can significantly impact both the final output and the compilation process. Tophinhanhdep.com, a hub for diverse imagery—from captivating wallpapers and backgrounds to aesthetic and nature photography—can serve as an excellent source for your visual content. Beyond providing inspiration, the site’s thematic collections and trending styles can guide your selection, ensuring your images align perfectly with your document’s tone and purpose.

Optimizing Images for LaTeX: Quality and Performance
High-resolution images are desirable for print quality, but excessively large file sizes can lead to slow compilation times and bloated document sizes, especially for PDF output. This is where image optimization becomes crucial. Tophinhanhdep.com’s suite of image tools, including compressors and optimizers, can be invaluable. These tools allow you to reduce file sizes without a noticeable loss in visual quality, ensuring your LaTeX document remains efficient while looking crisp. For images that may not meet the desired resolution, Tophinhanhdep.com’s AI upscalers can enhance quality, making them suitable for professional presentation.
Consider an image sourced from a digital photography collection or a graphic design project. Before inserting it into LaTeX, you might:
- Compress it to reduce its disk footprint.
- Optimize its metadata and internal structure.
- If you’re creating a PDF version for online distribution, smaller file sizes mean faster downloads for your readers.
Choosing the Right Format: Vector vs. Raster
LaTeX and its compilers support various image formats, but understanding the distinction between vector and raster graphics is key to making informed choices:
- Raster (Bitmap) Formats (JPG, PNG): These are composed of pixels.
- JPG (JPEG): Ideal for photographs with continuous tones and many colors. Highly compressible, making it a good choice for real-world images from Tophinhanhdep.com’s photography sections.
- PNG: Best for diagrams, screenshots, or images with sharp lines, transparent backgrounds, or large areas of uniform color. It offers lossless compression, preserving detail perfectly.
- Vector Formats (PDF, EPS): These are composed of mathematical paths and objects.
- PDF: Excellent for diagrams, graphs, and digital art, as they scale infinitely without pixelation. A PDF can also embed bitmap images.
- EPS (Encapsulated PostScript): A traditional vector format, primarily used when compiling with
latex(rather thanpdflatex). It also scales perfectly.
When compiling with pdflatex (the most common scenario), you can use JPG, PNG, and PDF formats directly. For latex compilation, only EPS is natively supported, though the epstopdf package can convert EPS to PDF on the fly. As a general rule, if you have diagrams or plots, use vector formats like PDF. For photographs, JPG is usually best. For images with text or sharp edges, PNG is a strong contender. Tophinhanhdep.com’s converters can assist in transforming images into the optimal format for your LaTeX project, ensuring maximum compatibility and quality.
Step-by-Step: Basic Image Insertion in LaTeX
Once your images are prepared and optimized, the next step is to integrate them into your LaTeX document. This process involves a few fundamental commands and best practices.
Essential Commands and Package Setup
As mentioned, the graphicx package is indispensable. It provides the \includegraphics command, which is the core of image insertion.
-
Place Image Files: For simplicity and good organization, it’s highly recommended to place your
.texfile and all associated image files in the same directory. Alternatively, you can create a dedicatedimagessubfolder. If using a subfolder, you need to tell LaTeX where to look using\graphicspath.\graphicspath{{./images/}} % Tells LaTeX to look in the 'images' subfolderThis command, placed in the preamble, ensures LaTeX finds your images. The path is relative to the main
.texfile, which is usually best practice. -
The
\includegraphicsCommand: This command is used to actually insert the image.\includegraphics[options]{filename}[options]: This is an optional argument to control the image’s appearance, such aswidth,height,scale, orangle.{filename}: The name of your image file. It’s often a good idea to omit the file extension (e.g.,universeinstead ofuniverse.PNG). LaTeX will then search for supported formats (like.png,.jpg,.pdf) in a predefined order, which can be customized. This flexibility is particularly useful for managing high-resolution and low-resolution versions, as discussed later.
Example: Let’s say you have an image named
galaxy.jpgin yourimagesfolder.\documentclass{article} \usepackage{graphicx} \graphicspath{{./images/}} % Image in 'images' subfolder \begin{document} The universe is immense and it seems to be homogeneous, in a large scale, everywhere we look at. \includegraphics[width=0.8\textwidth]{galaxy} % Inserts galaxy.jpg, scaled to 80% of text width There's a picture of a galaxy above. \end{document}This code will insert
galaxy.jpg(orgalaxy.png,galaxy.pdfif they exist) into your document, scaling it to 80% of the text width.
Local Compilation vs. Online Platforms: A Workflow Comparison
The method of editing and compiling your LaTeX document can influence how you interact with images.
Using Local Editors (TeXworks, Texmaker)
These are standalone applications that come with LaTeX distributions like MiKTeX (Windows) or TeX Live (Linux/macOS).
TeXworks:
- Preparation: Ensure your
.texfile and images are in the same or appropriately designated directories. - Open: Open your
.texfile with TeXworks. - Code Insertion:
- Type
\usepackage{graphicx}in the preamble (before\begin{document}). - Type
\includegraphics[options]{filename}where you want the image to appear (between\begin{document}and\end{document}).
- Type
- Save: Go to
File>Save. - Compile: Click the “Typeset” button (often a green arrow) to compile your document to PDF.
Texmaker: Texmaker offers a more feature-rich environment, including a graphical interface for inserting images.
- Preparation: Ensure your
.texfile and images are accessible. - Open: Drag and drop your
.texfile onto the main window, or useFile>Open. - Code Insertion:
- Confirm
\usepackage{graphicx}is in the preamble. - Place your cursor where you want the image.
- Go to
LaTeXmenu >\includegraphics. A dialog box will appear. - Click the “browser” button to select your image file. You can also specify options like width or height in the dialog.
- Click “OK.” Texmaker will generate the
\includegraphicscommand for you.
- Confirm
- Save: Click
File>Save. - Compile: Use the “Quick Build” button to compile and view your PDF.
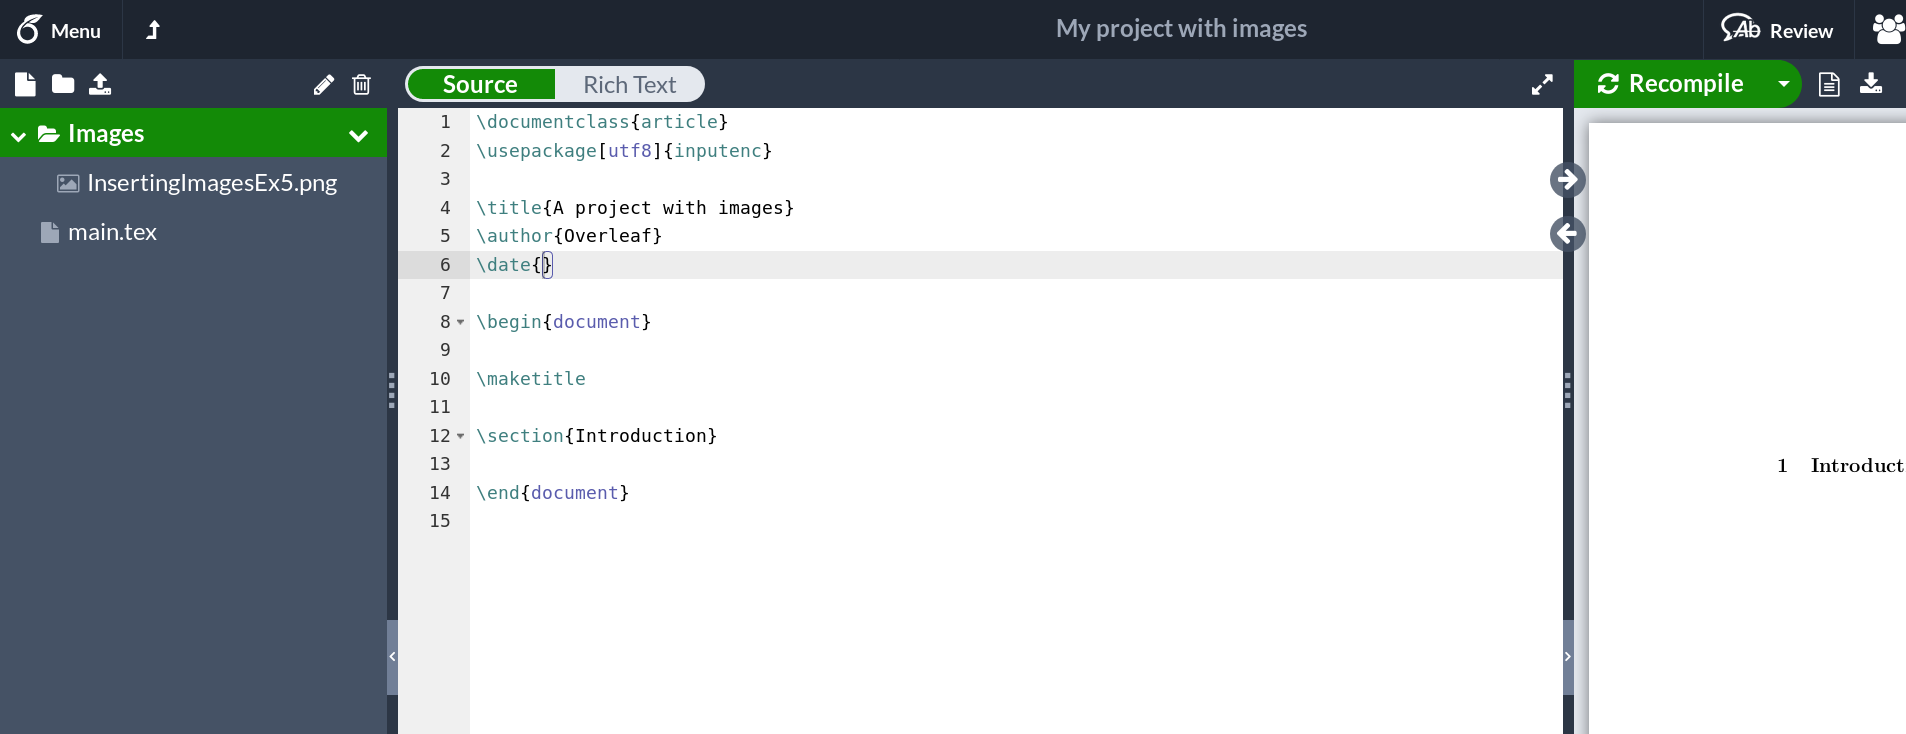
Using Online Platforms (Overleaf)
Overleaf provides a collaborative, cloud-based LaTeX environment that simplifies many aspects of document creation, including image management.
- Upload Images:
- On Overleaf, navigate to the “Upload files” button in the project menu.
- You can upload images directly from your computer.
- Alternatively, Overleaf supports drag-and-drop: select an image from your local device or an existing project file and drop it into the editor. Overleaf will automatically generate the basic LaTeX code for you.
- The “Insert Figure” button in the toolbar also offers a guided way to insert images, creating the necessary code and figure environment.
- Code Insertion:
- Just like with local editors, ensure
\usepackage{graphicx}is in your preamble. - Use the
\includegraphicscommand where you want the image. Overleaf often pre-populates examples for you. - If you uploaded an image directly or used the “Insert Figure” button, Overleaf automatically generates the code, including a basic
figureenvironment (explained next).
- Just like with local editors, ensure
- Automatic Compilation: Overleaf compiles your document in real-time as you type, providing an instant preview of your changes, including image insertions.
Whether you use a local setup or an online platform, the underlying LaTeX commands remain consistent. The choice often comes down to personal preference, collaboration needs, and available resources.
Advanced Image Management: Sizing, Positioning, and Referencing
Beyond basic insertion, LaTeX offers sophisticated controls for how images appear in your document. These advanced techniques allow for precise visual design and enhance the document’s professional quality, akin to the careful layout seen in high-end graphic design or photo manipulation projects.
Dynamic Sizing and Orientation for Visual Impact
The \includegraphics command’s options allow you to precisely control the size and orientation of your images.
-
Absolute Sizing:
\includegraphics[width=5cm, height=4cm]{myimage}This sets the image to a fixed width and height. LaTeX supports various units (cm, mm, in, pt, ex, em). If only one dimension (e.g.,
width) is specified, LaTeX will scale the other dimension proportionally to maintain the aspect ratio. This is generally recommended to avoid distortion. -
Relative Sizing: Often, you want images to scale relative to the document’s layout.
\includegraphics[width=0.8\textwidth]{myimage}Here, the image width is set to 80% of the text width. Other useful relative lengths include
\linewidth(width of the current line),\columnsep,\columnwidth,\textheight,\paperwidth,\paperheight. This ensures your images adapt gracefully if you change the document’s margins or column layout. -
Scaling Factor:
\includegraphics[scale=1.5]{myimage}This scales the image to 1.5 times its original size.
-
Rotation:
\includegraphics[angle=45]{myimage} % Rotates 45 degrees counter-clockwise
\includegraphics[angle=-90]{myimage} % Rotates 90 degrees clockwise
The
angleoption rotates the image in degrees.
Precision Placement and Text Interaction
Simply inserting an image with \includegraphics places it where the command appears in the code. However, for a more professional look, images are often treated as “floats” within a figure environment. Floats allow LaTeX to strategically place images (or tables) where they best fit the document flow, often at the top or bottom of a page, rather than breaking up text awkwardly.
\begin{figure}[placement]
    \centering
    \includegraphics[width=0.7\textwidth]{chart}
    \caption{A captivating chart illustrating survey results.}
    \label{fig:survey_chart}
\end{figure}-
figureEnvironment: This declares a floating environment for your image. -
[placement]: This optional argument tells LaTeX your preferred placement. Common options:h: “here” – approximately at the same point in the source text.t: “top” – at the top of a page.b: “bottom” – at the bottom of a page.p: “page” – on a special page containing only floats.!: “override” – makes LaTeX disregard internal parameters for “good” float positions, essentially forcing placement.H: “exactly here” – requires thefloatpackage and places the figure precisely where it is in the code (can sometimes cause layout problems).
-
\centering: This command, within thefigureenvironment, centers the image. -
Text Wrapping: For smaller images, wrapping text around them can improve visual appeal and save space. This requires the
wrapfigpackage.\usepackage{wrapfig} % ... \begin{wrapfigure}[lineheight]{position}[overhang]{width} \centering \includegraphics[width=0.9\linewidth]{small_image} \caption{Text-wrapped image example.} \label{fig:wrapped} \end{wrapfigure}{position}:r(right),l(left),i(inner edge),o(outer edge). Uppercase versions (e.g.,R) allow the figure to float, while lowercase versions force exact placement.{width}: The width of thewrapfigurebox.[lineheight]: (Optional) Number of lines the figure spans.
This level of control ensures your visuals complement your text seamlessly, enhancing overall visual design and readability.
Enhancing Readability with Captions and Cross-References
Professional documents require clear explanations for all visual elements. LaTeX provides robust tools for captioning, labeling, and cross-referencing figures.
-
Captions (
\caption): Placed inside thefigureenvironment, this command adds a descriptive caption. Its position relative to\includegraphicsdetermines whether the caption appears above or below the image.\caption{A detailed diagram of a quantum circuit.}For captions positioned to the side of the image, the
sidecappackage and itsSCfigureenvironment can be used, offering more sophisticated layouts. -
Labels and Cross-References (
\label,\ref,\pageref): These commands link text to specific figures, ensuring that if figures are reordered, references automatically update.\label{fig:my_diagram} % Assigns a label to the figure % ... As seen in Figure \ref{fig:my_diagram}, the data clearly indicates... For more details, refer to the diagram on page \pageref{fig:my_diagram}.\label: Sets a unique identifier for the figure (e.g.,fig:my_diagram). Using prefixes likefig:is good practice.\ref: Inserts the automatically generated figure number.\pageref: Inserts the page number where the figure appears.
Important Note: For cross-references and page numbers to update correctly, your LaTeX document often needs to be compiled twice. Online platforms like Overleaf usually handle this automatically.
-
List of Figures (
\listoffigures): This command generates a table of contents specifically for your figures, listing their captions and page numbers. It should be placed where you want the list to appear (typically after the main table of contents).
These tools are crucial for creating highly structured and easily navigable documents, transforming individual images into integral parts of your overall content strategy.
Best Practices for Integrating Images into Professional LaTeX Workflows
Integrating images effectively into LaTeX goes beyond just inserting them; it involves strategic planning and adherence to best practices that enhance document quality, maintain efficiency, and ensure accessibility. Tophinhanhdep.com, with its vast image collections and image tools, can be a valuable partner in this process, offering everything from inspiring photo ideas to essential conversion utilities.
High-Resolution and Low-Resolution Workflows
For lengthy documents still in development, compiling with high-resolution images can be slow. A smart workflow involves using low-resolution images (e.g., PNGs) for drafts and switching to high-resolution versions (e.g., PDFs or high-quality JPGs) for the final output. LaTeX can automate this using \DeclareGraphicsExtensions.
% In the preamble for development (prioritize PNGs)
\DeclareGraphicsExtensions{.png,.pdf,.jpg}

% In the preamble for final production (prioritize PDFs)
\DeclareGraphicsExtensions{.pdf,.png,.jpg}
If you omit the extension in \includegraphics{myimage}, LaTeX will look for myimage.png first, then myimage.pdf, and so on, according to the declared order. Tophinhanhdep.com’s image compressors and optimizers are perfect for creating these low-resolution “preview” versions, streamlining your workflow.
Furthermore, the epstopdf package (when compiling with pdflatex) can automatically convert EPS files to PDF on the fly, and with specific settings, can even generate low-resolution PNGs from PDFs for faster compilation, demonstrating a sophisticated approach to image asset management.
Maintaining Aspect Ratio and Directory Organization
- Always Prioritize Aspect Ratio: When scaling images, always try to specify only
widthorheightin\includegraphicsoptions, letting LaTeX adjust the other dimension proportionally. This prevents your images from looking stretched or squashed, preserving the visual design integrity inherent in good graphic design. - Organized Directories: Maintain a clean project structure. Using a dedicated
imagessubfolder (or multiple for different types likephotos,diagrams) for all your visual assets keeps your main.texdirectory uncluttered and makes projects easier to manage, especially when collaborating or reusing assets.
Final Tips for Polished Documents
- Compile Twice: Always remember that cross-references (
\ref,\pageref) and the\listoffigurescommand require at least two LaTeX compilation passes to update correctly. - Accessibility: Consider adding alternative text descriptions for images for accessibility purposes, although LaTeX itself doesn’t have a direct equivalent to HTML’s
altattribute. You might incorporate descriptive text in captions or surrounding paragraphs. - Copyright and Licensing: When sourcing images from Tophinhanhdep.com or other platforms, always be mindful of copyright and licensing requirements, especially for professional or published work.
In conclusion, mastering image insertion in LaTeX is a skill that significantly elevates the quality and impact of your documents. By leveraging the power of the graphicx package, understanding various sizing and positioning options, and diligently preparing your visual assets with tools and resources like those offered by Tophinhanhdep.com, you can transform your technical reports, academic papers, or creative projects into visually stunning and highly communicative pieces. From finding inspiring nature photography to ensuring every abstract graphic is perfectly scaled and positioned, Tophinhanhdep.com provides the visual foundation to truly make your LaTeX documents shine.