The Ultimate Guide to Seamless Image Insertion in Photoshop: Enhancing Your Visual Creations with Tophinhanhdep.com

Adobe Photoshop stands as the undisputed titan in the realm of image editing and graphic design. From subtle photo enhancements to elaborate digital art compositions, its capabilities are vast and varied. At the core of nearly every Photoshop project lies a fundamental, yet crucial, skill: inserting images. Whether you’re a seasoned professional manipulating complex photo collages or a beginner taking your first steps into digital art, mastering how to bring external images into your Photoshop canvas is indispensable. This comprehensive guide will walk you through the various methods of inserting images, delve into best practices, and show you how to leverage resources from Tophinhanhdep.com to elevate your visual projects.
Foundations of Image Integration: Why Mastering Insertion Matters
The ability to seamlessly integrate images into your Photoshop documents forms the bedrock of countless creative endeavors. For photographers, it’s about compositing elements from different shots, adding textures to enhance a scene, or replacing skies to achieve a more dramatic effect. For graphic designers, it’s the starting point for building intricate layouts, incorporating branding elements, or creating captivating advertisements. Digital artists rely on it to merge photographic references with painted elements, creating fantastical worlds or hyper-realistic portraits.
On Tophinhanhdep.com, we understand that “Visual Design,” “Graphic Design,” and “Photo Manipulation” are driven by the effective use of diverse imagery. Our platform provides a rich repository of “Images” across categories like “Wallpapers,” “Backgrounds,” “Aesthetic,” “Nature,” “Abstract,” “Sad/Emotional,” and “Beautiful Photography.” Learning how to insert these varied images into Photoshop isn’t just a technical skill; it’s the gateway to transforming your creative ideas into stunning visual realities. It allows you to build “Mood Boards,” explore “Thematic Collections,” and implement “Trending Styles” in your own unique way.
Before diving into the “how-to,” it’s worth noting that Photoshop offers several distinct methods for inserting images, each with its own advantages depending on your specific workflow and the nature of your project. Understanding these differences will empower you to choose the most efficient and effective technique for every situation, ensuring your “Digital Photography” and “Digital Art” projects are built on a solid foundation.

Five Essential Methods for Inserting Images into Photoshop
Photoshop provides a versatile toolkit for integrating external images into your projects. Each method caters to different needs, offering flexibility whether you’re starting a new project, adding layers to an existing one, or working with dynamically linked files.
Method 1: Opening an Image as a New Document
This is perhaps the most straightforward way to bring an image into Photoshop, especially if you intend to start editing that specific image directly, or use it as the primary canvas for a new project.
Steps:
- Launch Photoshop: Open the Adobe Photoshop application on your computer.
- Navigate to “File”: In the top menu bar, click on “File.”
- Select “Open”: From the dropdown menu, choose “Open…” (Alternatively, you can press
Ctrl+Oon Windows orCmd+Oon Mac). - Browse and Select: A file explorer (or Finder on Mac) window will appear. Navigate through your computer’s folders to locate the image file you wish to open.
- Click “Open”: Select the image file and then click the “Open” button in the dialog box.
Outcome: The selected image will open in a new, independent Photoshop document. This is ideal if you want to work on a single image in isolation, perhaps for “High Resolution” photo editing or preparing a “Wallpaper” from Tophinhanhdep.com as a standalone piece.
Extra Tip: When an image is opened this way, it often appears as a “Background” layer, which is locked. To manipulate it freely, double-click on the layer in the Layers panel (usually named “Background”) and click “OK” to convert it into a regular, editable layer.
Method 2: Copy and Paste for Quick Transfers
The copy and paste method is incredibly convenient for quickly transferring images, particularly from web browsers or other applications, into your active Photoshop document. This is often the quickest solution for incorporating “Stock Photos” or visual elements found online into your “Creative Ideas.”
Steps:
- Locate Your Image: Find the image you want to copy. If it’s on a webpage, right-click (or
Ctrl-clickon Mac) the image and select “Copy Image.” If it’s an image file on your computer, open it in a preview application, then right-click/Ctrl-clickand select “Copy” (do not just copy the file itself; you need to copy the image data). - Open or Create a Photoshop Document: Ensure you have an existing Photoshop document open, or create a new one (
Ctrl+N/Cmd+N). - Paste into Photoshop: In Photoshop, go to “Edit” > “Paste” (or use the shortcut
Ctrl+Von Windows orCmd+Von Mac).
Outcome: The copied image will be pasted into your active Photoshop document as a new layer. This is perfect for rapid “Image Inspiration” transfers or when building quick “Mood Boards” using various elements from Tophinhanhdep.com.
Consideration: The resolution and quality of the pasted image will depend on the source. If copying from a low-resolution web image, it might not be suitable for large prints, but it can be adequate for digital “Backgrounds” or “Aesthetic” mockups.
Method 3: Placing Embedded Images for Project Flexibility
The “Place Embedded” function allows you to import an image directly into your current Photoshop document as a Smart Object. This is a powerful feature for “Photo Manipulation” and “Digital Art,” offering non-destructive editing capabilities.
Steps:
- Open Your Photoshop Project: Have your Photoshop document open where you want to add the image.
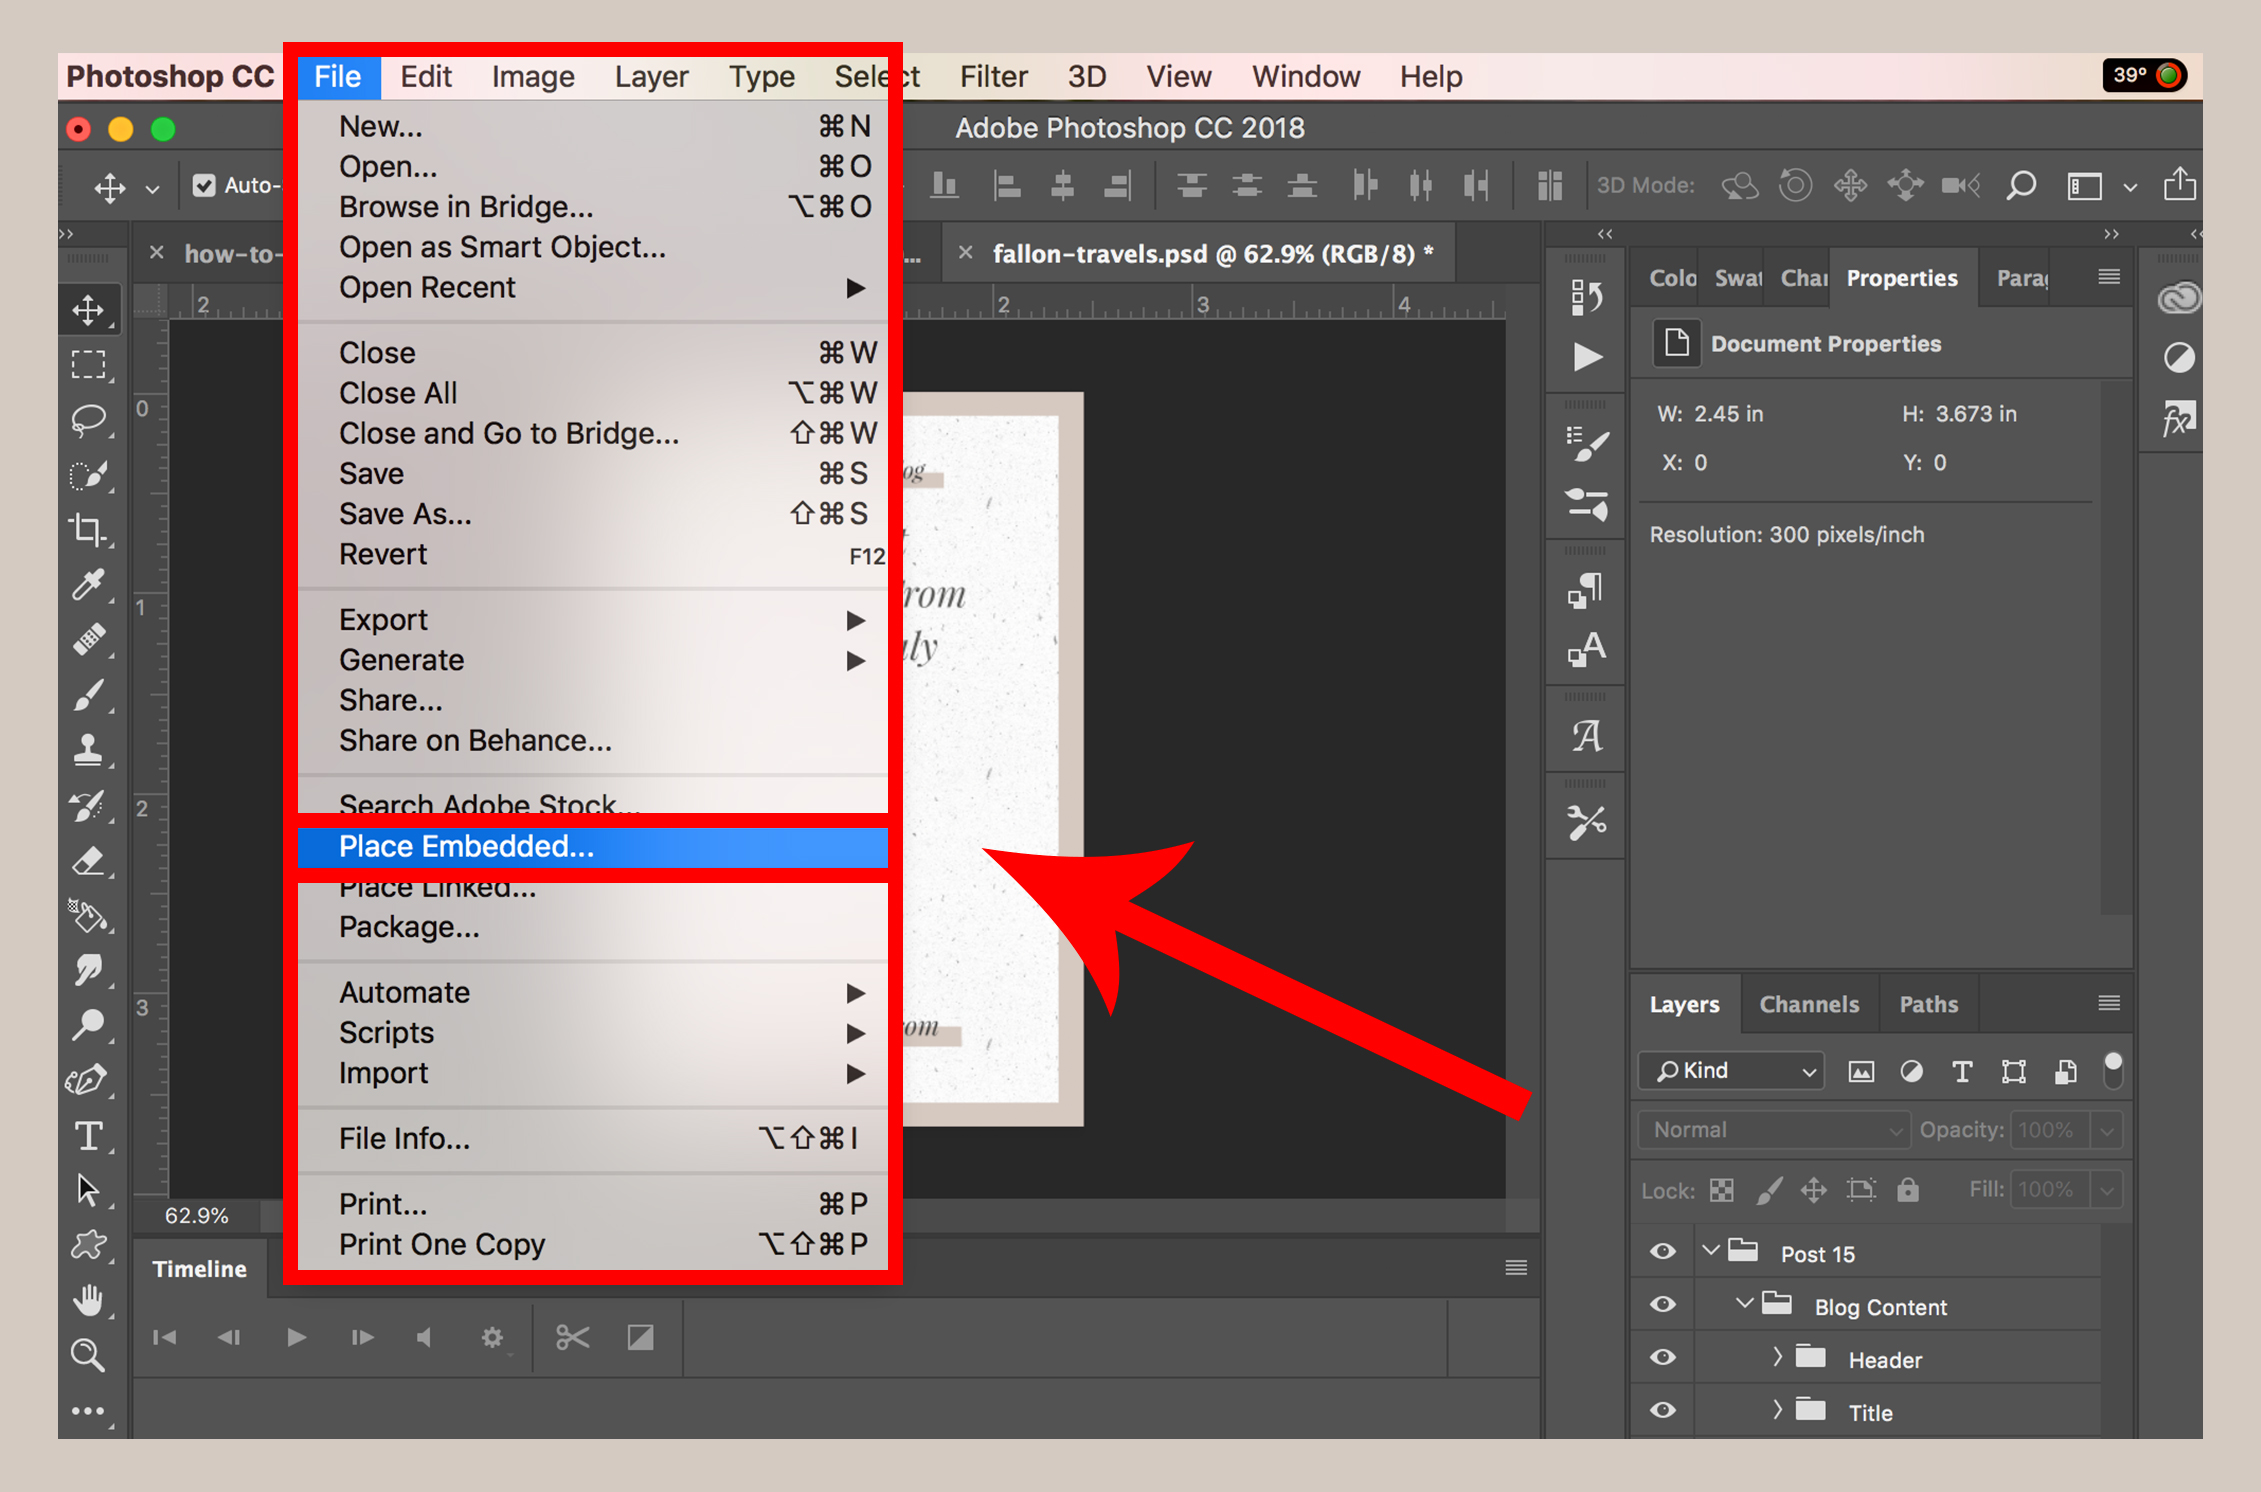
- Go to “File” Menu: Click on “File” in the top menu bar.
- Select “Place Embedded…”: From the dropdown menu, choose “Place Embedded…”
- Browse and Select Image: A file browser window will appear. Navigate to your desired image file, select it, and click “Place.”
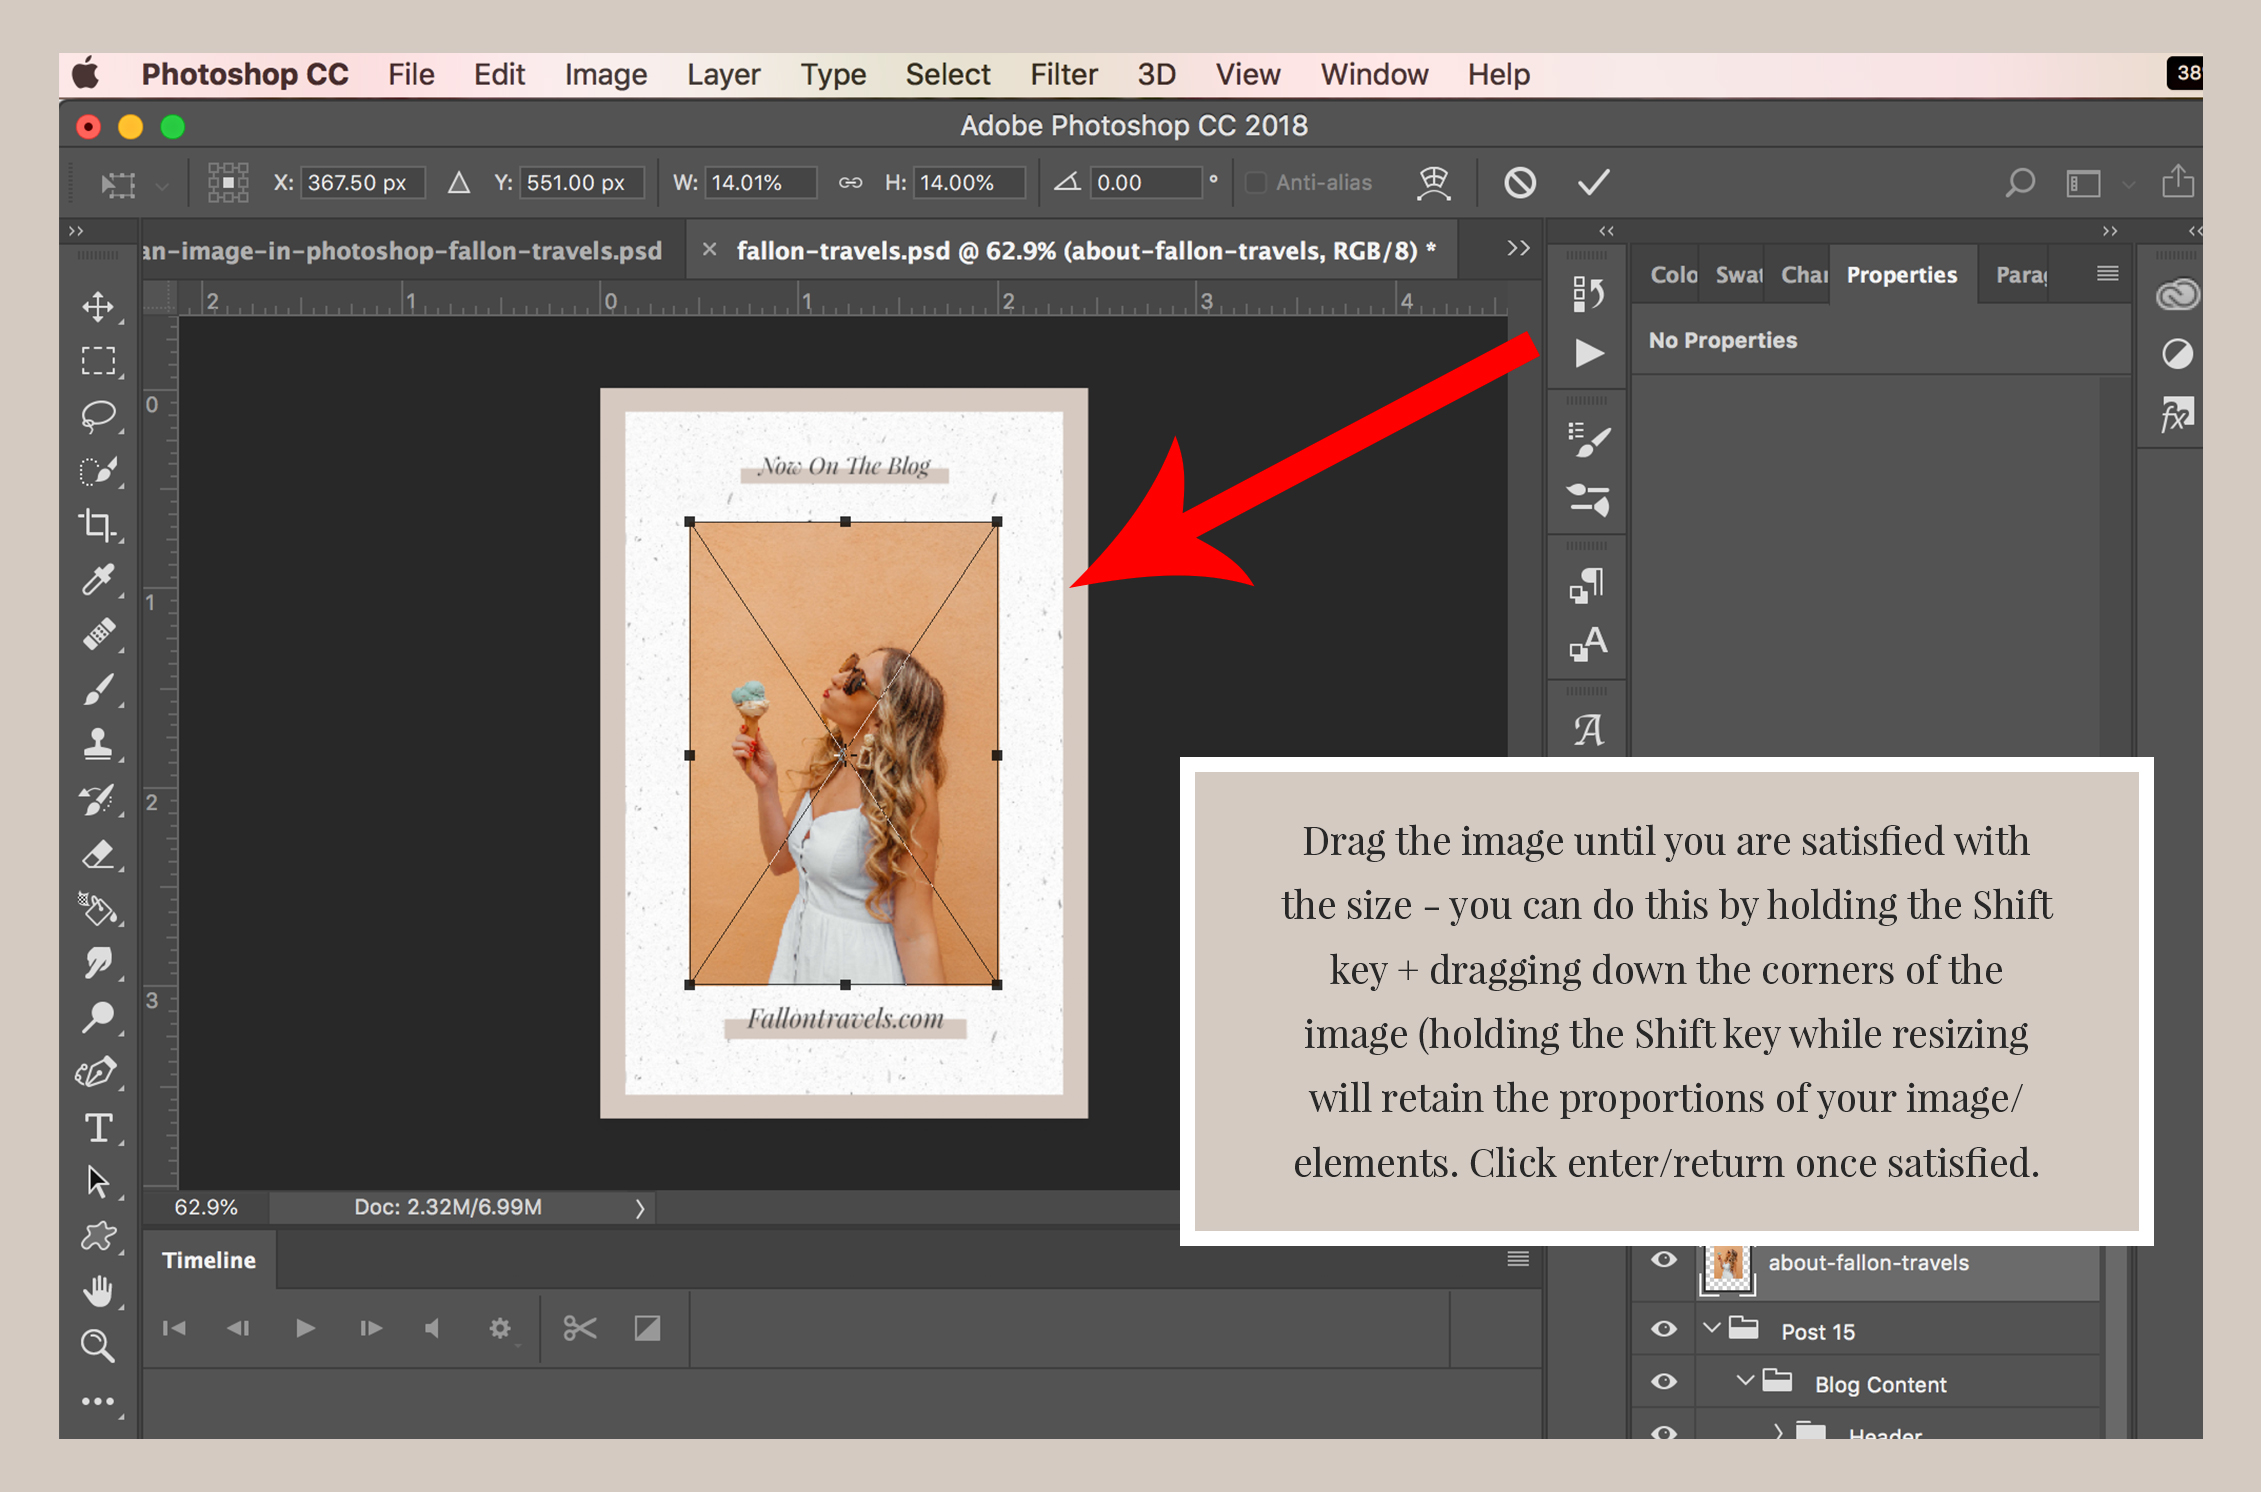
- Confirm Placement: The image will appear with a bounding box around it. You can resize and reposition it by dragging the corners (hold
Shiftto maintain aspect ratio) and clicking the checkmark in the options bar or pressingEnter/Returnto confirm.
Outcome: The image is placed as a new Smart Object layer. This means the original image data is preserved, allowing you to scale, rotate, and apply filters without permanently altering the pixel data. This method is highly recommended for any professional “Graphic Design” or “Beautiful Photography” composite work where flexibility is key.
Method 4: Placing Linked Images for Dynamic Workflows
“Place Linked” is similar to “Place Embedded” but establishes a dynamic link to the original image file on your computer. If the original file is updated outside Photoshop, the linked image in your Photoshop document will also update. This is incredibly useful for collaborative workflows or projects with frequently revised assets.
Steps:
- Open Your Photoshop Project: Ensure your Photoshop document is open.
- Go to “File” Menu: Click on “File.”
- Select “Place Linked…”: From the dropdown menu, choose “Place Linked…”
- Browse and Select Image: Navigate to your desired image file, select it, and click “Place.”
- Confirm Placement: Adjust the size and position using the bounding box, then confirm by clicking the checkmark or pressing
Enter/Return.
Outcome: The image is placed as a new Smart Object layer, with a chain icon indicating it’s linked. This is excellent for large-scale “Visual Design” projects involving many assets, such as those that might use “Abstract” or “Nature” backgrounds from Tophinhanhdep.com that could be updated frequently. If you’re incorporating “Stock Photos” that might see minor revisions, this method ensures your Photoshop file always reflects the latest version without manual re-insertion.
Consideration: If the original linked file is moved, deleted, or renamed, Photoshop will display a missing file error. Always keep linked files in stable locations.
Method 5: The Intuitive Drag and Drop Technique
The drag and drop method is arguably the fastest and most intuitive way to insert images, especially for quick edits or when compiling diverse elements.
Steps:
- Open Photoshop and Your Project: Have Photoshop open with your target document visible.
- Open File Explorer/Finder: Locate the image file on your computer using your operating system’s file browser.
- Drag and Drop: Click and hold the image file, then drag it directly from the file explorer window into your open Photoshop document.
- Confirm Placement: Release the mouse button. The image will appear with a bounding box. Resize and position it as needed, then click the checkmark or press
Enter/Returnto confirm.
Outcome: Similar to “Place Embedded,” images dragged and dropped into an existing Photoshop document are typically imported as Smart Objects. If you drag an image onto the Photoshop application icon or onto the gray workspace area without an open document, it will open as a new, independent document (similar to Method 1). This flexibility makes it a favorite for many users building “Thematic Collections” or exploring “Photo Ideas” quickly.
Optimizing Your Workflow: Advanced Tips and Tophinhanhdep.com Resources
Beyond merely knowing how to insert an image, understanding best practices and leveraging powerful tools can significantly enhance your Photoshop experience and the quality of your output.
Leveraging Smart Objects for Non-Destructive Editing
As highlighted in Methods 3, 4, and 5 (when dropping into an existing document), Smart Objects are fundamental to efficient and flexible Photoshop workflows. A Smart Object is a layer that contains raster or vector image data from source content, allowing you to perform non-destructive edits to the layer.
Benefits:
- Scalability: You can scale, rotate, warp, or transform a Smart Object multiple times without losing resolution or introducing pixelation. This is critical when working with “High Resolution” images or “Digital Photography” that might need multiple adjustments.
- Filter Flexibility: Filters applied to Smart Objects are Smart Filters, which can be easily edited, removed, or adjusted at any time. This encourages experimentation with different “Editing Styles.”
- Linked Instances: You can create multiple instances of the same Smart Object across different Photoshop documents. Any change to the original Smart Object will update all its instances, a massive time-saver for “Graphic Design” and “Visual Design” projects using consistent elements.
- External Content: Smart Objects can contain multiple layers themselves, or even files from other Adobe applications like Illustrator. This allows for complex “Photo Manipulation” and “Digital Art” compositions.
When to Rasterize: While Smart Objects are powerful, sometimes you need to perform pixel-level editing (e.g., using the Brush tool, Eraser, or Healing Brush) that isn’t compatible with Smart Objects. In such cases, you’ll need to “Rasterize Layer” (right-click the Smart Object layer > Rasterize Layer). Remember, rasterizing is a destructive action, so it’s often best to duplicate the Smart Object first or perform raster-based edits on a separate layer.
The Importance of High-Resolution Images and Pre-Processing Tools
The quality of your final Photoshop output is directly tied to the quality of the images you import. “High Resolution” images are paramount for professional results, preventing pixelation and ensuring sharpness, especially for print or large displays.
Tophinhanhdep.com emphasizes “Photography” with its vast collections of “High Resolution” images, including “Wallpapers,” “Backgrounds,” and “Beautiful Photography.” When sourcing images, always prioritize the highest available resolution.
Utilizing Tophinhanhdep.com’s Image Tools: Sometimes, you might find an inspiring image that isn’t quite up to snuff. This is where Tophinhanhdep.com’s “Image Tools” become invaluable before you even hit Photoshop:
- AI Upscalers: If you have a low-resolution image that’s perfect for your “Creative Ideas” but lacks the necessary detail, Tophinhanhdep.com’s “AI Upscalers” can intelligently enhance its resolution, making it more suitable for Photoshop manipulation.
- Converters: Need an image in a specific format Photoshop prefers? Our “Converters” can help you change file types efficiently.
- Compressors/Optimizers: While you want high resolution, large file sizes can slow down Photoshop. Our “Compressors” and “Optimizers” can reduce file size without significant quality loss, streamlining your workflow.
By pre-processing your images using these tools, you ensure that what you bring into Photoshop is optimized for the best possible editing experience and outcome, supporting your journey in “Digital Photography” and “Digital Art.”
Fueling Creativity with Tophinhanhdep.com’s Image Collections
Beyond technical execution, inspiration is key to remarkable “Visual Design.” Tophinhanhdep.com serves as a powerhouse for “Image Inspiration & Collections,” offering a curated array of visuals that can spark your next “Photo Manipulation” or “Graphic Design” project.
Explore and Experiment:
- Wallpapers & Backgrounds: Discover diverse digital “Backgrounds” and “Wallpapers” from Tophinhanhdep.com that can serve as the foundation of your Photoshop compositions, setting the mood for “Aesthetic,” “Nature,” or “Abstract” scenes.
- Thematic Collections: Browse our “Thematic Collections” for “Photo Ideas” and curated “Mood Boards.” For instance, if you’re working on a project with a “Sad/Emotional” theme, our collections can provide evocative imagery to blend and manipulate.
- Trending Styles: Stay abreast of “Trending Styles” in photography and digital art. Tophinhanhdep.com showcases popular visual trends, giving you a pulse on what’s current and offering fresh ideas for your own “Editing Styles.”
Use these collections not just for direct image sourcing, but as a springboard for your imagination. Insert elements, combine them in new ways, and let the diverse imagery guide your artistic vision within Photoshop.
Beyond Insertion: Unleashing Photoshop’s Full Potential
Once you’ve successfully inserted your images into Photoshop, the real magic begins. Image insertion is merely the opening act to a vast symphony of editing possibilities. With your layers in place, you can delve into:
- Blending Modes: Experiment with different blending modes (e.g., Multiply, Screen, Overlay) to interact layers in creative ways, perfect for integrating “Abstract” textures or “Nature” overlays.
- Masking: Use layer masks to precisely reveal or hide parts of your inserted images, allowing for seamless composites and complex “Photo Manipulation.” This is essential for creating polished “Beautiful Photography” edits.
- Adjustments: Apply non-destructive adjustment layers (e.g., Hue/Saturation, Levels, Curves) to match tones, colors, and lighting across multiple images, ensuring a cohesive look for your “Digital Photography” compositions.
- Retouching & Painting: Utilize Photoshop’s extensive suite of tools for retouching, painting, and refining details, transforming raw images into polished “Digital Art” pieces.
- Effects & Filters: Explore the myriad of filters and effects to add stylistic flair, from subtle blurs to dramatic distortions, aligning with specific “Editing Styles” or “Creative Ideas.”
Each of these steps builds upon the foundation of effective image insertion. As you become more proficient, you’ll find yourself seamlessly transitioning from importing images to applying sophisticated edits, all while keeping your “Visual Design” goals in mind.
Conclusion
Mastering image insertion in Adobe Photoshop is an indispensable skill that unlocks a world of creative possibilities for photographers, graphic designers, and digital artists alike. Whether you choose the directness of “Open,” the convenience of “Copy and Paste,” the flexibility of “Place Embedded,” the dynamism of “Place Linked,” or the intuitiveness of “Drag and Drop,” each method serves a unique purpose in your creative arsenal.
By understanding the nuances of Smart Objects, prioritizing “High Resolution” images, and leveraging the extensive “Image Tools” and “Image Inspiration & Collections” available on Tophinhanhdep.com, you can elevate your Photoshop workflow and the quality of your visual output. Tophinhanhdep.com stands as your go-to resource, providing not only the knowledge but also the rich imagery and essential tools needed to bring your “Graphic Design,” “Photo Manipulation,” and “Digital Art” visions to life. So, take these techniques, explore our vast library, and start creating something truly exceptional today.