Mastering Image Insertion: A Visual Guide for Stunning Documents and Designs with Tophinhanhdep.com

In today’s visually-driven world, documents and digital content are no longer complete with text alone. Images have become an indispensable component, transforming bland pages into engaging narratives and professional presentations. Whether you’re crafting a detailed report, designing a compelling presentation, or creating an eye-catching flyer, the strategic insertion of high-quality visuals can dramatically elevate your content. Studies show that incorporating relevant images can increase engagement with your content by a staggering 80%, and content featuring visuals attracts 94% more views compared to text-only alternatives.
At Tophinhanhdep.com, we understand the power of imagery. Our platform is a comprehensive resource for all things visual, offering an expansive collection of images—from breathtaking Wallpapers and inspiring Backgrounds to diverse categories like Aesthetic, Nature, Abstract, Sad/Emotional, and Beautiful Photography. Beyond just collections, we provide insights into Photography techniques, sources for High Resolution and Stock Photos, and essential Image Tools such as Converters, Compressors, Optimizers, and AI Upscalers. We also delve into Visual Design principles, Graphic Design, Digital Art, and Photo Manipulation to spark Creative Ideas, and curate Image Inspiration & Collections through Photo Ideas, Mood Boards, and Trending Styles.
This comprehensive guide will walk you through the process of inserting and editing images, focusing primarily on Microsoft Word, a widely used document creation tool. However, the principles and tips shared here extend far beyond Word, providing a foundational understanding for integrating visuals into any design project. By mastering these techniques and leveraging the incredible resources available at Tophinhanhdep.com, you can transform your documents into captivating visual experiences.
The Art of Image Integration: Why Visuals Matter
Before diving into the technicalities, it’s crucial to understand why images are so important. They are more than just decorative elements; they are powerful communication tools that can convey complex information, evoke emotions, and reinforce messages in ways text alone cannot.
Enhancing Document Appeal and Engagement
The human brain processes visuals much faster than text. This inherent preference means that a well-chosen image can instantly capture a reader’s attention and maintain their interest. Imagine reading a lengthy report without a single chart, diagram, or photograph – it would likely feel monotonous and difficult to digest. Images break up text, provide visual anchors, and make information more digestible. For instance, a beautifully captured Nature photograph can instantly set a serene tone for a travel blog, while a striking Abstract image can add sophistication to a corporate presentation.
Moreover, visuals are highly effective in increasing user engagement. When your documents are visually appealing, readers are more likely to spend time exploring the content, leading to a deeper understanding and appreciation of your message. Tophinhanhdep.com offers a curated selection of Aesthetic and Beautiful Photography that can instantly elevate the perceived quality of your work, making it stand out in a sea of text-heavy documents. Whether you need an evocative image from our Sad/Emotional collection to resonate with your audience or a vibrant Wallpaper to brighten a digital design, the right visual can make all the difference.
Sourcing High-Quality Visuals with Tophinhanhdep.com
The impact of an image is directly tied to its quality. Low-resolution, blurry, or pixelated images can detract from your document’s professionalism and undermine your message. Therefore, sourcing High Resolution images is paramount. Tophinhanhdep.com is your go-to destination for precisely this.
Our extensive library is rich with diverse categories, ensuring you find the perfect visual for any context. Need a stunning background for a presentation? Explore our Backgrounds collection. Looking for images to illustrate an article? Our Stock Photos are professionally curated and readily available. We support your Digital Photography endeavors by providing a platform where you can discover and utilize top-tier visuals. By choosing images from Tophinhanhdep.com, you guarantee visual excellence, ensuring your documents project professionalism and aesthetic appeal. We also provide Image Inspiration & Collections, helping you find Photo Ideas and explore Thematic Collections that align perfectly with your Creative Ideas and design objectives.
Step-by-Step: Inserting Images Across Platforms
Once you’ve selected your perfect image from Tophinhanhdep.com, the next step is to integrate it into your document. While the specific steps might vary slightly between applications and devices, the core process remains intuitive. We’ll primarily focus on Microsoft Word, given its widespread use for document creation.
Inserting Images from Your Device (Computer & Mobile)
The most common method involves inserting images directly from your computer or mobile device’s storage. This ensures you have full control over the specific image file.
On Your Computer (Microsoft Word):
- Position Your Cursor: Open your Word document and click precisely where you want the image to appear. This sets the initial insertion point.
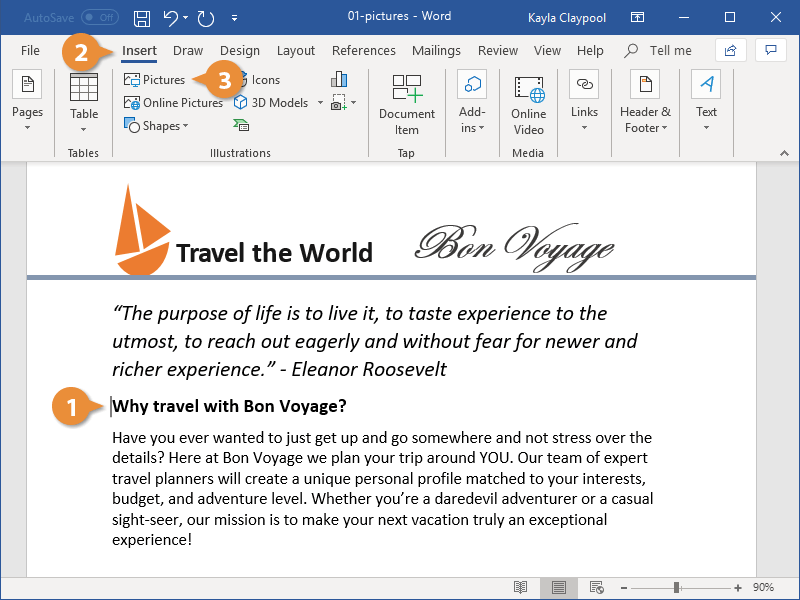
- Access the Insert Tab: Navigate to the main menu ribbon at the top of the Word window and click on the “Insert” tab.
- Select Pictures: Within the “Insert” tab, locate the “Illustrations” group. Here, you’ll find the “Pictures” button. Click on it.
- Choose “This Device”: A dropdown menu will appear. Select “This Device” (or “From File” in older versions) to browse for images saved on your computer.
- Browse and Insert: A file explorer window will open. Navigate through your folders to find the image you wish to insert. Once located, select the image file and click the “Insert” button.
The image will now appear in your document. Remember to always use High Resolution images, ideally sourced from Tophinhanhdep.com, to ensure clarity and sharpness, especially if the document is for print or large displays.
On Your Mobile Device (Word App - Android/iOS):
Mobile applications for Word offer a streamlined process, allowing you to add visuals directly from your phone’s gallery.
- Open Document and Select Position: Launch the Word app and open the document you want to edit. Tap on the screen where you want to insert the image.
- Access Edit Menu: Tap the “A with a pencil” icon (usually in the bottom toolbar) to open the editing menu.
- Navigate to Insert: In the editing menu, switch to the “Home” tab (if not already there), then tap “Insert.”
- Choose Pictures/Photos: Within the “Insert” menu, you’ll see an option like “Pictures” or “Photos.” Tap this to open your device’s image library.
- Select and Confirm: Browse your device’s photo gallery, select the desired image, and then confirm (often a “Done” or checkmark button).
- Optional Cropping/Rotation: Most mobile Word apps will offer basic editing options like cropping or rotating the image before final insertion. Make any necessary adjustments and tap “Done.”
Leveraging Online Image Libraries and Search
Beyond local storage, Word also provides integrated options to find and insert images directly from the web or other online repositories, an excellent feature when you need quick access to Stock Photos or specific themes.
Using Word’s Built-in Online Picture Search:
- Access the Insert Tab: As before, go to the “Insert” tab in Word.
- Select “Online Pictures”: In the “Illustrations” group, click on “Online Pictures” (or “Clip Art” in older versions, which often included online search).
- Search for Images: A search window, often powered by Bing Image Search, will appear. Type relevant keywords into the search bar. For example, if you’re writing about technology, you might type “futuristic tech” or “digital art.”
- Filter Results (Optional): Many online picture search functions allow you to filter results by size, type, color, layout, and even licensing (e.g., Creative Commons, which is crucial for respecting intellectual property). Use these filters to refine your search, aiming for images that match your Visual Design and Editing Styles preferences.
- Select and Insert: Review the search results, select the image(s) you want to use, and click the “Insert” button.
Copying and Pasting Images from the Web (and other sources):
A quick and easy method for integrating visuals is to copy and paste them. This is particularly useful for images found directly on Tophinhanhdep.com or other websites.
- Find Your Image: Browse Tophinhanhdep.com for the perfect Wallpaper, Background, or Beautiful Photography image.
- Copy the Image: Right-click on the image and select “Copy Image.” (On mobile, long-press the image and select “Copy Image” or “Save to device” then insert from device).
- Paste into Word: Go back to your Word document, place your cursor where you want the image, and press Ctrl + V (Windows) or Command + V (Mac), or right-click and select “Paste.”
Important Note: While convenient, copying and pasting images from the web often doesn’t embed the highest resolution version, and copyright considerations are vital. Always ensure you have the right to use an image before incorporating it into your work, especially for professional or commercial purposes. Tophinhanhdep.com focuses on providing resources that empower responsible and creative image usage.
Masterful Placement and Refinement: Editing Your Visuals
Inserting an image is just the beginning. To truly integrate visuals effectively, you need to master placement, resizing, and applying various enhancements. This is where Visual Design, Photo Manipulation, and understanding Editing Styles come into play.
Positioning Your Images with Precision (Text Wrapping & Layouts)
One of the most common challenges users face is getting an image to sit exactly where they want it relative to the surrounding text. This is controlled by “Text Wrapping” settings.
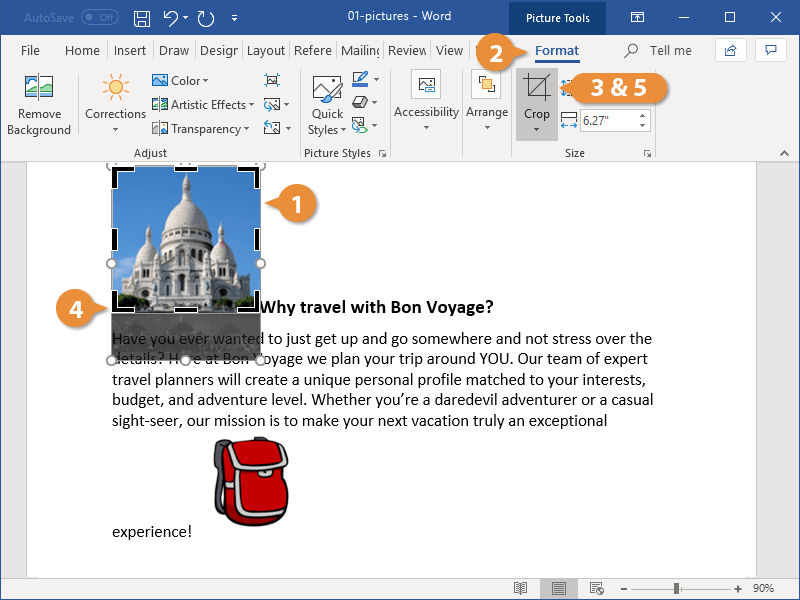
- Select the Image: Click on the inserted image to select it. The “Picture Format” (or “Format” under “Picture Tools”) tab will appear in the ribbon.
- Access Text Wrapping: In the “Arrange” group of the “Picture Format” tab, click on “Wrap Text.”
- Choose a Wrapping Style: A dropdown menu will present various options:
- In Line with Text: The image acts like a character within the text. It moves as text is added or removed, and you cannot freely drag it. This is often the default.
- Square: Text wraps around the square boundary of the image.
- Tight: Text wraps closely around the actual shape of the image, even if it’s irregular.
- Through: Similar to “Tight,” but can wrap even tighter, filling in empty spaces within the image’s boundaries.
- Top and Bottom: Text stops above the image and resumes below it, leaving the sides clear.
- Behind Text: The image is placed behind the text, acting as a background or watermark. This is useful for Backgrounds or Watermarks.
- In Front of Text: The image floats above the text, potentially obscuring it. This is ideal when the image is a focal point, like a logo or a decorative element from our Digital Art collection.
- Fine-tune with “More Layout Options”: For even greater control, select “More Layout Options” from the “Wrap Text” menu. This opens a dialog box where you can specify precise distances for text wrapping, horizontal and vertical positioning, and alignment relative to the page, margin, or paragraph.
- Use Predefined Positions: For common layouts, Word offers “Position” options (also in the “Arrange” group). These are essentially pre-configured combinations of text wrapping and alignment, allowing you to quickly place an image at the top-left, middle-right, etc., with appropriate text flow.
Experimenting with these options is key to achieving a professional and balanced Visual Design. It allows you to integrate Beautiful Photography or thematic images seamlessly into your document’s flow.
Transforming Images: Size, Effects, and Artistic Touches
Once positioned, you can further refine your image’s appearance using Word’s built-in editing capabilities, tapping into basic Photo Manipulation and Editing Styles.
-
Resizing Images:
- Select the Image: Click on the image. Small circles (sizing handles) will appear around its perimeter.
- Drag Corner Handles: Click and drag one of the corner handles to resize the image proportionally. Holding down the Shift key while dragging ensures the aspect ratio is maintained, preventing distortion.
- Drag Side Handles: Dragging the side handles will stretch or compress the image horizontally or vertically, which can distort it but might be desired for specific Creative Ideas or effects.
- Precise Sizing: For exact dimensions, use the “Height” and “Width” input fields in the “Size” group of the “Picture Format” tab.
-
Applying Picture Styles and Effects:
- Picture Styles: In the “Picture Format” tab, the “Picture Styles” group offers a gallery of pre-set styles. These include borders, shadows, reflections, and 3D effects. Hover over them to see a live preview. Applying a subtle border or shadow can make an Aesthetic image pop from the page.
- Picture Effects: For more granular control, click the “Picture Effects” dropdown. Here you can apply individual effects like shadows, reflections, glow, soft edges, bevels, and 3D rotations, further customizing your Digital Art or Photography elements.
- Artistic Effects: The “Artistic Effects” dropdown (in the “Adjust” group) allows you to apply creative filters such as “Pencil Sketch,” “Watercolor,” “Glass,” or “Blur,” transforming your image into something resembling Digital Art. These can be particularly useful for thematic documents or when you want an image to blend in a stylized way.
- Color, Corrections, and Remove Background: Other options in the “Adjust” group allow you to fine-tune color saturation and tone, make brightness/contrast corrections, or even attempt to automatically remove the background from an image.
For images that may not be perfectly High Resolution or require enhancement before insertion, Tophinhanhdep.com’s Image Tools come in handy. Our AI Upscalers can increase image resolution without significant quality loss, while Optimizers can prepare images for web or print by balancing file size and quality.
Special Image Applications: Backgrounds and Shapes
Beyond standard insertion, images can serve unique functions within your documents, expanding the scope of Visual Design possibilities.
Chèn ảnh làm phông nền trong Word (Inserting Images as Backgrounds/Watermarks):
Images from our Backgrounds or Wallpapers collections can be used to create a subtle, branded, or decorative backdrop for your document.
- Access the Design Tab: Go to the “Design” tab on the ribbon.
- Select Watermark: In the “Page Background” group, click “Watermark.”
- Choose “Custom Watermark”: From the dropdown, select “Custom Watermark.”
- Select Picture Watermark: In the “Printed Watermark” dialog box, select the “Picture watermark” radio button.
- Choose Your Image: Click “Select Picture” and browse for an image from your device or use “Bing Image Search” to find one online.
- Adjust “Washout”: To make the image subtle and prevent it from overpowering the text, check the “Washout” box. This reduces its intensity and makes it semi-transparent.
- Apply: Click “OK” or “Apply.”
Chèn ảnh trong shape (Inserting Images into Shapes):
This technique allows you to crop images into custom shapes, adding a unique touch to your Graphic Design efforts.
- Insert a Shape: Go to the “Insert” tab, click “Shapes” (in the “Illustrations” or “Models” group), and draw your desired shape on the document.
- Access Shape Format: Select the shape. The “Shape Format” tab will appear.
- Select “Shape Fill”: In the “Shape Styles” group, click “Shape Fill.”
- Choose “Picture”: From the dropdown, select “Picture.”
- Insert Image: You can then choose to insert a picture “From a File” (from your device) or “Online Pictures.” Select your image, and it will be cropped to fit the shape.
This method is excellent for creating visually interesting layouts, framing images creatively, or incorporating Digital Art elements into your document’s structure.
Optimizing and Troubleshooting for Flawless Visuals
Even with the best intentions, image integration can sometimes hit snags. Knowing how to troubleshoot common issues and apply best practices, especially concerning Image Tools, can save time and frustration.
Common Image Insertion Issues and Solutions
-
Images Not Inserting or Appearing Broken:
- File Format Compatibility: Word generally supports common formats like JPEG, PNG, GIF, and BMP. If your image is in an obscure format (e.g., EPS, which is no longer fully supported in newer Office versions), try converting it. Tophinhanhdep.com offers Converters as part of its Image Tools to easily switch formats.
- Large File Size: Extremely large image files can cause Word to slow down or even crash. Use an Image Compressor (available on Tophinhanhdep.com) to reduce the file size without significant loss of visual quality before inserting.
- Corrupt File: The image file itself might be corrupt. Try opening it in another image viewer or editor to verify.
-
Images Appear Low Quality or Pixelated:
- Low Resolution Source: This is the most frequent culprit. Always start with High Resolution images. Sourcing your images from Tophinhanhdep.com’s collections helps mitigate this, as we prioritize quality.
- Excessive Resizing: Enlarging a low-resolution image will inevitably lead to pixelation. If you absolutely need to enlarge a smaller image, consider using an AI Upscaler from Tophinhanhdep.com to intelligently increase its resolution.
- Word Version: Ensure your Word application is up-to-date, as newer versions often have improved rendering engines.
-
Images Obscuring Text or Moving Erratically:
- Incorrect Text Wrapping: As discussed, this is almost always due to the “In Line with Text” setting or an inappropriate wrapping style. Adjust “Wrap Text” to “Square,” “Tight,” “Behind Text,” or “In Front of Text” as needed.
- Anchor Issues: When an image is not “In Line with Text,” it’s often “anchored” to a specific paragraph. If you delete that paragraph, the image might disappear. Keep an eye on the anchor symbol (a small anchor icon) when selecting an image.
Pro Tips for Professional Document Design
To truly master image insertion and create professional documents, consider these expert tips, all of which are supported by the resources at Tophinhanhdep.com:
- Prioritize High Resolution and Relevance: Always opt for High Resolution images that are directly relevant to your content. A beautiful but irrelevant image can distract more than it enhances. Tophinhanhdep.com provides a vast array of Beautiful Photography and Stock Photos to ensure both quality and relevance.
- Optimize File Sizes: Large images inflate document size, making files slow to open, edit, and share. Utilize Image Compressors and Optimizers from Tophinhanhdep.com’s Image Tools to reduce file size while maintaining visual integrity.
- Maintain Consistent Styling: If using multiple images, strive for a consistent Editing Style, color palette, or thematic approach. This contributes to a cohesive Visual Design. Explore Tophinhanhdep.com’s Thematic Collections and Mood Boards for inspiration and stylistic consistency.
- Use Alt Text: For accessibility, always add “Alt Text” (alternative text) to your images. This descriptive text helps screen readers convey image content to visually impaired users and is good practice for SEO in digital documents.
- Group Images for Complex Layouts: If you have multiple images or an image combined with text boxes or shapes, “group” them together. Select all elements (holding Shift or Ctrl), right-click, and choose “Group.” This allows you to move and resize them as a single unit, essential for intricate Graphic Design elements.
- Consider Copyright and Licensing: Be mindful of where your images come from. Tophinhanhdep.com offers resources and guidance on understanding image licensing, empowering you to use visuals ethically and legally.
Conclusion
Inserting images into your documents is a fundamental skill that goes far beyond simply adding a picture. It’s an act of Visual Design that can transform ordinary text into compelling, engaging, and professional content. By understanding the different insertion methods, mastering text wrapping, and leveraging Word’s powerful editing tools, you gain the ability to craft documents that truly stand out.
Remember that the quality of your source images is paramount. Tophinhanhdep.com is dedicated to being your ultimate resource for Images and Photography, providing an extensive collection of High Resolution Wallpapers, Backgrounds, Aesthetic shots, Nature scenes, Abstract art, Sad/Emotional imagery, and stunning Beautiful Photography. Our Image Tools like Converters, Compressors, Optimizers, and AI Upscalers are designed to help you prepare your visuals perfectly. Furthermore, our sections on Visual Design, Graphic Design, Digital Art, Photo Manipulation, and Creative Ideas, alongside Image Inspiration & Collections with Photo Ideas, Mood Boards, and Trending Styles, offer endless possibilities for your creative endeavors.
Take the knowledge from this guide, combine it with the rich visual resources at Tophinhanhdep.com, and start creating documents that not only convey information but also captivate and inspire. Elevate your documents, captivate your audience, and unlock your creative potential with the vast resources at Tophinhanhdep.com. Happy designing!