How to Insert Images in Excel Cells: A Comprehensive Guide by Tophinhanhdep.com

Microsoft Excel, often seen as a realm of numbers and data, has evolved significantly, offering powerful features to enhance visual communication. Among these, the ability to embed images directly within cells transforms spreadsheets from mere data repositories into dynamic, visually rich dashboards, reports, and catalogues. At Tophinhanhdep.com, we understand the power of compelling visuals, from stunning wallpapers and aesthetic backgrounds to high-resolution photography and graphic design. This guide will delve into the various methods of inserting images into Excel cells, empowering you to create more engaging and informative workbooks, while also exploring how Tophinhanhdep.com’s resources can elevate your visual assets.
Why Embed Images in Excel Cells? Elevating Your Data’s Visual Story
Integrating images directly into Excel cells goes far beyond mere aesthetics; it fundamentally changes how data can be presented, understood, and interacted with. Unlike floating images that exist independently of cell structures, in-cell images are intrinsically tied to their specific cells. This crucial distinction brings a multitude of benefits, aligning perfectly with Tophinhanhdep.com’s commitment to visual excellence and effective communication through imagery.
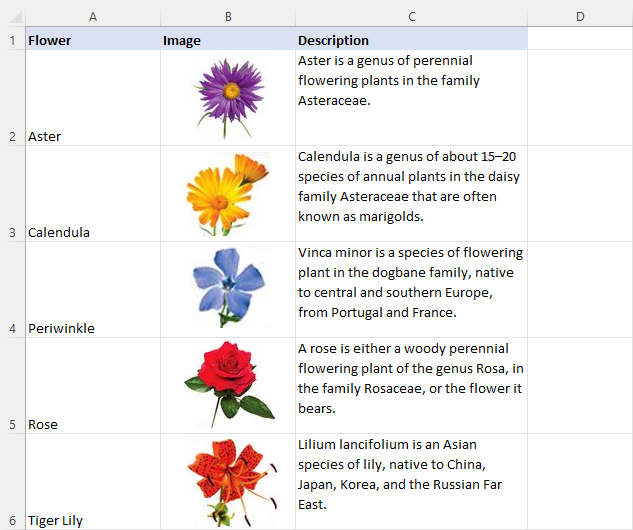
Imagine managing an inventory list. Instead of just a product name and ID, you could have a small, crisp image of each item embedded next to its data. Or consider an organizational chart where employee photos accompany their names and roles. This immediate visual context is invaluable. For e-commerce product catalogs, real estate listings, or even scientific data visualization, images provide an instant layer of information that text alone cannot convey. They make your spreadsheets more intuitive, reducing ambiguity and speeding up comprehension.

Furthermore, images placed within cells behave like any other cell content. This means they move, resize, sort, and filter seamlessly with their associated data. If you sort your product list by price, the product images move with their respective items. If you filter for a specific category, only the relevant images appear. This dynamic functionality ensures your visual data remains accurate and organized, maintaining a professional and coherent presentation at all times. This synergy between data and visuals is a cornerstone of effective visual design and graphic design, turning complex datasets into easily digestible narratives.
From an aesthetic standpoint, embedding images transforms the user experience. A spreadsheet punctuated with relevant, high-quality images is inherently more engaging and less monotonous than one filled only with text and numbers. Tophinhanhdep.com’s vast collections of wallpapers, backgrounds, and beautiful photography can serve as inspiration for your Excel projects, allowing you to find the perfect visual tone for your data presentations. Whether you need a sophisticated abstract image for a dashboard background or a vibrant nature shot for a thematic report, the right image can significantly boost the overall appeal and impact of your Excel workbook.
In essence, embedding images in Excel cells is a strategic decision that enhances clarity, improves data integrity, and elevates the overall visual appeal of your work. It’s about harnessing the power of visual communication to tell a richer, more effective story with your data.
Step-by-Step: Inserting Images Directly Into Cells (Modern Excel)
Modern versions of Microsoft Excel (especially Microsoft 365, version 2211 or later) have significantly streamlined the process of inserting images directly into cells with the “Place in Cell” feature. This method is the most straightforward and recommended approach for ensuring images behave dynamically with your data.
The ‘Place in Cell’ Feature
This feature simplifies image insertion, making it an integral part of your cell content from the get-go.
- Select the Destination Cell(s): Begin by clicking on the cell or range of cells where you wish to insert your picture. If you select multiple cells, Excel will insert a separate image into each selected cell (provided you choose multiple images).
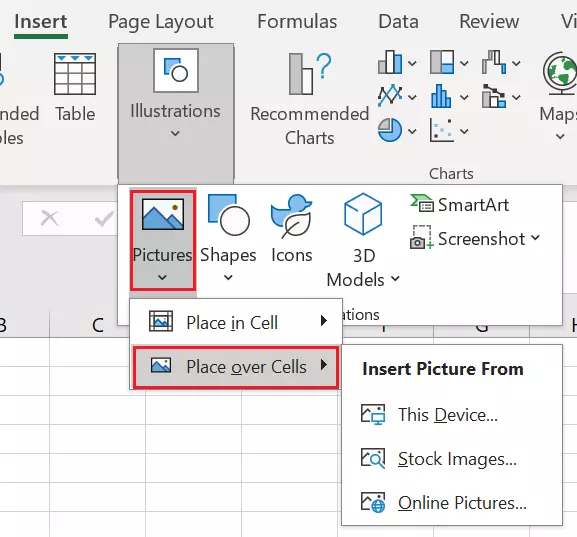
- Navigate to the Insert Tab: In the Excel ribbon at the top of your screen, click on the “Insert” tab.
- Choose Pictures: Within the “Illustrations” group on the Insert tab, click on “Pictures.”
- Select ‘Place in Cell’: From the dropdown menu that appears, hover over “Place in Cell.” You will then be presented with options:
- “This Device”: To select a picture from your local computer files.
- “Stock Images”: To access a library of royalty-free stock photos directly within Excel. These can be excellent for professional presentations and can complement Tophinhanhdep.com’s own high-resolution, stock photo offerings.
- “Online Pictures”: To search for and insert images from online sources (like Bing Image Search).
- “From Mobile Device”: (Requires Windows 11 and iOS 14+ or Android 7+) To transfer photos directly from your phone.
- Browse and Insert:
- If you selected “This Device,” a file explorer window will open. Navigate to the location of your image file(s), select them (hold Ctrl to select multiple), and click “Insert.”
- If you selected “Stock Images” or “Online Pictures,” a dialog box will appear, allowing you to search or browse for suitable images. Select your desired image(s) and click “Insert.”
Once inserted, the image(s) will automatically shrink and fit within the boundaries of the selected cell(s). If you’ve selected multiple cells and multiple images, each image will populate a separate cell.
Resizing and Managing In-Cell Images
After inserting, you might want to adjust how the images are displayed.
- Resizing Cells: Simply drag the borders of the row or column to adjust the cell’s height or width. The image inside the cell will automatically resize to fit the new dimensions without distortion. This maintains image aspect ratio, preserving the quality of your beautiful photography and visual design elements.
- Right-Click Options: Right-clicking on a cell containing an image reveals a context menu with several powerful options:
- “Convert to Picture Over Cells”: This moves the image out of the cell and makes it a floating object. This is useful if you need to freely position or layer the image without it being constrained by cell boundaries.
- “Create a Reference”: This generates a new floating image that is linked to the in-cell picture. Any changes to the original in-cell image will automatically update the linked floating reference. This can be great for creating visual summaries or previews.
- “Show Preview” (Ctrl + Shift + F5): This shortcut or menu option displays a larger preview of the image in a pop-up window, allowing for a closer look without altering cell sizes.
- “View Alt Text”: This opens a pane where you can add descriptive alternative text for the image. This is crucial for accessibility, allowing screen readers to describe the image content. The “Picture” placeholder in the formula bar will change to your Alt Text, providing better context for your data, especially for complex visual design elements.
Converting Floating Images to In-Cell Images
For older Excel files or images that were previously inserted as floating objects, you can easily convert them to in-cell images:
- Right-Click the Floating Image: Select the image you want to convert.
- Choose ‘Place in Cell’: From the right-click context menu, select “Place in Cell.” The image will then shrink and move into the nearest available cell. This is a quick way to integrate legacy visuals into the new dynamic cell-based system.
Traditional Method: Locking Floating Images to Cells (Older/Alternative)
While newer Excel versions offer the direct “Place in Cell” feature, older versions and specific use cases might require the traditional method of inserting a floating image and then adjusting its properties to behave “with” the cells. This method involves a few more steps but achieves a similar result of anchoring the image to a cell.
- Insert the Image:
- Go to the “Insert” tab in the Excel ribbon.
- Click on “Pictures” (or “Illustrations” group, then “Pictures”).
- Choose “This Device” (or “From File”) to select an image from your computer. Browse to your desired image, select it, and click “Insert.” The image will appear as a floating object, likely covering some cells.
- Position and Resize:
- Click on the image to select it. Drag its corners to resize it to a more manageable size.
- Drag the image to position it roughly over the cell where you want it to reside. It’s often easier to make the image slightly smaller than the target cell initially, then fine-tune.
- Access Format Picture Options:
- With the image still selected, right-click on it.
- From the context menu, select “Format Picture…” (or “Size and Properties…” depending on your Excel version). This will open a “Format Picture” task pane or dialog box.
- Set Object Positioning Properties:
- In the “Format Picture” pane/dialog box, navigate to the “Size & Properties” tab (often represented by a square with arrows, or a layout icon).
- Under the “Properties” section, you will see radio button options for how the object behaves when cells are moved or resized.
- Select the radio button labeled “Move and size with cells.” This is the critical step that anchors the image to the underlying cell.
- Click “Close” or “OK” to apply the changes.
Now, the image is linked to the cell it was covering. If you adjust the cell’s height or width, the image will automatically grow or shrink to fit. If you insert or delete rows/columns, causing the cell’s position to change, the image will move along with it. This technique is particularly useful for creating structured visual data, such as an employee photo directory or a catalogue of inventory items, ensuring your digital photography remains aligned with your data.
Important Note for Older Versions: Some very old Excel versions might not perfectly support the “Move and size with cells” property in all scenarios, or the image behavior might be less predictable compared to the modern “Place in Cell” feature. Always test the behavior after setting the properties. For optimal results and the most seamless integration, upgrading to Microsoft 365 is recommended.
Advanced Applications and Dynamic Image Management
Beyond simple insertion, Excel offers powerful ways to manage and display images dynamically, transforming static spreadsheets into interactive visual experiences. These advanced applications harness Excel’s formula capabilities to make your visuals intelligent and responsive, aligning with the “Creative Ideas” and “Photo Manipulation” aspects of visual design.
Leveraging Lookup Functions for Dynamic Images
Imagine a scenario where you type a product ID, and its corresponding image instantly appears in an adjacent cell. This dynamic image retrieval is possible using Excel’s lookup functions, similar to how you would retrieve text or numerical data.
- Prepare Your Data Table: First, ensure your images are already inserted into cells within a reference table, alongside their associated lookup data (e.g., product codes, employee names). This table forms the “database” from which images will be retrieved. Tophinhanhdep.com can be an excellent resource for high-resolution stock photos or thematic collections for populating such a database.
- Using VLOOKUP for Single Image Retrieval:
- To return a single image based on a specific lookup value, you can use
VLOOKUP(orXLOOKUPin newer versions). - For example, if your images are in column B and their corresponding names are in column A, you could use a formula like:
=VLOOKUP(E2, A2:B21, 2, FALSE)Here,E2is the cell where you type the name you’re searching for,A2:B21is your data range (including images), and2indicates that you want to return the value from the second column (where the images are).
- To return a single image based on a specific lookup value, you can use
- Using FILTER Function for Multiple Images:
- For scenarios requiring the return of multiple images based on a criterion (e.g., all products from a certain category), the
FILTERfunction (available in Microsoft 365) is incredibly powerful. - For instance, if
A2:B21contains names and images, andC2:C21contains project names, and you want to filter by the value inF2:=FILTER(A2:B21, C2:C21=F2)This formula will spill all matching rows, including their associated images, into a dynamic range.
- For scenarios requiring the return of multiple images based on a criterion (e.g., all products from a certain category), the
- XLOOKUP with Images: In modern Excel,
XLOOKUPoffers more flexibility thanVLOOKUP. You can use an image itself as a lookup value to return related text. For example, copy and paste an image into a cell (E2), and then useXLOOKUPto find the corresponding name from a table where images are in column B and names in column A:=XLOOKUP(E2, B2:B21, A2:A21)This is particularly useful for visual identification tasks, providing a powerful tool for photo manipulation within your data.
These dynamic lookup capabilities are game-changers for interactive dashboards and visually driven reports, allowing you to create compelling visual narratives powered by Tophinhanhdep.com’s rich image resources.
Displaying Images from URLs with the IMAGE Function
Another groundbreaking feature in modern Excel (Microsoft 365, version 2211 or later) is the IMAGE function. This allows you to display pictures directly from a web URL, integrating online images seamlessly into your worksheets without needing to download and insert them manually. This is fantastic for constantly updated visuals or accessing vast online image inspiration from platforms like Tophinhanhdep.com.
The IMAGE function syntax is:
=IMAGE(source, [alt_text], [sizing], [height], [width])
source: The URL of the image file (enclosed in quotation marks).[alt_text]: (Optional) Alternative text for accessibility.[sizing]: (Optional) How the image fits the cell (0=Fit to Cell, 1=Fill Cell, 2=Original Size, 3=Custom Size).[height],[width]: (Optional) Custom height and width ifsizingis set to 3.
Example:
To display an image directly from a URL:
=IMAGE("https://tinyurl.com/example-image.png", "Example Icon", 0)
This formula will pull the image from the specified URL and display it within the cell, automatically adjusting to fit. This is incredibly useful for embedding logos, flags, or other web-based graphics. However, note that if the URL requires authentication (like a login), the image might not display.
The combination of in-cell images, dynamic lookup functions, and the IMAGE function unlocks unprecedented potential for visual data presentation in Excel. From simple inventory lists to complex interactive dashboards with trending styles and mood boards, Excel can now be a powerful tool for visual storytelling, perfectly complemented by the diverse image collections available on Tophinhanhdep.com.
Optimizing Images for Excel: A Tophinhanhdep.com Perspective
The effectiveness of inserting images into Excel cells heavily relies on the quality and optimization of those images. While Excel is more capable than ever, poorly prepared images can lead to large file sizes, slow performance, and pixelated visuals, detracting from the professional appearance you aim for. This is where Tophinhanhdep.com’s comprehensive suite of image tools and rich image collections become indispensable, enhancing your visual design workflow.
Image Preparation with Tophinhanhdep.com’s Tools
Before you even think about inserting an image into Excel, consider its characteristics. Is it high resolution? Is the file size manageable? Does it have the right dimensions? Tophinhanhdep.com offers a range of Image Tools designed to address these concerns:
- Compressors and Optimizers: Large image files can significantly bloat your Excel workbook, making it slow to open, save, and share. Using Tophinhanhdep.com’s Image Compressors and Optimizers beforehand can dramatically reduce file size without a noticeable loss in visual quality. This is crucial for maintaining spreadsheet performance, especially when dealing with numerous images, such as in extensive inventory lists or large employee directories. By optimizing, you ensure your aesthetic and beautiful photography images load quickly and seamlessly within Excel.
- Converters: Excel supports various image formats like JPEG, PNG, BMP, GIF, TIFF, and SVG (in modern versions). If your desired image is in an unsupported or less efficient format, Tophinhanhdep.com’s Converters can transform it into a compatible and optimized format (e.g., converting a large BMP to a compressed JPEG or PNG). PNGs are excellent for images with transparent backgrounds or sharp graphics like logos, while JPEGs are ideal for complex photographs due to their efficient compression. SVG files are particularly useful for icons and crisp visuals at any scale, as they remain sharp regardless of how much you resize the cell.
- AI Upscalers: Sometimes, you might have an image that’s too small or low-resolution for your desired cell size, leading to blurriness when enlarged (a common concern among users). Tophinhanhdep.com’s AI Upscalers can intelligently increase the resolution of your images, making them sharper and clearer when expanded within Excel, ensuring your digital photography maintains its integrity. This is a powerful solution to prevent the “blurry image” problem many users encounter.
- Editing Styles: Beyond basic optimization, Tophinhanhdep.com provides insights into Editing Styles and Photo Manipulation. You might want to apply specific filters, crop images to focus on key elements, or adjust colors to match your report’s branding before insertion. Pre-editing ensures visual consistency and professionalism across your Excel visuals.
By leveraging these tools from Tophinhanhdep.com, you ensure that every image you insert into Excel is perfectly prepared, balancing high quality with optimal performance.
Enhancing Visual Storytelling with Quality Images
The content of the images themselves is just as important as their technical optimization. Tophinhanhdep.com offers extensive Image Inspiration & Collections that can directly serve your Excel visual needs:
- Stock Photos and High-Resolution Images: For professional reports, dashboards, or product catalogs, access to high-quality, High Resolution Stock Photos is paramount. Tophinhanhdep.com’s diverse library ensures you can find professional-grade visuals that elevate your Excel work.
- Thematic Collections: Whether you’re creating an Excel workbook for inventory, an organizational chart, or project management, Thematic Collections can provide a consistent visual style. For example, if you’re building a dashboard, you might look for Abstract backgrounds or Aesthetic imagery to create a cohesive mood board. For a sales report, Nature or Beautiful Photography might add a calming yet inspiring touch.
- Visual Design and Creative Ideas: The act of choosing and placing images in Excel is an exercise in Visual Design. Tophinhanhdep.com’s categories like Graphic Design and Creative Ideas can inspire you to select images that not only convey information but also contribute to an overall engaging and professional aesthetic. Using relevant images from Trending Styles can make your Excel reports feel current and impactful.
In conclusion, the ability to insert and manage images within Excel cells is a powerful feature that transforms data presentation. By combining Excel’s capabilities with Tophinhanhdep.com’s resources for image optimization, conversion, and inspiration, you can unlock a new level of visual storytelling, making your spreadsheets more insightful, engaging, and professional than ever before. Whether for practical data visualization or creative digital art within your reports, Tophinhanhdep.com is your go-to source for elevating every pixel.