Unlock Your Creativity: A Comprehensive Guide to Inserting Images in Canva for Stunning Visual Designs

In today’s visually-driven world, compelling imagery is no longer a luxury but a necessity for effective communication and engagement. Whether you’re a content creator, a small business owner, or simply someone looking to design eye-catching social media posts, presentations, or personal projects, Canva stands out as an indispensable tool. Its intuitive interface and vast array of features make sophisticated graphic design accessible to everyone, regardless of their prior experience. At the heart of any great Canva design lies the strategic use of images – your own unique captures, curated stock photography, or captivating digital art.
At Tophinhanhdep.com, we understand the power of visuals. We offer an extensive collection of images, from vibrant Wallpapers and serene Backgrounds to Aesthetic, Nature, and Abstract photography, alongside emotionally resonant and Beautiful Photography. We also provide invaluable Image Tools like Converters, Compressors, Optimizers, and AI Upscalers, ensuring your images are always at their best. This guide will walk you through every step of inserting, manipulating, and optimizing images within Canva, empowering you to bring your creative visions to life and elevate your Visual Design skills.
The ability to seamlessly integrate high-resolution images into your Canva projects is fundamental. It allows you to personalize templates, convey specific messages, and craft truly unique visual narratives that resonate with your audience. From basic uploads to advanced techniques like fitting images into custom shapes using frames, understanding these processes is key to unlocking Canva’s full potential and transforming your raw Photo Ideas into polished masterpieces.
Importing Your Visuals: A Seamless Process for Every Designer
Adding images to your Canva designs is the first step towards creating engaging visual content. Canva offers multiple straightforward methods to bring your chosen photographs, digital art, or even AI-generated images into its editor. This flexibility ensures that no matter where your images are stored, you can quickly integrate them into your project. For optimal results, especially when aiming for High Resolution output, it’s always a good practice to start with the best possible source image, perhaps one refined using the Image Tools found at Tophinhanhdep.com.
Uploading Images from Your Desktop or Web Browser
The most common way to introduce your own images into Canva is directly from your computer, whether you’re using the desktop application or a web browser. This method is ideal for incorporating your personal Digital Photography, specific product shots, or any imagery that makes your design stand out from generic Stock Photos.
Here’s a step-by-step guide:
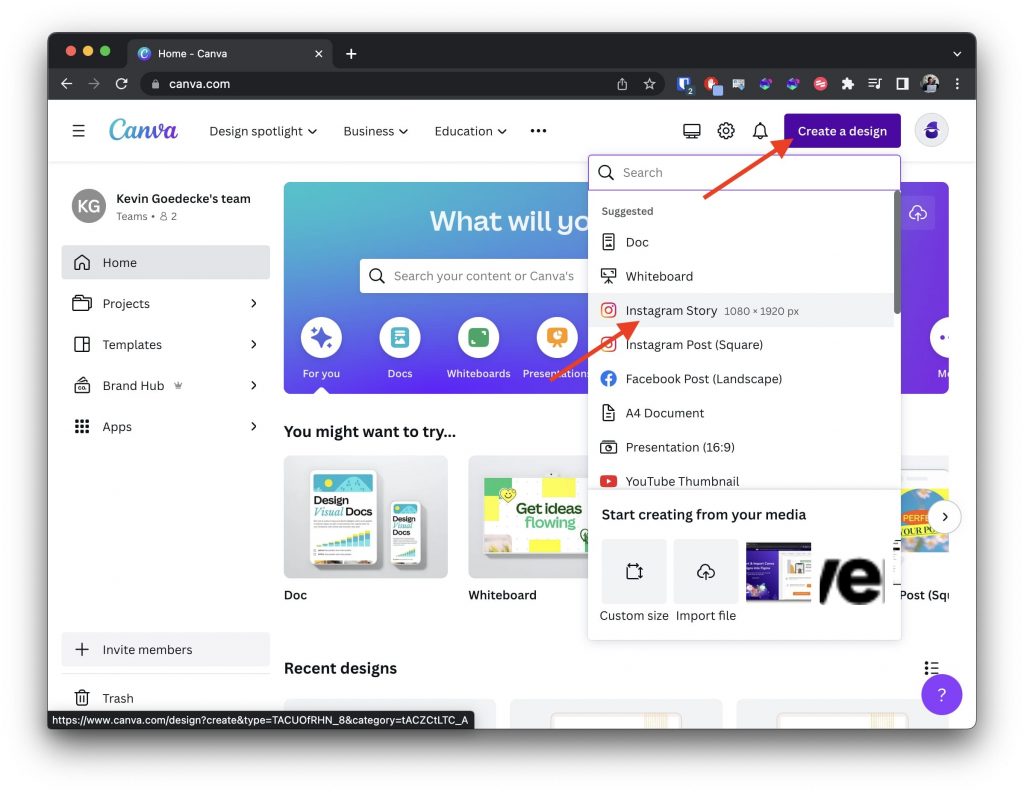
- Open Canva and Your Design: Begin by logging into your Canva account on Tophinhanhdep.com (or the Canva platform). Open an existing design you wish to modify or start a brand-new one by clicking “Create a design” and choosing a template or custom dimensions.
- Navigate to the “Uploads” Panel: On the left-hand side menu of the Canva editor, you’ll find a series of icons. Click on the icon labeled “Uploads.” This panel is your central hub for managing all the media you’ve brought into Canva.
- Initiate the Upload: Within the “Uploads” panel, locate and click the prominent “Upload files” button. This action will open a file explorer window on your computer, allowing you to browse your local storage.
- Select Your Image(s): Navigate to the folder where your desired image files are stored. You can select one image or multiple images simultaneously (typically by holding down the Ctrl key on Windows or Cmd key on Mac while clicking). Once selected, click “Open” (or double-click the file) to begin the upload process.
- Drag and Drop (Quick Tip): For an even faster upload, you can simply drag and drop your image files directly from your computer’s folders onto the “Uploads” panel in Canva. Canva is smart enough to recognize these files and will automatically add them to your uploads, regardless of which menu you’re currently viewing.

Once uploaded, your images will appear as thumbnails in the “Uploads” panel, ready for you to drag and drop onto your canvas and integrate into your design. This simple process is fundamental to personalizing your Visual Design and ensuring your content reflects your unique brand or style.
Importing from Mobile Devices and Cloud Services
Canva recognizes that creativity isn’t confined to a desktop. Its mobile app and integrations with cloud storage services provide immense flexibility, allowing you to import images on the go. This is particularly useful for quickly using photos from your Camera Roll or accessing your organized thematic collections stored online.
- Using the Canva Mobile App:
- Open the Canva app on your smartphone or tablet.
- Open an existing design or create a new one.
- Look for a “Camera Roll” icon (often represented by a photo gallery symbol) on the bottom menu bar. Tapping this will give Canva access to your device’s photo library.
- Select the image(s) or video(s) you wish to upload. You can then choose to “Add as New Pages” or “Add to Page” to immediately place them into your design. These files will also be automatically added to your “Uploads” section for future use.
- Connecting Cloud Storage and Social Media:
- Canva seamlessly integrates with popular cloud services like Google Drive and Dropbox. Within the “Uploads” panel on desktop or mobile, look for options to connect to these platforms (often represented by a “…” or “Connect” button).
- Once connected and authorized, you can browse your cloud folders and directly import images into your Canva uploads.
- Similarly, Canva allows you to link your social media accounts, such as Instagram or Facebook. This enables you to directly pull images from your feeds into your Canva designs, a boon for social media content creation and maintaining consistent Aesthetic.
These advanced import options ensure that your photo ideas, whether from a spontaneous shot or a carefully curated online album, are always within reach for your next great Visual Design.
Supported Image Formats and Important Considerations
While Canva is highly versatile, it’s crucial to be aware of the supported image formats and any limitations to ensure a smooth design process and optimal results. Knowing these details, often found on resources like Tophinhanhdep.com’s Image Tools section, can save you time and prevent upload errors.
- Supported Image Formats: Canva generally supports a wide range of popular image formats, including:
- JPG/JPEG: Ideal for photographs and images with many colors and gradients.
- PNG: Excellent for images with transparent backgrounds or sharp lines, such as logos or illustrations.
- GIF: For animated images or simple graphics.
- HEIC/HEIF: High-Efficiency Image File Format, commonly used by Apple devices.
- WebP: A modern image format that provides superior lossless and lossy compression.
- SVG: Scalable Vector Graphics, perfect for vector illustrations and icons that need to scale without pixelation.
- Unsupported Formats and Conversion: Canva does not directly support professional design file formats like PDF, Photoshop (PSD), or Illustrator (AI) for direct image import. If you have images in these formats, you’ll need to convert them to a compatible format (like JPG or PNG) first. Tophinhanhdep.com offers Image Converters that can help you with this, ensuring your files are ready for Canva.
- Size and Resolution Limitations: Canva has certain practical limitations on image file size and resolution for optimal performance. While specific numbers can vary, it’s generally recommended to:
- Use images with a resolution of at least 96 DPI (dots per inch) for web-based designs. For print, higher DPI (e.g., 300 DPI) is preferable, though Canva often handles scaling well.
- Keep file sizes manageable. Very large images can slow down the editor and upload times. If your files are too large, consider using an Image Compressor or Optimizer from Tophinhanhdep.com before uploading.
- Canva Free users typically have 5GB of storage, while Pro and Teams users enjoy a generous 1TB. Education and Nonprofit users get 100GB. Be mindful of these limits if you’re uploading a vast number of files.
By adhering to these guidelines, you’ll ensure your images are imported efficiently and display beautifully in your Canva designs, preserving their High Resolution quality and contributing to a professional Visual Design.
Enhancing Designs with Canva Frames: Shape Your Visual Story
Canva’s Frames are a powerful and creative feature often misunderstood. They aren’t merely decorative borders but rather intelligent “photo holders” that allow you to crop and shape your images or videos into virtually any form imaginable. This tool is a cornerstone of advanced Visual Design and Photo Manipulation in Canva, enabling you to create dynamic layouts and unique visual effects. Whether you want to place a headshot in a perfect circle, integrate a landscape into a complex geometric pattern, or craft a visually engaging Mood Board, Frames offer endless creative ideas.
Discovering and Adding Frames to Your Design
Before you can fit an image into a custom shape, you need to select and add a frame to your canvas. Canva offers a vast, diverse library of free and Pro frames, catering to every thematic collection and trending style.
- Open Your Design: Start by opening your design in the Canva editor.
- Access the “Elements” Tab: On the left-hand side menu, click on the “Elements” icon. This is Canva’s treasure trove of graphic assets, including shapes, lines, icons, and – crucially – frames. If “Elements” isn’t immediately visible, click “More” and it will likely be at the top of that expanded section.
- Find the “Frames” Section:
- You can scroll down through the “Elements” panel until you find the “Frames” section. Once you see it, click “See all” to view the entire collection.
- Alternatively, for a quicker search, type “Frames” into the search bar at the top of the “Elements” panel. Look for the result marked with a heart icon – this signifies the photo frames section.
- Browse and Select a Frame: A wide array of frame shapes will appear. You’ll find everything from basic geometric shapes (circles, squares, triangles) to more intricate designs (letters, numbers, objects, abstract forms). Hover your mouse over a frame to see if it’s “Free” or “Pro.”
- Add to Your Design: Click on your chosen free frame, and it will automatically be placed onto your canvas.
- Resize and Reposition: Once on your canvas, you can click and drag the white circle handles at the corners of the frame to resize it. You can also click and drag the entire frame to reposition it anywhere on your design page. Take your time to get the placement and size just right before adding your image.
Exploring the “Frames” library is an excellent source of Image Inspiration. You’ll find shapes that can transform your Wallpapers or Backgrounds, and allow you to creatively crop your Beautiful Photography, adding a unique dimension to your Graphic Design projects.
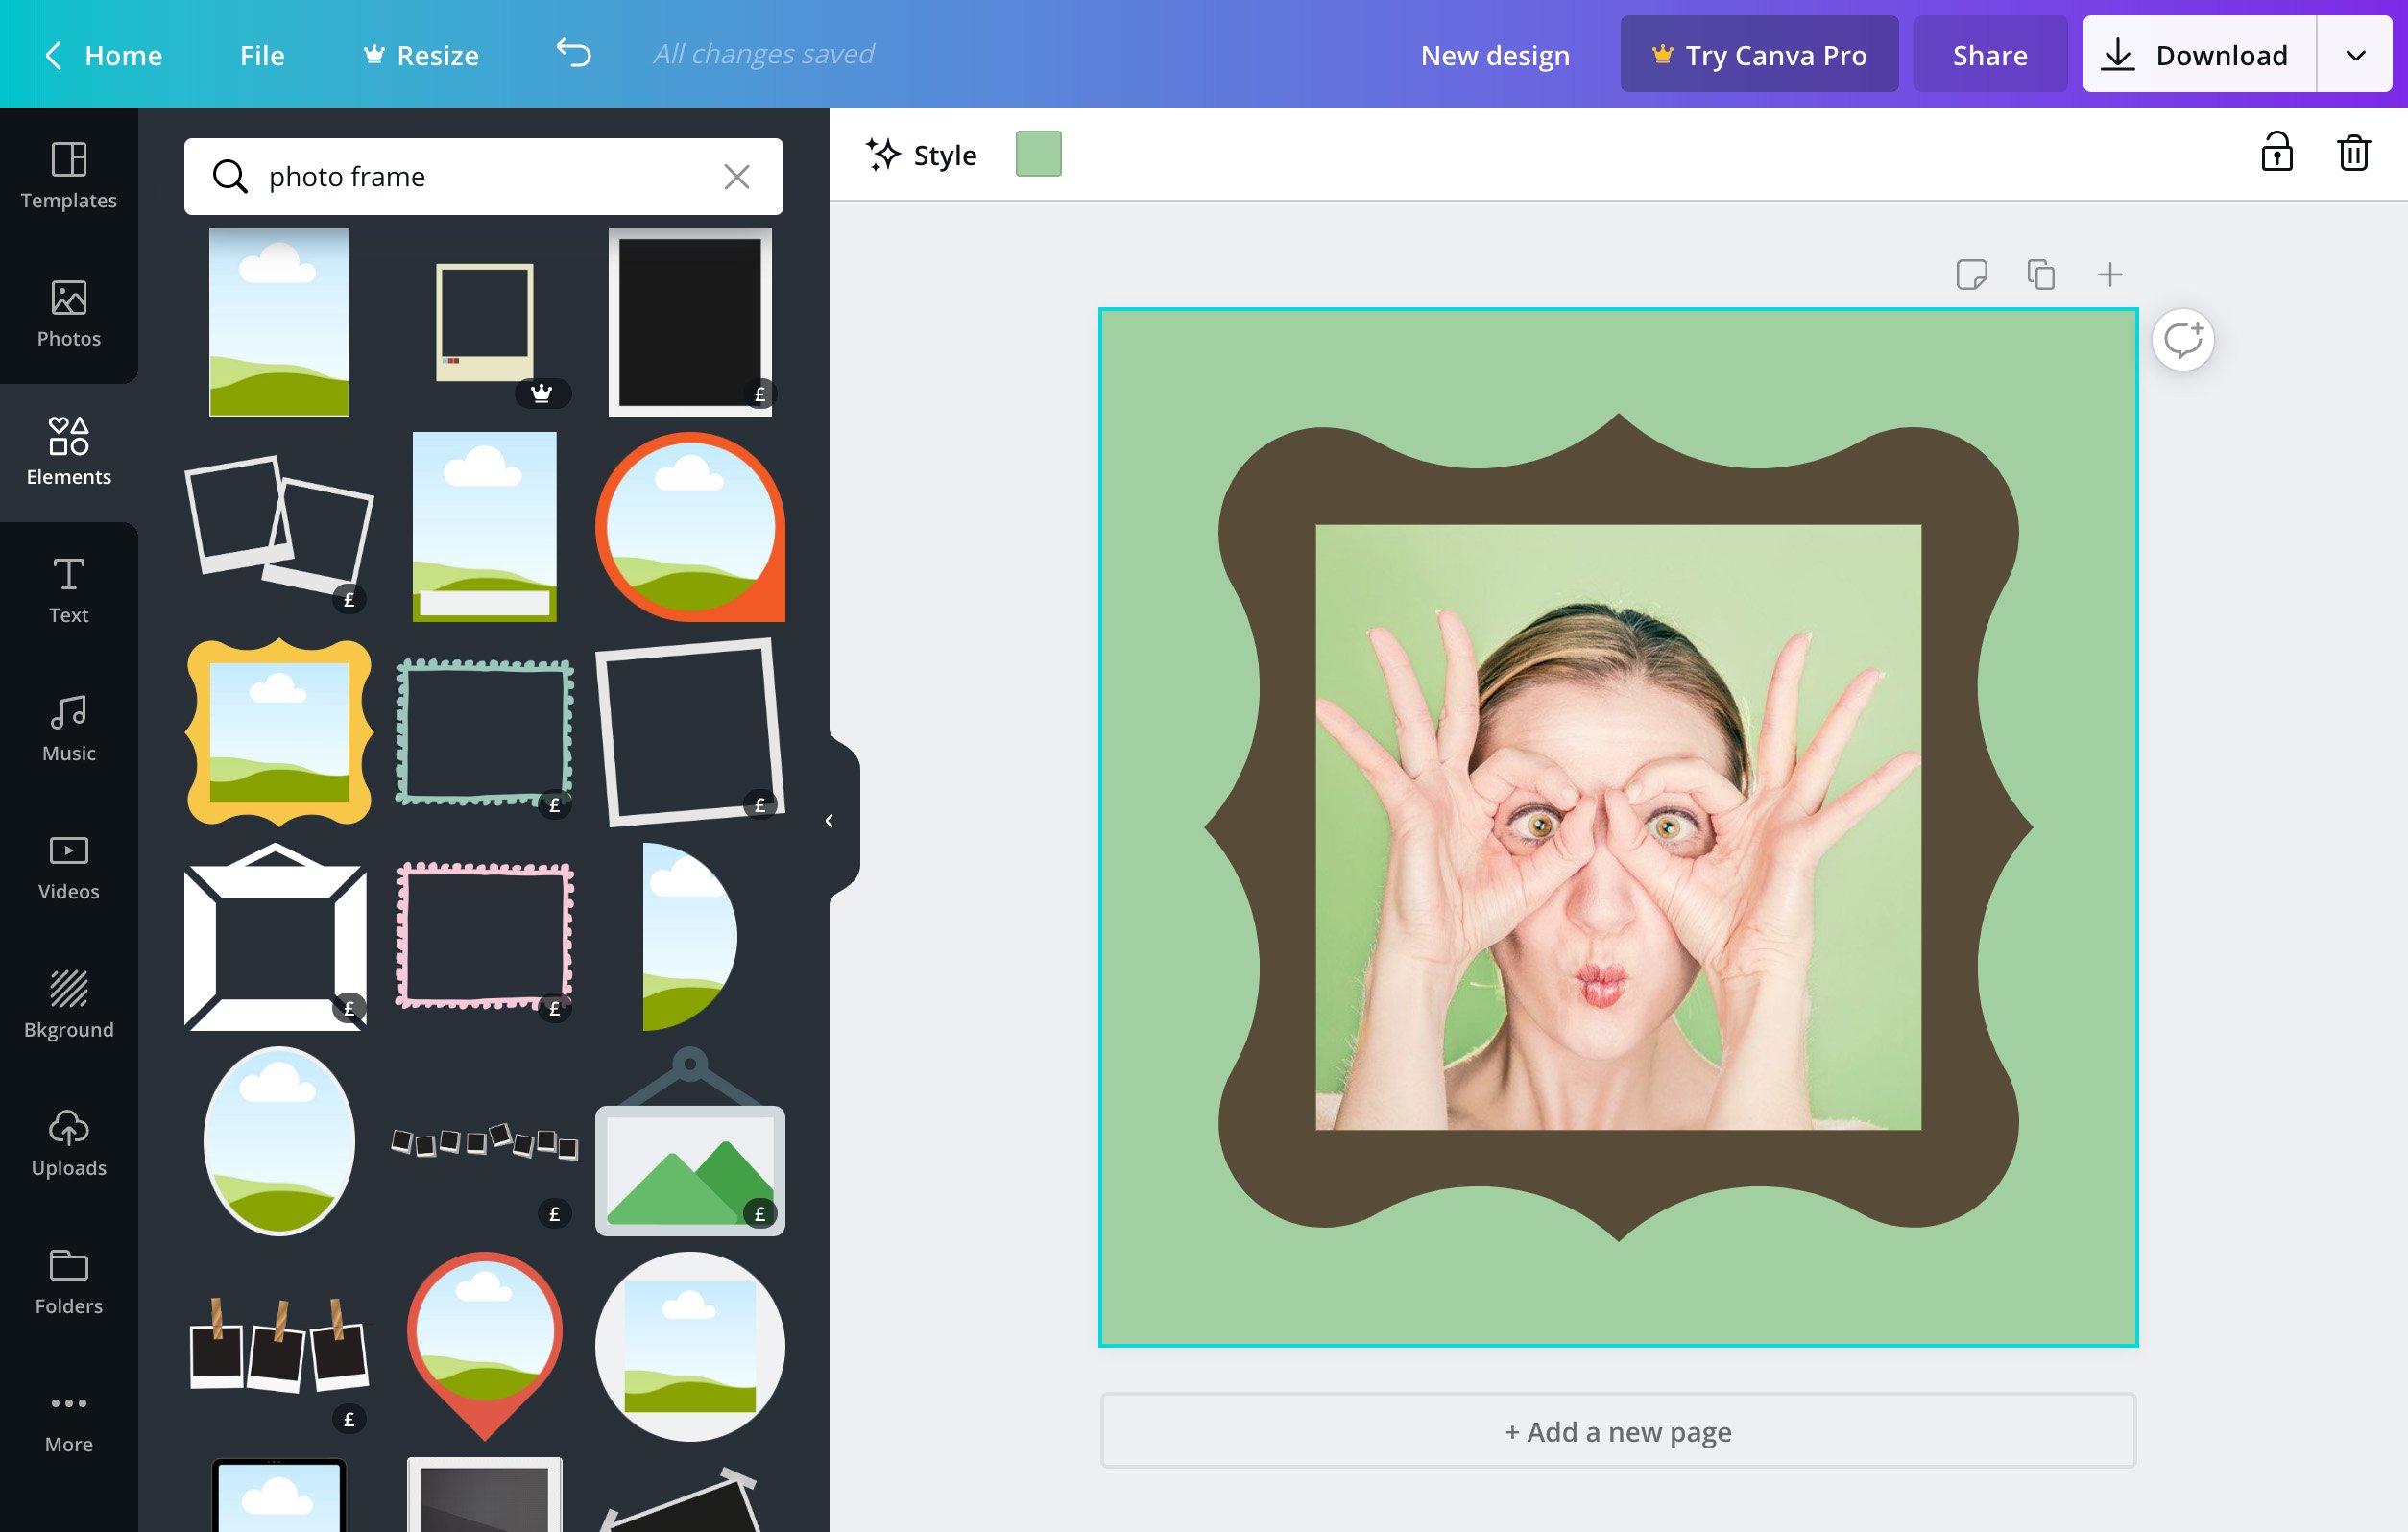
Inserting and Adjusting Images within Frames
With your frame in place, the next exciting step is to insert your image. This process is incredibly intuitive and allows for precise Photo Manipulation to achieve your desired visual effect.
- Access Your Images: Go back to the “Uploads” panel (where your own images are stored) or the “Photos” tab (for Canva’s library of Stock Photos).
- Drag and Drop into the Frame:
- Click and hold the image you want to use.
- Drag it over your design. As you hover the image over the frame, you’ll see a preview of how your image will look inside it.
- Release the mouse button when your image “snaps” into the frame. Canva automatically crops the image to fit the frame’s shape.
- Fine-Tuning Image Positioning: Don’t worry if the initial placement isn’t perfect. To adjust the image within the frame:
- Double-click anywhere on the image inside the frame. This will reveal the full, uncropped version of your image, with the frame acting as a transparent overlay.
- Click and drag the image to move it around until the desired part of the photo is visible within the frame. You can also use the white circle handles to resize the image within the frame, allowing you to zoom in or out.
- Once you’re satisfied, click “Done” or “Cancel” at the top of the editor.
- Filling Multiple Photo Placeholders: If you’ve chosen a frame with multiple sections (like a collage frame), repeat the drag-and-drop process for each section. Double-click each image individually to adjust its positioning.
This dynamic process is central to creating sophisticated Visual Designs. It allows you to experiment with different crops and compositions, turning simple images into compelling components of your overall Graphic Design.
Advanced Frame Techniques: Editing, Swapping, and Saving
Beyond basic insertion, Canva’s frames offer advanced functionalities that enhance your Editing Styles and workflow, proving their value as a versatile Image Tool. These features are crucial for refining your designs and maintaining consistency across your creative projects.
- Editing Images Within a Frame:
- To apply filters, adjust colors, or add effects (like shadows or transparency) to an image inside a frame, simply click the image once to select it (you’ll see a single bounding box, not the full image for repositioning).
- The toolbar at the top of the editor will change, offering options like “Edit photo,” “Filter,” “Adjust,” “Crop,” etc. Apply your desired edits.
- To deselect, click anywhere outside the image.
- Resizing or Editing the Frame:
- You can resize the entire frame (and the image inside it will automatically scale proportionally) by clicking on the frame (not the image) and dragging its corner handles.
- To change the color of a frame (if applicable – some frames allow this), select the frame and use the color picker tool in the toolbar. You can even fill frames with a solid color instead of an image, perfect for creating visually striking abstract backgrounds or color blocks.
- Changing the Image in a Frame:
- Method A (Drag and Replace): Simply drag a new image from your “Uploads” or “Photos” panel directly over the existing image in the frame. The new image will automatically replace the old one and even adopt any filters or effects that were previously applied, saving you time.
- Method B (Delete and Replace): Click the image in the frame once and press the “Delete” key on your keyboard (or use the trash can icon). This will remove the image, leaving the empty frame visible. Then, drag and drop your replacement image into the now-empty frame as you normally would. With this method, the new image will be fresh, without any inherited filters or effects.
- Adding Multiple Frames: You’re not limited to one frame per design! To add multiple frames:
- Go back to “Elements” > “Frames” and select another one.
- To duplicate an existing frame, select it on your canvas and click the “Duplicate” icon (often two overlapping squares) in the mini-options bar above it.
- Arrange and resize your multiple frames as needed, then drag and drop different images into each.
- Saving Frames for Future Designs (“Star” or “Add to Folder”):
- If you find a frame you particularly like or create a complex multi-frame layout you want to reuse, you can save it.
- When browsing frames in the “Elements” panel, hover over a frame and click the three dots that appear. You can then “Star” it to add it to your “Starred Folder” or “Add to Folder” to save it in a custom project folder.
- To access your saved frames later, go to “Projects” on the Canva homepage, then navigate to the “Folders” section and find your “Starred Folder” or custom folder.
These techniques allow for sophisticated Graphic Design and Photo Manipulation, enabling you to create stunning Mood Boards, Thematic Collections, and unique visual narratives that leverage your Beautiful Photography in creative ways.
Managing and Troubleshooting Your Visuals: Ensuring a Smooth Workflow
Effective Visual Design extends beyond just creativity; it also involves efficient management of your assets and the ability to troubleshoot common issues. From organizing your vast collection of Images and Photography to dealing with unexpected upload errors, understanding these practical aspects ensures a smooth workflow and minimizes frustration. Resources like Tophinhanhdep.com, with its array of Image Tools, can complement your Canva experience by helping you prepare and manage your visuals outside the platform as well.
Refining Your Images: Basic Editing and Manipulation
Canva provides a robust suite of basic editing tools that allow you to refine your images once they are in your design. While not a full-fledged Photo Manipulation software, these tools are perfect for quick adjustments that align with your desired Editing Styles and overall Visual Design.
- General Image Editing:
- Click on any image on your canvas (not necessarily within a frame) to select it.
- In the toolbar above the canvas, you’ll find options like “Edit photo,” “Filter,” “Adjust,” and “Crop.”
- Edit photo: This usually opens a side panel with more advanced options, including background remover (Pro feature), various effects, and smart mockups.
- Filter: Apply pre-set filters to change the mood or style of your image, ranging from vintage to vibrant. This is a quick way to achieve an Aesthetic consistency across your design.
- Adjust: Manually fine-tune aspects like brightness, contrast, saturation, tint, blur, shadows, highlights, and even clarity. This allows for precise control over the image’s appearance.
- Crop: Trim unwanted parts of your image. You can use freeform cropping or select a specific aspect ratio.
- Flip/Rotate: Orient your image horizontally or vertically, or rotate it to any angle.
- Important Note on Non-Destructive Editing: A key advantage of editing images in Canva is that it’s non-destructive. Any changes you make (filters, adjustments, cropping) apply only to the instance of the image within that specific design. Your original uploaded image file in the “Uploads” panel (or its source location on your computer/cloud) remains completely unaltered. This means you can use the same image in multiple designs, applying different Editing Styles to each without fear of permanently changing the original.
This flexibility in Digital Photography editing within Canva empowers you to experiment freely and adapt your visuals to different contexts, from a cheerful Wallpapers to a somber Sad/Emotional graphic.
Organizing Your Uploads and Managing Design Elements
As you use Canva more, your “Uploads” panel can become quite crowded. Good organization is essential for quickly finding your Images, Backgrounds, and specific Photo Ideas when you need them, especially if you’re working with large Thematic Collections.
- Naming Your Files: When you upload images, they often retain their original file names (e.g.,
IMG_1234.jpg). It’s highly recommended to rename your image files with descriptive keywords before uploading them to Canva. This practice makes them much easier to find later. If you forget, you can sometimes rename them within Canva’s “Projects” section by navigating to your “Uploads” folder. - Using Folders: Canva allows you to organize your designs and uploads into custom folders. From the Canva home page, go to “Projects” and then “Folders.” You can create new folders for specific projects, clients, or image categories (e.g., “Nature Photography,” “Abstract Backgrounds”). Once created, you can move uploaded images into these folders.
- Searching Your Uploads: On the Canva home page, you can use the search bar to find images within your “Uploads” folder if you’ve named them well with relevant keywords. This saves immense time compared to endlessly scrolling.
- Deleting Images or Frames:
- Deleting an Image from a Frame: Click the image once inside the frame, then press the “Delete” key on your keyboard (or click the trash can icon in the toolbar). This removes the image, leaving the empty frame.
- Deleting an Image Permanently (from Uploads): Go to your “Uploads” panel. Hover over the thumbnail of the image you want to delete. Click the three dots (ellipsis) that appear and select “Delete.” Be mindful that this permanently removes the image from your Canva library.
- Deleting a Frame: Click anywhere on the frame (making sure not to select the image inside it), then press “Delete” on your keyboard (or click the trash can icon in the toolbar). This removes the entire frame and its contents from your design.
Proper organization is an Image Tool in itself, streamlining your workflow and enabling you to efficiently tap into your Image Inspiration & Collections for any Visual Design project.
Common Upload Errors and Solutions
Even with a user-friendly platform like Canva, you might occasionally encounter issues when uploading images. Understanding the most common causes and their solutions can help you troubleshoot effectively and get back to your Creative Ideas faster.
- No Internet Connection:
- Issue: The most basic problem. If your internet connection is unstable or non-existent, Canva won’t be able to upload your files.
- Solution: Double-check your Wi-Fi or Ethernet connection. Try opening another website (like Tophinhanhdep.com) to confirm your internet is working.
- File Type Not Supported:
- Issue: You’re trying to upload a file format that Canva doesn’t accept (e.g., PSD, AI, or certain obscure video formats).
- Solution: Refer back to the “Supported Image Formats” section. If your file is in an unsupported format, you’ll need to convert it. Tophinhanhdep.com offers various Image Converters that can quickly transform your files into compatible JPG or PNG formats.
- File Too Large:
- Issue: While Canva is generous, extremely large image files (especially very high-resolution photos or lengthy videos) can sometimes cause upload timeouts or errors.
- Solution: For images, consider resizing them slightly or compressing them without significant loss of quality. Tophinhanhdep.com provides Image Compressors and Optimizers that can help reduce file size while maintaining visual integrity. For videos, ensure they are within reasonable limits (e.g., under 1GB for free accounts).
- Running Out of Storage Space:
- Issue: This is less common for image files but can occur if you have a vast number of uploads, especially if you’re a free user.
- Solution: Check your current storage usage in your Canva account. If you’re nearing your limit (5GB for Free, 100GB for Education/Nonprofit, 1TB for Pro/Teams), consider deleting old, unused uploads from your “Uploads” folder or upgrading your Canva plan.
- Corrupted File:
- Issue: Very rarely, the image file itself might be corrupted and unreadable.
- Solution: Try opening the image in another program on your computer to see if it’s functional. If it’s corrupted, you might need to find an alternative version or recreate it.
If you continue to experience persistent upload errors, it’s always advisable to contact Canva’s support team through their help section. By being aware of these potential issues and leveraging appropriate Image Tools, you can ensure a smooth and efficient design process within Canva, making your Visual Design journey more enjoyable and productive.
Canva has revolutionized the way we approach Visual Design, making it incredibly simple to create visually stunning content. Mastering the art of inserting and manipulating images within this powerful platform is fundamental to unlocking your full creative potential. Whether you’re uploading your High Resolution Digital Photography, experimenting with Stock Photos, or incorporating sophisticated Photo Manipulation techniques with frames, every step contributes to a more polished and impactful design.
From finding the perfect Background for your project to crafting a unique Aesthetic using various Editing Styles, Canva empowers you to translate your Photo Ideas into captivating realities. And when you need to prepare your images for optimal performance – be it converting formats, compressing file sizes, or upscaling resolution – remember that Tophinhanhdep.com offers a comprehensive suite of Image Tools designed to support every aspect of your visual workflow.
We encourage you to experiment with the diverse range of frames, explore the vast collections of Wallpapers, Nature, Abstract, and Sad/Emotional imagery, and let your imagination soar. The journey of Visual Design is one of continuous discovery, and with Canva and the resources from Tophinhanhdep.com, you have everything you need to create truly Beautiful Photography and graphic masterpieces. Start creating today and see your designs transform!