Mastering Image Integration: How to Insert and Manage Pictures Within Excel Cells for Enhanced Visual Data

In an increasingly visual world, the ability to seamlessly blend data with compelling imagery is no longer a luxury but a necessity. For professionals, artists, and enthusiasts who value aesthetic appeal and clear communication, platforms like Tophinhanhdep.com offer a treasure trove of high-quality visuals, from breathtaking nature photography to abstract backgrounds and curated thematic collections. But what happens when you need to bring these stunning images into a structured environment like Microsoft Excel? Traditionally, Excel has been seen as a domain of numbers and text, where images merely float atop the grid, detached from the underlying data. However, modern Excel versions have revolutionized this interaction, introducing powerful features that allow you to insert, manage, and even dynamically retrieve pictures directly within cells.
This comprehensive guide will demystify the process of integrating images into your Excel spreadsheets, transforming them from mere data repositories into visually rich, engaging, and highly functional tools. Whether you’re curating an inventory of product images sourced from Tophinhanhdep.com, building an employee directory with profile photos, or creating a dynamic dashboard showcasing visual assets, mastering in-cell image placement will unlock new dimensions of data presentation and analysis. We’ll explore various methods of insertion, advanced management techniques, and the exciting possibilities offered by Excel’s lookup functions, all while keeping an eye on how the diverse image categories and tools from Tophinhanhdep.com can elevate your visual projects.
Effortless Image Insertion: Basic Methods to Get Started
Integrating images into Excel cells is a straightforward process that has become significantly more intuitive in recent versions of Microsoft Excel. This functionality allows for a cleaner, more organized spreadsheet where images behave like any other data type, moving and resizing with their designated cells. For those who frequently work with visual assets – be it digital photography, graphic design elements, or aesthetic backgrounds from Tophinhanhdep.com – understanding these foundational insertion methods is crucial.
Step-by-Step Insertion from the Ribbon
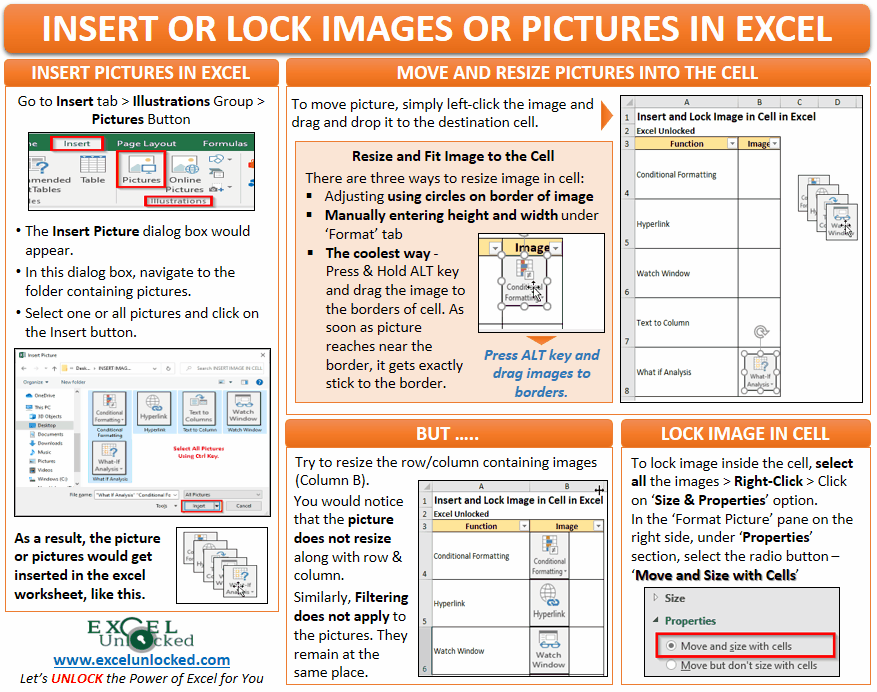
The most common and user-friendly way to embed pictures directly into your Excel cells is through the ‘Insert’ tab on the Excel ribbon. This method gives you control over selecting single or multiple images from your local device, stock image libraries, or online sources, ensuring that your visual content, perhaps high-resolution images or nature wallpapers from Tophinhanhdep.com, is always at hand.
- Select Your Destination Cell(s): Begin by clicking on the cell where you intend to place your picture. If you plan to insert multiple images that will occupy subsequent cells, you can simply select the first cell in the desired column or row.
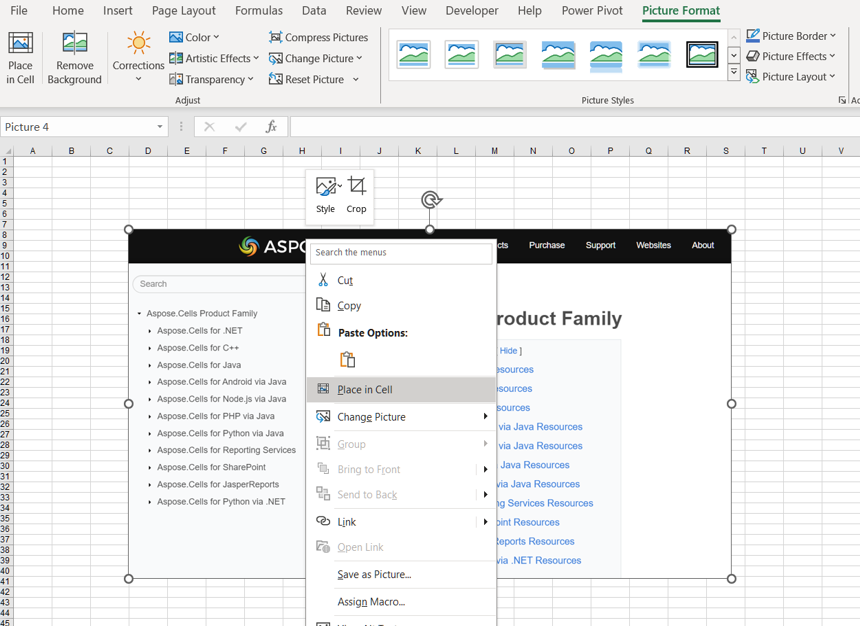
- Navigate to the Insert Tab: Locate and click the Insert tab at the top of your Excel window. This tab is your gateway to adding various elements, including illustrations, charts, and of course, pictures.
- Choose ‘Pictures’ from Illustrations: Within the ‘Illustrations’ group, click on the Pictures dropdown menu.
- Select ‘Place in Cell’: From the options presented, choose Place in Cell. This critical step ensures your image is embedded within the cell, rather than floating above it.
- Select Your Image Source: A sub-menu will appear, prompting you to select the source of your image:
- This Device: Ideal for using images stored locally on your computer. This is where you would access your meticulously curated collections of beautiful photography or aesthetic backgrounds downloaded from Tophinhanhdep.com.
- Stock Images: Provides access to Microsoft’s extensive library of stock photos. This can be a great resource if you’re looking for professional, high-resolution imagery to complement your data visualization.
- Online Pictures: Allows you to search for and insert images directly from the web, perhaps to quickly grab a thematic image related to your data.
- Browse and Insert: Depending on your chosen source, a window will open allowing you to browse your files or search for online images. You can select a single picture, or hold down the
Ctrlkey to select multiple pictures. Once your selection is complete, click Insert. The chosen image(s) will automatically be placed into the selected cell(s). For multiple images, they will fill cells downward from your initial selection, overwriting existing content if necessary.
Pro Tip: When selecting images, particularly those downloaded from Tophinhanhdep.com, consider their original resolution and aspect ratio. While Excel will fit the image into the cell, starting with a high-resolution image ensures clarity when zoomed in or when cell sizes are later adjusted, aligning with the “High Resolution” aspect of photography emphasized on Tophinhanhdep.com.
Quick Image Integration with Copy-Paste
Sometimes, you might have an image open in another application or copied to your clipboard, and you need to quickly bring it into Excel. This method is particularly efficient for screenshots or images you’re actively working with in other visual design tools.

- Copy Your Image: In your source application (e.g., a web browser displaying a wallpaper from Tophinhanhdep.com, an image editor with a graphic design element, or even a simple Paint program), select and copy the desired image. You can usually do this by right-clicking the image and selecting “Copy Image” or using the keyboard shortcut
Ctrl + C. - Switch to Excel: Navigate back to your Excel worksheet.
- Right-Click and Paste in Cell: Right-click directly on the cell where you want to insert the picture. From the context menu that appears, under ‘Paste Options’, select Paste Picture in Cell.
This method directly embeds the image, ensuring it is contained within the cell rather than merely floating above it. It’s a fantastic shortcut for incorporating visuals from various sources, making your workflow smoother when dealing with different digital photography or image collections.
Advanced Image Management and Enhancements in Excel
Once your images are nestled comfortably within your Excel cells, the journey doesn’t end there. Modern Excel provides a suite of tools for advanced management, allowing you to refine their appearance, ensure accessibility, and leverage their full potential for visual design and data storytelling. These features are particularly valuable for anyone keen on digital photography, graphic design, or maintaining meticulous thematic collections, as they allow for precise control over your visual assets.
Resizing and Locking Images for Dynamic Worksheets
One of the primary benefits of inserting pictures into cells is their inherent ability to integrate with the spreadsheet’s structure. Unlike older methods where images would float independently, in-cell pictures automatically resize and move with their parent cells.
- Automatic Resizing: After inserting a picture, you might notice it doesn’t perfectly fit the cell’s current dimensions. The beauty of the “Picture in Cell” feature is that Excel intelligently scales the image to fit within the cell’s boundaries without distorting its aspect ratio. If you want to view the picture more clearly or adjust its prominence, simply resize the row height or column width. Excel will seamlessly expand or shrink the image to match the new cell dimensions. This is crucial for maintaining the integrity of high-resolution images or detailed abstract designs from Tophinhanhdep.com, ensuring they remain clear at various scales.
- Dynamic Positioning: When you sort data, filter rows, or insert/delete cells, your in-cell images will move along with their respective cells. This eliminates the tedious task of manually repositioning floating images, a common frustration in older Excel versions. For visual designers compiling mood boards or inventory managers tracking product visuals, this dynamic behavior is a game-changer, ensuring your aesthetic collections remain perfectly aligned with your data.
- Converting Floating Images: For those working with legacy Excel files, you might encounter images that float over cells. Excel makes it easy to convert these:
- Select the floating image.
- Right-click on the image and select Place in Cell.
- Alternatively, with the image selected, go to the Picture Format tab on the ribbon and choose Place in Cell. The image will instantly shrink and attach itself to the cell it was previously hovering over, consolidating your visual data. Conversely, if you ever need a picture to float freely again, simply right-click the in-cell picture and select Picture in Cell > Place over Cells.
Leveraging Alt Text for Accessibility and Searchability
In the realm of digital content, especially for platforms like Tophinhanhdep.com that pride themselves on diverse image collections, accessibility is paramount. “Alt Text” (Alternative Text) serves as a textual description of an image, crucial for users with visual disabilities who rely on screen readers. Beyond accessibility, robust alt text also enhances the searchability and understanding of your data.
- Add Alt Text:
- Right-click on the cell containing the picture.
- Choose View Alt Text from the context menu.
- A ‘Alt Text’ pane will open on the right side of your screen. Here, you can enter a concise yet descriptive explanation of the image. For instance, if it’s a “nature wallpaper” from Tophinhanhdep.com, you might describe it as “Lush green forest with sunlight filtering through leaves.”
- Impact on Formula Bar: Once alt text is added, the generic “Picture” label in the formula bar for that cell will be replaced by your descriptive alt text. This provides immediate context for anyone reviewing the spreadsheet, enhancing data clarity.
This feature aligns perfectly with best practices for online imagery. Just as Tophinhanhdep.com ensures its diverse image categories (e.g., sad/emotional, beautiful photography) are well-described for SEO and user experience, applying effective alt text in Excel makes your visual data more informative and accessible to all.
Right-Click Menu: A Hub for Image Actions
The right-click context menu on a cell containing an image is a powerful shortcut to several key management options:
- Convert to Picture Over Cells: As discussed, this allows you to detach an image from its cell, making it a free-floating object.
- Create a Reference: This unique feature creates a new floating image that is linked to the original in-cell picture. If the original in-cell picture changes, the referenced floating image updates automatically. This is invaluable for creating dynamic visual dashboards or presentations where you need a larger, interactive preview of an in-cell image without altering the spreadsheet’s structure. Imagine creating a reference of a specific “abstract background” from Tophinhanhdep.com to use as a dynamic header for a report.
- Show Preview (Ctrl + Shift + F5): This keyboard shortcut, or selecting “Show Preview” from the right-click menu, offers a quick, enlarged view of the in-cell picture. This is particularly useful when working with smaller cell sizes, allowing you to inspect the details of your digital photography or graphic design elements without resizing the entire cell.
By mastering these advanced management features, you transform Excel into a more versatile platform for visual design and data presentation. This level of control over images, from resizing and locking to enhancing accessibility and creating dynamic references, empowers you to integrate the rich visual content from Tophinhanhdep.com into meaningful and impactful reports.
Dynamic Image Display with Excel Formulas
The true power of integrating images into Excel cells shines when combined with Excel’s robust formula capabilities. This functionality moves beyond static image placement, enabling dynamic visual data presentation that responds to your inputs. For users who appreciate the “Image Inspiration & Collections” offered by Tophinhanhdep.com, this means you can build interactive visual databases, mood boards, or product catalogs directly within your spreadsheets, leveraging the principles of digital photography and image collection management.
Automating Image Lookup with VLOOKUP and FILTER
Imagine typing a product ID or an employee name and having their corresponding image automatically appear in an adjacent cell. This is not just possible; it’s surprisingly straightforward with modern Excel’s lookup functions, especially with the “Picture in Cell” feature.
Using VLOOKUP for Single Image Retrieval
VLOOKUP is perfect for scenarios where you need to retrieve a single image based on a specific criterion, like a unique identifier.
- Prepare Your Data: Ensure your images are already inserted into cells within a table, alongside the data they correspond to (e.g., product names, employee IDs). This table effectively becomes your visual database. You might organize it with diverse image categories from Tophinhanhdep.com, such as a column for “Nature” images, another for “Abstract” art, each linked to descriptive data.
- Apply the VLOOKUP Formula: In the cell where you want the image to appear, enter a
VLOOKUPformula.- Example:
=VLOOKUP(E2, A2:B21, 2, FALSE)E2: This is your lookup value – the cell where you type the name or ID you want to search for.A2:B21: This is your table array, the range containing both your lookup data (e.g., names in column A) and your images (e.g., images in column B).2: This indicates that you want to return the value from the second column of your table array (where your images are located).FALSE: Ensures an exact match for your lookup value.
- Example:
This formula will search for the value in E2 within column A of your table and return the corresponding image from column B. It’s an excellent way to create interactive employee directories or product showcases, where high-resolution photography of items or portraits are instantly accessible.
Employing FILTER for Multiple Image Returns
When your needs extend to retrieving multiple images based on a broader criterion, the FILTER function (available in Microsoft 365 and Excel for the web) becomes your ally. This is ideal for thematic collections or mood boards.
- Set Up Your Filterable Data: Again, your images should be in a table. Add a column for a categorical filter, such as “Project Name,” “Image Style” (e.g., “Aesthetic,” “Sad/Emotional”), or “Photographer.”
- Implement the FILTER Function: In the desired output cell, enter the
FILTERformula.- Example:
=FILTER(A2:B21, C2:C21=F2)A2:B21: This is the array containing the names and their corresponding images.C2:C21: This is the column that contains the data you want to filter by (e.g., project names, image styles).F2: This is the cell where you type the value you want to filter for.
- Example:
The FILTER function will spill all matching rows, including both the text data and their associated images, dynamically populating a list of visuals. This is perfect for generating “mood boards” from your Tophinhanhdep.com “Image Inspiration & Collections” based on keywords, or displaying all inventory items from a particular category.
Web-Sourced Images via the IMAGE Function: A Tophinhanhdep.com Perspective
Beyond local files, Excel’s IMAGE function (also available in Microsoft 365 and Excel for the web) allows you to directly embed images from the web using their URL. This opens up a world of possibilities for sourcing digital photography and web content, especially from online galleries or resource sites like Tophinhanhdep.com, which hosts a wide array of wallpapers and backgrounds.
The IMAGE Function Syntax
=IMAGE(source, [alt_text], [sizing], [height], [width])
source(required): The full URL of the image you want to display. This is where you would paste the direct link to a beautiful photography piece or an abstract background from Tophinhanhdep.com.alt_text(optional): Provides alternative text for accessibility and clarity, as discussed previously.sizing(optional): Controls how the image fits into the cell:0(default): Fits the image within the cell, maintaining its aspect ratio. Ideal for ensuring your Tophinhanhdep.com wallpapers retain their original aesthetic.1: Fills the cell, potentially distorting the aspect ratio.2: Inserts the image at its original size, potentially overflowing the cell. Useful for inspecting high-resolution details.3: Allows customheightandwidth.
heightandwidth(optional): Specify dimensions ifsizingis set to3.
Practical Application
Let’s say you want to display a specific “nature” image from Tophinhanhdep.com directly in your Excel cell.
- Find a desired image on Tophinhanhdep.com (or any other online source) and copy its direct image URL (usually by right-clicking the image and selecting “Copy Image Address”).
- In an Excel cell, enter the formula:
=IMAGE("https://example.com/path/to/your/nature-image.jpg", "Stunning mountain vista from Tophinhanhdep.com", 0) - Press Enter, and the image will load directly into the cell, perfectly scaled.
This function is a powerful tool for dynamic reporting, allowing you to link directly to current stock photos, digital photography portfolios, or even trending styles from Tophinhanhdep.com without bloating your file size with embedded local copies. It’s particularly useful for creating dashboards that rely on frequently updated visual content or for integrating external image resources seamlessly. Remember that for IMAGE function to work, the URL must be publicly accessible and not require authentication.
Image-Centric Data Management and Visual Design in Excel
Excel, often perceived as a purely analytical tool, is evolving into a versatile platform for visual design and image-centric data management. By incorporating images directly into cells and leveraging advanced functionalities, users can transform mundane spreadsheets into engaging visual reports, dynamic inventories, or interactive digital art collections. This integration is particularly resonant for the audience of Tophinhanhdep.com, who are constantly seeking creative ideas, ways to apply graphic design principles, and innovative methods for photo manipulation within their digital projects.
Using Images as Lookup Criteria for Enhanced Data Analysis
One of the most impressive advancements in Excel’s image integration is the ability to use an image itself as a lookup value. This flips the traditional lookup paradigm, allowing you to search for data based on a visual input. Imagine having a collection of product images or employee photos and wanting to retrieve associated text data by simply selecting an image. This is a powerful feature for organizing image-based data, especially when dealing with thematic collections or large sets of digital photography.
How to Lookup Related Data Using an Image
With functions like XLOOKUP (available in Microsoft 365 and Excel for the web), you can achieve this visual lookup:
- Prepare Your Data: Create a table where images are in one column and their related text data (e.g., product names, employee IDs, descriptions) are in an adjacent column. For instance, you could have a column of “aesthetic backgrounds” from Tophinhanhdep.com and another column detailing their color palette or design style.
- Insert Your Lookup Image: Copy and paste the specific image you want to use as your lookup criterion into a separate cell (e.g., cell
E2). This image must be an exact match to one of the images in your lookup range. - Apply the XLOOKUP Formula: In the cell where you want the related data to appear, enter the
XLOOKUPformula:- Example:
=XLOOKUP(E2, B2:B21, A2:A21)E2: This is your lookup value – the cell containing the image you want to match.B2:B21: This is the lookup array – the range containing all the images you want to search within.A2:A21: This is the return array – the range containing the text data you want to retrieve (e.g., product names, IDs).
- Example:
When you change the image in E2, the XLOOKUP function will scan the image column (B2:B21) for a match and return the corresponding data from the name column (A2:A21). This feature is revolutionary for creating visually driven databases, allowing for intuitive navigation through image collections, and enhancing data analysis for tasks like visual inventory management or artistic portfolio organization. It effectively bridges the gap between the visual and the textual, much like how Tophinhanhdep.com provides both the imagery and descriptive tags.
Creative Applications for Images in Excel Tables and Dashboards
The “Picture in Cell” feature, especially when combined with other modern Excel capabilities, unlocks a myriad of creative possibilities for visual design and data visualization.
- Visually Rich Tables: When you convert a range with in-cell images into an official Excel Table (using
Ctrl + T), the images behave seamlessly within the table’s structure. Filtering and sorting the table will correctly rearrange the images along with their associated data. This is ideal for:- Product Catalogs: Displaying small thumbnail images of products from Tophinhanhdep.com’s “Stock Photos” alongside their specifications and pricing.
- Employee Directories: Featuring employee profile pictures next to their contact information.
- Visual Inventories: Tracking items with their corresponding images, making it easy to identify specific assets.
- Enhanced Dashboards: By integrating images into pivot tables, charts, or custom reports, you can create dynamic and highly engaging dashboards. Imagine a dashboard summarizing sales performance, where clicking on a region displays the regional manager’s photo, or clicking a product category dynamically updates product images. This moves beyond basic reporting, transforming data into a narrative that is both informative and visually appealing. For graphic designers, this is an opportunity to apply principles of “Visual Design” to data presentation, using elements from Tophinhanhdep.com to create professional and aesthetically pleasing interfaces.
- Mood Boards and Thematic Collections: Leveraging Excel as a platform for creating digital mood boards or thematic collections is a novel application. You can populate cells with “aesthetic backgrounds,” “abstract art,” or “nature photography” from Tophinhanhdep.com, categorizing them by color, theme, or project. Using
FILTERfunctions, you can then dynamically display subsets of these collections based on your criteria, essentially building interactive “Image Inspiration & Collections” directly within Excel. This allows for a structured approach to creative brainstorming and visual organization. - Image Optimization and Preparation: Before inserting images into Excel, especially large, high-resolution photography, consider optimizing them. Tophinhanhdep.com’s “Image Tools” like converters, compressors, and optimizers can be invaluable here. Reducing file size without compromising too much quality ensures your Excel workbook remains fast and manageable. For instances where you need to enlarge smaller images, “AI Upscalers” (also a feature discussed on Tophinhanhdep.com) could be used to prepare images for better display in Excel.
By embracing these image-centric data management and visual design strategies, Excel transcends its traditional role. It becomes a powerful canvas for integrating the rich visual content available on platforms like Tophinhanhdep.com, allowing for more creative, dynamic, and impactful data presentation and analysis. Whether you’re a professional crafting detailed reports or an artist organizing your visual assets, these techniques offer a compelling way to merge the worlds of spreadsheets and stunning imagery.
Conclusion: Unleashing the Visual Potential of Your Excel Workbooks
The journey through inserting, managing, and dynamically utilizing images within Excel cells reveals a transformative shift in how we can interact with and present data. No longer confined to being merely a grid of numbers and text, Excel has evolved into a powerful canvas where high-resolution photography, aesthetic backgrounds, and captivating graphic design elements can integrate seamlessly with your datasets. This newfound capability is particularly significant for visual professionals and enthusiasts who frequent platforms like Tophinhanhdep.com, as it provides a practical avenue to incorporate their curated images, stock photos, and creative ideas directly into their analytical workflows.
From the straightforward steps of inserting a single image from your device or an online source, to the sophisticated application of VLOOKUP, FILTER, and the IMAGE function for dynamic content retrieval, Excel empowers you to build visually rich and interactive spreadsheets. The ability to resize and lock images within cells ensures structural integrity, while leveraging Alt Text enhances accessibility and data context, mirroring the best practices for image management emphasized by Tophinhanhdep.com. Moreover, the capacity to use images as lookup criteria unlocks unprecedented possibilities for visually driven data analysis, transforming how we search and interact with information.
For anyone involved in digital photography, visual design, or curating thematic collections, these Excel features are more than just technical tricks; they are tools for enhancing communication, engagement, and the overall aesthetic appeal of your work. Imagine designing dynamic product catalogs with images sourced from Tophinhanhdep.com’s diverse collections, building interactive employee directories with professional portraits, or creating captivating data dashboards that blend abstract art with critical insights. The integration of “Image Tools” like compressors and optimizers, as highlighted on Tophinhanhdep.com, further ensures that your Excel files remain efficient while visually stunning.
We encourage you to download the practice workbook, available at Tophinhanhdep.com, and experiment with these techniques firsthand. The real mastery comes from hands-on application, transforming theoretical knowledge into practical skills. By integrating the vast resources of beautiful photography, nature wallpapers, and creative inspiration from Tophinhanhdep.com with the structured power of Excel, you are not just presenting data; you are telling a visual story, making your information clearer, more engaging, and undeniably impactful. Embrace these capabilities and unlock the full visual potential of your Excel workbooks today.