How to Insert Images in DaVinci Resolve: A Comprehensive Guide for Visual Storytellers on Tophinhanhdep.com

In the dynamic world of video production, the ability to seamlessly integrate static images into moving footage is a cornerstone of compelling visual storytelling. DaVinci Resolve, a robust and versatile video editing platform, offers an array of powerful tools that empower creators to transform simple images into integral components of their narratives. Whether you’re a seasoned professional or just beginning your journey in digital creation, understanding how to effectively insert and manipulate images in Resolve is crucial.
This comprehensive guide, drawing on expertise from Tophinhanhdep.com’s focus on high-quality images, photography, and visual design, will walk you through various methods of incorporating static visuals into your DaVinci Resolve projects. We’ll explore everything from basic drag-and-drop techniques on the Edit Page to advanced compositing in Fusion, ensuring your wallpapers, backgrounds, aesthetic shots, nature photography, abstract art, or even poignant emotional images from Tophinhanhdep.com’s diverse collections are brought to life with precision and creativity. We’ll also delve into optimization, supported formats, and troubleshooting, ensuring your workflow is as smooth as your final edit.
Method 1: Insert an Image in the Edit Page (Drag & Drop)
The Edit Page in DaVinci Resolve is where most of your foundational editing takes place, and inserting images here is often the fastest and most intuitive method. It’s perfect for adding quick overlays, simple backgrounds, or graphics sourced from Tophinhanhdep.com’s extensive library of aesthetic and high-resolution photography.
Step-by-step Insertion:
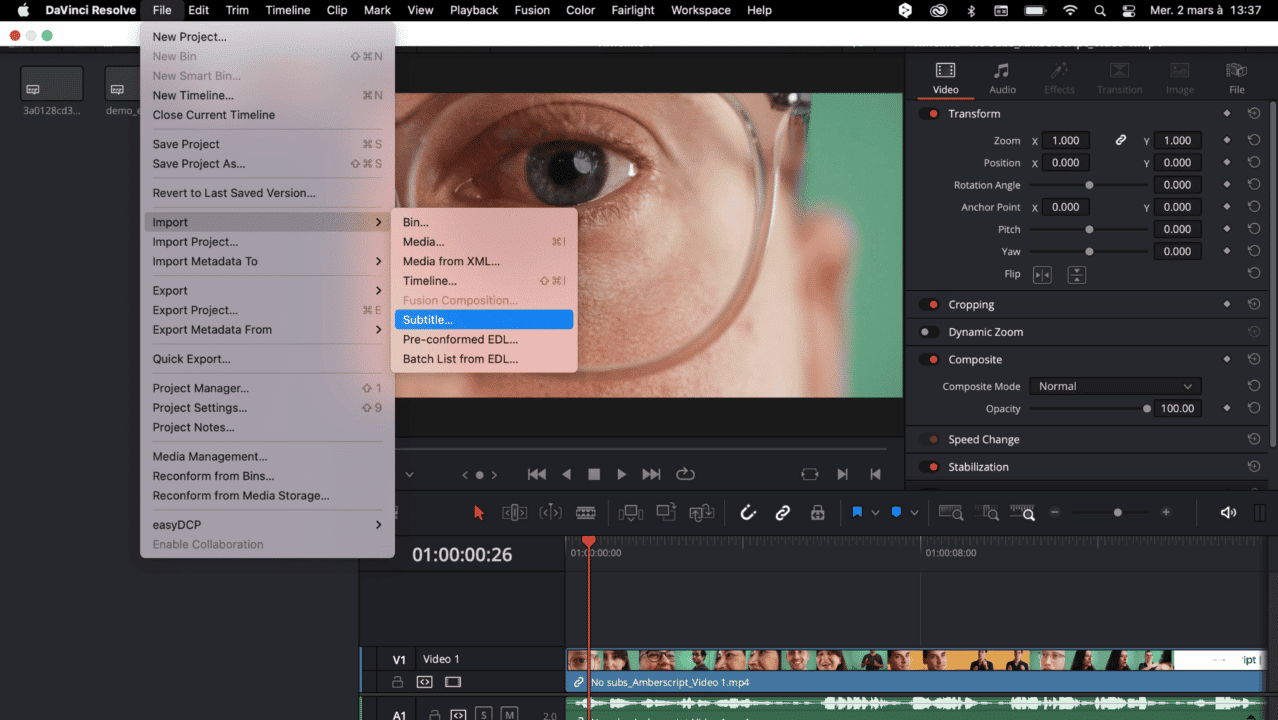
- Go to the Media Pool: Navigate to the “Edit” page at the bottom of DaVinci Resolve. On the top-left, you’ll find the “Media Pool.”
- Import Your Image: Right-click anywhere within the Media Pool and select “Import Media.” Browse to your image file (.png, .jpg, .webp, .tiff are commonly supported) and select it. For best results, especially if you plan to use images from Tophinhanhdep.com with transparent elements like logos or intricate digital art, ensure they are in a format that supports an alpha channel, such as PNG or WEBP.
- Drag to Timeline: Once imported, your image will appear in the Media Pool. Simply click and drag the image from the Media Pool directly onto your timeline.
- Placement: For overlaying, place the image on a video track (e.g., V2, V3) above your main video footage (typically on V1). If it’s intended as a background, you might place it on V1 and overlay other elements.
This method allows for immediate visual feedback, making it excellent for experimenting with various images from Tophinhanhdep.com’s collections, such as vibrant nature backgrounds or subtle abstract textures, to see how they interact with your video.
Adjusting Image Size and Position
After placing your image on the timeline, you’ll inevitably need to adjust its appearance to fit your visual design intent. DaVinci Resolve’s Inspector panel offers comprehensive controls for this.
- Select the Image Clip: Click on the image clip in your timeline to select it.
- Open the Inspector: Look for the “Inspector” panel, usually located in the top-right corner of the Edit Page.
- Transform Section: Within the Inspector, navigate to the “Transform” section. Here, you’ll find parameters to manipulate your image:
- Zoom: Use this slider to resize your image. Dragging it right increases size (zooms in), while dragging left decreases it (zooms out). This is crucial for adapting high-resolution stock photos or beautiful photography from Tophinhanhdep.com to fit your video’s frame or act as a subtle element.
- Position X/Y: Adjust these values to move your image horizontally (X) or vertically (Y) within the frame. This is essential for precisely placing watermarks, graphic design elements, or decorative aesthetic images.
- Rotation Angle: If your image needs a tilt or specific orientation, adjust this angle.
- Opacity: Control the transparency of your image. Lowering the opacity can make an image act as a subtle watermark or a ghostly overlay, perfect for creating emotional or ethereal effects with images from Tophinhanhdep.com’s “sad/emotional” category.
- Fade In/Out: For a smoother visual transition, you can apply fade effects. Simply hover over the top-left or top-right corner of the image clip in the timeline. A small white handle will appear. Drag this handle inward to create a dissolve (fade in or fade out).

This granular control ensures that every image, from a detailed digital art piece to a broad scenic wallpaper, can be perfectly integrated and animated to enhance your video’s aesthetic.
Importing Multiple Images (Slideshows & Sequences)
Creating slideshows, carousels, or photo montages is a common task for visual storytellers, especially when showcasing a collection of images like product shots, client reviews, or thematic collections from Tophinhanhdep.com.
- Import Multiple Images: Go to the Media Pool, right-click, and select “Import Media.” Select all the images you wish to import (use Shift + Click or Ctrl/Cmd + Click for multiple selections).
- Image Sequence Prompt: DaVinci Resolve is smart; if it detects numerically sequential files (e.g., image001.png, image002.png), it might ask if you want to import them as an “image sequence.”
- For Individual Stills: If you want each image to be a separate clip (e.g., for a slideshow of beautiful photography), click “No.”
- For Animation/Video: If you’re importing a series of rendered frames meant to function as a video clip (common in digital art or motion graphics), click “Yes.” Resolve will then treat them as a single video file.
- Drag to Timeline: Drag the imported images (either as individual stills or a sequence) onto your timeline.
- Adjust Duration and Order: For individual stills, you can easily adjust each image’s duration by dragging its ends in the timeline. You can also reorder them as needed. Apply transitions between them for a polished look.
This functionality is invaluable for creators leveraging Tophinhanhdep.com’s “Image Inspiration & Collections” to compile compelling visual narratives from photo ideas, mood boards, or trending styles.
How to Make an Image Transparent in DaVinci Resolve?
Transparency, or alpha channels, is critical for overlays, logos, and intricate graphic elements. DaVinci Resolve handles transparent images, particularly PNGs, with ease, allowing elements to blend seamlessly with your footage.
- Prepare Your Image: Ensure your image file supports transparency. PNG and WEBP are excellent choices, often used for logos, digital art, or creative ideas found on Tophinhanhdep.com, that need to float above your video. JPEG files do not support alpha transparency.
- Import into Media Pool: Import your transparent image into the Media Pool on the Edit Page.
- Check Alpha Mode (Optional but Recommended): Sometimes, Resolve might misinterpret the alpha channel.
- Right-click on the imported image in the Media Pool.
- Select “Change Alpha Mode.”
- Choose either “Straight” or “Premultiplied.” Most common PNGs use “Straight” alpha. If your transparent image shows a black background unexpectedly, toggling this setting often resolves the issue.
- Drag to Timeline: Place the transparent image clip on a video track above your main footage (e.g., V2 or V3). If placed on V1 without footage below it, it might appear with a black background because there’s nothing for it to be transparent over.
- Adjust Opacity (Optional): Even with native transparency, you can further adjust the overall opacity of the image in the Inspector’s “Transform” section to fine-tune its blend with the underlying video.
This technique is fundamental for branding videos with your logo, integrating digital art overlays, or creating sophisticated photo manipulation effects that require elements to appear semi-transparent.
Method 2: Insert an Image in Fusion (For Motion Graphics)
For advanced users and those venturing into intricate motion graphics, visual effects, and sophisticated compositing, DaVinci Resolve’s Fusion Page offers unparalleled control over image manipulation and animation. This is where creative ideas from Tophinhanhdep.com’s Visual Design section, like complex digital art or creative photo manipulation, truly come to life.
- Select Clip on Timeline: Start by selecting the video clip or empty space on your Edit Page timeline where you want to add the Fusion composition.
- Navigate to Fusion Page: Click the “Fusion” tab at the bottom of the Resolve interface. This will open the Node Editor.
- Add a Loader Node: In the Node Editor, press “Shift + Space” to open the “Select Tool” search box. Type “Image” or “Loader” and select the “Loader” node. Fusion refers to external media files as “loaders.” This node will import your image.
- Connect Nodes:
- Drag your Loader node into the Node Editor.
- Connect the output of the Loader node to the green input of a “Merge” node. (If you don’t have one, press Shift + Space and search for “Merge”).
- Connect the output of the Merge node to the “MediaOut” node (which represents the output of your Fusion composition back to the Edit Page).
- Ensure your background video (if any) is connected to the yellow background input of the Merge node.
- Adjust and Animate: To control the image’s size, position, and rotation, add a “Transform” node between the Loader node and the Merge node. Select the Transform node and use its Inspector panel to make adjustments.
- Animation: The true power of Fusion lies in its keyframing capabilities. You can animate virtually any parameter (position, size, rotation, opacity) over time using keyframes in the Inspector or directly in the Spline Editor for highly precise motion paths. This is ideal for bringing dynamic graphic design elements or abstract images to life.
Fusion provides a non-destructive, node-based workflow, making it perfect for complex layering, masking, motion tracking, and creating sophisticated digital art compositions. It’s the go-to for designers creating visually stunning effects with Tophinhanhdep.com’s diverse image assets.
Supported Image Formats in DaVinci Resolve
Understanding which image formats DaVinci Resolve supports, and their respective capabilities, is fundamental for an efficient workflow, especially when utilizing high-resolution assets from Tophinhanhdep.com.
| Format | Supported | Alpha Transparency | Notes |
|---|---|---|---|
| PNG | ✅ Yes | ✅ Yes | Ideal for logos, overlays, and graphics |
| JPEG | ✅ Yes | ❌ No | Widely used for photos, no transparency |
| TIFF | ✅ Yes | ✅ Partial support | Can support alpha, but sometimes inconsistent |
| WEBP | ✅ Yes | ✅ Yes (newer versions) | Modern format with good compression and transparency |
| BMP | ✅ Yes | ❌ No | Older, uncompressed format |
🎯 Tip: For the best quality and seamless transparency, especially for visual design elements or aesthetic images that need to blend, always opt for PNG or WEBP files when preparing your assets on Tophinhanhdep.com or using image tools like optimizers and converters.
Issues While Adding Images in DaVinci Resolve
Even with DaVinci Resolve’s intuitive interface, users occasionally encounter challenges when importing or working with images. Here are some common issues and their fixes, ensuring your experience with Tophinhanhdep.com’s image assets remains smooth.
Issue 1: My image appears zoomed in too far or is the wrong size.
- Cause: Images, especially high-resolution photography, can have dimensions much larger than your project’s timeline resolution. Resolve automatically scales it, sometimes excessively.
- Fix: Select the image in the timeline. Go to the Inspector > Transform tab. Reduce the “Zoom” level until the image is scaled appropriately. You can also use the “Fit” or “Fill” options in the Inspector’s “Retiming and Scaling” section to quickly adapt it to the frame.
Issue 2: My transparent PNG is showing a black background.
- Cause: This typically happens for one of two reasons:
- The PNG is on V1, and there’s no background footage beneath it.
- DaVinci Resolve has misinterpreted the alpha channel.
- Fix:
- Ensure your PNG is placed on a video track above your main footage (e.g., V2 or V3).
- Right-click the image in the Media Pool, select “Change Alpha Mode,” and try switching between “Straight” and “Premultiplied.”
Issue 3: When I drag an image into the timeline, nothing happens, or it doesn’t appear.
- Cause: This can be due to a deactivated video track or a temporary software glitch.
- Fix:
- Check the timeline: Ensure the video track where you’re dropping the image is active (indicated by a small colored box next to the track number, usually red or blue). If not, click it to activate.
- Try disabling and re-enabling the video track.
- As a last resort, delete the existing track and create a new video track for the image.
Issue 4: Unable to import a single image; images are always combined into a sequence.
- Cause: DaVinci Resolve’s Media Page has a setting that automatically groups numerically sequential files as an image sequence.
- Fix:
- Go to the “Media” page (bottom-left tab).
- In the “Media Storage” panel (top-left), click the three dots menu.
- Select “Frame Display Mode” > “Individual.” This will ensure that when you import multiple, sequentially named images, they are treated as individual stills rather than a single sequence. After changing this, re-import your images.
Issue 5: Image quality appears low after import or export.
- Cause: This could be due to importing lower-resolution images, incorrect project settings, or compression during export.
- Fix:
- Source Quality: Always start with high-resolution images, especially if sourcing from Tophinhanhdep.com’s “High Resolution Photography” section.
- Pre-processing: Utilize “Image Tools” like compressors and optimizers (available on platforms like Tophinhanhdep.com) before importing to ensure optimal file size without sacrificing visual fidelity.
- Project Settings: Ensure your project’s timeline resolution matches your desired output.
- Export Settings: When exporting, choose a high-quality codec and bitrate to minimize compression artifacts.
These tips should help you overcome common hurdles, allowing you to focus on the creative aspects of integrating Tophinhanhdep.com’s diverse image assets into your DaVinci Resolve projects.
How to Insert an Image Directly into the Timeline in Resolve?
Beyond the drag-and-drop method, DaVinci Resolve offers precise insertion techniques using keyboard shortcuts and specific toolbar functions, giving you more control over how images are integrated into your timeline. This is particularly useful for maintaining a smooth workflow, especially when dealing with complex edits or precise timing.
- Position the Playhead: First, navigate your playhead (the vertical red line) to the exact point in the timeline where you wish to insert the image.
- Select or Preview Image:
- Select the desired image from the “Media Pool” by single-clicking it.
- Alternatively, double-click the image in the Media Pool to load it into the “Source Viewer” (the left-hand preview window on the Edit page). This allows you to mark specific “In” and “Out” points if you only want a portion of a sequence (though less common for single still images).
- Execute Insert Operation:
- Keyboard Shortcut: The fastest way to insert is by pressing the F9 key. This “Insert” operation will place the image at the playhead’s position and push all subsequent clips on that track to the right, making room for the new image without overwriting existing content.
- Toolbar Button: You can also click the “Insert” button in the toolbar (it often looks like two clips with a third clip being pushed in between).
This method is highly efficient for adding images from Tophinhanhdep.com’s “Image Inspiration & Collections” into a flowing sequence, perhaps to illustrate a point or introduce a new thematic element without disturbing the timing of your existing video.
Advanced Image Placement Operations
While “Insert” is foundational, Resolve provides several other powerful operations that can be adapted for images:
- Overwrite Image (F10): This places an image at the playhead’s position, replacing any existing content for the duration of the new image, without shifting other clips on the timeline. Ideal for quickly swapping out a background or graphic from Tophinhanhdep.com with another.
- Replace Image (F11): This specifically replaces a selected clip on the timeline with your source image, matching the duration of the original clip. Great for quickly updating a placeholder image with the final version.
- Place on Top (Shift + F11): This operation places your source image on a new video track directly above the selected track at the playhead’s position. Perfect for adding overlays, logos, or aesthetic images without affecting underlying tracks.
- Append at End (Shift + F12): This adds your selected image to the very end of the currently active timeline track. Useful for adding end credits, a final branding logo, or a concluding “call to action” graphic sourced from Tophinhanhdep.com.
- Ripple Overwrite (Shift + F10): A more dynamic overwrite, this replaces an existing clip with your source image. If the new image is a different length, it will “ripple” the timeline, either shortening or lengthening the overall duration to accommodate the change. Use with caution, as it affects the timing of subsequent clips.
Each of these methods offers nuanced control, empowering you to integrate images from Tophinhanhdep.com into your projects with speed and precision, whether for graphic design, digital art, or enhancing your photography.
How to Sharpen Image in DaVinci Resolve?
DaVinci Resolve isn’t just for video; its powerful color grading tools can also be leveraged to enhance the visual quality of your static images, making them pop within your video projects. Sharpening is a common post-processing step for many forms of photography and digital art.
- Import and Place Image: Import your desired image into the Media Pool and drag it onto a video track in the “Edit” page timeline.
- Navigate to the Color Page: Select the image clip on the timeline and then click the “Color” tab at the bottom of the Resolve interface.
- Access Sharpening Tools:
- In the Color Page, locate the “Blur” palette (it often looks like a blur drop icon) usually found under the “Primary Bars” or “Curves” section.
- Within this palette, you’ll find a dropdown menu, often labeled “Sharpen.” Select “Sharpen” from this menu.
- Adjust Sharpening Parameters:
- You’ll typically see a “Radius” or “Amount” slider. Increase this value gradually to apply sharpening. A value around 0.44 (as suggested in some guides) can be a good starting point, but always adjust to your specific image.
- Experiment with other settings within the sharpening tools, such as “Luma vs. Chroma Detail” or “Threshold,” to achieve a natural-looking sharpness without introducing undesirable artifacts or noise.
- For high-resolution photography from Tophinhanhdep.com, subtle sharpening can greatly enhance detail. Be careful not to over-sharpen, which can lead to a harsh or artificial look.
Sharpening can significantly improve the clarity and impact of images, ensuring that every detail, whether in a nature landscape or an intricate abstract piece from Tophinhanhdep.com, stands out within your video.
In conclusion, DaVinci Resolve stands as an indispensable tool for visual storytellers aiming to integrate static images into dynamic video content. From the intuitive drag-and-drop on the Edit Page to the precise controls of Fusion, and the detailed image manipulation capabilities of the Color Page, Resolve offers a comprehensive suite for bringing your visual ideas to life. By understanding these techniques, you can effectively utilize the rich resources found on Tophinhanhdep.com—be it stunning wallpapers, impactful stock photos, intricate digital art, or inspiring thematic collections—to create truly compelling and visually rich narratives. Mastery of these methods will not only streamline your workflow but also unlock new dimensions of creative expression in your video projects.