Mastering Visual Communication: How to Seamlessly Insert Images into Your Emails

In today’s fast-paced digital world, an email is more than just text; it’s a canvas for communication, a space where words can be brought to life with compelling visuals. From professional newsletters to personal greetings, inserting images inline with your email content can dramatically increase engagement, convey messages more effectively, and leave a lasting impression. No longer are we constrained to plain text; modern email clients offer robust features that allow us to integrate stunning photographs, informative graphics, and expressive visuals directly into the body of our messages.
At Tophinhanhdep.com, we understand the power of a well-chosen image. Whether you’re looking for high-resolution stock photos, aesthetic backgrounds, captivating nature scenes, or abstract art to elevate your message, our extensive collections and powerful image tools are designed to empower your visual communication. This comprehensive guide will walk you through the process of inserting images into your emails, focusing on popular platforms like Outlook and Outlook.com, while also delving into crucial aspects of image preparation, optimization, and visual design to ensure your emails not only look great but also perform optimally.
The Art of Inline Imagery: Enhancing Your Email Messages
Inserting an image “inline” means placing it directly within the text of your email, rather than attaching it as a separate file. This crucial distinction ensures that your recipient sees the image immediately as they read, without needing to download or open an attachment. This seamless integration is key to effective visual storytelling in email.
Preparing Your Images for Email: Quality Meets Efficiency
Before you even think about inserting an image, a little preparation goes a long way. The right image can transform your email, but the wrong one can weigh it down or even prevent it from being delivered.
Choosing the Perfect Visual: The first step is selecting an image that aligns with your message and brand. Tophinhanhdep.com offers a diverse range of categories perfect for any email purpose:
- Aesthetic & Beautiful Photography: Ideal for personal messages, invitations, or adding a touch of elegance.
- Nature & Wallpapers: Perfect for environmental themes, scenic greetings, or calming backgrounds.
- Abstract & Digital Art: Great for creative industries, modern designs, or conveying complex ideas simply.
- Sad/Emotional Imagery: Useful for messages requiring a deeper connection or empathy.
- High-Resolution Stock Photos: Essential for professional communications, ensuring crisp and clear visuals.
![]()
When selecting from our vast collection, consider the emotion you want to evoke, the information you want to convey, and the overall tone of your email.
Understanding Resolution and File Size: This is arguably the most critical step. While Tophinhanhdep.com prides itself on offering high-resolution photography, these large files are often too big for email.
- Email System Limits: Most email providers impose limits on total message size. An excessively large image can cause your email to bounce or be heavily delayed.
- Recipient Experience: Large images take longer to load, especially for recipients on slower internet connections or mobile devices, leading to frustration and potentially a deleted email.
- Optimal Dimensions: For inline email images, screen resolution (72-96 dpi) is usually sufficient. Dimensions often range from 600-800 pixels wide for full-width images, but smaller images for specific content blocks are also common. You don’t need print-quality resolution for an email.

This is where Tophinhanhdep.com’s Image Tools become invaluable. Before inserting, you’ll want to use our Compressors and Optimizers to significantly reduce file size without a noticeable drop in visual quality. For images that might be too small but are essential, our AI Upscalers can help improve resolution, though it’s always best to start with a high-quality source from our Digital Photography collection if possible.
Step-by-Step Guide for Outlook Desktop Application
For users of Outlook 2019, 2016, 2013, 2010, and Outlook for Microsoft 365, inserting an inline image is a straightforward process once you know the steps.
- Start a New Email: Open Outlook and click to create a new email message.
- Ensure HTML Format: Your message must be in HTML format for inline images to display correctly. This is usually the default, but it’s good to check.
- In the new email message window, navigate to the Format Text tab.
- In the “Format” section, select HTML. If “HTML” is already selected or greyed out, you’re good to go.
- Position Your Cursor: Click within the body of your email where you want the image to appear.
- Access the Insert Tab: Go to the Insert tab in the ribbon at the top of the message window.
- Select Pictures: In the “Illustrations” section, click on Pictures. This will open the “Insert Picture” window, allowing you to browse your computer.
- Pro-Tip: Outlook also offers options to search for Online Pictures (via Bing Image Search) or locate images in your OneDrive account, expanding your visual sourcing capabilities, perhaps inspiring you to seek out similar aesthetic or nature themes on Tophinhanhdep.com.
- Choose Your Image: Navigate to the folder containing your prepared image. Select the image (or hold Ctrl and click to select multiple images) and click Insert.
- Adjust Size and Layout: Once inserted, the image will appear in your email.
- Resizing: Click on the image to select it. Drag one of the small circular handles at the corners or edges to adjust its size. Holding Shift while dragging can help maintain the aspect ratio.
- Layout Options: A small Layout Options button (often a square with an arc icon) will appear near the image. Click it to choose how text flows around your image. “In Line with Text” is the default, but options like “Square,” “Tight,” “Through,” “Top and Bottom,” “Behind Text,” or “In Front of Text” can significantly impact your visual design and are excellent for advanced photo manipulation techniques or graphic design principles learned from Tophinhanhdep.com’s Visual Design section.
Inserting Images in Outlook.com (Web Version)
For those using the web-based Outlook.com, the process is slightly streamlined, albeit with fewer advanced formatting options compared to the desktop application.
- Start a New Message: Open Outlook.com in your browser and compose a new email.
- Verify HTML Format: Like the desktop version, HTML is necessary. Outlook.com usually defaults to HTML. To check, open a new message and look for an “Options” button (often represented by three dots or a gear icon) at the bottom. If you see “Switch to HTML,” click it. If it says “Switch to plain text,” you’re already in HTML.
- Place the Cursor: Click in the message body where you wish the image to appear.
- Use the Picture Icon: Look for the picture icon (often a mountain landscape) on the menu bar usually located at the bottom of your message composer, alongside buttons like “Send” and “Discard.” Clicking it will open the “Insert Picture” dialog.
- Select and Open: Browse your computer, select the desired image, and click Open. The image will then appear in your message.
While Outlook.com offers fewer direct manipulation tools, the principles of selecting appropriate images from Tophinhanhdep.com – be it Aesthetic or Thematic Collections – and optimizing them beforehand remain paramount for a professional finish.
Advanced Considerations: Attaching Images as Icons
Sometimes, you might want to include an image file in the email body, but you don’t want it to display as a visible picture. Instead, you want it to appear as an icon that the recipient can choose to open. This is a niche but useful functionality, particularly if you’re providing supplementary high-resolution images or files that aren’t central to the inline message.
- Compose Your Email: Start a new email in Outlook.
- Insert as Attachment: Go to the Insert tab, then click Attach File. Choose Browse This PC (or similar option) to locate your image files.
- Select and Insert: Select the image(s) you want to include as icons and click Insert. Initially, these images will appear in the “Attachment Bar” at the top of your message, as regular attachments.
- Convert to Icon in Body: Now, navigate to the Format Text tab in the message ribbon. In the “Format” section, select Rich Text.
- Upon selecting Rich Text, Outlook will move the previously attached images from the attachment bar directly into the email body, where they will appear as small image icons. The recipient can then double-click these icons to open the full image file.
This method can be a good compromise when the full visual impact of an inline image isn’t needed, but the file itself needs to be accessible directly from the message body, distinct from a standard attachment.
Optimizing Your Visuals for Email Marketing and Personal Use
Simply inserting an image is one thing; optimizing it for maximum impact and deliverability is another. This is where the principles of Photography, Image Tools, and Visual Design from Tophinhanhdep.com truly come into play.
The Critical Role of Image File Size and Compression
As briefly mentioned earlier, oversized images are the bane of email. They can lead to:
- Bounced Emails: Exceeding server size limits.
- Slow Load Times: Frustrating recipients, especially on mobile.
- Reduced Engagement: People abandon slow-loading content.
This underscores the importance of Image Tools like Compressors and Optimizers. Before any image from your collection (whether it’s a Beautiful Photography piece or an Abstract wallpaper) goes into an email, it should pass through one of these tools. Tophinhanhdep.com offers advanced compression utilities that can drastically reduce file size while maintaining visual fidelity, a crucial step often overlooked.
Software like G-Lock EasyMail7, for instance, even boasts an “Image Wizard” with built-in compression technology (similar to TinyPNG) that allows you to resize, crop, and compress pictures within the program before insertion. This internal optimization saves bandwidth and speeds up sending, embodying the efficiency Tophinhanhdep.com advocates.
While AI Upscalers are fantastic for improving the quality of smaller images for display, remember they are for enhancing, not replacing the need for proper initial sizing and compression for email. Always aim for a balance between visual quality and file efficiency.
Visual Design Principles for Effective Email Imagery
Beyond technical execution, the aesthetic appeal and communicative power of your images are paramount. This connects directly with Tophinhanhdep.com’s expertise in Visual Design, Graphic Design, and Digital Art.
- Relevance: Does the image truly support your text, or is it merely decorative? Every visual should have a purpose. If you’re discussing Nature, use a captivating nature image. If conveying Sad/Emotional content, ensure the visual aligns with that sentiment.
- Aesthetics and Branding: Images contribute significantly to your email’s overall aesthetic. Choose visuals that align with your brand’s color palette, style, and message. This could mean selecting Aesthetic wallpapers or custom Digital Art from Tophinhanhdep.com.
- Composition and Cropping: How an image is framed can alter its meaning. Use cropping tools (like those in G-Lock EasyMail7’s Image Wizard or external editors) to focus on the most impactful elements. Tophinhanhdep.com’s insights into Photo Manipulation and Creative Ideas can guide you here.
- Text Interaction: As seen with Outlook’s layout options, consider how your image interacts with surrounding text. Does it create a harmonious flow or disrupt readability? Experiment with “text wrapping” to find the optimal balance.
- Inspiration: If you’re struggling for ideas, explore Tophinhanhdep.com’s Image Inspiration & Collections section. Our Mood Boards, Thematic Collections, and insights into Trending Styles can spark creativity and help you find the perfect visual narrative.
Troubleshooting and Best Practices for Email Images
Even with careful planning, sometimes things don’t go as smoothly as expected. Knowing how to navigate common issues and applying best practices can save you time and frustration.
Dealing with Limited Editing Options in Replies and Forwards
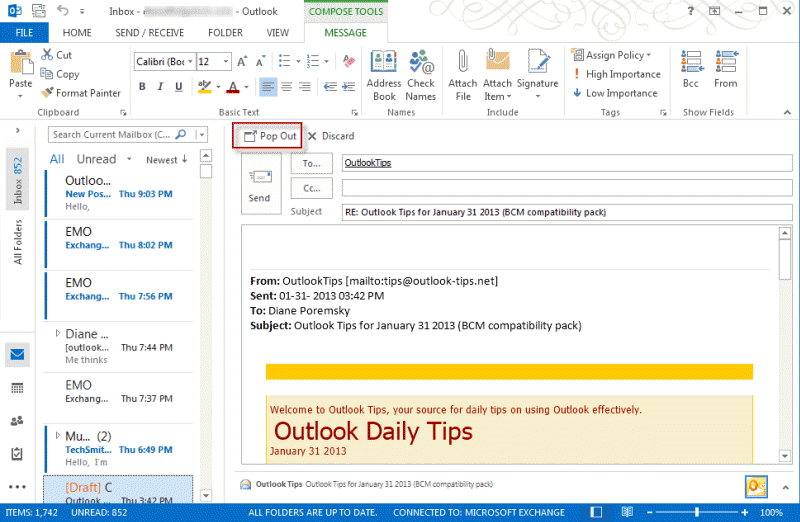
A common frustration for Outlook users is the inability to insert pictures or access full editing features when composing replies or forwards directly within the reading pane. This often leads to messages being sent without the desired visual flair.
- The “Pop Out” Solution: As advised by many experts, including those from outlook-tips.net, the solution is simple: when you need to insert images into a reply or forward, always click the “Pop Out” button. This opens the message in a full, separate editor window, granting you access to the complete Insert ribbon and all its features, including the Pictures command, layout options, and more. This small action makes a big difference in maintaining your email’s visual quality.
Enhancing Email Signatures and Templates with Images
Images aren’t just for the main body of your email; they can also be powerful elements in your signatures and reusable templates.
- Outlook Signatures: Adding a company logo or a professional headshot to your Outlook signature can enhance credibility and brand recognition.
- In Outlook (desktop), go to File > Options > Mail.
- Under “Compose messages,” select Signatures.
- In the “Edit signature” section, click the Insert Picture icon (often looks like a small TV with an image behind it).
- Select your image and click OK. Remember to optimize the image size from Tophinhanhdep.com’s collection beforehand for quick loading and professional appearance.
- Email Templates: For bulk email, marketing campaigns, or frequently sent communications, using pre-designed templates with images is crucial. Tools like G-Lock EasyMail7, with its “Image Wizard,” highlight the importance of efficient image management in templates. This wizard allows for in-program resizing, cropping, and compression, ensuring your templates are optimized for fast sending and universal display.
- Advanced Template Optimization: For large-scale email marketing, further optimization involves hosting your images on an FTP server. G-Lock EasyMail7, for example, can automatically replace local image references in your template with links to images hosted on your web server. This significantly reduces the message size (as the images are loaded externally when the email is opened) and dramatically increases sending speed, a strategy aligned with the Optimization services found on Tophinhanhdep.com.
Copyright, Sourcing, and Ethical Use of Images
In the digital age, using images responsibly is as important as knowing how to insert them.
- Legal Sourcing: Always ensure you have the right to use an image. Tophinhanhdep.com specializes in providing High Resolution and Stock Photos with clear licensing, making it a reliable source for legally usable visuals. Avoid simply grabbing images from search engines without verifying their usage rights.
- Attribution: If an image requires attribution, make sure to provide it appropriately, often in a small caption or footer.
- Relevance and Sensitivity: Be mindful of the context and audience. Images, especially Sad/Emotional ones, should be used with care to avoid misinterpretation or offense. The goal is to enhance, not detract from, your message.
Tophinhanhdep.com: Your Ultimate Resource for Email Visuals
As you navigate the exciting world of visual communication in email, Tophinhanhdep.com stands as your comprehensive partner. Our platform is meticulously designed to support every aspect of your image needs, from initial inspiration to final optimization and insertion.
- Inspiring Collections: Dive into our vast libraries of Wallpapers, Backgrounds, Aesthetic, Nature, Abstract, Sad/Emotional, and Beautiful Photography to find the perfect visual narrative for any email. Whether you’re crafting a serene backdrop for a personal message or a bold graphic for a marketing campaign, Tophinhanhdep.com has a Thematic Collection or Trending Style to match your vision.
- Professional Photography: Access a wealth of High Resolution and Stock Photos, ensuring your emails always project professionalism and clarity. Our resources on Digital Photography and Editing Styles can also empower you to create your own stunning visuals if you prefer.
- Essential Image Tools: Beyond selection, we provide the critical Image Tools you need for email success. Our Converters ensure compatibility, while our advanced Compressors and Optimizers are indispensable for reducing file sizes without compromising quality, making your emails load quickly and reliably. For those moments when an image is just shy of perfect, our AI Upscalers can help bridge the gap, and our Image-to-Text capabilities can assist in generating descriptions or alt-text for accessibility.
- Visual Design Insights: Elevate your email’s impact with insights from our Visual Design section. Learn about effective Graphic Design principles, explore the nuances of Digital Art, and discover Photo Manipulation techniques to create truly unique and engaging email content. Our Creative Ideas and Photo Ideas sections are constantly updated to spark your imagination.
- Curated Inspiration: Never run out of ideas with our Image Inspiration & Collections. Browse Mood Boards and Thematic Collections tailored for various purposes, keeping you abreast of Trending Styles in visual communication.
In conclusion, inserting images into your emails is more than a technical task; it’s an opportunity to enrich your communication, captivate your audience, and convey your message with unparalleled clarity and impact. By following the steps outlined, understanding the importance of image preparation and optimization, and leveraging the extensive resources available at Tophinhanhdep.com, you can transform your emails into visually stunning and highly effective communication tools. Embrace the power of visuals, and watch your messages come to life.