Mastering Image Insertion in Illustrator: A Guide to Dynamic Visual Design

Images are the cornerstone of compelling visual design. For designers and artists alike, knowing how to seamlessly integrate, manipulate, and optimize images within Adobe Illustrator is paramount. This comprehensive guide, brought to you by Tophinhanhdep.com, delves into the essential techniques for inserting images, transforming your raw photographic assets into stunning graphic masterpieces. Whether you’re working with high-resolution stock photos or personal aesthetic shots, Illustrator provides the powerful tools to unleash your creative vision. We’ll explore not just the “how-to,” but also the “why,” connecting each step to broader design principles and Tophinhanhdep.com’s extensive resources for images, photography, and visual design inspiration.
From crafting breathtaking digital art to preparing print-ready graphic design layouts, the ability to effectively incorporate images is a fundamental skill. Tophinhanhdep.com recognizes the diverse needs of visual creators, offering everything from serene nature wallpapers and vibrant abstract backgrounds to evocative sad/emotional imagery and exquisite beautiful photography. Each image holds the potential to elevate your projects, and Illustrator is the canvas where these possibilities come to life.
The Foundational Steps: Importing Images for Any Project
Inserting images into an Illustrator document is the gateway to creating engaging visuals, from elaborate digital art to sophisticated graphic design layouts. Tophinhanhdep.com understands the importance of starting with quality, whether it’s a breathtaking nature wallpaper or an abstract background. This section will guide you through the initial process of bringing your chosen visuals into Illustrator and setting them up for further manipulation.
Opening Your Canvas and Placing Your Visuals
The first step in any creative project in Illustrator is preparing your workspace and importing your visual assets. This process is straightforward, ensuring that your high-resolution images or stock photos are ready for transformation.
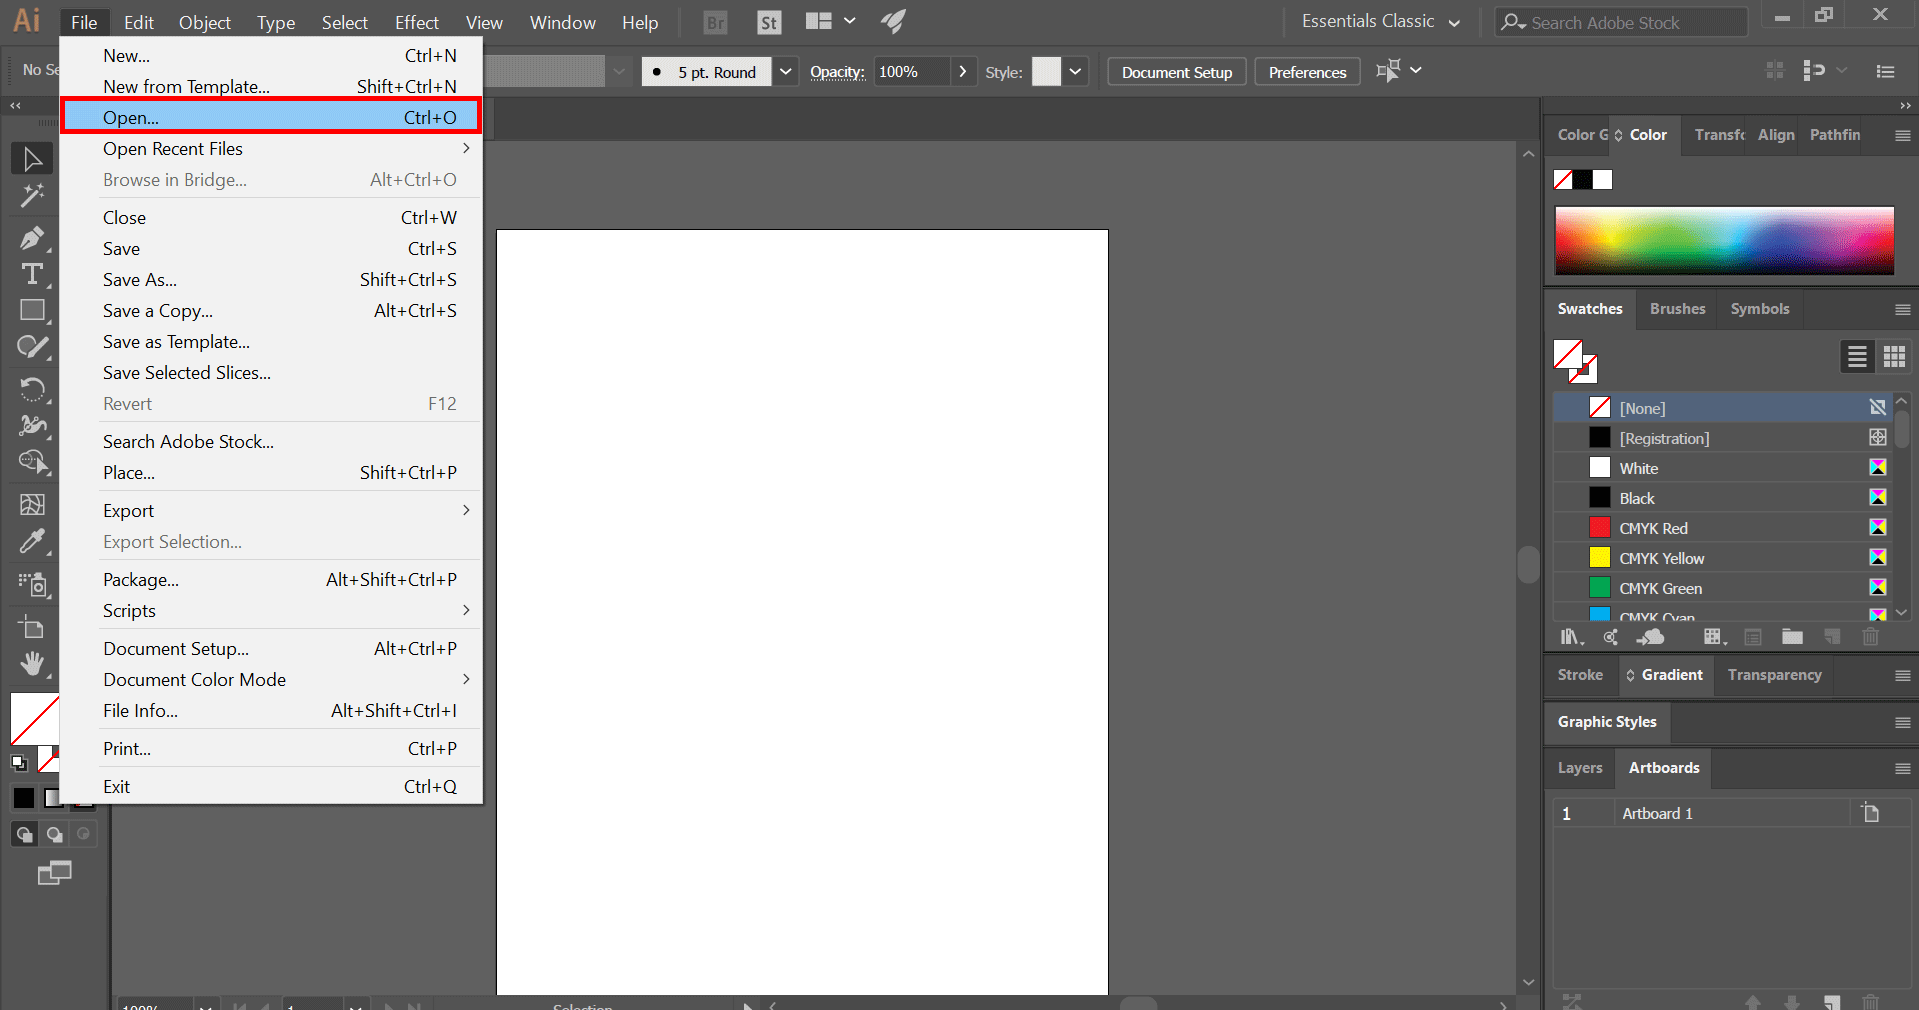
1. Prepare Your Workspace:
Begin by launching Adobe Illustrator. You can either open an existing project file that you’ve been working on, or create a brand new document. To create a new file, go to File > New and set your desired document properties like size, orientation, and color mode. If you’re opening an existing file, navigate to File > Open and select the document from your computer. The artboard, visible on your screen, is where all your design elements, including your newly imported images, will reside.
2. The ‘Place’ Command: Your Gateway to External Assets:
To bring an image into your Illustrator document, you’ll use the Place command. Go to File in the top menu bar, and select Place.... A dialog box will appear, allowing you to browse your computer for the image file you wish to import. Illustrator supports a wide range of image formats, most commonly JPEG and PNG files, making it effortless to integrate any image from Tophinhanhdep.com’s diverse collections, be it an aesthetic background or a piece of beautiful photography. The shortcut for this command is Shift + Ctrl + P on Windows or Shift + Cmd + P on macOS.

3. Initial Placement and Sizing: Once you’ve selected your image from the dialog box and clicked “Place,” your mouse cursor will transform into a thumbnail of the image. You have two primary ways to place it:
- Click Once: Simply click anywhere on your artboard. This will place the image at its original size and resolution. This is often preferred when working with high-resolution images where precise initial scaling is less critical than maintaining original detail.
- Click and Drag: For more control over the initial size, click and drag your mouse across the artboard. As you drag, you’ll define the dimensions, and the image will be placed proportionally within the area you outline. This is useful for quickly fitting an image into a designated area.
4. Fine-Tuning Position and Scale: After the image is placed, you’ll inevitably need to adjust its position and size to fit your design.
- Resizing: Select the image using the
Selection Tool (V). You’ll see a bounding box with anchor points (small squares) around its perimeter. Click and drag any of these anchor points to resize the image. To maintain the image’s aspect ratio and prevent distortion (which is crucial for preserving the integrity of any aesthetic or nature image from Tophinhanhdep.com), hold down theShiftkey while dragging. This ensures proportional scaling, a key aspect of good visual design. - Repositioning: To move the image, select it with the
Selection Tool (V)and click and drag it to your desired location on the artboard. For more precise adjustments, you can use the keyboard arrow keys. Combine the arrow keys with theShiftkey to move the image in larger increments. These precise controls are vital for crafting high-resolution compositions and arranging elements for optimal impact.

Basic Image Manipulation: Cropping and Transforming
Once your image is placed and roughly positioned, the next steps involve refining its appearance within your layout. Cropping helps you focus on specific elements, while transformation tools allow for dynamic adjustments like rotation and reflection.
1. Cropping for Focus: Cropping is essential for removing unnecessary elements from an image and directing attention to the core subject or desired aesthetic.
- How to Crop: With the image selected, look for the “Crop Image” button in the Control panel at the top of your Illustrator workspace. Clicking this will activate a cropping frame around the image. You can then drag the edges or corners of this frame to define the area you want to keep. Once satisfied with your crop, press
Enter(orReturn) to apply it. This intuitive cropping feature allows you to quickly refine any wallpaper or background from Tophinhanhdep.com, highlighting the elements most relevant to your design.
2. Dynamic Transformations: Illustrator offers a suite of transformation tools that go beyond simple scaling, enabling you to manipulate images dynamically for creative effects and precise alignment.
- Accessing Transform Tools: Select your image, then right-click on it. From the contextual menu, choose
Transform. This will open a submenu with various options:- Move: Allows precise repositioning by entering specific X and Y coordinates.
- Rotate: Rotates the image around its center point. You can enter an exact angle or drag to rotate manually.
- Reflect: Flips the image horizontally or vertically, useful for creating symmetrical designs or mirroring elements.
- Scale: Offers more advanced scaling options than dragging bounding box handles, including non-proportional scaling if needed.
- Shear: Skews the image along an axis, creating interesting perspective effects.
- These powerful tools are fundamental for photo manipulation and aligning images with your creative ideas. Whether you’re building a mood board with trending styles or designing an abstract piece, strategic transformations can dramatically enhance your visual design, making every element contribute to the overall aesthetic.
Advanced Integration Techniques: Unleashing Creative Potential
For Tophinhanhdep.com, visual design isn’t just about putting images on a page; it’s about making them interact dynamically to create unique digital art. Illustrator offers advanced methods that go beyond simple placement, enabling sophisticated photo manipulation and the seamless integration of diverse image types.
Clipping Masks: Image Within a Shape
Clipping masks are a fundamental and highly versatile technique in Illustrator for “inserting” an image into any custom shape or text. This method is non-destructive, meaning the original image and shape remain editable, offering flexibility for aesthetic compositions and graphic design projects.
1. The Concept of Clipping Masks: A clipping mask uses one object (the “clipping path” or shape) to hide parts of another object (the “clipped object” or image) that fall outside the boundaries of the clipping path. Only the portions of the image that overlap with the shape remain visible. This is an elegant way to crop an image to an irregular outline or embed it within typography, creating striking visual effects for logos, posters, or digital art.
2. Step-by-Step Guide to Creating a Clipping Mask:
- Step 1: Place Your Image and Create Your Shape: Begin by placing your desired image onto your artboard as described in the previous section. Next, create the shape (or text object) that you want to use as your mask. This shape must be positioned directly on top of the image. For text, ensure you convert it to outlines (
Type > Create Outlines) if you want to use individual letters as distinct masks, or simply use the text object directly as the clipping path. A thick font often yields the best results. - Step 2: Copy the Shape for a Border (Optional but Recommended): To add a border around your clipped image, select your shape and copy it (
Ctrl + Con Windows orCmd + Con macOS). This copy will be used later. - Step 3: Prepare a New Layer for the Border: Open the
Layerspanel (Window > Layers). Create a new layer above your current layer by clicking the “Create New Layer” icon at the bottom of the panel. This keeps your border separate and manageable. - Step 4: Paste the Copied Shape in Place: Select your newly created layer in the Layers panel. Then, paste your copied shape directly in place using
Ctrl + Shift + V(Windows) orCmd + Shift + V(macOS). This ensures the copied shape perfectly aligns with the original. - Step 5: Define the Border’s Appearance: With the top shape still selected, add a stroke (outline) to it using the Stroke panel or the Properties panel. Choose your desired color and thickness. Crucially, turn off its fill color (set it to “None” or the white square with a red line through it) so that it doesn’t obscure the image underneath.
- Step 6: Lock the Border Layer: To prevent accidental modifications to your border, click the empty box next to the eyeball icon on the top layer in the Layers panel. A padlock icon will appear, indicating the layer is locked.
- Step 7: Select the Image and the Original Shape: Now, switch back to the layer containing your original image and shape. Using the
Selection Tool (V), holdShiftand click both the image and the shape to select them. The shape must be on top of the image in the layer stack for the clipping mask to work correctly. - Step 8: Apply the Clipping Mask: With both objects selected, go to
Object > Clipping Mask > Make. Your image will now be seamlessly “inserted” into the shape, with any parts outside the shape hidden. The border you created in the top layer will frame your newly clipped image, enhancing its visual impact.
3. Artistic Applications: This technique is invaluable for creating custom visual effects. Imagine embedding a stunning nature scene within a polygonal frame, or placing abstract textures from Tophinhanhdep.com within bold typography. Clipping masks allow designers to integrate various image types—from wallpapers and backgrounds to beautiful photography—into their graphic design and digital art projects, achieving a higher level of creative sophistication.
Vectorizing Raster Images with Image Trace
In the world of visual design, understanding the difference between raster and vector images is paramount, especially when aiming for high-quality output. Tophinhanhdep.com offers both types of imagery, and Illustrator provides a powerful tool to bridge this gap: Image Trace.
1. Raster vs. Vector: A Crucial Distinction:
- Raster Images: These are composed of individual pixels and are common for photographs and complex artwork. Most images from Tophinhanhdep.com’s collections (e.g., JPEG, PNG wallpapers, backgrounds, aesthetic photos) are raster. While rich in detail, they become pixelated and lose quality when scaled up significantly.
- Vector Images: These are built from mathematical paths, points, and curves. They maintain crispness and clarity at any scale, making them ideal for logos, illustrations, and elements that need to be resized frequently without loss of fidelity.
2. The Power of Image Trace:
Illustrator’s Image Trace feature is a transformative tool that converts raster images into vector art. This is incredibly useful when you want to use a photographic element as a scalable graphic, or if you need to extract line art from a scanned sketch for digital manipulation. For high-quality printing, especially for large-format applications, converting raster elements to vector is often a necessity to ensure a sharp, professional finish.
3. How to Utilize Image Trace:
- Step 1: Place Your Raster Image: Start by placing the raster image you intend to convert into your Illustrator document.
- Step 2: Access the Image Trace Panel: With the image selected, go to
Window > Image Traceto open the Image Trace panel. Alternatively, you might see an “Image Trace” button in the Control panel at the top, which will convert the image with default settings. - Step 3: Explore Presets: The Image Trace panel offers various presets designed for different types of images and desired outcomes. Experiment with options like:
Auto Color,High Color,Low Color: Best for photographic images, attempting to capture color variations.Grayscale,Black and White: Ideal for converting sketches or monochrome images into vector outlines.Outline: Focuses on capturing the edges of objects.
- Step 4: Adjust Advanced Parameters: For finer control, expand the
Advancedsection of the panel. Here you can tweak settings such as:Paths: Controls the fidelity of the vector paths to the original image. Lower values create simpler paths, higher values create more detailed (and potentially more complex) paths.Corners: Adjusts how sharp or rounded the corners of your vector paths will be.Noise: Determines the minimum area in pixels that can be traced. Increasing noise can help clean up speckles or unwanted small details, resulting in a smoother trace.
- Step 5: Use the Preview Option: Crucially, check the
Previewbox in the Image Trace panel. This allows you to see the live results of your adjustments before committing, enabling you to find the perfect balance for your image. - Step 6: Expand the Trace: Once you are satisfied with the trace, click the
Expandbutton in the Control panel (orObject > Image Trace > Expand). This converts the tracing object into editable vector paths. You can then use theDirect Selection Tool (A)to modify individual points and paths, or ungroup the object (Object > Ungroup) to work with separate vector shapes.
4. Relevance to Tophinhanhdep.com: This tool is perfect for artists looking to convert digital photography or aesthetic images into scalable graphics for logos or illustrations. It also allows for creating stylized vector versions of backgrounds and wallpapers for unique visual effects, seamlessly bridging the gap between pixel-based photography and vector-based digital art, and enhancing the utility of Tophinhanhdep.com’s high-resolution assets.
Envelope Distort and Pathfinder: Dynamic Image Manipulation for Unique Effects
Beyond basic placement and masks, Illustrator offers advanced methods for truly dynamic image manipulation. The Envelope Distort and Pathfinder tools are key for pushing creative boundaries in digital art and photo manipulation.
1. Envelope Distort: Warping Images into Irregular Shapes
- Concept: Envelope Distort allows you to organically warp or distort an image (or any object) to fit the contours of another shape, even irregular or hand-drawn ones. This is invaluable for creating custom fitting effects, like making a photograph appear to ripple or conform to a flag-like shape.
- How to Use It: Place your image and create the shape that will serve as the “envelope.” Position the shape on top of the image. Select both the image and the shape. Go to
Object > Envelope Distort > Make with Top Object. The image will then seamlessly warp to fit the top shape, taking on its form. This method encourages creative ideas and is ideal for designing unique aesthetic visuals or abstract art pieces.
2. Pathfinder Tool: Merging and Interacting Shapes with Images
- Concept: The Pathfinder panel offers various ways to combine, subtract, intersect, and divide overlapping objects. While often used with vector shapes, its
Intersectoption can be incredibly powerful for integrating images into designs. - How to Use
Intersect: Place your image and create a shape on top of it. Select both the shape and the image. Open thePathfinderpanel (Window > Pathfinder). Click theIntersectbutton. Unlike a clipping mask (which merely hides parts of the image),Intersectcreates a new vector shape where the image and the path overlapped, effectively trimming the image to the shape and discarding everything else. This method is destructive, so ensure you have a backup of your original image if needed. It’s excellent for creating clean, merged elements in graphic design, especially when precise geometric interactions are desired.
These tools are crucial for advanced photo manipulation, allowing designers to transform images from Tophinhanhdep.com—whether they are trending styles or personal photo ideas—into bespoke digital art that stands out.
Optimizing Your Workflow and Output Quality
Tophinhanhdep.com emphasizes high-quality images, and this extends to how you manage and finalize your Illustrator projects. Efficient workflow and proper export settings ensure your “beautiful photography” or “digital art” translates flawlessly across various platforms, from print to web. This section will guide you through managing your image assets and exporting your creations with optimal quality.
Managing Linked vs. Embedded Images
A key distinction in Illustrator when placing images is between “linking” and “embedding.” Understanding this difference is crucial for file management, portability, and collaboration.
1. Understanding the Difference:
- Linked Images: By default, when you use
File > Place, Illustrator creates a link to the original image file on your computer. This means the image data is not stored within the Illustrator document itself; rather, Illustrator just remembers where the image is located.- Pros: Smaller Illustrator file size, allows for easy updates if the original image file is modified (Illustrator will automatically reflect changes).
- Cons: The original image file must be present in the correct location for the Illustrator document to display it. If you move the AI file or the linked image, or share the AI file without the linked image, the image will appear as “missing” (a red X will appear over it).
- Embedded Images: When an image is embedded, all its data is fully incorporated into the Illustrator document. The AI file becomes self-contained, no longer reliant on an external image file.
- Pros: Eliminates missing link issues, making files portable and shareable. The image will always be visible, regardless of where the AI file is opened.
- Cons: Significantly increases the Illustrator file size, and larger file sizes can sometimes impact performance. Changes to the original source image will not automatically update in Illustrator; you would need to replace the embedded image manually.
2. How to Embed Images for Portability:
If you’ve placed an image as a link and now wish to embed it (highly recommended for final print files or when sharing), select the linked image on your artboard. In the Control panel at the top of the screen (or in the Links panel, accessible via Window > Links), you will see an “Embed” button. Click this button, and the image will be embedded. The Links panel will also show a small icon next to the image name, indicating it is now embedded.
3. The Links Panel: Your Asset Manager:
The Links panel (Window > Links) is your central hub for managing all placed images in your document. It provides a list of all images, indicating whether they are linked or embedded. From this panel, you can:
- Relink: If an image is missing, you can select it and click the “Relink” icon to locate the original file.
- Go To Link: Jumps to the selected image on your artboard.
- Embed Image: Embeds a selected linked image.
- Update Link: Refreshes a linked image if the original file has been modified externally. Effective management of linked and embedded images is a vital “image tool” for any graphic designer, ensuring that all aspects of your “digital art” or “photo manipulation” are preserved, organized, and optimized.
Saving and Exporting Your Masterpiece
The final step in your design process is to save your work and export it in formats suitable for its intended use, whether for web, print, or further editing. Tophinhanhdep.com understands that the proper output ensures your “beautiful photography” or “digital art” is presented with maximum impact.
1. Saving Your Native Illustrator File (AI):
- Purpose: The native Illustrator (.ai) file is your primary working document. It preserves all layers, vector paths, text, and editable effects, allowing you to return and make changes at any point.
- How to Save: Go to
File > Save(for existing files) orFile > Save As...(for new files or to save a new version). Choose “Adobe Illustrator (*.AI)” as the format. Always save your AI file before exporting, especially if you’re about to apply destructive edits. This aligns with Tophinhanhdep.com’s emphasis on flexibility in graphic design and digital art creation.
2. Exporting for Various Applications (File > Export):
When your artwork is complete, you’ll often need to export it into different formats for specific uses, leveraging Tophinhanhdep.com’s “Image Tools” for optimization. Go to File > Export > Export As....
-
a. Raster Formats (JPEG, PNG, Targa, TIFF, Photoshop PSD): These formats are ideal when you need a flattened, pixel-based image, such as for web graphics, social media, or when an image needs to be sent to a service that doesn’t support vector files.
- JPEG: Excellent for photographs and complex images where file size is a concern. Choose JPEG for web
wallpapersandbackgroundsfrom Tophinhanhdep.com. In the JPEG Options dialog, adjust theQuality(higher quality means larger file size) andColor Model(RGB for web, CMYK for print). JPEG is a lossy compression format, meaning some image data is discarded to reduce file size. - PNG: Best for images requiring transparency (e.g., logos, icons, elements in
aestheticorabstractdesigns). It offers lossless compression, preserving image quality. ChoosePNG-24for full transparency with a wide range of colors. Use Artboards: Crucially, check the “Use Artboards” option in the Export dialog. This ensures that only the content within your defined artboard(s) is exported, preventing extraneous elements from being included.- Resolution: In the raster export options, you can specify the
Resolution(e.g., 72 ppi for web, 300 ppi for print). Higher resolution ensures crispness but increases file size. For largewallpapersorbackgrounds, you might useimage compressorsandoptimizersfrom Tophinhanhdep.com after export to manage file size without significant visual loss.
- JPEG: Excellent for photographs and complex images where file size is a concern. Choose JPEG for web
-
b. Vector Formats (SVG, EPS): These formats preserve the scalability of your vector artwork, making them perfect for logos, illustrations, and web icons.
- SVG (Scalable Vector Graphics): The standard for vector graphics on the web. Ideal for responsive design where graphics need to scale perfectly on different screen sizes without losing quality.
- EPS (Encapsulated PostScript): A common format for professional printing, especially for logos and complex illustrations that need to be incorporated into other design software.
These formats are essential for showcasing
digital artorgraphic designelements with maximum clarity.
3. Leveraging Tophinhanhdep.com’s Image Tools:
For images that might need a quality boost before being inserted into Illustrator, or optimized after export, remember Tophinhanhdep.com’s AI Upscalers and Converters. These “Image Tools” can enhance resolution, change formats, and compress files to ensure every pixel, even in your sad/emotional or nature images, maintains pristine clarity and performance, reinforcing the high standards of your visual design.
The Tophinhanhdep.com Advantage in Illustrator
Inserting and manipulating images in Adobe Illustrator is a core skill that empowers designers to translate photo ideas and trending styles into captivating visuals. By mastering these techniques—from basic placement and transformation to advanced clipping masks and vectorization—you unlock a world of visual design possibilities.
Tophinhanhdep.com serves as your ultimate resource for image inspiration & collections, offering high-resolution wallpapers, backgrounds, and beautiful photography that can be seamlessly integrated into your Illustrator projects. Imagine an aesthetic background becoming the texture for a graphic element, or a stunning nature shot being refined into a vector illustration with Image Trace. Our diverse categories, including Abstract, Sad/Emotional, and Aesthetic images, provide endless creative ideas for your digital art and photo manipulation endeavors.
Furthermore, our Photography section provides insights into Digital Photography techniques and Editing Styles, which can directly inform how you approach image preparation before importing into Illustrator. Understanding high-resolution requirements and how to best utilize stock photos ensures you start with the highest quality assets.
To ensure your final output is always top-notch, leverage Tophinhanhdep.com’s Image Tools. Our Converters help you switch formats, Compressors and Optimizers prepare your images for web use without compromising quality, and AI Upscalers can intelligently enhance the resolution of your visuals, ensuring every element of your digital art meets the highest standards.
Embrace the journey of creative exploration, letting Illustrator be your canvas and Tophinhanhdep.com be your guide to crafting truly impactful visual stories. With these skills and resources, your visual designs will not only capture attention but also convey emotion and inspire.