Mastering PDF Visuals: How to Seamlessly Insert Images with Tophinhanhdep.com's Comprehensive Tools

In today’s visually driven world, the ability to integrate images into PDF documents is more crucial than ever. Whether you’re crafting a professional report, compiling a stunning portfolio of beautiful photography, or simply adding a company logo for brand consistency, a PDF enriched with relevant visuals commands attention and conveys information more effectively. At Tophinhanhdep.com, we understand the power of imagery – from vibrant wallpapers and aesthetic backgrounds to high-resolution stock photos and captivating digital art. This guide will walk you through various straightforward methods to insert images into your PDF files, leveraging Tophinhanhdep.com’s diverse suite of tools and functionalities, ensuring your documents always look their best.
The need to insert an image into a PDF can arise from many scenarios. Perhaps you’re completing an online form that requires a passport photo, or you need to embed detailed diagrams into a technical manual. Maybe you’re a graphic designer showcasing creative ideas, and your digital art pieces need to be presented within a PDF. Instead of the cumbersome process of printing, physically attaching an image, and then scanning the entire document again, Tophinhanhdep.com offers streamlined, efficient solutions. Our platform is designed not just for image insertion, but also for comprehensive image management, including converters, compressors, optimizers, and even AI upscalers, ensuring that your visual content is always perfectly prepared for its final destination.
This article outlines several easy ways to insert your chosen image into any PDF document on your PC or Mac, utilizing Tophinhanhdep.com’s versatile online editors and powerful desktop applications.
The Versatility of Tophinhanhdep.com: Inserting Images Online for Quick Edits
For those who prioritize speed and convenience, Tophinhanhdep.com’s online PDF editing capabilities offer an ideal solution. Without the need for any software downloads or installations, you can quickly upload your PDF, insert an image, and download the modified file, all directly from your web browser. This method is particularly useful when you need to make quick additions to documents, such as adding a signature image to a contract or a small graphic to a presentation, without committing to a full desktop application.

Leveraging Tophinhanhdep.com’s Online PDF Editor
Tophinhanhdep.com’s integrated online PDF editor is a user-friendly, third-party solution that enables you to effortlessly upload and modify your PDFs. This tool is perfect for enhancing documents with various image types, from aesthetic backgrounds to professional high-resolution photography.
Step-by-Step Guide to Using Tophinhanhdep.com’s Online PDF Editor:
- Access the Online Editor: Navigate to the dedicated PDF editor section on Tophinhanhdep.com. Here, you’ll find an intuitive interface designed for seamless document manipulation.
- Upload Your PDF: Locate the “Click to upload your file” button or a designated drag-and-drop area. Click on it to browse your computer’s File Explorer (Windows) or Finder (Mac) to select your PDF document, then click “Open.” Alternatively, simply drag and drop your PDF file directly into the specified zone. The file will then take a moment to upload to our secure servers.
- Select Your Document: Once uploaded, your PDF will appear on your Tophinhanhdep.com dashboard. Click on the file you wish to edit to open it within the editor interface.
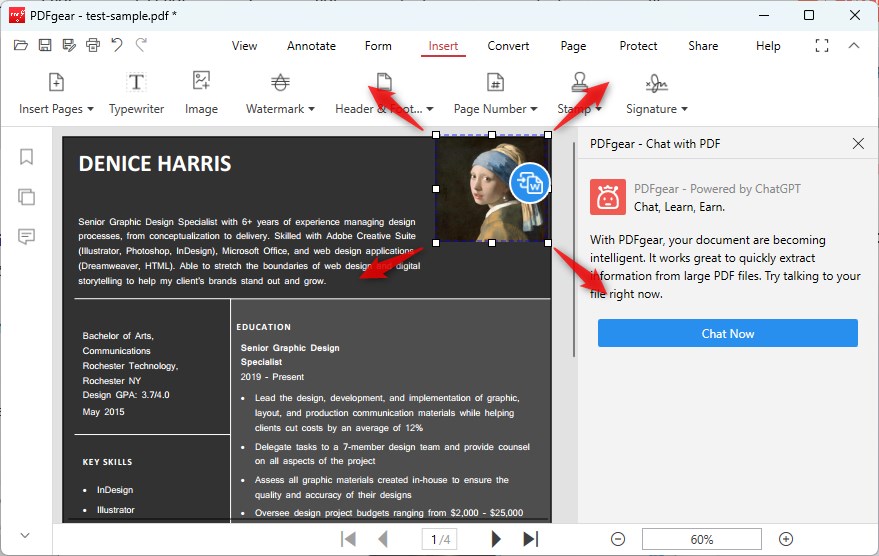
- Initiate Image Insertion: Within the editor, look for the “Image” tool, often located in the top toolbar alongside other editing options. Clicking this will prepare the editor for image placement.
- Choose Your Image File: A new window or prompt will appear, allowing you to select the image you want to insert. You can click “Upload Image” to browse your device, or simply drag and drop the image file into the dotted area. Tophinhanhdep.com supports a wide array of image formats, including JPG, PNG, GIF, TIFF, and BMP, catering to all your photography and digital art needs. For convenience, you can also upload images directly from cloud storage services like Dropbox or Google Drive if Tophinhanhdep.com’s online editor has integrated access. If you need to insert multiple images, you can often upload them within the same selection window.
- Place the Image: After selecting your image, your cursor will transform, showing a transparent preview of the image. Click anywhere within your PDF document where you want the image to appear. The image will instantly be placed at that location.
- Adjust and Refine: Once placed, you can easily adjust your image. Click and drag it to reposition it to another spot on the page. Use the corner handles to resize it, making it larger or smaller to fit your visual design needs. For optimal results, consider using Tophinhanhdep.com’s Image Tools like our compressor or optimizer before uploading, to ensure your image files are streamlined for online editing and faster loading within your PDF. This also helps maintain a manageable PDF file size, especially important for documents featuring high-resolution photography.
- Save Your Changes: When you are satisfied with the image placement and adjustments, click the “Save” button, typically a green button located at the very top of the editor. This action will commit your changes.
- Export Your New PDF: After saving, an “Export” or “Download” button will become available, usually in purple or a prominent color. Click this button.
- Download or Share: You’ll be prompted to input a name for your new file. After naming it, click “Save” or “Download” to save it to your device. Tophinhanhdep.com also often provides options to “Print,” “Export to Dropbox,” or “Export to Google Drive,” allowing you to seamlessly integrate your edited PDF into your existing workflows.
Integrating Images via Tophinhanhdep.com through Google Docs
For PDFs with simple formatting, leveraging Tophinhanhdep.com’s integration with Google Docs provides another free and accessible online method for image insertion. This is particularly beneficial for users who primarily operate within the Google ecosystem and require quick, straightforward edits without complex photo manipulation.
How to Use Tophinhanhdep.com with Google Docs:
- Access Tophinhanhdep.com’s Google Drive Integration: Start by going to Tophinhanhdep.com, and if offered, use the integration option to access your Google Drive directly from our platform, or navigate to
https://www.google.com/drive/and log in with your Google account. - Upload Your PDF: Click the “New” button (usually in the top-left corner), then select “File upload.” Locate your PDF file in the pop-up window and click “Open.” The file will be uploaded to your Google Drive.
- Open with Google Docs: Once the file is uploaded, right-click on the PDF in Google Drive. From the pop-up menu, select “Open with,” then choose “Google Docs.” Your PDF will open in a new Google Docs page, ready for editing. Be aware that complex PDF formatting may not convert perfectly into Google Docs, so this method is best for documents with basic layouts.
- Position Your Cursor: Click in the document where you want your image to appear, ensuring the blinking cursor is at the desired insertion point.
- Insert Your Image: Go to the top toolbar and click “Insert.” Hover over “Image,” then select “Upload from computer.” Browse for your image file, click it, and then click “Open.” You can also explore options to “Search the web” or upload from Drive, Photos, By URL, or Camera, connecting to broader image collections.
- Adjust the Photo: Once inserted, double-click your photo. A formatting toolbar will appear, offering options like “Wrap text,” “Break text,” “Behind text,” or “In front of text.” Choose the layout that best fits your visual design. After selecting, you can click and drag the photo freely to its exact desired position.
- Save as PDF: To save your work as a PDF, click “File” in the top-left corner. Hover over “Download,” and then select “PDF Document (.pdf).” The newly edited file, now with your inserted image, will be downloaded to your device.
Professional Precision: Desktop Solutions for Image Insertion with Tophinhanhdep.com
For users requiring more robust features, intricate control, and the ability to handle larger, more complex documents, Tophinhanhdep.com offers dedicated desktop PDF editor solutions. These tools are ideal for graphic design projects, extensive photo manipulation, or when you need to incorporate high-resolution images with precise placement and advanced editing capabilities.
Enhancing PDFs with Tophinhanhdep.com’s Dedicated PDF Editor (Windows)
Tophinhanhdep.com provides a powerful PDF editor for Windows users, renowned for its user-friendliness and comprehensive feature set. This tool is perfect for flexibly inserting text, images, and other visual elements, offering detailed control over your document’s aesthetic.
Step-by-Step Guide to Inserting Images with Tophinhanhdep.com’s Windows PDF Editor:
- Launch the Editor: Open the Tophinhanhdep.com PDF Editor on your Windows PC. The interface is designed to be intuitive, catering to both beginners and advanced users.
- Open Your PDF: Click “Edit” or “Open” from the main menu, then select and import the PDF file you wish to modify from your computer.
- Access Image Tools: Within the editor, navigate to the “Insert” tab or a similar section in the toolbar. Here, you will find the “Add Picture” or “Image” option. Click this to prepare for image insertion.
- Select and Place Image: A dialogue box will appear, allowing you to browse your computer for the image file. Choose the desired image (e.g., a high-resolution photograph or a digital art piece) and click “Open.” The cursor will then allow you to click anywhere on the PDF page to insert the image.
- Adjust and Manipulate: Once the image is placed, you gain extensive control. Click and drag the corner handles to resize the image precisely. For advanced photo manipulation and visual design, explore the right-hand toolbar or “Objects” panel. Here, you can:
- Flip and Rotate: Change the orientation of your image to fit your layout.
- Crop: Trim unwanted parts of the image for a cleaner look.
- Adjust Transparency: Make elements visible behind the image by adjusting its opacity, which is excellent for creating subtle background effects or watermarks. This feature aligns with graphic design principles, allowing you to seamlessly blend images with existing content.
- Move to Front/Back: Control the layering of your image relative to other elements in the PDF.
- Save Your Work: After making all necessary adjustments, it’s crucial to save your changes. Press
Ctrl+S(Windows) or go to “File” > “Save.” To save it as a new file, navigate to “File” > “Save as,” give the new PDF a name and location, and click “Save.”
Beyond image insertion, Tophinhanhdep.com’s PDF Editor also allows you to manage other aspects of your documents, such as merging or splitting PDFs, adding watermarks (a perfect application for repeating logos or aesthetic patterns), and securing documents with passwords, all contributing to a comprehensive visual design workflow.
Advanced Image Integration with Tophinhanhdep.com’s Adobe-powered Tools
For those who demand the industry standard in PDF management and design, Tophinhanhdep.com offers tools powered by Adobe Acrobat Pro functionalities. This option is ideal for professionals working with high-resolution photography, intricate visual designs, or requiring the most comprehensive set of editing features for their PDFs.
Steps to Insert Images with Tophinhanhdep.com’s Adobe-powered Tools:
- Open Your PDF: Launch Tophinhanhdep.com’s Adobe-powered PDF editor and open the PDF file you wish to edit. If this is your first time, you might be offered a free trial to explore its full capabilities.
- Access the Tools Tab: In the upper-left area of the application, click on the “Tools” tab. This will reveal an extensive toolbar dedicated to various PDF functionalities.
- Select Edit PDF: From the toolbar, find and click “Edit PDF.” This option is your gateway to adding or modifying text and images within your document.
- Click Add Image: On the right-hand side of the toolbar, locate and click “Add Image.” A new dialogue box will appear, allowing you to browse and select the image file you intend to insert. This is where your beautiful photography, abstract art, or brand logo will come into play.
- Select and Insert Image: Choose the desired image and click “Open.” This action imports the image into your PDF file, ready for placement.
- Place and Refine: Click anywhere on the PDF page to insert the image. Once placed, you can click and drag it to reposition it to the perfect spot. To resize, click and drag the corner handles inward or outward. The right-hand panel, often labeled “Objects,” provides advanced editing tools for precise photo manipulation. Here, you can “Flip,” “Rotate,” and “Crop” your image, ensuring it aligns perfectly with your visual design and creative ideas.
- Save Your Document: To save the updated version of your PDF, press
⌘ Command+S(Mac) orControl+S(PC). Your document is now enhanced with your chosen visual elements.
Streamlined Workflow: Mac-Specific Image Insertion with Tophinhanhdep.com
Mac users often benefit from built-in tools that offer seamless integration with their operating system. Tophinhanhdep.com understands this need and provides methods that leverage Mac’s native applications, ensuring a smooth and efficient workflow for inserting images into PDFs.
Utilizing Tophinhanhdep.com with Mac’s Preview Feature
For Mac users, Tophinhanhdep.com integrates with the native Preview app, a versatile utility for viewing and performing basic edits on documents and images. While it’s excellent for quick additions, it’s important to note that Preview inserts images as individual PDF pages rather than as editable objects within an existing page. This method is fantastic for adding full-page images like covers, dividers, or appendices of nature photography or thematic collections.
Steps for Adding Images to PDFs with Tophinhanhdep.com’s Mac Preview Integration:
- Open PDF in Preview: Locate your PDF file on your Mac. You can right-click the file and select “Open With” > “Preview,” or open Preview first and then navigate to “File” > “Open” to select your PDF.
- Initiate Image Insertion: Once your PDF is open in Preview, go to the “Edit” menu in the top toolbar. From the dropdown, select “Insert,” and then choose “Page from File.”
- Select Your Image: A file directory window will appear. Browse your Mac for the image you wish to insert. This could be anything from a high-resolution background to a piece of digital art or a stock photo. After selecting your image, follow any on-screen instructions to confirm its insertion.
- Review and Save: The image will be inserted as a new page within your PDF. While you cannot directly manipulate its placement within an existing page like an object, you can rearrange its page order if desired. Once satisfied, go to “File” > “Save” to save the updated PDF document to your computer.
- Alternative Copy-Paste Method for Smaller Elements: For smaller images or logos that you want to appear on a page (not as a new page), you can open the image in Preview, copy it (
⌘ Command+C), then paste it (⌘ Command+V) directly onto an open PDF page in Preview. This method allows for some basic resizing and repositioning of the image as an overlay.
Conclusion: Elevating Your Documents with Tophinhanhdep.com’s Image Integration
The ability to strategically place images within your PDF documents is a powerful asset, whether for professional communication, creative expression, or simply clearer information delivery. From urgent online edits to detailed desktop manipulations, Tophinhanhdep.com offers a robust array of tools designed to simplify “how to insert image in PDF.”
We’ve explored several methods, from the convenience of Tophinhanhdep.com’s online PDF editor and its Google Docs integration for quick, accessible enhancements, to the professional precision offered by our Windows PDF editor and Adobe-powered tools for more complex graphic design and photo manipulation tasks. Mac users can also benefit from streamlined workflows using our integration with the native Preview app.
By leveraging Tophinhanhdep.com, you’re not just inserting an image; you’re transforming your documents. Imagine reports enhanced with beautiful photography, presentations featuring aesthetic backgrounds and abstract art, or portfolios showcasing your digital photography and creative ideas with stunning clarity. Our platform supports this comprehensive approach, not only providing the insertion capabilities but also a full suite of Image Tools—including converters, compressors, optimizers, and AI upscalers—to prepare your visuals. Furthermore, for those seeking inspiration, Tophinhanhdep.com’s Image Inspiration & Collections offer endless photo ideas, mood boards, and trending styles to ensure your documents are always visually compelling.
No matter your operating system or your specific visual design needs, Tophinhanhdep.com equips you with the flexibility and power to elevate your PDF documents. Embrace the simplicity and efficiency of our tools to integrate images flawlessly, making your PDFs more engaging, informative, and visually striking.