How to Insert Images in Photoshop: A Comprehensive Guide for Stunning Visual Design

Adobe Photoshop is an indispensable tool for anyone venturing into the realms of digital art, photography editing, or graphic design. Whether you’re a budding enthusiast looking to create your first aesthetic background, or a seasoned professional meticulously crafting a photo manipulation masterpiece, the foundational skill of inserting images into your Photoshop projects is paramount. This comprehensive guide, brought to you by Tophinhanhdep.com, will walk you through various methods to effortlessly add images, empowering you to unlock your creative potential and produce captivating visuals.
At Tophinhanhdep.com, we understand the diverse needs of visual creators. From high-resolution wallpapers and beautiful photography to abstract art and thematic collections, our platform is a hub for inspiration, resources, and cutting-edge image tools. Mastering image insertion in Photoshop is your first step towards transforming raw images into the breathtaking visual content you envision, whether for a personal project or professional portfolio.
Methods for Bringing Images into Photoshop
Inserting an image into Photoshop isn’t a one-size-fits-all operation. Depending on whether you’re starting a new project or integrating an image into an existing one, Photoshop offers several flexible methods. Understanding these approaches is key to a smooth and efficient workflow, especially when dealing with diverse image types like high-resolution stock photos or personal digital photography.

Starting with a Fresh Canvas: Opening Images Directly
Often, your journey begins with a single image you wish to edit, enhance, or use as the primary element of a new design. Photoshop provides straightforward ways to open an image as a new document.
1. Using the ‘File > Open’ Command
This is perhaps the most traditional and universally understood method for opening files in most software applications.
- Step 1: Launch Photoshop. Open Adobe Photoshop on your computer. You’ll usually be greeted by the home screen, which displays recent projects and options to start new ones.
- Step 2: Access the ‘Open’ Dialogue. Navigate to the menu bar at the very top of your screen. Click on File, then select Open… from the dropdown menu. Alternatively, you can use the keyboard shortcut Ctrl+O (Windows) or Cmd+O (Mac).
- Step 3: Locate and Select Your Image. A file explorer (Finder on Mac, Explorer on Windows) window will appear. Browse through your computer’s folders to find the image file you want to open. This could be a stunning nature photograph from your collection, an abstract graphic you’ve downloaded, or a sad/emotional image destined for a thematic project.
- Step 4: Open the Image. Click on the desired image to select it, then click the Open button in the lower-right corner of the dialogue box. Photoshop will then open this image as a brand-new document, treating it as the background layer.
Extra Tip for Beginners: When an image is opened this way, Photoshop often locks it as a “Background” layer to prevent accidental movement. To fully manipulate it as a standard layer, double-click on the layer in the “Layers” panel (usually on the right side of the workspace), then click “OK” in the pop-up window. This unlocks the layer and allows for more versatile editing, an essential step for complex photo manipulation or digital art.
2. Opening from the Photoshop Home Screen
For quick access to images, especially recently used ones, the Photoshop home screen is a convenient entry point.
- Step 1: Launch Photoshop. Upon launching, the home screen presents several options.
- Step 2: Use the ‘Open’ Button. On the left side of the home screen, click the Open button. This will bring up the familiar file explorer window.
- Step 3: Select and Open. Navigate to your image, select it, and click Open.
3. Right-Clicking to Open With Photoshop
This method bypasses Photoshop’s internal menu and is great for opening an image directly from its location on your computer.
- Step 1: Locate Your Image. Using your operating system’s file explorer, find the image you want to open.
- Step 2: Right-Click and Select. Right-click on the image file (or Ctrl-click on a Mac without a right mouse button). From the context menu, choose Open With, then select Adobe Photoshop. Your image will then open in a new Photoshop document.
Integrating into Existing Projects: Placing Images as New Layers
The true power of Photoshop often lies in combining multiple images, elements, and textures to create new compositions. This is where methods for inserting images as new layers into an already open Photoshop document become invaluable, especially for visual design, photo manipulation, and crafting unique aesthetic backgrounds.
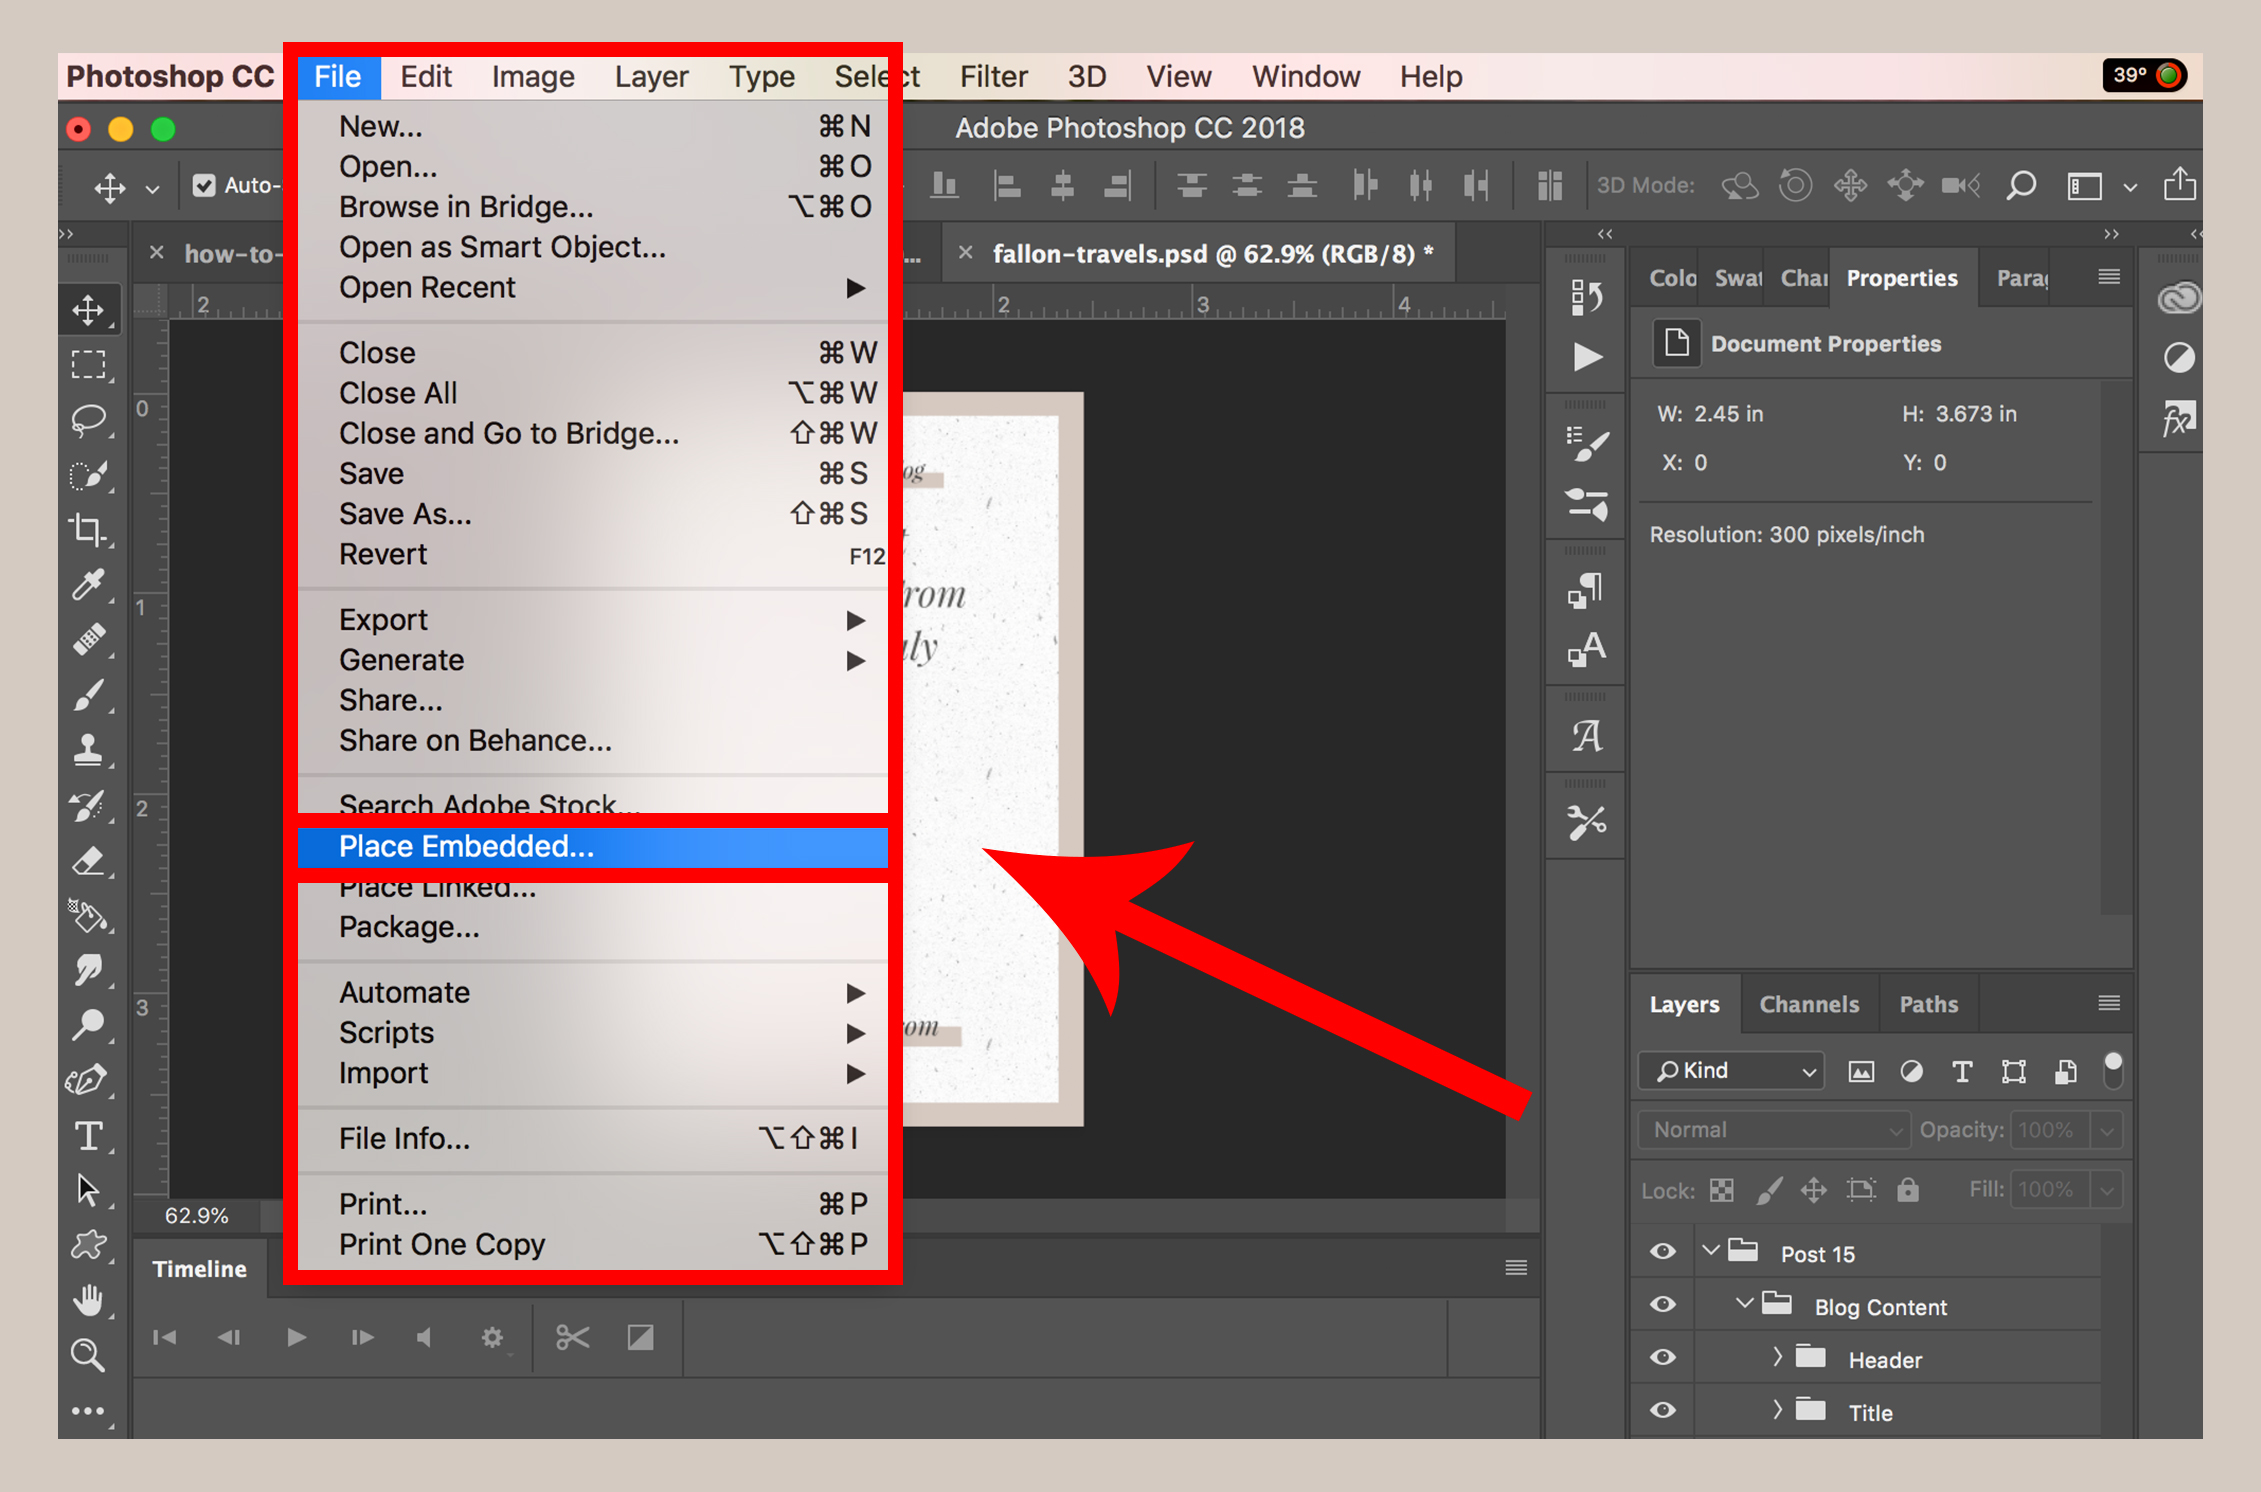
1. Leveraging ‘File > Place Embedded’
This is one of the most robust and recommended methods for adding images into an existing document, as it automatically converts the incoming image into a Smart Object.
- Step 1: Open Your Base Document. Start by opening the Photoshop file (.PSD) or image that will serve as your primary canvas. This could be a digital art project, a background you’re developing for a wallpaper, or a piece of beautiful photography you intend to enhance.
- Step 2: Go to ‘File > Place Embedded’. From the top menu bar, click File, then select Place Embedded… from the dropdown menu.
- Step 3: Choose Your Image. A file explorer window will appear. Navigate to and select the image file you wish to insert. This could be a high-resolution image to overlay, a graphic element for your design, or a piece of nature photography to blend into a scene. Click Place.
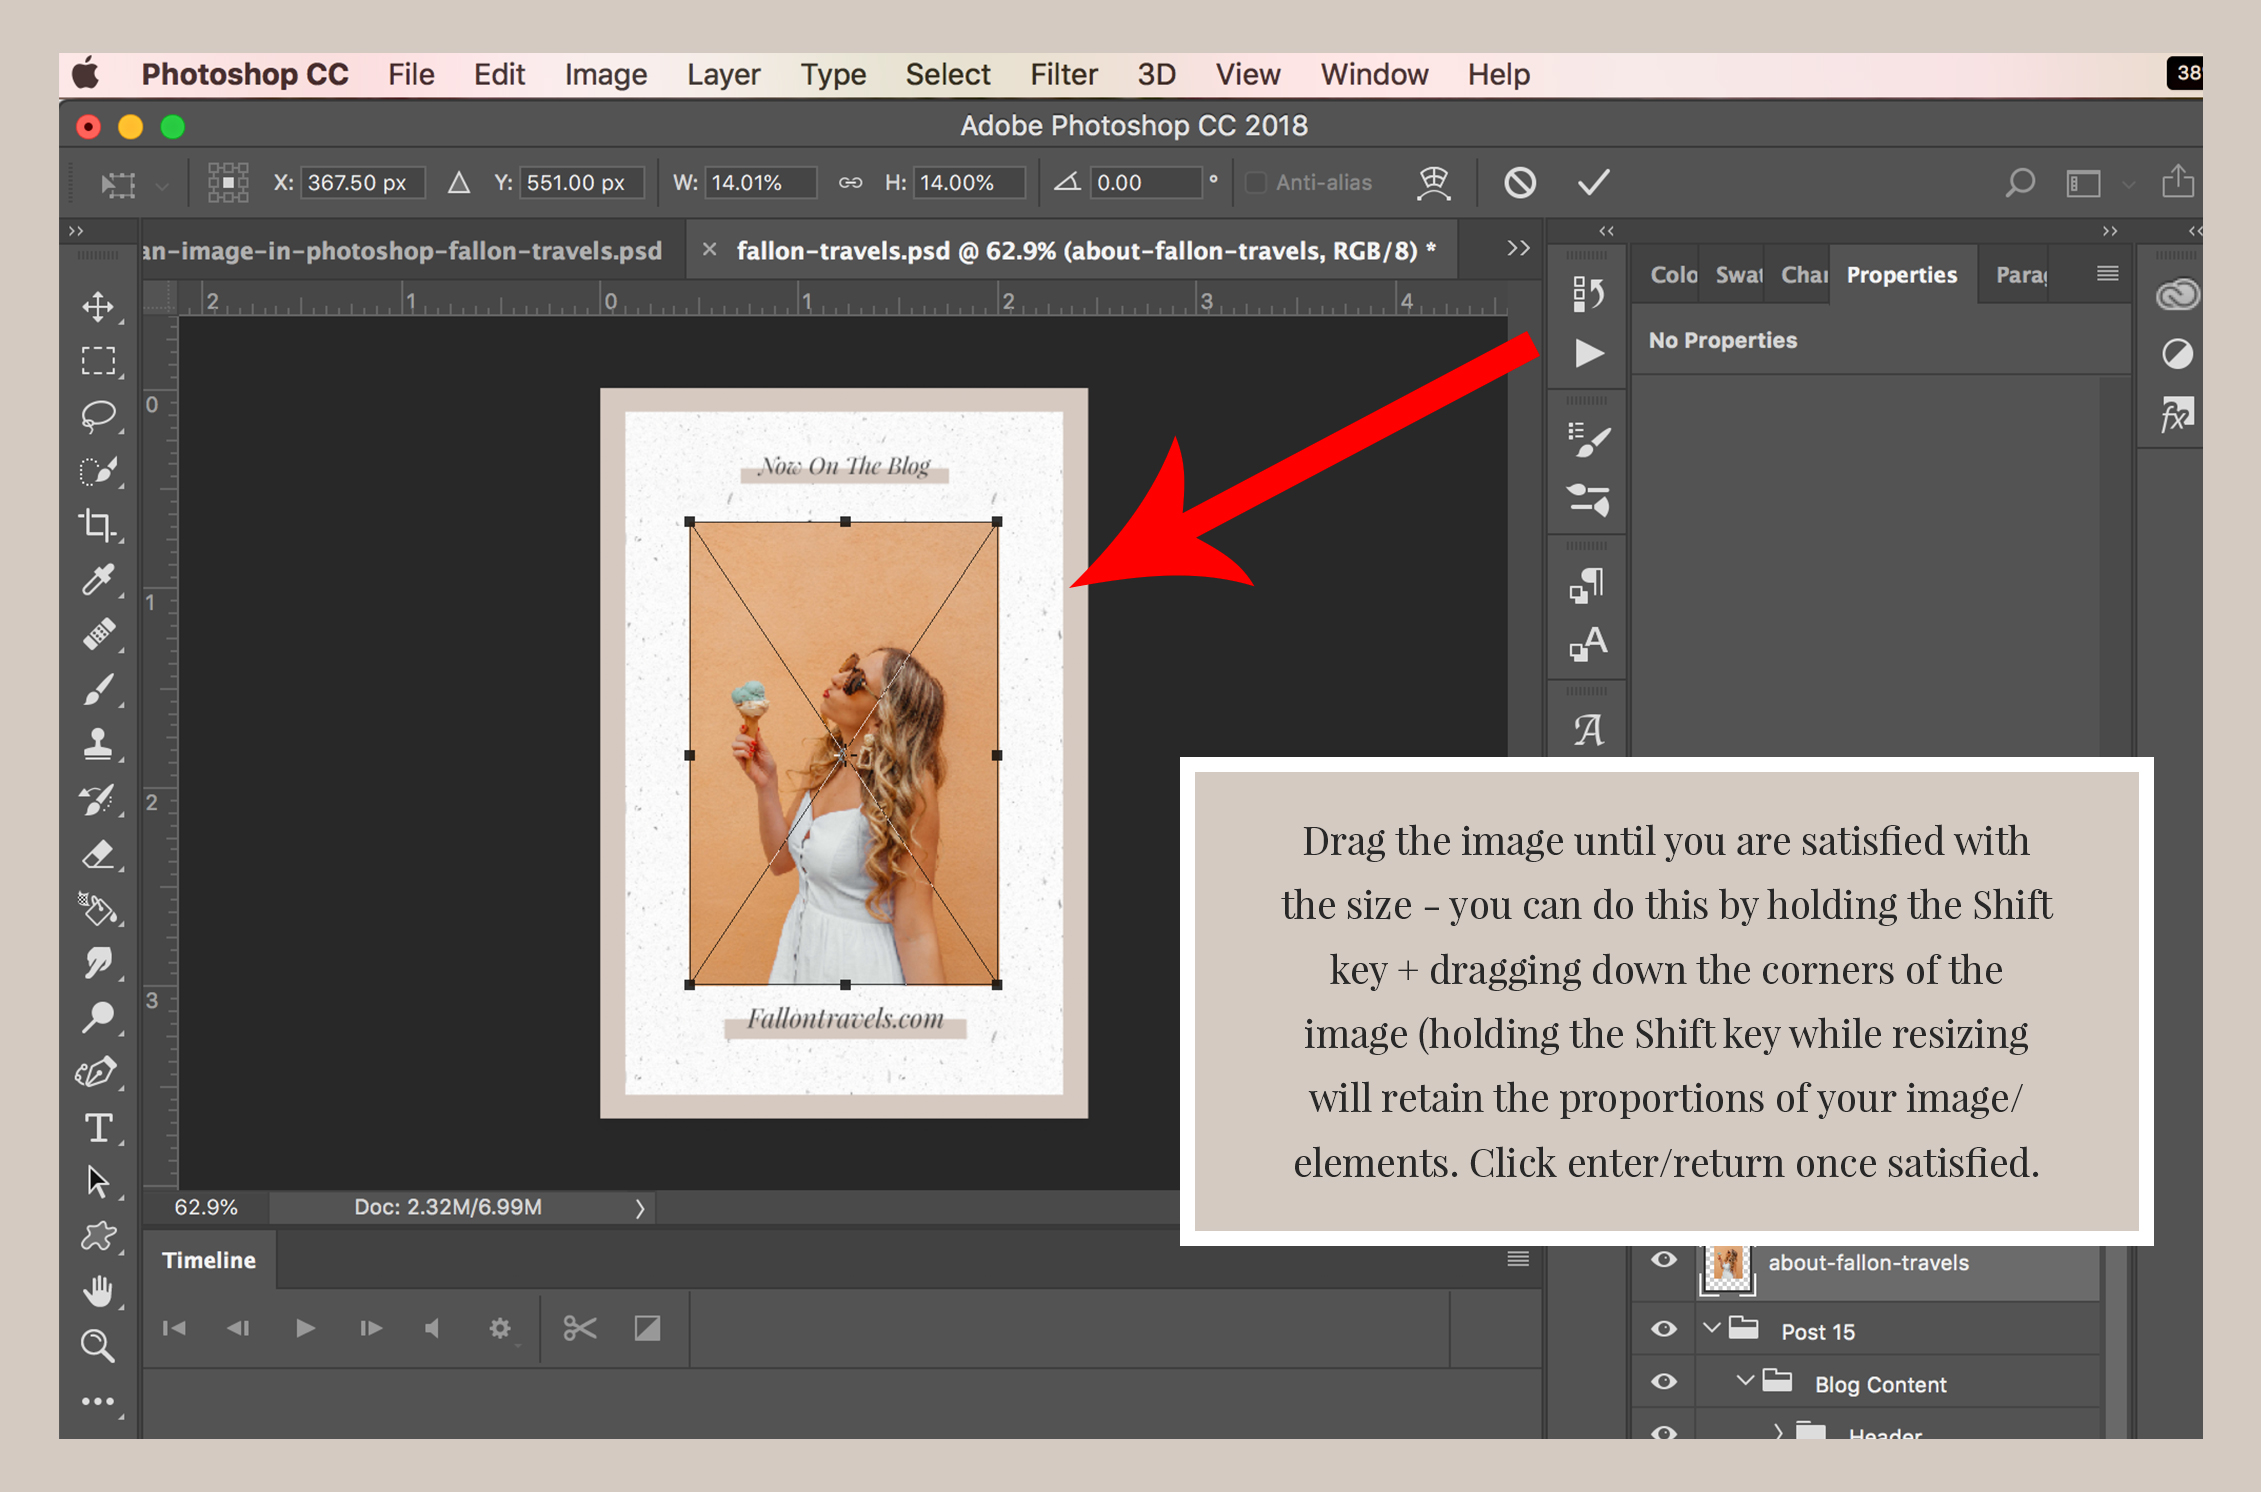
- Step 4: Position and Scale. The chosen image will appear in your document as a new layer, often with a “bounding box” (transform controls) around it.
- Resizing: Drag the corners of this bounding box to adjust the size. Crucially, hold down the Shift key while dragging to maintain the image’s aspect ratio and prevent distortion. This is vital for preserving the quality of stock photos or any image where proportion is important.
- Positioning: Click and drag the image within the bounding box to move it.
- Rotating: Move your cursor just outside a corner handle until it becomes a curved arrow, then click and drag to rotate.
- Step 5: Confirm Placement. Once satisfied with the size, position, and rotation, press Enter (Windows) or Return (Mac) on your keyboard, or click the checkmark in the options bar at the top of the screen.
The Power of Smart Objects: When you use “Place Embedded,” Photoshop automatically converts the incoming image into a Smart Object. This is a game-changer for non-destructive editing:
- Preserves Original Data: The original image data is preserved, meaning you can scale the Smart Object up or down multiple times without losing quality, a huge benefit for high-resolution images or digital photography.
- Non-Destructive Transformations: All transformations (scaling, rotating, skewing) are applied non-destructively, allowing you to re-edit them later.
- Apply Filters Non-Destructively: You can apply Smart Filters, which are editable and re-adjustable at any time. This is perfect for experimenting with different editing styles.
When to Rasterize a Smart Object: While Smart Objects are powerful, they can increase file size. If you need to perform pixel-level edits (like painting directly on the layer, using many selection tools, or applying certain destructive filters), you might need to convert it back to a regular pixel layer.
- To Rasterize: With the Smart Object layer selected in the Layers panel, go to Layer > Rasterize > Smart Object. Be aware that once rasterized, scaling the image up will result in pixelation if it has been scaled down previously. Only do this when you are confident in the size and position of the image. For image optimization and managing file size, Tophinhanhdep.com also offers compressors and optimizers that can be used on your final output.
2. The Efficiency of Drag and Drop
For sheer speed, dragging and dropping is hard to beat. It’s often the go-to for adding images quickly, especially when you’re experimenting with different elements for a mood board or a creative idea.
- Step 1: Arrange Your Workspace. Have both your Photoshop window (with your open document) and your file explorer (or even a web browser) visible on your screen.
- Step 2: Drag the Image. Click and hold the image file in your file explorer. While holding the mouse button, drag the image directly into your open Photoshop document.
- Step 3: Drop and Confirm. Release the mouse button to drop the image. It will appear as a new Smart Object layer, complete with the bounding box for positioning and scaling. Confirm its placement by pressing Enter/Return.
Note: If you drag and drop an image onto the Photoshop application icon (instead of an open document), Photoshop might open it as a new document instead of adding it as a layer. Ensure you drag it into the active document window.
3. Copy and Paste: Quick, But with Caveats
This method is fast for grabbing content, particularly from web pages or other applications, but it may not always yield a Smart Object.
- Step 1: Copy the Image.
- From the Web: Right-click on an image in your web browser and select Copy Image.
- From Your Computer: Open the image in an image viewer, right-click, and select Copy. (Simply copying the file from the explorer won’t work.)
- Step 2: Paste into Photoshop. In your Photoshop document, go to Edit > Paste from the top menu, or use the shortcut Ctrl+V (Windows) / Cmd+V (Mac).
- Step 3: Adjust (if needed). The image will appear as a new layer. Depending on the source and Photoshop version, it might be a pixel layer rather than a Smart Object. If it’s a pixel layer, any scaling will be destructive. If you want to transform it non-destructively, right-click the new layer in the Layers panel and choose Convert to Smart Object.
4. ‘File > Place Linked’ (For Collaborative or Dynamic Projects)
While less common for individual creators or beginners, “Place Linked” is an important method for specific workflows, particularly in graphic design or larger visual design projects where assets are managed centrally.
- Step 1: Open Your Base Document. As with ‘Place Embedded’, start with your main Photoshop document open.
- Step 2: Go to ‘File > Place Linked’. From the top menu bar, click File, then select Place Linked… from the dropdown menu.
- Step 3: Select Your Image and Place. Browse your computer, select the image, and click Place.
- Step 4: Position and Scale, then Confirm. Similar to ‘Place Embedded’, adjust the image using the bounding box (remembering to hold Shift for aspect ratio), then press Enter/Return to confirm.
Key Difference: Unlike “Place Embedded” which embeds a copy of the image data into your PSD, “Place Linked” creates a link to the original file on your hard drive.
- Benefits: Reduces PSD file size, and any changes made to the original source file will automatically update in your Photoshop document. Ideal for team projects or when using assets that might evolve.
- Caveats: If the original linked file is moved, renamed, or deleted, Photoshop will lose the link, and the image may appear as missing. Always ensure linked files remain in their original location.
Why These Insertion Skills Matter for Your Visual Journey with Tophinhanhdep.com
Mastering how to insert images in Photoshop is more than just a technical skill; it’s the gateway to limitless creative expression, aligning perfectly with the diverse offerings on Tophinhanhdep.com:
Images: Crafting Personalized Visuals
Whether you’re looking for stunning Wallpapers, serene Backgrounds, or visually striking Aesthetic images, Tophinhanhdep.com offers a rich collection. With Photoshop’s insertion capabilities, you can combine multiple images to create unique compositions. Imagine merging a calming Nature scene with subtle Abstract elements to design a one-of-a-kind desktop background, or taking a Sad/Emotional image and integrating symbolic elements for a powerful narrative. The ability to place images seamlessly allows you to build layers of meaning and beauty, transforming raw inspiration into personalized visual statements.
Photography: Elevating Your Shots and Discovering New Styles
For photographers, inserting images is fundamental. You can:
- Enhance Digital Photography: Place your High Resolution photos into a document to begin the editing process, perhaps overlaying textures, adding specific light effects, or incorporating elements from Stock Photos to enrich your scene.
- Experiment with Editing Styles: Combine multiple exposures, composite elements, or add artistic flair, all made possible by layering images. This empowers you to develop distinct Editing Styles and transform ordinary snapshots into extraordinary Beautiful Photography.
Image Tools: Refining Your Creations
Once your images are perfectly placed and manipulated in Photoshop, Tophinhanhdep.com’s suite of Image Tools comes into play for the final touches:
- AI Upscalers: If you’ve worked with a lower-resolution element, an AI Upscaler can help enhance its quality before final output.
- Compressors & Optimizers: For sharing your designs online or using them as web backgrounds, these tools are crucial for reducing file size without significant loss of visual quality.
- Converters: Transform your final Photoshop output into various formats suitable for different platforms.
- Image-to-Text: If your design includes text that needs to be extracted or recognized, this tool can be a lifesaver.
Visual Design: The Foundation of Creativity
Every aspect of Graphic Design, Digital Art, and Photo Manipulation relies heavily on the ability to integrate diverse visual elements. Learning image insertion techniques is the bedrock for:
- Creative Ideas: Bringing together disparate images to form new concepts.
- Photo Manipulation: Seamlessly blending subjects, backgrounds, and special effects.
- Digital Art: Constructing complex scenes from numerous layers, forming intricate and imaginative worlds.
Image Inspiration & Collections: Turning Ideas into Reality
Tophinhanhdep.com provides endless Image Inspiration, Mood Boards, Thematic Collections, and insights into Trending Styles. By mastering image insertion, you can take this inspiration and bring it to life in Photoshop. Create your own mood boards for upcoming projects, assemble thematic collages, or experiment with trending visual aesthetics by layering various images and effects.
Advanced Tips for Seamless Image Integration and Workflow Efficiency
Beyond the basic steps, a few advanced considerations can significantly improve your image insertion and manipulation workflow in Photoshop.
1. Understanding the Layers Panel for Organization
The Layers panel (Window > Layers) is your control center. Each inserted image occupies its own layer, allowing independent editing without affecting other elements.
- Naming Layers: Get into the habit of renaming layers (double-click the layer name) to keep your project organized, especially when working with many images for complex photo manipulation or digital art.
- Grouping Layers: Use layer groups (Ctrl+G / Cmd+G) to organize related images, such as all elements for a specific background or a character composite.
- Blending Modes and Opacity: Experiment with different blending modes (dropdown in the Layers panel) and adjust layer opacity to seamlessly integrate images, create artistic effects, or achieve specific aesthetic looks.
2. Mastering Transformations and Non-Destructive Editing
- Free Transform (Ctrl+T / Cmd+T): This versatile tool allows you to scale, rotate, skew, distort, and apply perspective to a layer. Always remember to hold Shift when scaling to maintain aspect ratio, unless intentionally distorting.
- Smart Objects are Your Friends: As discussed, prioritize ‘Place Embedded’ or converting layers to Smart Objects. This practice ensures that your high-resolution photography and detailed design elements remain pristine throughout the editing process, preserving their original quality for any future adjustments.
3. Maintaining Image Quality and Resolution
Always strive to start with the highest possible quality and resolution for your source images, especially for projects destined for print or large displays. While Photoshop can downscale images gracefully, upsizing them (especially rasterized layers) will inevitably lead to pixelation and a loss of clarity. Tophinhanhdep.com offers a vast collection of High Resolution images that are perfect starting points for any project.
4. Leveraging Keyboard Shortcuts for Speed
Efficiency is key in any creative process. Familiarize yourself with common Photoshop keyboard shortcuts:
- Ctrl+O / Cmd+O: Open
- Ctrl+V / Cmd+V: Paste
- Ctrl+T / Cmd+T: Free Transform
- Ctrl+S / Cmd+S: Save
- V: Move Tool (essential for positioning after transformation)
5. Considering Creative Consoles for Enhanced Control
For those deeply involved in photo editing and visual design, tools like creative consoles or external controllers can significantly enhance your workflow. These devices often feature programmable dials, buttons, and scroll wheels, allowing you to execute commands, adjust parameters, and navigate layers without constantly switching between mouse and keyboard. This can be especially beneficial for repetitive tasks like fine-tuning image size and position, fostering a more intuitive and immersive creative experience.
Conclusion
Inserting images into Adobe Photoshop is a fundamental skill that underpins nearly every creative endeavor within the software. From simply opening a single beautiful photograph to intricately layering multiple abstract elements for a complex digital art piece, the methods outlined in this guide provide you with the necessary tools to begin your visual design journey.
At Tophinhanhdep.com, we are dedicated to fueling your imagination and providing the resources to bring your Creative Ideas to life. By mastering these image insertion techniques, you’re not just learning a software function; you’re unlocking the potential to create stunning Wallpapers, captivating Backgrounds, and deeply personal Thematic Collections. Continue to explore, experiment, and transform your vision into reality. We invite you to delve into Tophinhanhdep.com for endless Image Inspiration, High Resolution assets, and powerful Image Tools to support every step of your creative process.