Mastering Image Insertion in PowerPoint: Elevating Your Presentations with Tophinhanhdep.com

In today’s visually-driven world, a compelling presentation is rarely purely textual. Images, photographs, and graphic elements are no longer just supplementary; they are integral to conveying messages, engaging audiences, and leaving a lasting impression. Microsoft PowerPoint, a ubiquitous tool for creating slideshows, understands this fundamental truth, offering robust features for integrating visuals seamlessly. Whether you’re assembling a professional business proposal, an academic lecture, or a personal photo album, knowing “how to insert image in PowerPoint” is a foundational skill that can dramatically enhance your communication.
This comprehensive guide will walk you through the various methods of inserting images into your PowerPoint presentations, from local files to online sources. More importantly, we’ll explore how to leverage high-quality images and powerful tools available on platforms like Tophinhanhdep.com to transform your slides from ordinary to extraordinary. With a focus on visual design, optimization, and inspiration, you’ll learn to curate and present visuals that truly resonate.
The Essentials: Inserting Images from Various Sources
The first step to enriching your presentation is understanding the mechanics of bringing images into PowerPoint. Depending on your version of PowerPoint (from newer Microsoft 365 iterations to Office 2016-2019, macOS, Web, Android, or iOS), the precise clicks might vary slightly, but the core functionality remains consistent. PowerPoint provides multiple avenues for sourcing images, each with its own advantages.
From Your Local Device or Network
The most common method involves inserting pictures directly from your computer, a connected network drive, or even cloud storage like iCloud Drive or OneDrive. This is ideal when you have specific, pre-prepared images, such as personal photographs, company logos, or custom graphics.
Step-by-Step Guide:
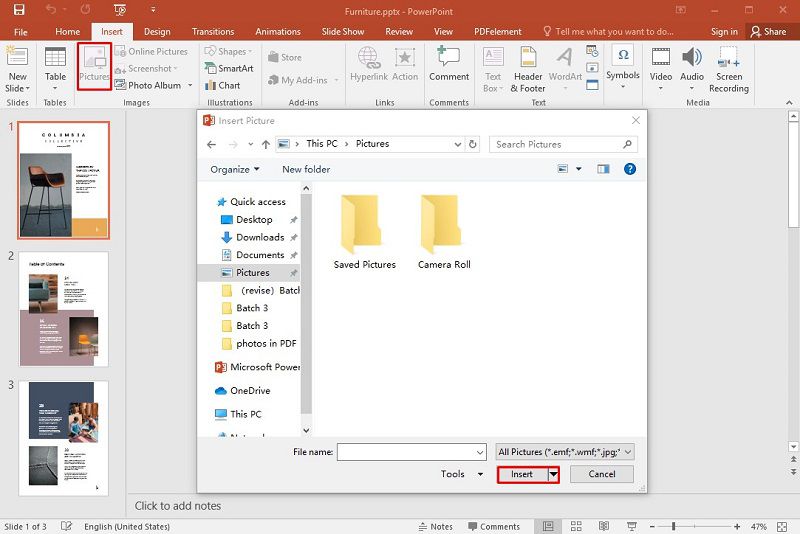
- Select Your Destination: Open your PowerPoint presentation and navigate to the specific slide where you wish to insert the picture. The image will be placed where your cursor is, or simply centered on the slide if no specific object is selected.
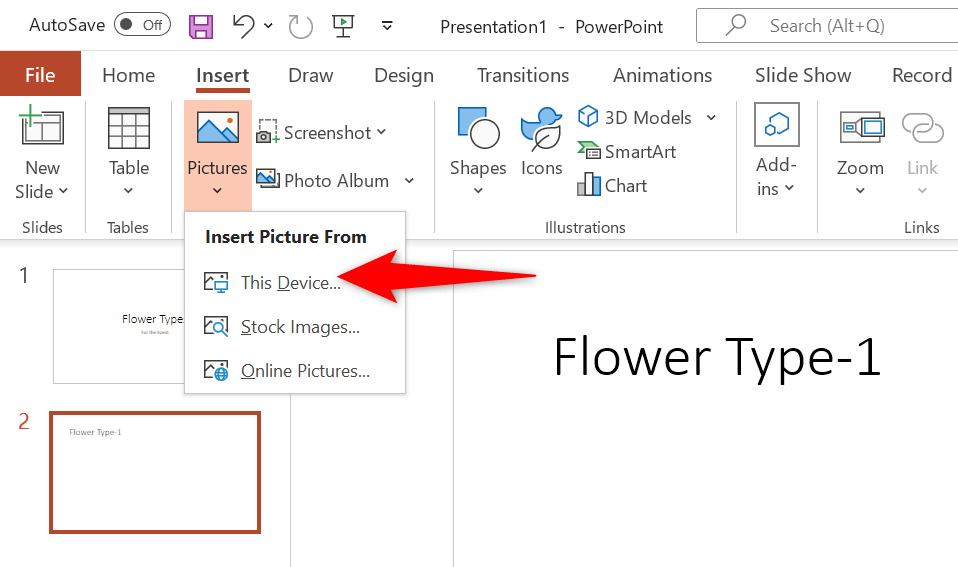
- Access the Insert Tab: Locate the “Insert” tab in the PowerPoint ribbon at the top of your screen and click on it.
- Choose “Pictures”: Within the “Images” group on the “Insert” tab, you’ll find the “Pictures” option. Click on it.
- Specify Source: A drop-down menu will appear. Select “This Device,” “Video on My Computer,” “Video on My PC,” or “Picture From File” (depending on your PowerPoint version and operating system, e.g., macOS users will see “Picture From File”).
- Browse and Select: A dialog box will open, allowing you to browse your computer’s file system. Navigate to the folder containing your desired image. Select the picture(s) you want to insert.
- Pro Tip for Multiple Selections: To insert several images simultaneously, hold down the
Ctrlkey (Windows) orShiftkey (macOS) while clicking on each desired picture, then click “Insert” or “Open.”
- Pro Tip for Multiple Selections: To insert several images simultaneously, hold down the
- Insert: Click “Insert” (or “Open” on some versions) to place the image(s) onto your slide.
Once inserted, the image will appear on your slide. You can then resize it, reposition it, and apply various formatting options. For those who prefer keyboard shortcuts, a quick Alt + N + P followed by D (for device) can swiftly bring up the local file browser, streamlining your workflow.
Leveraging Tophinhanhdep.com for Local Files: Before inserting images from your device, consider the quality and optimization of your files. Tophinhanhdep.com offers a suite of “Image Tools” including Compressors and Optimizers that can significantly reduce file sizes without sacrificing visual integrity. This is crucial for keeping your PowerPoint file lean and ensuring smooth playback, especially if you’re working with numerous high-resolution photographs. If you have images that are too small or pixelated, Tophinhanhdep.com’s AI Upscalers can enhance their resolution, making them suitable for larger display on your slides. Ensuring your digital photography is high-resolution and properly formatted before insertion can save you time and prevent presentation performance issues.
Tapping into Online Resources: Stock and Web Images
PowerPoint isn’t limited to local files. It also provides convenient ways to fetch images directly from the internet or curated stock libraries, making it easy to find diverse visuals without leaving the application.
Inserting Stock Images
Microsoft 365 subscribers have access to a vast library of royalty-free stock images directly within PowerPoint. These images are typically high-resolution and professionally curated, making them excellent for adding a polished look to your presentations.
Step-by-Step Guide:
- Select Your Destination: Choose the slide where you want the image to appear.
- Access the Insert Tab: Click the “Insert” tab.
- Choose “Pictures”: In the “Images” group, click “Pictures.”
- Select “Stock Images”: From the drop-down menu, choose “Stock Images.”
- Search and Select: A pane will open, allowing you to browse categories or type keywords into a search box (e.g., “nature,” “abstract,” “aesthetic”). Select the images you want by clicking on them. You can select multiple images.
- Insert: Click “Insert” to add them to your slide.
Tophinhanhdep.com and Stock Photography: For an even wider selection of visually stunning and thematically diverse visuals, Tophinhanhdep.com serves as an excellent external resource. Its “Photography” section features High Resolution stock photos suitable for any presentation. Whether you’re looking for Nature, Abstract, Aesthetic, or Beautiful Photography to enhance your narrative, Tophinhanhdep.com’s extensive collections provide a rich source of inspiration. Consider browsing Tophinhanhdep.com for thematic collections or trending styles to find the perfect visual match for your content, then download and insert them as local files.
Inserting a Picture from the Web
If stock images don’t quite fit your needs, PowerPoint allows you to search the web directly for images using a built-in search powered by Bing (or Google in some older versions/plugins).
Step-by-Step Guide:
- Select Your Destination: Go to the slide where the picture should be.
- Access the Insert Tab: Click the “Insert” tab.
- Choose “Pictures”: In the “Images” group, click “Pictures.”
- Select “Online Pictures” or “Search on Web”: From the drop-down, choose “Online Pictures” or “Search on Web.”
- Search and Filter: In the search box that appears, type your desired keywords (e.g., “sad emotional background,” “abstract wallpaper”). Press Enter. You can often use filters (Size, Type, Color, Layout, and Licensing) to refine your results, ensuring you find images that are both visually appropriate and legally permissible (e.g., Creative Commons licenses).
- Select and Insert: Choose the images you want, then click “Insert.”
Privacy Settings Note: If you encounter a message like “The service required to use this feature is turned off,” you might need to adjust your privacy settings under File > Account > Account Privacy > Manage Settings and enable “optional connected experiences,” then restart PowerPoint.
Image Inspiration & Collections from Tophinhanhdep.com: When searching for online pictures, the sheer volume can be overwhelming. Tophinhanhdep.com can act as your curated inspiration hub. Explore its “Image Inspiration & Collections” for Photo Ideas, Mood Boards, Thematic Collections, and Trending Styles. These resources can help you pinpoint the exact visual aesthetic you need, allowing you to conduct more targeted searches within PowerPoint’s online picture feature or download images from Tophinhanhdep.com directly. From Wallpapers to Backgrounds, Tophinhanhdep.com’s categories can guide your search for compelling visuals.
Utilizing Special Formats and Backgrounds
Beyond standard image insertion, PowerPoint offers advanced options for integrating visuals, including screenshots and images for background or master slide use.
Inserting Screenshots
Sometimes, the best visual is a direct capture of something on your screen. PowerPoint allows you to insert screenshots of open windows or specific screen clippings.
Step-by-Step Guide:
- Select Your Destination: Go to the slide where you want the screenshot.
- Access the Insert Tab: Click the “Insert” tab.
- Choose “Screenshot”: In the “Images” group, click the “Screenshot” option.
- Select Option:
- “Available Windows”: A gallery of your currently open windows will appear. Click on the window you wish to capture entirely.
- “Screen Clipping”: Your screen will fade, and your cursor will turn into a crosshair. Click and drag to select the specific area of your screen you want to capture. The selected area will automatically appear on your slide.
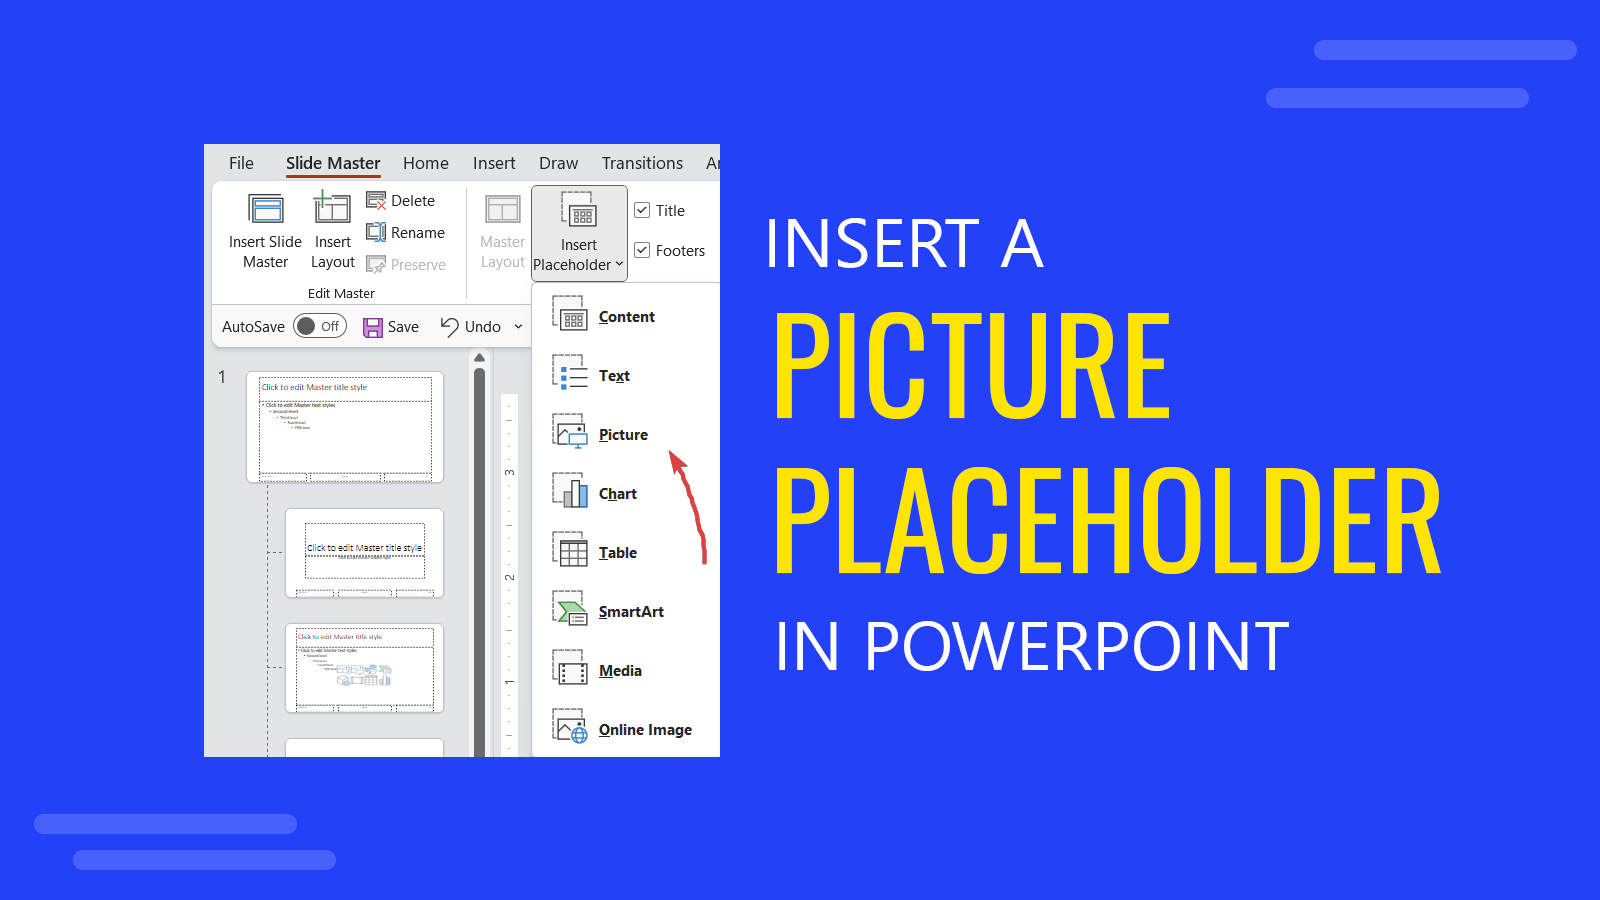
Inserting Images into the Slide Master or Background
For a consistent visual theme across multiple slides, you can embed an image into the slide master or as a background.
- Slide Master: If you want an image (like a logo, a subtle graphic element, or a Wallpaper from Tophinhanhdep.com) to appear on every slide of a specific type in your template, add it to the slide master. This ensures uniformity and prevents accidental deletion or movement during editing. (Learn more about “What is a slide master?” within PowerPoint’s help.)
- Slide Background: To have an image serve as a background for a single slide or a selection of slides without affecting all master slides, change the background settings. Right-click on the slide, select “Format Background,” choose “Picture or texture fill,” and then “Insert Picture From.” Here, you can select an image from your device or online sources. Tophinhanhdep.com’s “Backgrounds” and “Aesthetic” image categories are particularly useful for this purpose, offering visually appealing backdrops.
Enhancing Your Visuals: Photography and Design Principles
Inserting an image is just the beginning. The true power of visuals lies in how they are selected, prepared, and integrated into your overall presentation design. This is where the principles of good photography and visual design come into play, significantly influencing your presentation’s impact.
The Power of High-Resolution Photography
Blurry, pixelated images are a presentation killer. They undermine credibility and make your slides look unprofessional. Always prioritize High Resolution photography. Tophinhanhdep.com’s “Photography” section is dedicated to providing high-quality visuals that maintain their sharpness and detail even when scaled up.
- Clarity and Detail: High-resolution images allow for greater detail and clarity, which is crucial for conveying complex information or showcasing intricate designs.
- Professionalism: Using crisp, clear images instantly elevates the perceived professionalism of your presentation.
- Versatility: High-res images can be resized and cropped more freely without losing quality, offering greater flexibility in your visual design.
When choosing images, whether from your own Digital Photography collection or from Stock Photos on Tophinhanhdep.com, aim for the highest resolution available that doesn’t excessively bloat your file size. Remember, Tophinhanhdep.com’s Compressors can help manage large file sizes post-selection.
Creative Visual Design and Photo Manipulation
PowerPoint offers basic image editing tools, but for truly impactful visual design, you might need to think about Photo Manipulation and Graphic Design principles.
-
In-PowerPoint Editing: Once an image is inserted, select it, and a “Picture Format” or “Picture Tools” tab will appear on the ribbon. Here you can:
- Adjust Size and Position: Drag corner handles to scale (hold
Shiftfor proportional scaling) and drag the image to reposition it. Use “Format Picture” (right-click) for precise control over height and width. - Apply Picture Styles: Choose from pre-defined frames, shadows, and effects to give your image a polished look.
- Make Corrections: Adjust brightness, contrast, and color saturation.
- Recolor and Artistic Effects: Apply filters to change the image’s color scheme or give it an artistic touch.
- Crop and Trim: Remove unwanted parts of an image or crop it to a specific shape (e.g., a circle or triangle, as mentioned in the PresenterMedia article).
- Remove Background: For newer versions, a “Remove Background” tool helps isolate subjects.
- Adjust Size and Position: Drag corner handles to scale (hold
-
Pre-PowerPoint Manipulation with Tophinhanhdep.com’s Vision: For more advanced Digital Art and Photo Manipulation, consider preparing your images before insertion. Tophinhanhdep.com provides inspiration for Creative Ideas that you can then implement using dedicated image editing software. Imagine a presentation where specific elements are subtly manipulated for artistic effect or where a series of images tells a story through carefully crafted Editing Styles. These techniques, while potentially requiring external tools, lead to unique and memorable visual experiences.
Leveraging Tophinhanhdep.com for Aesthetic Impact
The selection of imagery plays a monumental role in setting the tone and emotional resonance of your presentation. Tophinhanhdep.com excels in curating images that cater to diverse aesthetic needs, from soothing landscapes to thought-provoking abstract art.
- Aesthetic Appeal: Tophinhanhdep.com’s collections of Aesthetic images can transform a bland slide into a captivating visual experience. These images are chosen for their compositional harmony, color balance, and overall pleasing appearance.
- Emotional Connection: For presentations that require an emotional touch, Tophinhanhdep.com offers categories like Sad/Emotional imagery. These visuals can help you forge a deeper connection with your audience, making your message more impactful.
- Nature’s Serenity: If your topic calls for a sense of calm, growth, or natural beauty, Tophinhanhdep.com’s Nature category provides breathtaking landscapes, intricate flora, and dynamic wildlife photography.
- Abstract Thought: For conceptual presentations or those requiring a modern, avant-garde feel, Abstract images from Tophinhanhdep.com can stimulate thought and add a sophisticated edge.
- Beautiful Photography: Across all categories, Tophinhanhdep.com emphasizes Beautiful Photography, ensuring that every visual you select is of the highest artistic and technical quality.
By intentionally choosing images that align with your presentation’s theme and emotional objectives, you can significantly enhance audience engagement and message retention.
Optimizing Images with Tophinhanhdep.com’s Advanced Tools
High-quality images are fantastic, but they often come with large file sizes, which can slow down your presentation, make the file cumbersome to share, and even lead to crashes during playback. This is where image optimization becomes crucial, and Tophinhanhdep.com’s Image Tools offer essential solutions.
Managing File Size: Compressors and Optimizers
Large images, especially high-resolution ones, can drastically increase your PowerPoint file size. This can lead to:
- Slow Loading Times: Slides may take longer to load, disrupting your presentation flow.
- Performance Issues: Animations and transitions might become choppy, especially on older machines.
- Sharing Difficulties: Large files are harder to email or upload.
Tophinhanhdep.com’s Compressors and Optimizers are designed to address these challenges. These tools intelligently reduce the data in an image while preserving visual quality as much as possible. By running your images through these tools before inserting them into PowerPoint, you can ensure a smooth, efficient presentation experience. For videos, which are even larger, PowerPoint itself offers a “Compress Media” feature (File > Info > Media Size and Performance), but for images, external optimization tools like those on Tophinhanhdep.com are highly recommended.
Improving Quality: AI Upscalers and Converters
Sometimes, you might find the perfect image, but it’s too small or in an incompatible format.
- AI Upscalers: Tophinhanhdep.com’s AI Upscalers use artificial intelligence to intelligently increase the resolution of low-quality images. Unlike traditional resizing, which simply stretches pixels and causes blurriness, AI upscaling reconstructs details, making small images suitable for larger displays in your presentation without pixelation. This is invaluable when your ideal image isn’t available in high resolution.
- Converters: Ensuring your images are in a compatible format is also vital. PowerPoint supports various image formats including .bmp, .gif, .jpg (.jpeg), .png, .tif (.tiff), and .wmf (.emf). If you have an image in an unusual format, Tophinhanhdep.com’s Converters can transform it into a PowerPoint-friendly type, preventing compatibility issues.
Extracting Information: Image-to-Text Features
While not directly related to visual presentation, Tophinhanhdep.com’s Image-to-Text tool represents another facet of image utility. If your presentation requires extracting text from an image (e.g., a scanned document or a screenshot of important data), this tool can convert the visual text into editable digital text. This can then be used in your presentation, saving you the hassle of manual transcription and ensuring accuracy.
Beyond Insertion: Styling and Impact
Once images are inserted and optimized, PowerPoint provides further capabilities to style them and integrate them effectively into your overall presentation narrative.
Formatting and Styling Images in PowerPoint
The “Picture Format” tab (or “Picture Tools” on older versions) becomes active when an image is selected on a slide, offering a wealth of options for styling and refining its appearance.
- Picture Styles: Apply pre-defined styles that include borders, shadows, reflections, and 3D effects. These can instantly give your images a professional and cohesive look.
- Picture Border: Customize the color, weight, and style of the border around your image.
- Picture Effects: Add more advanced effects such as shadows, reflections, glows, soft edges, bevels, and 3D rotations to make your images stand out or blend in.
- Picture Layout: Convert your image into a SmartArt graphic, allowing you to easily add captions or associated text, making complex ideas more digestible.
- Arrange and Align: Use tools to bring images forward or send them backward in relation to other objects, align them precisely on the slide, and group multiple images for easier manipulation.
- Crop to Shape: Beyond rectangular cropping, you can crop images to fit into various shapes like circles, arrows, or custom forms, creating unique visual elements. This is a powerful feature for Photo Manipulation within PowerPoint, turning standard images into Digital Art components.
Crafting Visual Narratives with Thematic Collections
The most effective presentations tell a story, and images are powerful narrative devices. Tophinhanhdep.com, with its rich “Image Inspiration & Collections,” can be instrumental in developing a cohesive visual story.
- Photo Ideas: Explore Tophinhanhdep.com for fresh Photo Ideas that can spark creativity and provide new perspectives for your presentation’s visual narrative.
- Mood Boards: Use Tophinhanhdep.com to create virtual Mood Boards by collecting images that embody the desired tone, style, and emotional impact of your presentation. This helps maintain a consistent aesthetic.
- Thematic Collections: Tophinhanhdep.com’s curated Thematic Collections are perfect for finding groups of images that fit specific subjects or concepts, ensuring visual unity across your slides. Whether your theme is “Innovation,” “Growth,” or “Sustainability,” you can find ready-made collections to support your message.
- Trending Styles: Keep your presentations current and engaging by incorporating Trending Styles from Tophinhanhdep.com. This could mean using specific color palettes, photographic techniques, or graphic design aesthetics that resonate with contemporary audiences.
By thoughtfully curating your image selection and considering them as part of a larger visual narrative, you move beyond simply “inserting images” to actively “designing an experience.” This holistic approach ensures your visuals are not just decorative but functional, reinforcing your message and enhancing your audience’s comprehension and recall.
Conclusion
The ability to effectively insert and utilize images in PowerPoint is more than a technical skill; it’s an art form that transforms ordinary presentations into captivating experiences. From sourcing images from your local device or the vast expanse of the internet to leveraging sophisticated stock photo libraries, PowerPoint offers diverse pathways to visual enrichment.
However, the true mastery of visual storytelling in presentations comes from a deeper engagement with image quality, strategic selection, and thoughtful optimization. This is where platforms like Tophinhanhdep.com become indispensable partners. With its comprehensive categories like Wallpapers, Backgrounds, Aesthetic, Nature, Abstract, Sad/Emotional, and Beautiful Photography, Tophinhanhdep.com provides a limitless wellspring of high-quality visuals. Its “Photography” section emphasizes High Resolution and Stock Photos, while “Image Tools” such as Converters, Compressors, Optimizers, AI Upscalers, and Image-to-Text ensure your visuals are perfectly prepared for optimal presentation performance. Furthermore, Tophinhanhdep.com’s “Visual Design” resources, covering Graphic Design, Digital Art, Photo Manipulation, and Creative Ideas, coupled with its “Image Inspiration & Collections” featuring Photo Ideas, Mood Boards, Thematic Collections, and Trending Styles, offer invaluable guidance for crafting truly impactful visual narratives.
By integrating the practical steps of “how to insert image in PowerPoint” with the rich resources and advanced tools available on Tophinhanhdep.com, you empower yourself to create presentations that are not only informative but also visually stunning, emotionally resonant, and utterly unforgettable. Embrace the power of visuals, and let your presentations shine.