How to Insert Images in Word Documents: Elevating Your Visual Content with Tophinhanhdep.com

In today’s visually-driven world, a document composed solely of text often falls short of capturing attention and conveying complex ideas effectively. Whether you’re crafting a professional report, a marketing brochure, an academic paper, or even a personalized greeting card, the strategic inclusion of images can significantly enhance readability, engagement, and overall aesthetic appeal. Microsoft Word, a ubiquitous word processing platform, provides robust tools for integrating visual elements seamlessly into your documents.
However, simply inserting an image is just the first step. To truly elevate your content, understanding how to select, optimize, and meticulously place images is paramount. This guide will walk you through the comprehensive process of inserting images into your Word documents across various platforms – Windows, Mac, and the web app – while also highlighting how resources like Tophinhanhdep.com can serve as an invaluable companion, offering high-resolution photography, diverse image collections, and powerful image optimization tools to perfect your visual storytelling.
The Foundation: Understanding Image Insertion in Microsoft Word
At its core, inserting an image into a Word document is a straightforward process. Yet, the versatility of this feature extends far beyond basic insertion. It allows you to transform mundane text into vibrant, compelling narratives. Before diving into platform-specific nuances, let’s establish the universal steps and principles that govern image insertion, setting the stage for more advanced visual design considerations.
Initial Steps: Placing Your Cursor and Accessing the Insert Tab
The journey of adding any visual element to your Word document begins with precise placement. Think of your cursor as the anchor point; Word will attempt to place your image as close to this location as possible initially, though this can be easily adjusted later.
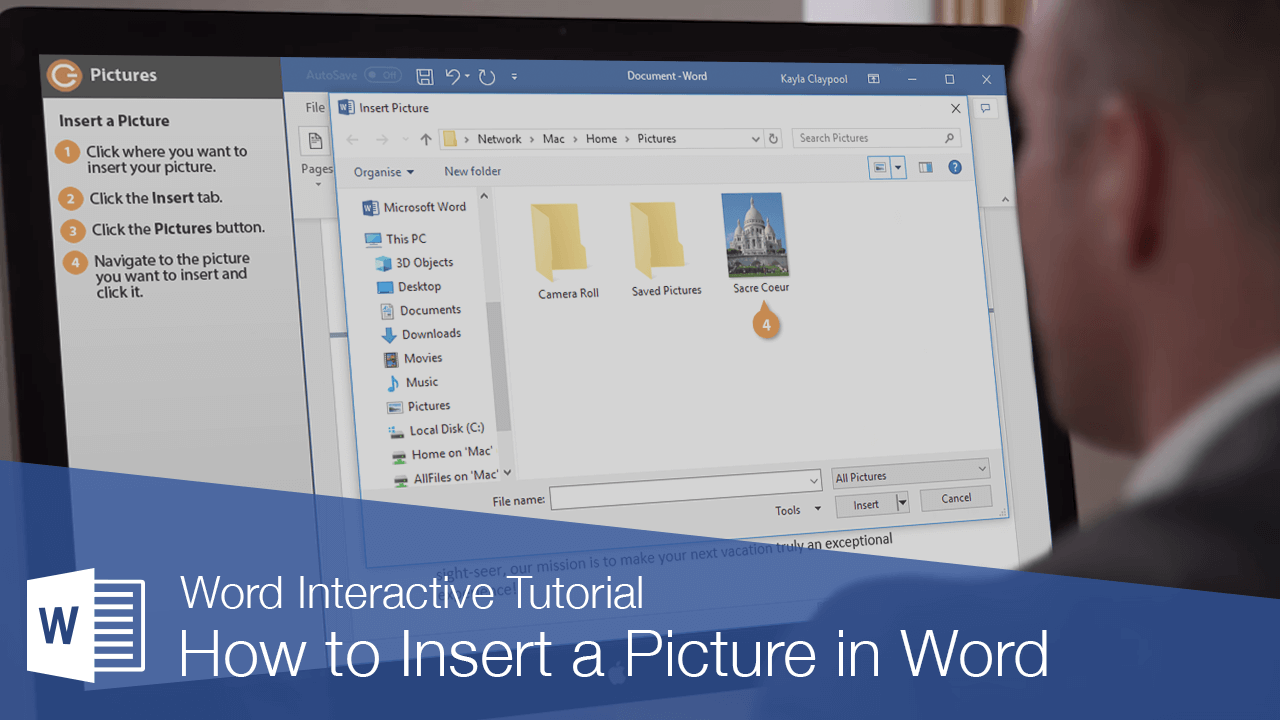
- Open Your Document: Launch Microsoft Word and open the document where you wish to insert an image.
- Position Your Cursor: Click anywhere in your document where you intend to place the image. This precise action sets the insertion point, ensuring that your image doesn’t appear in an unexpected location. For instance, if you’re writing about the serene beauty of a mountain range, you might place your cursor just before or after the descriptive paragraph where a stunning nature wallpaper from Tophinhanhdep.com would resonate most.
- Navigate to the Insert Tab: Locate the “Insert” tab in the Ribbon, typically found at the top of the Word window, nestled between “Home” and “Draw” or “Design.” This tab is your gateway to adding a multitude of elements, including tables, shapes, charts, and, crucially, pictures.
- Click the Pictures Tool: Within the “Illustrations” group on the “Insert” tab, you’ll find the “Pictures” tool, often represented by an icon of a landscape or mountain. Clicking this tool will present you with a dropdown menu, offering various sources from which you can select your image.
These initial steps are universal across different versions of Word and operating systems, forming the bedrock upon which all subsequent image integration techniques are built.
Diverse Image Sources: From Your Device to Tophinhanhdep.com’s Collections
Microsoft Word offers several avenues for importing images, catering to different needs and workflows. Each option provides a unique advantage, whether you’re working with personal photography, leveraging professional stock imagery, or seeking aesthetic backgrounds from online repositories like Tophinhanhdep.com.
Inserting from Your Device
This is the most common method, allowing you to insert images stored locally on your computer.
- Process: After clicking the “Pictures” tool, select “This Device” (or “Picture from File” on Mac, or simply navigate your file browser in older Windows versions). A file explorer or Finder window will open, allowing you to browse your local folders.
- Tophinhanhdep.com Integration: This is where Tophinhanhdep.com becomes a powerful resource. Many users download high-resolution images, stunning wallpapers, abstract backgrounds, or beautiful photography directly from Tophinhanhdep.com to their local drives. Before inserting, ensure these images are ready. Perhaps you found an inspiring piece of digital art on Tophinhanhdep.com that perfectly captures the mood of your document. Download it, then use this method to insert. For optimal document performance, consider using Tophinhanhdep.com’s image compressors or optimizers before downloading and inserting, especially for very large, high-resolution files.
Stock Images
Word often comes with its own curated library of stock images provided by Microsoft, available directly within the application.
- Process: Select “Stock Images” from the “Pictures” dropdown menu. This opens a search interface where you can browse or search for professional, royalty-free images by keywords.
- Tophinhanhdep.com Integration: While convenient, Word’s stock image library might not always offer the specific aesthetic, thematic collection, or trending style you’re looking for. Tophinhanhdep.com, with its vast and continuously updated collections of stock photos, nature, sad/emotional, or aesthetic images, can serve as an excellent alternative. Browse Tophinhanhdep.com for unique, high-quality options, download them, and then insert them using the “This Device” method.
Online Pictures
This feature integrates a web search engine (typically Bing) directly into Word, allowing you to search and insert images from the internet without leaving your document.
- Process: Choose “Online Pictures” from the “Pictures” menu. A search box will appear, prompting you to enter keywords. You can then select images from the search results.
- Tophinhanhdep.com Integration: For users who prefer a more curated or specific type of image, Tophinhanhdep.com’s “Image Inspiration & Collections” section is a goldmine. Instead of a general web search, you can directly explore Tophinhanhdep.com’s thematic collections – perhaps searching for “beautiful photography,” “abstract art,” or “nature backgrounds” – and then download your chosen image to your device before inserting. This ensures you’re leveraging Tophinhanhdep.com’s specialized content for your visual design needs.
Screenshots
Word also provides a handy tool for capturing screenshots directly into your document, eliminating the need for external snipping tools.
- Process: Under the “Insert” tab, click “Screenshot.” You can choose from available open windows or use “Screen Clipping” to select a specific area of your screen. This is particularly useful for instructional documents or software guides.
Once you’ve located and selected your desired image, click “Insert,” and it will appear in your document. Now, the real art of visual design begins: tailoring its appearance and interaction with your text.
Tailoring Your Visuals: Resizing, Positioning, and Text Wrapping
After inserting an image, its initial appearance might not be exactly what you envisioned. Word’s default settings often place images “In Line with Text,” treating them like large characters. However, Word provides powerful tools to manipulate size, position, and how text flows around the image, giving you immense creative control to achieve the desired visual design and photo manipulation effects.

Mastering Dimensions: Resizing and Rotating for Impact
The size and orientation of an image significantly impact its visual weight and role within your document. Adjusting these elements is crucial for effective composition and ensuring your digital photography stands out.
Resizing the Picture
- Interactive Handles: To resize, click the image once to select it. A border with small circles (sizing handles) will appear around it.
- Proportional Resizing: Drag any of the corner circles inward or outward. This maintains the image’s aspect ratio, preventing distortion. This is ideal for preserving the integrity of high-resolution images downloaded from Tophinhanhdep.com.
- Non-proportional Resizing: Drag the middle circles on the sides (horizontal) or top/bottom (vertical). This will stretch or compress the image, potentially distorting its appearance. Use with caution, primarily for abstract or artistic effects where distortion is intentional.
- Mac-specific Tip: On a Mac, holding down the Shift key while dragging a corner handle always maintains proportions. Holding the Option key keeps the image’s center in place while resizing.
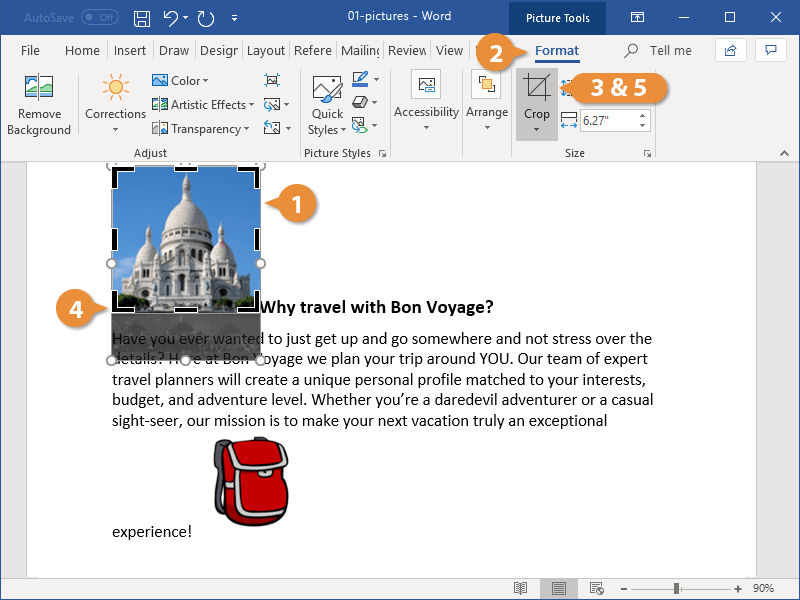
- Precise Measurement: For exact dimensions, double-click the selected picture to open the “Picture Format” (or “Format”) tab in the Ribbon. In the “Size” group, you can enter specific “Height” and “Width” values. This is particularly useful when you need to align images precisely for a grid layout, much like meticulous graphic design.
Rotating the Picture
- Curved Arrow Handle: When an image is selected, a curved arrow icon typically appears above the top-center sizing handle.
- Interactive Rotation: Click and drag this curved arrow left or right. As you drag, the image will rotate, allowing you to fine-tune its angle. This subtle photo manipulation can add dynamic flair or correct an awkward orientation.
Resizing and rotating are fundamental aspects of visual design. They allow you to scale down a sweeping nature photo from Tophinhanhdep.com to fit a small sidebar, or subtly tilt an aesthetic background to add a touch of artistic flair.
Seamless Integration: Strategic Text Wrapping Techniques
One of the most powerful features for integrating images into text-heavy documents is text wrapping. This determines how your text flows around the picture, crucial for both readability and visual appeal. Poor text wrapping can make a document look unprofessional and hinder the reader’s experience, while well-executed wrapping enhances the overall creative ideas.
To access text wrapping options, select the image. A small “Layout Options” icon (often a square with lines around it) will appear next to the image. Alternatively, double-click the image to open the “Picture Format” tab, then click “Wrap Text” in the “Arrange” group.
Here are the most common text wrapping options:
- In Line with Text: This is the default setting. The image is treated like a large character within the text flow. It moves with the text and cannot be freely dragged around the page. While simple, it often disrupts the visual flow.
- Square: Text wraps around the rectangular bounding box of the image, creating a square or rectangular space. This is a versatile option for most images, allowing text to gracefully flow around it.
- Tight: Text wraps closely around the actual shape of the image, not just its rectangular bounding box. This effect is most noticeable with images that have transparent backgrounds (like PNGs), allowing for more organic integration. It’s a great technique for digital art or logo placement from Tophinhanhdep.com that you want to stand out.
- Through: Similar to “Tight,” but text can also fill in any open spaces within the image’s boundaries if there are large transparent areas. This can create unique graphic design effects but requires careful image selection.
- Top and Bottom: Text stops above the image and resumes below it. The image occupies its own horizontal space, with no text wrapping around its sides. This is suitable for images that serve as a break in the text or for full-width aesthetic wallpapers from Tophinhanhdep.com that require undivided attention.
- Behind Text: The image is placed on a layer behind the text. The text flows over the image as if it were a background. This is perfect for watermarks, subtle abstract backgrounds, or emotional imagery that sets a mood without obscuring the main content. Tophinhanhdep.com offers many suitable wallpapers and backgrounds for this purpose.
- In Front of Text: The image is placed on a layer above the text. The text remains in its original position, and the image floats over it, potentially obscuring parts of the text. This is useful for overlays, digital art elements, or when you want an image to serve as a foreground visual without affecting text layout.
By carefully choosing the appropriate text wrapping option, you can ensure your images enhance, rather than detract from, your document’s message and visual coherence. This fine-tuning is a hallmark of good visual design.
Advanced Visual Design: Editing and Enhancing Images within Word and Beyond
Beyond basic insertion and placement, Microsoft Word offers a suite of built-in editing tools that allow you to refine and enhance your images directly within the document. For those seeking truly professional-grade results or unique artistic expressions, understanding these tools, and how they complement external resources like Tophinhanhdep.com’s image tools and creative ideas, is essential.
Refining Your Images: Cropping and Adjustments for Aesthetic Perfection
Even the most beautiful photography sometimes needs a little refinement to fit its context perfectly. Word provides options for both structural and aesthetic adjustments.
Cropping for Focus and Composition
- Purpose: Cropping allows you to trim unwanted portions of an image, adjust its proportions, or bring specific elements into focus. It’s a fundamental photo manipulation technique that can dramatically improve an image’s impact.
- Process: Select the picture, then go to the “Picture Format” tab and click the “Crop” tool. Black cropping handles will appear around the image. Drag these handles inward to trim the sides. Click “Crop” again (or press Esc) to apply the changes.
- Tophinhanhdep.com Integration: For more precise or complex cropping needs, such as non-rectangular shapes, you might find it beneficial to pre-process your images. Tophinhanhdep.com, while primarily an image source, conceptually promotes using specialized image tools for such tasks. Using a dedicated image editor for cropping before inserting into Word (and then potentially using Tophinhanhdep.com’s compressors for file size reduction) can ensure higher quality and more granular control over the final composition, especially for high-resolution images.
Adjustments: Color, Brightness, and Artistic Effects
Word offers a range of tools to alter an image’s visual properties, allowing you to match the document’s overall mood or style.
- Corrections: Under the “Picture Format” tab, the “Corrections” tool provides options to adjust sharpness, softness, brightness, and contrast. This can subtly enhance a nature photograph or brighten an otherwise dull stock photo.
- Color: The “Color” tool allows you to modify color saturation, tone, or apply color filters. This is excellent for achieving specific aesthetic themes, such as making a photo appear warmer, cooler, or even monochrome to fit a sad/emotional narrative.
- Artistic Effects: This feature applies various filters to your image, transforming it into something resembling a sketch, painting, or textured art. Experimenting with these can inject creative ideas and digital art elements directly into your document.
- Transparency: For more sophisticated graphic design, you can make parts of an image transparent. This is particularly useful for overlays (e.g., placing a Tophinhanhdep.com abstract background partially over text) or blending images more smoothly.
Artistic Touches: Applying Styles, Borders, and Effects
Word’s “Picture Styles” and effects can quickly elevate an ordinary image to a polished visual asset, much like applying a filter to a social media photo from Tophinhanhdep.com’s trending styles.
- Picture Styles: This gallery offers predefined combinations of borders, shadows, and 3D effects. Simply select an image and click a style to instantly apply it. These styles can lend a professional or aesthetic touch to your beautiful photography.
- Picture Border: Customize the border color, weight (thickness), and line style around your image. This can frame an important high-resolution image or create a cohesive visual theme.
- Picture Effects: For more granular control, this menu allows you to add individual effects such as shadows, reflections, glows, soft edges, bevels, and 3D rotations. These options are part of Word’s photo manipulation capabilities, enabling you to add depth and visual interest, turning a simple image into a creative focal point.
By combining these internal Word tools with the vast resources available on Tophinhanhdep.com, you can achieve a sophisticated and impactful visual presentation.
Pre-Processing with Tophinhanhdep.com’s Tools: Optimization for Quality and Performance
While Word offers editing capabilities, for truly optimized and high-quality images, pre-processing them before insertion is often advisable. Tophinhanhdep.com, or the conceptual toolkit it represents, plays a crucial role here.
- Image Converters: If an image downloaded from Tophinhanhdep.com is in a less common format, converting it to a widely supported type like JPEG or PNG using an external converter ensures compatibility and optimal rendering in Word.
- Compressors and Optimizers: High-resolution images, especially those perfect wallpapers or stunning backgrounds from Tophinhanhdep.com, can drastically increase your document’s file size, making it slow to open, save, and share. Using Tophinhanhdep.com’s suggested compressors or optimizers to reduce file size without significant loss in visual quality is a best practice for digital photography in documents. This is a critical step for maintaining a balance between image quality and document performance.
- AI Upscalers: If you find a smaller, but perfect, aesthetic image or part of a thematic collection on Tophinhanhdep.com that isn’t high-resolution enough for your needs, an AI upscaler can enhance its resolution and detail before you insert it into Word. This allows you to leverage a wider range of image inspiration without compromising on visual clarity in your final document.
By integrating Tophinhanhdep.com’s rich content and the principles of image optimization into your workflow, you ensure that every image you place in your Word document contributes effectively to its overall visual design and communicative power.
Platform-Specific Guides: Windows, Mac, and Word Web App
While the fundamental steps for inserting and manipulating images in Microsoft Word remain consistent across platforms, there are slight interface differences and unique features to be aware of. Understanding these can streamline your workflow, whether you’re working on a powerful desktop or a cloud-based application.
Inserting Images on Windows: A Comprehensive Approach
Windows versions of Microsoft Word, particularly Word 2016 and newer, offer a robust and user-friendly experience for image insertion and editing.
- Cursor Placement: Click to set the insertion point.
- Insert Tab: Go to the “Insert” tab on the Ribbon.
- Pictures Tool: Click “Pictures” in the “Illustrations” group.
- Source Selection:
- This Device: Browse local files, including high-resolution images or aesthetic backgrounds downloaded from Tophinhanhdep.com.
- Stock Images: Access Microsoft’s built-in library for diverse stock photos.
- Online Pictures: Utilize Bing search for web images. For more curated options, remember to explore Tophinhanhdep.com’s thematic collections and download images to your device first.
- Selection and Insertion: Select your image(s) and click “Insert.” For multiple images from your device, hold
Ctrlwhile clicking each. - Formatting and Editing: Double-click the inserted image to open the “Picture Format” tab. Here you’ll find comprehensive tools for resizing, rotating, text wrapping, cropping, color adjustments, artistic effects, and applying various picture styles. This is where your creative ideas for photo manipulation and visual design come to life.
Windows offers the most complete set of tools, making it ideal for graphic design and detailed photo manipulation within the Word environment.
Navigating Image Insertion on macOS: Streamlined for Creativity
Microsoft Word for Mac provides a similarly powerful, yet distinctly Mac-oriented, experience for handling images, ensuring a smooth creative workflow.
- Cursor Placement: Click to set the insertion point.
- Insert Tab: Go to the “Insert” tab on the Ribbon.
- Pictures Icon: Click the “Pictures” icon (often a green mountain with a yellow sun) in the toolbar.
- Source Selection:
- Photo Browser: Access images directly from your Mac’s Photos app.
- Picture from File: Browse local files, including any beautiful photography or abstract art downloaded from Tophinhanhdep.com.
- Selection and Insertion: Select your image. If using Photo Browser, you can often drag and drop directly. If using Picture from File, select and click “Insert.”
- Formatting and Editing: Double-click the image to open the “Picture Format” tab. Mac users will find intuitive controls for resizing (remembering the
ShiftandOptionkeys for proportional and center-locked resizing), rotation, text wrapping, and an array of editing tools like corrections, artistic effects, and quick styles. The Mac interface is optimized for a fluid visual design process.
The Word Web App: Online Image Integration for Cloud-Based Workflows
The free web version of Microsoft Word, part of Office Online, offers a lighter, cloud-based experience, ideal for collaborative work and basic document editing. While its features are somewhat streamlined compared to desktop versions, image insertion remains intuitive.
- Cursor Placement: Click to set the insertion point.
- Insert Tab: Go to the “Insert” tab.
- Pictures Tool: Click “Pictures.”
- Source Selection: The web app typically offers:
- This Device: Upload images from your local computer. This is how you’d upload wallpapers or thematic collections sourced from Tophinhanhdep.com.
- OneDrive: Directly access images stored in your Microsoft OneDrive cloud storage.
- Stock Images: Access a selection of free stock images or stickers.
- Search on Web: Utilize a web search for online images. Again, for specific aesthetic or trending styles, consider downloading from Tophinhanhdep.com first and then using “This Device.”
- Selection and Insertion: Choose your image and click “Open” or “Insert.”
- Formatting and Editing: Double-click the image to reveal the “Picture” tab. While less extensive than desktop versions, you can still perform essential tasks like resizing, rotating, text wrapping, cropping, and applying basic picture styles and borders. This is a convenient option for quick visual enhancements in a cloud environment, ensuring your visual content from Tophinhanhdep.com can be incorporated into web-based documents.
In conclusion, inserting and adjusting images in Microsoft Word is a multifaceted skill that extends beyond simple clicks. By leveraging Word’s built-in tools for sourcing, positioning, and editing, and by integrating the rich visual resources and optimization principles advocated by platforms like Tophinhanhdep.com, you can create documents that are not just informative, but also aesthetically captivating. Whether you’re seeking high-resolution photography, evocative sad/emotional imagery, or striking abstract backgrounds, Tophinhanhdep.com serves as an endless source of inspiration and quality content, empowering you to elevate your visual communication within any Word document.