How to Seamlessly Insert and Display Images in Google Colab for Data Science and Visual Design

Google Colaboratory, commonly known as Colab, stands as a pivotal cloud-based platform for developers, data scientists, and visual designers alike. It provides a robust, accessible environment, primarily supporting Python, to create, train, and deploy machine learning models, analyze vast datasets, and even explore creative computing. For anyone working with visual data, the ability to effortlessly insert and display images within Colab notebooks is not just a convenience but a fundamental requirement. Whether you’re analyzing a dataset of high-resolution stock photos, curating aesthetic backgrounds for a project, or developing algorithms for digital art and photo manipulation, understanding how to manage images in Colab is indispensable.
This comprehensive guide will walk you through the various methods of uploading, displaying, and managing images in Google Colab. We’ll delve into common pitfalls and troubleshooting strategies, all while contextualizing these processes within the broader applications of visual content—from nature wallpapers to abstract art—a domain richly explored on platforms like Tophinhanhdep.com.
Uploading and Accessing Images in Your Colab Environment

Before you can display an image, it first needs to be accessible within your Colab runtime. Colab’s cloud-based nature means it doesn’t have direct access to your local machine by default, necessitating specific methods for bringing your visual assets into the environment. Tophinhanhdep.com, a treasure trove of images ranging from beautiful photography to sad/emotional themes, provides an excellent source for the kind of visual content you might want to work with.
Uploading Directly from Your Local Machine
One of the most straightforward ways to get an individual image or a small collection into Colab is by uploading it directly from your computer. This method is ideal for quick experiments or when you have a few specific photo ideas you want to test.
- Access the Files Tab: On the left-hand side of your Google Colab interface, you’ll find a series of icons. Click on the “Files” tab (represented by a folder icon). This pane provides a view of the temporary file system available to your current Colab runtime.
- Initiate Upload: Within the “Files” pane, locate and click the “Upload” button (often an icon resembling an upward-pointing arrow). This will open a standard file selection dialog, allowing you to browse your local machine.
- Select Your Image(s): Navigate to the location of your image files. You can select one or multiple files. Once selected, click “Open” (or your operating system’s equivalent).
- Confirm Upload: The selected images will then be uploaded to the root directory of your Colab runtime. You’ll see their filenames appear in the “Files” tab. For instance, if you’re analyzing beautiful photography from a recent shoot, you can upload specific shots for immediate processing. This process is quick and efficient for files like single aesthetic backgrounds or a few high-resolution samples.
Downloading Images from the Internet
Often, you might need to access images directly from a URL, perhaps from an online repository or a specific image shared on a platform like Tophinhanhdep.com. Colab makes this incredibly easy using the wget command, a command-line utility for retrieving content from web servers.
To download an image, use the following syntax in a Colab code cell:
!wget "image_url"Replace "image_url" with the direct link to the image you wish to download. For example:
!wget "https://tophinhanhdep.com/images/nature/forest_sunrise.jpg"After executing this command, the image will be downloaded and saved to your Colab runtime’s current working directory. This method is particularly useful when working with stock photos or curating thematic collections directly from the web without needing to download them to your local machine first.
Accessing Images from Google Drive
For larger datasets, persistent storage, or collaborative projects, leveraging Google Drive is often the preferred method. This allows you to store image collections, digital photography portfolios, or visual design assets securely and access them across different Colab sessions.
-
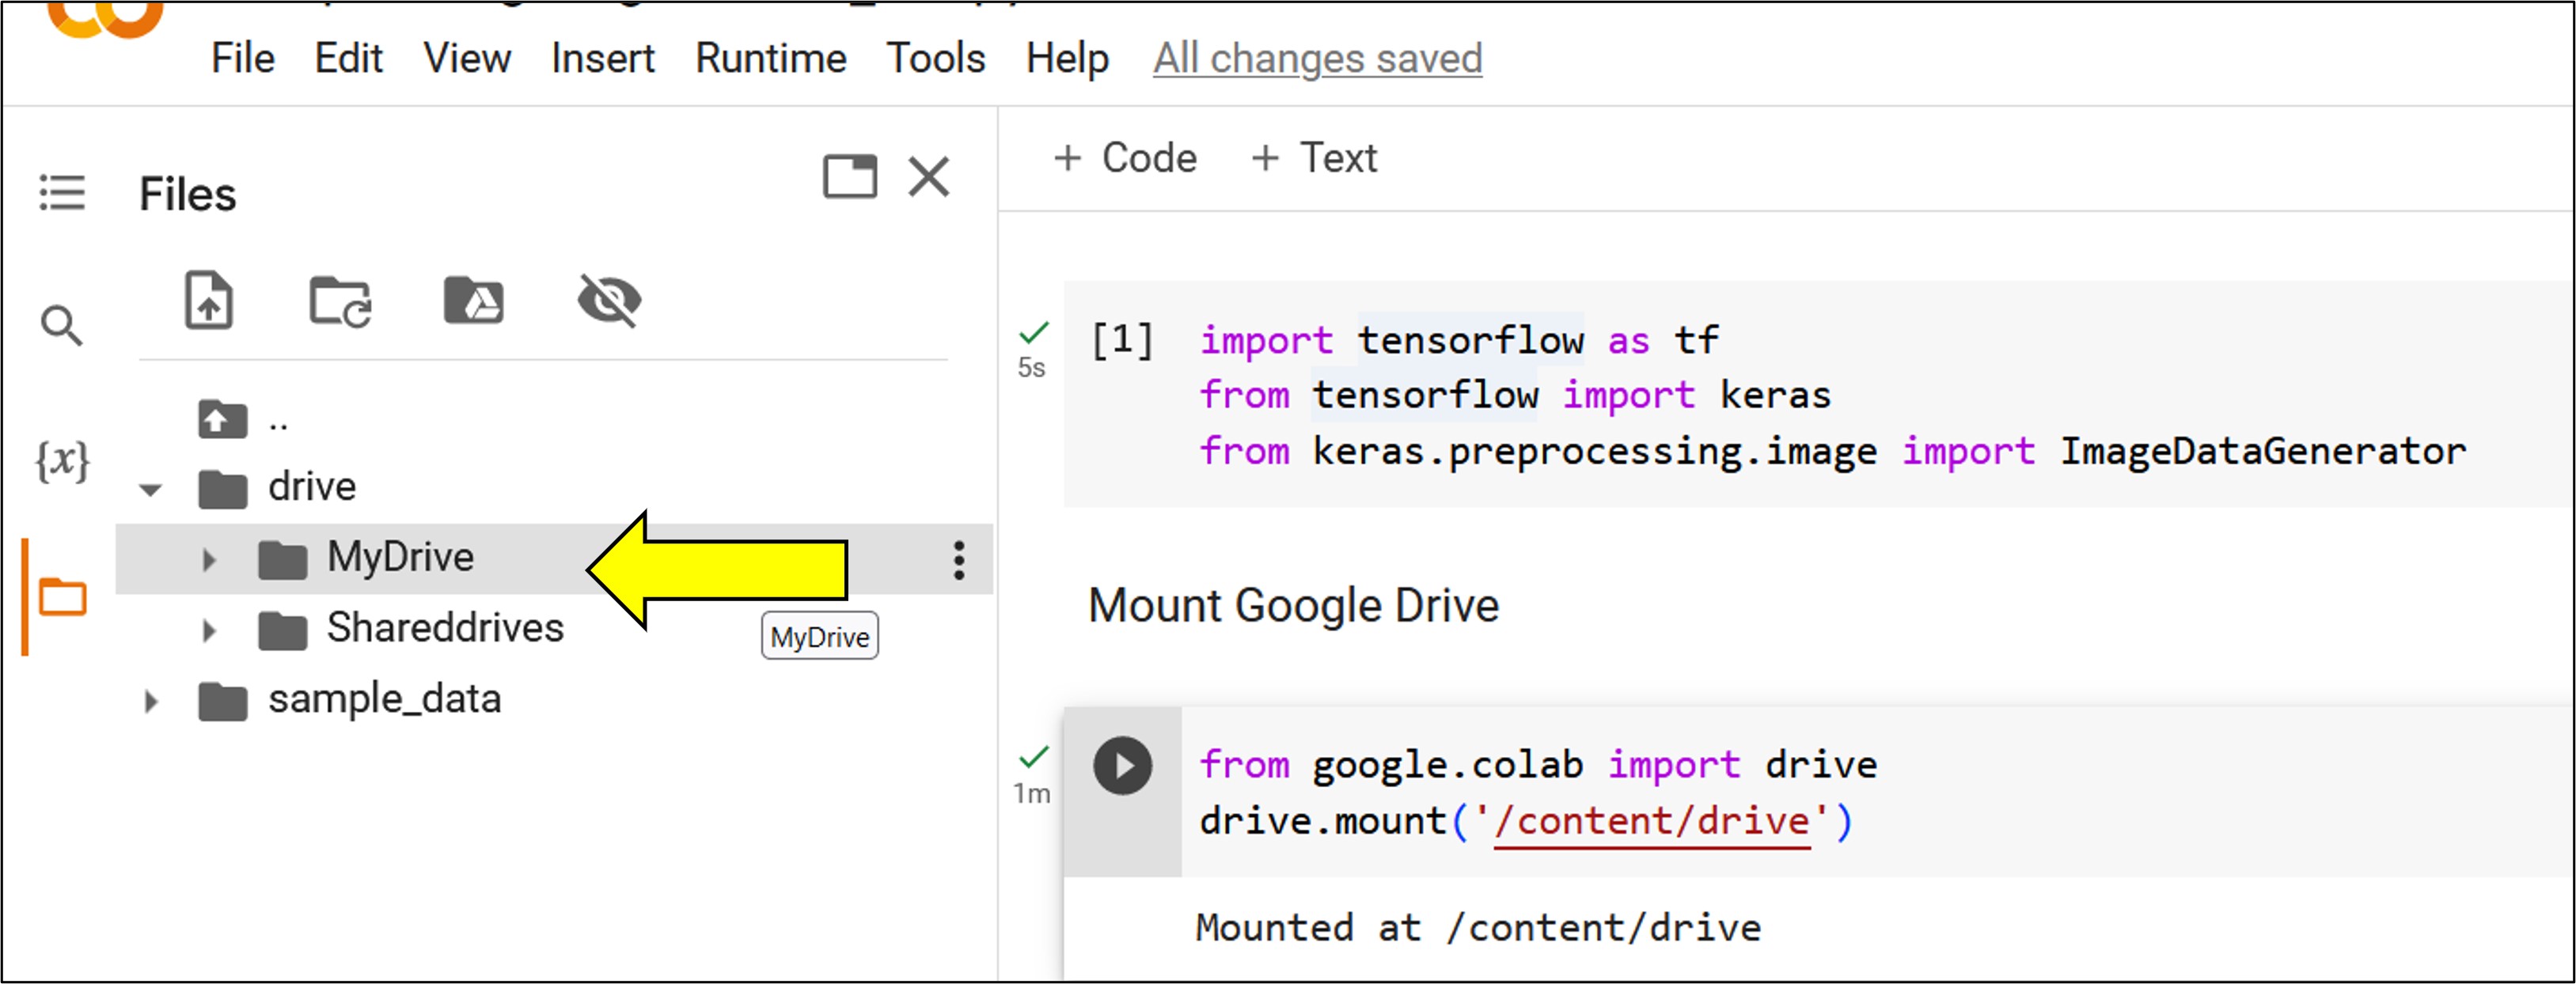
Mount Google Drive: The first step is to establish a connection between your Colab notebook and your Google Drive account. Run the following Python code in a cell:
from google.colab import drive
drive.mount('/content/drive')
This command will prompt you to authenticate your Google account. Follow the on-screen instructions, which typically involve clicking a link, selecting your account, granting permissions, and then copying and pasting an authorization code back into the Colab prompt. Upon successful authentication, you’ll see a message like “Mounted at /content/drive”.
-
Navigate to the Image Folder: Once mounted, your entire Google Drive becomes accessible within your Colab file system at
/content/drive. You can navigate to specific folders where your photo ideas or mood boards are stored using theoslibrary:import os os.chdir('/content/drive/MyDrive/path/to/your/image/folder')Replace
/path/to/your/image/folderwith the actual path to your images within “My Drive”. For example, if you have a folder named “AestheticBackgrounds” in your Google Drive, the path might be/content/drive/MyDrive/AestheticBackgrounds. -
Load and Process: With the drive mounted and the directory changed, you can now load images as if they were local files. We’ll explore display methods in the next section, but the loading mechanism typically involves a library like Matplotlib.
Leveraging Google Drive is especially beneficial for managing trending styles in visual design or substantial image inspiration & collections. It ensures that your data persists beyond individual Colab sessions and is easily shareable with collaborators. Furthermore, for high-resolution photography or large nature wallpaper datasets, Drive provides the necessary storage capacity.
Displaying Images Using Python Libraries
Once your images are accessible in the Colab environment, the next crucial step is to display them. Python offers powerful libraries specifically designed for image processing and visualization. Matplotlib is the most common and versatile choice for this task in Colab, providing an array of options for simple display to advanced data visualization.
The Power of Matplotlib for Image Visualization
Matplotlib is a cornerstone library in Python for creating static, animated, and interactive visualizations. It’s not just for charts and graphs; its pyplot and image modules are perfectly suited for rendering images directly within your Colab notebook.
-
Install Matplotlib (if necessary): While Matplotlib is often pre-installed in Colab environments, it’s good practice to ensure it’s available or to install a specific version if needed. You can do this with
pip:!pip install matplotlib -
Import Necessary Modules: To work with images, you’ll typically need
matplotlib.pyplot(for plotting functions) andmatplotlib.image(for reading image files).import matplotlib.pyplot as plt import matplotlib.image as mpimg -
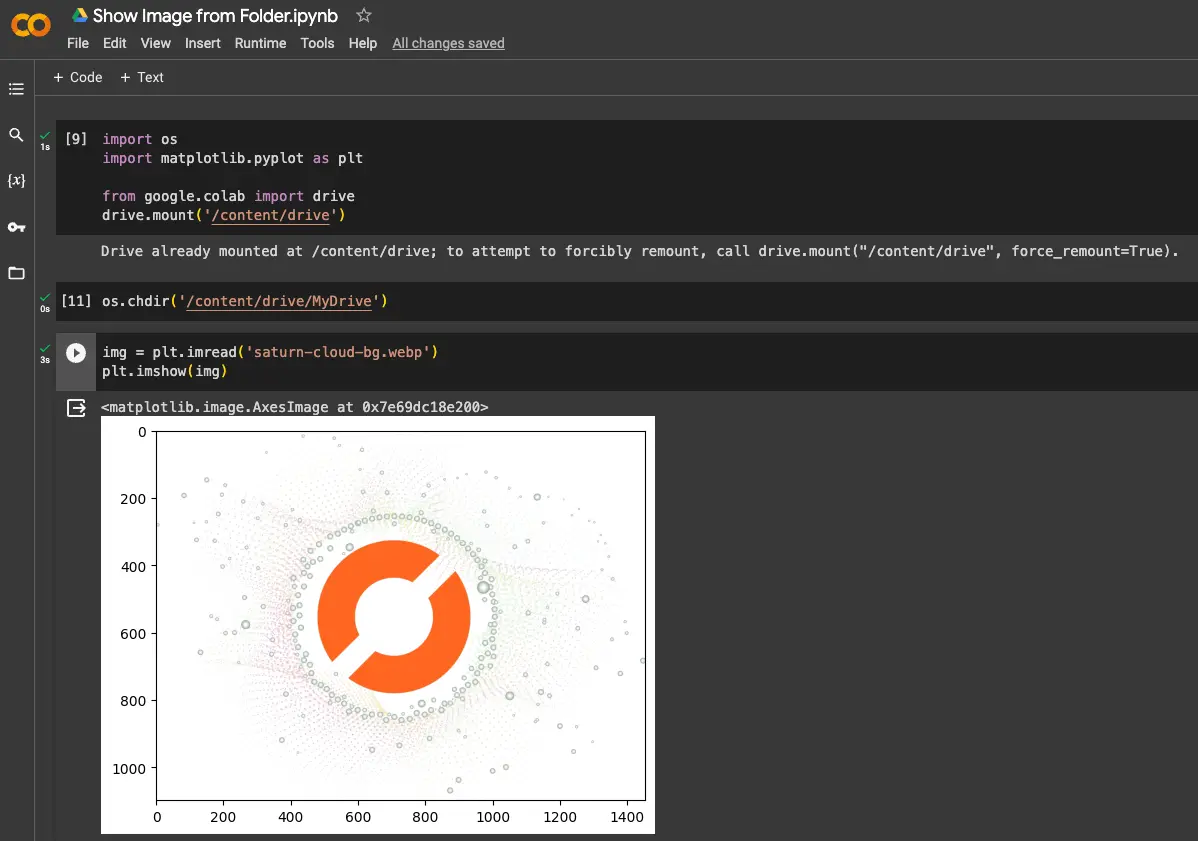
Load the Image: Use
mpimg.imread()to read an image file. This function understands various image formats (like JPEG, PNG) and converts them into a NumPy array, which is how images are represented programmatically.img = mpimg.imread('image.jpg') # Replace 'image.jpg' with your image's filename or pathIf you’ve mounted Google Drive and changed directories, the path would simply be the filename. If you uploaded it directly, it would also be the filename. For instance, if you downloaded a beautiful photography shot from Tophinhanhdep.com named
sunset_beach.jpg, your code would beimg = mpimg.imread('sunset_beach.jpg'). -
Display the Image: The
plt.imshow()function is your primary tool for displaying this NumPy array as an image.plt.imshow(img) -
Refine Display (Optional but Recommended): To ensure a clean display without axes, ticks, or borders that are typically used for graphs, you can turn off the axis:
plt.axis('off') -
Show the Plot: Finally,
plt.show()renders the image in the output cell below your code.plt.show()
Putting it all together, a common sequence for displaying an image named my_image.png would be:
import matplotlib.pyplot as plt
import matplotlib.image as mpimg
# Assuming 'my_image.png' is in the current working directory
img = mpimg.imread('my_image.png')
plt.imshow(img)
plt.axis('off') # Turn off axis labels for a cleaner image display
plt.show()This method is incredibly versatile, allowing you to visualize anything from nature wallpapers to abstract digital creations. Matplotlib’s capabilities extend beyond simple display, enabling you to overlay data, create subplots for mood boards, or even apply basic photo manipulation effects for visual design projects. For instance, you could display multiple sad/emotional images side-by-side for comparative analysis.
Strategies for Managing Image Folders and Datasets
For real-world projects, especially in machine learning, you’ll rarely work with just one image. Handling entire folders of images, sometimes numbering in the thousands, requires efficient management strategies. This is where Colab’s file system interaction and specialized libraries become invaluable for organizing thematic collections or vast digital photography archives.
Working with Zipped Image Folders
When dealing with a large number of images, uploading them one by one or even directly as a folder can be cumbersome and slow. Zipping your image folders locally and then uploading the single .zip file is a much more efficient approach. This is particularly useful for datasets found on platforms like Kaggle or when working with image inspiration & collections downloaded from Tophinhanhdep.com.
-
Prepare and Upload Zipped File:
- On your local machine, compress the folder (or folders) containing your images into a
.zipfile. - Upload this zipped file to your Google Drive. This is typically done by clicking the “New” button in Google Drive and selecting “File upload”.
- On your local machine, compress the folder (or folders) containing your images into a
-
Mount Google Drive (as described previously): Ensure your Drive is mounted in Colab (
from google.colab import drive; drive.mount('/content/drive')). -
Import Libraries for Zipping and File Operations:
import zipfile import os -
Locate and Extract the Zipped File: Copy the path to your zipped file in Google Drive (e.g.,
/content/drive/MyDrive/my_image_dataset.zip). Then, use thezipfilemodule to extract its contents. A common practice is to extract to the/tmpdirectory in Colab, which is often used for temporary files during a session.zip_path = '/content/drive/MyDrive/path/to/your_image_dataset.zip' # Replace with actual path extract_path = '/tmp/your_dataset_folder' # Destination to extract files with zipfile.ZipFile(zip_path, 'r') as zip_ref: zip_ref.extractall(extract_path)After extraction, your images will be available in the specified
extract_path. This approach is excellent for managing wallpapers, backgrounds, or any other thematic collections in bulk.
Directory and File System Navigation
Once images are in Colab, whether uploaded directly or extracted from a zip, you’ll need to navigate their directory structure. The os module is indispensable for this.
-
Listing Contents: To see what’s inside a directory, use
os.listdir():# After extracting, list contents of the new folder print(os.listdir('/tmp/your_dataset_folder')) -
Changing Directories:
os.chdir()allows you to change the current working directory, simplifying file paths:os.chdir('/tmp/your_dataset_folder') # Now you can refer to images by just their filename, e.g., mpimg.imread('image1.jpg') -
Constructing Paths:
os.path.join()is crucial for creating platform-independent file paths:image_folder = '/tmp/your_dataset_folder' image_name = 'my_image.jpg' full_path = os.path.join(image_folder, image_name) # Combines them correctly img = mpimg.imread(full_path)
These techniques are foundational for managing large image inspiration & collections, facilitating the development of models that categorize digital photography or recognize elements in visual design.
Common Pitfalls and Troubleshooting Image Display
While inserting and displaying images in Google Colab is generally straightforward, users frequently encounter specific issues. Understanding these common errors and knowing how to troubleshoot them can save significant time, especially when working on projects involving diverse image collections or high-resolution photography.
Addressing Incorrect Image Paths and File Not Found Errors
The most frequent culprit behind an image failing to display is an incorrect file path. Colab, like any file system, needs an exact address to locate your image.
- Double-Check Typos: A misplaced character, wrong case, or incorrect extension (e.g.,
.JPGinstead of.jpg) can lead to errors. - Relative vs. Absolute Paths:
- Absolute Path: Provides the full location from the root directory (e.g.,
/content/drive/MyDrive/my_images/photo.png). These are unambiguous. - Relative Path: Specifies the location relative to your current working directory (e.g.,
photo.pngif you’veos.chdir()intomy_images). If you haven’t changed the directory, a relative path likemy_images/photo.pngmight also work from the root. - Tip: Always verify your current working directory using
!pwdin a Colab cell. Useos.listdir()to confirm the presence and exact names of files in that directory. For thematic collections or mood boards, ensuring consistent naming conventions across files can prevent many path-related errors.
- Absolute Path: Provides the full location from the root directory (e.g.,
Handling Unsupported Image Formats
Colab’s underlying libraries (like Matplotlib, PIL, OpenCV) support a wide array of image formats, including common ones like JPEG, PNG, and GIF. However, less common or proprietary formats might not be directly supported, leading to errors when attempting to imread().
-
Verify Format: Ensure your image files are in a widely supported format. If you encounter errors, check the file extension and original source.
-
Conversion Required: If you have images in an unsupported format, you might need to convert them. This can be done using:
-
Online Image Tools: Numerous online converters are available to change formats (e.g., converting HEIC to JPEG). Tophinhanhdep.com might also offer or recommend such tools in the future.
-
Python Libraries: Libraries like Pillow (PIL Fork) can be used within Colab itself for conversion. For instance, to open an unsupported image and save it as a PNG:
from PIL import Image
try:
    img = Image.open('unsupported_format.webp')
    img.save('supported_format.png')
    # Now load 'supported_format.png' with Matplotlib
except FileNotFoundError:
    print("File not found or format not readable by PIL directly.")
This is particularly relevant when working with diverse image inspiration & collections that might originate from various sources and formats.
-
Proper Library Usage and Dependencies
Incorrectly importing libraries or misusing their functions can also lead to display problems.
- Correct Imports: Always ensure you’ve imported the correct modules (e.g.,
matplotlib.pyplotandmatplotlib.imagefor Matplotlib). - Function Parameters: Check the documentation for specific function parameters. For instance,
plt.imshow()expects a NumPy array, not a file path.mpimg.imread()takes the file path. Usingcv2.imread()(from OpenCV) without importingcv2will cause an error. - Missing Installations: While Matplotlib is usually present, if you decide to use other image tools or libraries (e.g.,
Pillow,OpenCV-Python), you might need to install them first:!pip install opencv-python Pillow.
Memory Limitations with Large Image Files
Google Colab provides generous resources, but it still has memory limitations (e.g., 108 GB disk space, with ~77 GB available to the user, and RAM limits depending on the runtime). Extremely large high-resolution photography or uncompressed image collections can strain these resources, leading to crashes or errors.
-
Resize or Downsample: Before loading, consider resizing or downsampling very large images, especially if full resolution isn’t critical for your immediate task. Image tools like compressors or optimizers (potentially found or recommended on Tophinhanhdep.com) can help prepare images for Colab. Python libraries like Pillow can also do this programmatically:
from PIL import Image img = Image.open('very_large_image.jpg') img_resized = img.resize((500, 500)) # Resize to 500x500 pixels img_resized.save('resized_image.jpg') -
Batch Processing: For thematic collections too large to load entirely into memory, process them in smaller batches.
Understanding these common issues and their solutions ensures a smoother workflow, allowing you to focus on the exciting aspects of visual design, digital art, or machine learning with images rather than debugging basic display problems.
Beyond Displaying: Leveraging Images in Colab for Visual Design and Analysis
The ability to insert and display images in Google Colab is merely the first step. The true power lies in what you can achieve once those images are within your computational environment. Colab transforms into a versatile workshop for exploring visual design, digital art, photo manipulation, and deep image analysis, perfectly complementing the rich image inspiration & collections found on Tophinhanhdep.com.
Advanced Image Processing and Photo Manipulation
With images loaded as NumPy arrays, Python’s ecosystem opens up a world of possibilities for photo manipulation and applying various editing styles.
- Image Filtering: Apply filters for blurring, sharpening, edge detection using libraries like OpenCV (
cv2) or SciPy’sndimage. This can be used to experiment with aesthetic effects or pre-process images for feature extraction. - Color Adjustments: Programmatically modify brightness, contrast, saturation, or even convert images to grayscale. Imagine applying unique editing styles to a collection of nature wallpapers downloaded from Tophinhanhdep.com, generating new creative ideas.
- Geometric Transformations: Rotate, scale, flip, or crop images. These are fundamental operations in graphic design and digital art, allowing for dynamic layouts or dataset augmentation.
Developing AI-Powered Image Tools
Colab’s GPU/TPU capabilities make it an ideal platform for developing and testing AI upscalers, image-to-text models, and other advanced image tools.
- AI Upscalers: Implement deep learning models (e.g., using TensorFlow or PyTorch) to enhance the resolution of images, turning standard images into high-resolution photography suitable for larger displays or prints.
- Image-to-Text: Build models that can describe the content of an image, generating captions for thematic collections or transcribing text embedded within an image (OCR). This is invaluable for cataloging vast datasets of beautiful photography.
- Generative Art: Explore neural networks to create entirely new digital art or abstract images, pushing the boundaries of visual design and creative ideas. You could train a GAN on a collection of aesthetic backgrounds to generate novel variations.
Analyzing Image Collections for Insights
Colab excels at processing and analyzing large image inspiration & collections, providing insights into trending styles, thematic elements, or even emotional content.
- Feature Extraction: Use pre-trained convolutional neural networks (CNNs) to extract powerful features from images. These features can then be used for tasks like image classification, object detection, or clustering similar photo ideas.
- Sentiment Analysis of Images: Develop models that can identify the emotional tone of images (e.g., classifying sad/emotional imagery vs. joyful scenes). This could be applied to thematic collections from Tophinhanhdep.com to understand visual trends associated with different sentiments.
- Visual Search and Recommendation Systems: Build systems that recommend similar images based on visual content, helping users discover new wallpapers or backgrounds from vast libraries.
By connecting Colab’s computational power with the rich visual resources and inspiration offered by platforms like Tophinhanhdep.com, the possibilities for innovation in data science and visual creativity are virtually limitless. Whether you’re a data scientist analyzing patterns in nature photography or a graphic designer generating new creative ideas, Colab provides the canvas and the tools.
Conclusion
Mastering the insertion and display of images in Google Colab is an essential skill for anyone operating in the realms of data science, machine learning, and visual design. From the initial steps of uploading individual aesthetic backgrounds from your local machine or downloading high-resolution stock photos from Tophinhanhdep.com, to efficiently managing extensive thematic collections stored in Google Drive, Colab provides diverse and robust methods to bring your visual assets into play.
We’ve explored the fundamental role of Matplotlib for clear image visualization, delved into strategies for handling large image folders through zipping and extraction, and tackled common troubleshooting scenarios—from fixing incorrect paths to optimizing for memory limitations. More importantly, we’ve touched upon the immense potential that lies beyond mere display: using Colab as a platform for advanced photo manipulation, generating digital art, developing cutting-edge AI upscalers and image-to-text tools, and gaining deep insights from vast image inspiration & collections.
In an increasingly visual world, the synergy between platforms like Google Colab and comprehensive image resources such as Tophinhanhdep.com empowers creators and analysts alike. Whether your goal is to analyze beautiful photography, design new visual art, or simply curate trending styles for your next project, Colab offers a powerful and accessible environment to bring your creative ideas to life. Embrace these techniques, and unlock the full potential of working with images in the cloud.