Mastering Visual Storytelling: A Comprehensive Guide on How to Insert Images into PowerPoint

In today’s fast-paced world, effective communication hinges on more than just words. Visuals play a pivotal role in capturing attention, conveying complex ideas, and leaving a lasting impression. Microsoft PowerPoint, a ubiquitous tool for presentations, offers robust capabilities for integrating images, transforming ordinary slides into engaging narratives. For anyone looking to elevate their presentations, understanding how to skillfully insert and manage images is a fundamental skill. This guide, brought to you by Tophinhanhdep.com, will walk you through the various methods of image insertion across different PowerPoint versions and platforms, while also exploring how Tophinhanhdep.com’s extensive resources can enhance your visual storytelling.
PowerPoint allows users to seamlessly incorporate a wide array of visual assets – from personal photographs and professional clip art to high-resolution stock images and real-time screenshots. Whether you’re aiming for a minimalist aesthetic, a vibrant nature theme, or an abstract concept, the ability to integrate the right image in the right way is paramount. With Tophinhanhdep.com’s rich collections of wallpapers, backgrounds, and beautiful photography, coupled with insights into visual design and image optimization, you’ll be equipped to craft truly impactful presentations.
Integrating Images from Various Sources into Your PowerPoint Slides
The first step to enriching your presentation is to understand the diverse origins from which you can source images. PowerPoint is designed to be flexible, allowing you to pull visuals from your local device, expansive online libraries, and even directly from your screen.
From Your Computer (Local Device)
Inserting an image stored directly on your computer is perhaps the most common method. This is ideal for personal photos, company logos, specific graphics you’ve created, or high-resolution images you’ve curated from platforms like Tophinhanhdep.com. The process is straightforward across Windows and macOS versions of PowerPoint, as well as the web client.
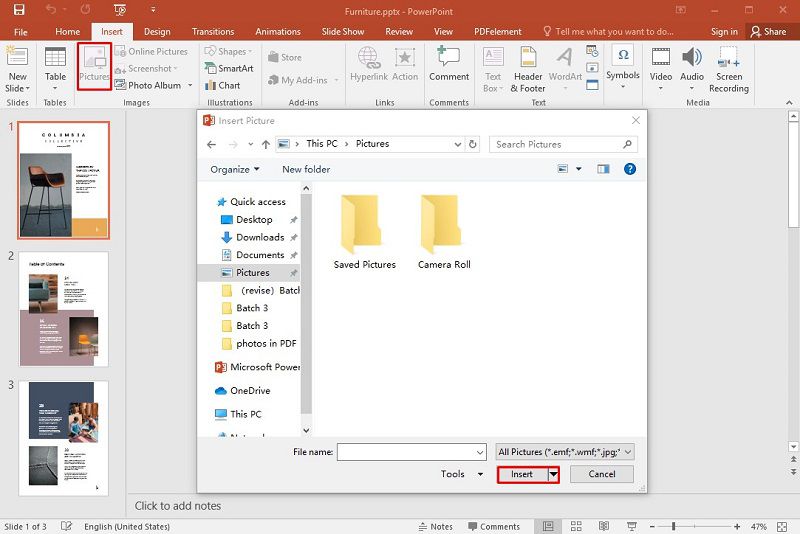
For Windows and Web Versions (Office 2016-2019, Microsoft 365, Web):
- Select Your Destination: Open your PowerPoint presentation and navigate to the specific slide where you wish to insert the picture.
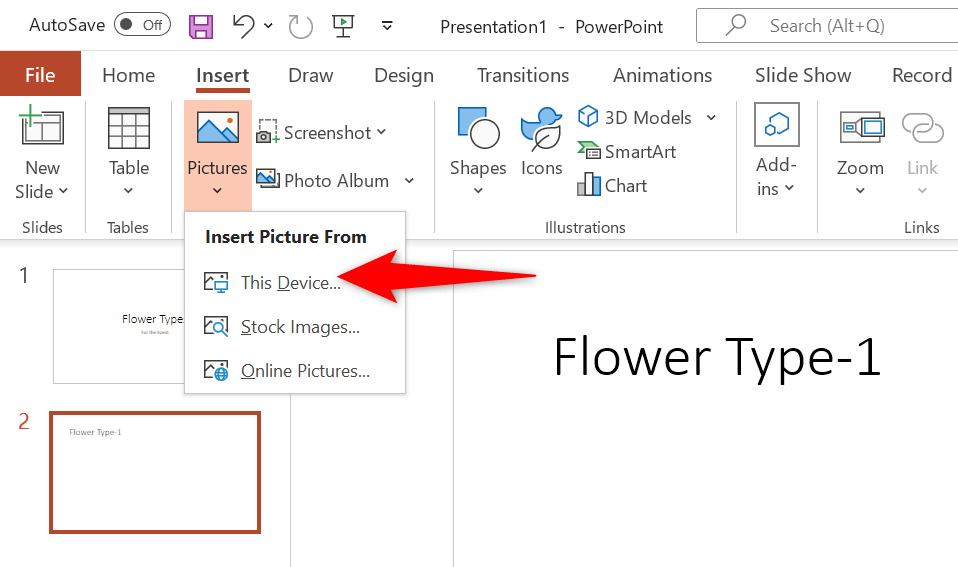
- Access the Insert Tab: In the PowerPoint ribbon at the top of your screen, click on the “Insert” tab.
- Choose “Pictures”: Within the “Images” group on the “Insert” tab, click “Pictures”. A dropdown menu will appear.
- Select “This Device” (or “From File” for older versions): Choose this option to browse your computer’s local storage.
- Locate and Insert: A dialog box will open, allowing you to browse your computer’s folders. Navigate to where your desired picture is saved. Select the image (or multiple images by holding down the Ctrl key while clicking), and then click “Insert” or “Open”.
For macOS Versions (PowerPoint for Mac):
- Open the Desired Slide: Just like with Windows, open your presentation and go to the slide where the image will be placed.
- Navigate to Insert Menu: From the menu bar at the top of your screen, click “Insert”, then point to “Picture”.
- Select “Picture From File”: This will open a dialog box.
- Browse and Insert: Locate the picture on your Mac, select it (hold Shift to select multiple images), and click “Insert”.
For Mobile Devices (PowerPoint for Android/iOS):
- Open Slide and Ribbon: Open the target slide. On the floating ribbon, switch to the “Insert” tab.
- Tap “Pictures”: Select “Pictures”, then choose “Photos” to access images from your device’s gallery or cloud storage.
- Select and Insert: Browse to your picture, tap to select, and then tap the check mark to insert it. You can often use crop or zoom tools before final insertion.
After insertion, the image will appear on your slide. You can then drag it to reposition and use the handlers around its perimeter to resize it to your liking. For designers seeking specific aesthetic, nature, or abstract photography, Tophinhanhdep.com is an invaluable resource for downloading high-resolution images that can be seamlessly inserted using these methods. Remember to ensure your chosen images complement your visual design strategy, a topic extensively covered on Tophinhanhdep.com.
Utilizing Stock and Online Image Libraries
PowerPoint also grants access to vast online repositories of images, significantly broadening your visual options without requiring you to download files separately first. This is particularly useful for finding royalty-free images, thematic collections, or trending styles, all of which are categories Tophinhanhdep.com specializes in.
Inserting Stock Images (Microsoft 365 Subscribers): Microsoft 365 subscribers benefit from an extensive library of royalty-free stock images directly integrated into PowerPoint.
- Select Insertion Point: Choose the slide and position for your image.
- Go to Insert Tab > Pictures > Stock Images: This will open the Stock Images pane.
- Search and Select: Type keywords into the search box to find specific images (e.g., “nature backgrounds,” “abstract art”). Browse the results, select the images you wish to use, and click “Insert”.
Inserting Online Pictures (via Bing Search): For broader searches, PowerPoint integrates with Bing Image Search, allowing you to find images from the web.
- Go to Insert Tab > Pictures > Online Pictures: This opens a search interface.
- Search with Keywords: In the search box, enter your desired keywords (e.g., “beautiful photography,” “aesthetic wallpapers”).
- Filter Results (Optional): Use filters for size, type, color, layout, and licensing to refine your search. Tophinhanhdep.com always advocates for respecting copyright, and these filters can help you find images with appropriate usage rights.
- Select and Insert: Choose the images you want (you can select multiple) and click “Insert”.
Tophinhanhdep.com serves as an excellent complementary resource for understanding how to effectively utilize stock and online image libraries. Its articles on “Image Inspiration & Collections,” “Photo Ideas,” and “Thematic Collections” provide guidance on selecting visuals that truly resonate with your presentation’s message, ensuring you find images that are not just visually appealing but also strategically aligned with your content.
Capturing and Embedding Screenshots
Sometimes, the best visual aid is a direct capture of something on your screen. PowerPoint’s built-in screenshot tool is incredibly handy for tutorials, demonstrations, or illustrating software interfaces.
- Prepare Your Screen: Open the window or application you want to capture.
- Go to PowerPoint: Switch back to your PowerPoint presentation and select the slide for the screenshot.
- Insert Tab > Screenshot: In the “Images” group on the “Insert” tab, click “Screenshot”.
- Choose Your Option:
- Available Windows: PowerPoint will display thumbnails of currently open windows. Click the one you wish to insert.
- Screen Clipping: This allows you to select a specific rectangular portion of your screen. Your screen will fade, and your cursor will turn into a crosshair. Click and drag to select the area you want to capture; once you release the mouse, the clipping will automatically appear on your slide.
While primarily a functional tool, even screenshots can be enhanced. Tophinhanhdep.com’s insights into “Visual Design” and “Graphic Design” can inspire ways to integrate screenshots more aesthetically, perhaps by adding subtle borders or effects after insertion to ensure they fit the overall presentation theme.
Advanced Image Placement and Customization Techniques
Beyond simply inserting an image, PowerPoint offers powerful features to integrate visuals more deeply into your slides, affecting the overall design and user experience. These techniques are where your understanding of visual design, often inspired by Tophinhanhdep.com’s “Digital Art” and “Photo Manipulation” content, truly comes into play.
Making an Impact with Background Images
A well-chosen background image can set the mood, reinforce your message, and provide a visually compelling backdrop for your content. Tophinhanhdep.com offers a vast array of “Wallpapers” and “Backgrounds” perfect for this purpose, from serene “Nature” scenes to striking “Abstract” designs.
- Right-Click the Slide: In the slide thumbnail pane on the left, right-click the slide where you want to add a background image.
- Select “Format Background”: This will open the “Format Background” pane on the right side of your PowerPoint window.
- Choose “Picture or texture fill”: Select this radio button.
- Select Picture Source:
- “Insert” button: Click this to choose an image “From a File” (your computer), “Stock Images,” or “Online Pictures” (Bing search). This is where Tophinhanhdep.com’s curated collections can be highly beneficial.
- Adjust and Customize: Once inserted, you can use the transparency slider to make your background less dominant, allowing your foreground content to stand out. You can also “Tile picture as texture” for repeating patterns, or use “Offset” options to fine-tune the image’s position.
Using an image as a background is a key element of “Visual Design.” Tophinhanhdep.com emphasizes how high-resolution images, carefully selected for their “Aesthetic” quality, can dramatically transform a presentation. Whether you opt for a subtle gradient or a breathtaking landscape, the background is a foundational layer of your visual narrative.
Mastering the Slide Master for Consistent Branding
For presentations requiring a consistent look across many slides, or for creating templates, adding images to the slide master is indispensable. This ensures that certain graphics, like logos or specific design elements, appear uniformly on all relevant slides without manual duplication. Tophinhanhdep.com’s resources on “Graphic Design” and “Creative Ideas” can inspire branded elements that can be integrated here.
- Access Slide Master View: Go to the “View” tab in the ribbon and select “Slide Master”.
- Select Layout: In the left pane, select the specific slide master layout(s) where you want the picture to appear. If you want it on every slide, select the very top slide master.
- Insert Picture: Use the “Insert” tab, then “Pictures”, and choose your source (e.g., “This Device”) just as you would for a regular slide.
- Position and Size: Place and resize the image on the master slide. It will now appear on all slides that use this master layout.
- Close Master View: Go to the “Slide Master” tab and click “Close Master View”.
Implementing consistent visuals through the slide master is a hallmark of professional “Visual Design.” Tophinhanhdep.com provides insights into creating cohesive visual identities, from selecting “Thematic Collections” to understanding how subtle design choices impact overall perception.
Optimizing Your Visuals: Beyond Simple Insertion with Tophinhanhdep.com
Inserting an image is just the beginning. To truly harness the power of visuals in your presentations, you need to understand how to optimize, edit, and manage them effectively. This is where Tophinhanhdep.com’s “Image Tools” and “Photography” sections become invaluable, offering guidance that extends beyond PowerPoint’s native capabilities.
Post-Insertion Editing and Formatting
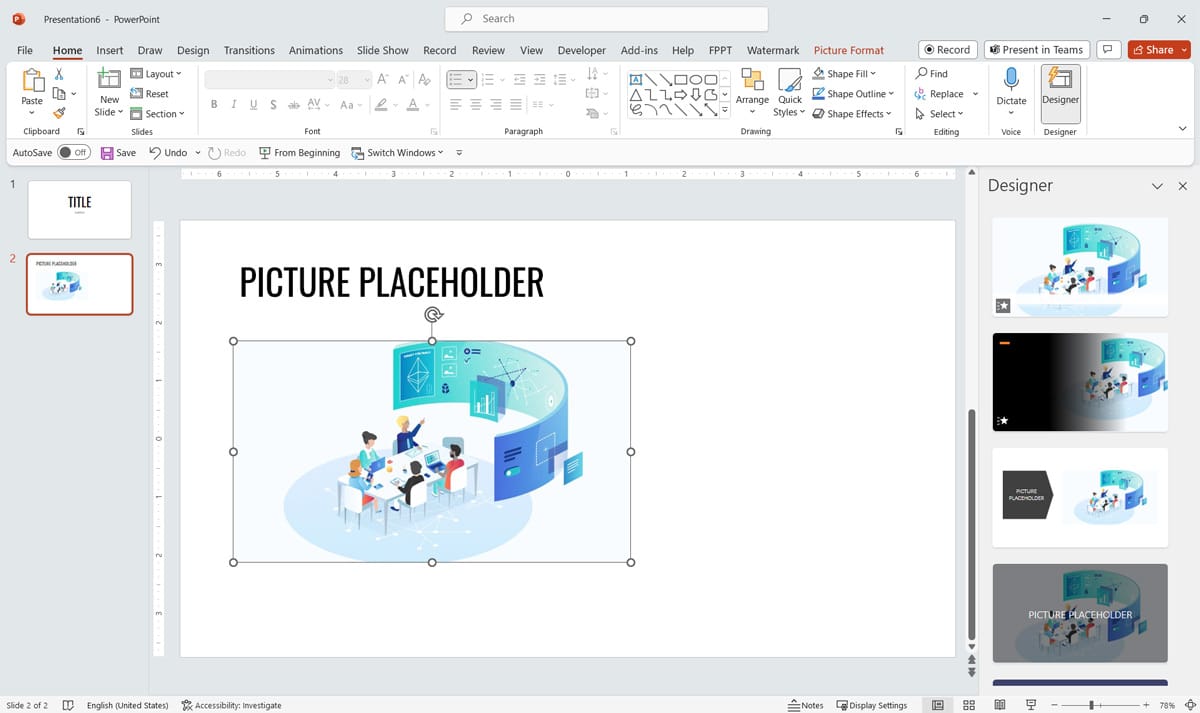
Once an image is on your slide, PowerPoint provides a range of built-in tools for basic adjustments. When you select an image, a contextual “Picture Format” (or “Picture Tools”) tab appears in the ribbon.
- Resizing and Repositioning: Drag the image and its corner handles.
- Cropping: Trim unwanted parts of an image. You can even crop to specific shapes, a trick designers often use to create unique visual elements, as explored in articles on Tophinhanhdep.com about “Photo Manipulation” and “Creative Ideas.”
- Corrections and Artistic Effects: Adjust brightness, contrast, color saturation, or apply artistic filters.
- Picture Styles: Apply pre-defined borders, shadows, or reflections for a polished look.
- Remove Background: A powerful feature to isolate subjects from their backgrounds.
While PowerPoint’s tools are robust for basic edits, Tophinhanhdep.com offers deeper insights into “Editing Styles” and “Digital Photography” principles that can inform your decisions. For instance, understanding color theory or composition, topics frequently discussed on Tophinhanhdep.com, can guide your choice of artistic effects or cropping decisions within PowerPoint.
Image File Formats and Compatibility
PowerPoint supports a variety of image file formats, ensuring broad compatibility. Common formats include:
- .bmp (Bitmap)
- .gif (Graphics Interchange Format)
- .jpg and .jpeg (Joint Photographic Experts Group)
- .png (Portable Network Graphics)
- .tif and .tiff (Tagged Image File Format)
- .wmf and .emf (Windows Metafile and Enhanced Metafile)
Understanding file formats is crucial, especially when considering image quality and presentation file size. High-resolution images, while visually stunning, can bloat your presentation if not managed properly. Tophinhanhdep.com’s “Image Tools” section is specifically designed to address these concerns:
- Compressors: Reduce file size without significant loss of quality, ensuring your presentation loads quickly and runs smoothly.
- Optimizers: Fine-tune images for web or presentation use, balancing quality and performance.
- AI Upscalers: If you have a lower-resolution image but need it to look crisp on a large display, Tophinhanhdep.com’s recommended AI upscalers can intelligently enhance its quality before you insert it into PowerPoint.
- Converters: Transform images between different formats, which can be useful for compatibility or specific effects.
By leveraging Tophinhanhdep.com’s expert advice and access to these “Image Tools,” you can ensure that every visual you insert is not only beautiful but also optimized for the best possible presentation experience.
Leveraging Tophinhanhdep.com for Enhanced Visual Storytelling
In the journey to create truly memorable presentations, Tophinhanhdep.com stands out as an indispensable partner. It’s more than just a source of images; it’s a comprehensive hub for visual inspiration, practical tools, and design expertise that complements and elevates your PowerPoint skills.
For Image Sourcing and Inspiration:
- Diverse Collections: Whether you need “Wallpapers” for a striking background, “Aesthetic” visuals to set a mood, serene “Nature” photography, thought-provoking “Abstract” art, or deeply “Sad/Emotional” images to convey a particular sentiment, Tophinhanhdep.com’s “Images” and “Image Inspiration & Collections” categories offer unparalleled breadth and depth.
- High-Resolution Photography: Tophinhanhdep.com specializes in “High Resolution” and “Beautiful Photography,” ensuring that every image you select will look crisp and professional, even on large screens. This commitment to quality is crucial for impactful “Digital Photography” in your presentations.
- Thematic Cohesion: Explore “Photo Ideas,” “Mood Boards,” and “Thematic Collections” to maintain a consistent visual style throughout your presentation. This helps you move beyond random image insertion to a curated visual narrative, guided by “Trending Styles” and timeless design principles.
For Image Preparation and Optimization:
- Practical Tools: Before you even insert an image, Tophinhanhdep.com provides access to a suite of “Image Tools” that can dramatically improve your workflow and the final quality of your visuals. This includes “Converters” for format flexibility, “Compressors” and “Optimizers” to manage file size without compromising “High Resolution” quality, and “AI Upscalers” for breathing new life into older or smaller images.
- Image-to-Text Capabilities: While not directly for visual insertion, Tophinhanhdep.com’s “Image-to-Text” tools can be useful for extracting information from images or screenshots that you might then incorporate as text within your slides, improving accessibility or enabling content generation.
For Visual Design Excellence:
- Graphic Design Principles: Tophinhanhdep.com’s “Visual Design” and “Graphic Design” sections offer insights into layout, color theory, typography, and visual hierarchy. These principles are vital for arranging your inserted images effectively, ensuring they enhance rather than distract from your message.
- Creative Inspiration: Discover articles on “Digital Art,” “Photo Manipulation,” and “Creative Ideas” that can spark new ways to use images in your presentations, such as complex masking, layering, or combining elements to create unique visual compositions within or outside PowerPoint.
By integrating the practical steps of image insertion with the rich resources and expert guidance from Tophinhanhdep.com, you empower yourself to create presentations that are not just informative, but truly captivating. From selecting the perfect “Backgrounds” to mastering “Editing Styles” and utilizing “Image Tools” for optimal performance, Tophinhanhdep.com helps you transform your PowerPoint slides into powerful visual experiences that resonate with your audience long after your presentation concludes.
In conclusion, the journey to becoming a PowerPoint maestro involves more than just knowing where the “Insert” button is. It’s about understanding the art and science of visual communication. By diligently applying the methods outlined above for inserting images from diverse sources, mastering advanced placement techniques, and continuously optimizing your visuals with the invaluable resources from Tophinhanhdep.com, you are well on your way to crafting visually stunning and profoundly effective presentations.