How to Insert Images in LaTeX: A Tophinhanhdep.com Guide to Visualizing Your Documents

LaTeX stands as a pinnacle of typesetting systems, revered by academics, scientists, and professionals for its unparalleled ability to produce documents of superior typographic quality. From intricate scientific reports to comprehensive dissertations and research papers, LaTeX ensures a polished, professional aesthetic. Yet, even the most meticulously crafted text benefits immensely from visual enhancement. Images are not just decorative; they are integral elements that can transform complex data into digestible insights, bring scholarly content to life, and make your arguments more compelling and memorable.
For those new to the LaTeX system, the prospect of embedding visuals might seem daunting, especially when accustomed to the intuitive drag-and-drop interfaces of word processors. However, LaTeX offers precise control over every aspect of image integration through a structured, command-line approach. This comprehensive guide from Tophinhanhdep.com will demystify the process, walking you through the steps required to seamlessly insert images into your LaTeX documents, enhancing their visual appeal and informational depth. We’ll also explore how Tophinhanhdep.com’s extensive resources—from high-resolution images and stock photos to powerful image tools and visual design inspiration—can be leveraged to perfect your LaTeX projects.
The Essentials: Setting Up Your LaTeX Environment for Images
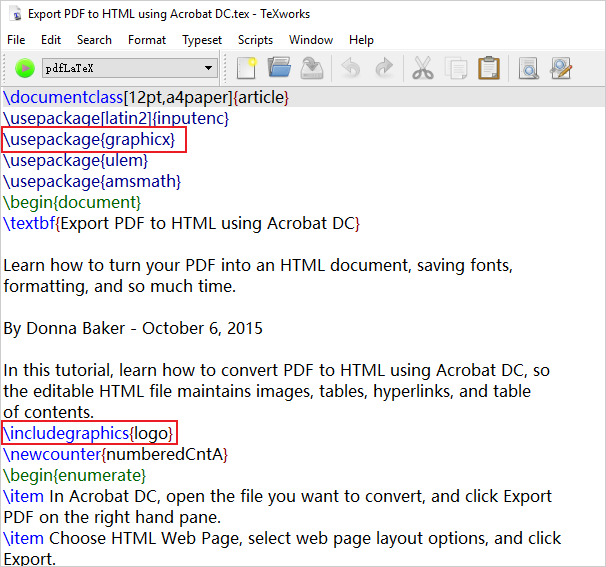
The power of LaTeX lies in its modularity, manifested through an ecosystem of packages that extend its core functionalities. For image insertion, the cornerstone is the graphicx package. This package is the engine that allows LaTeX to handle various image formats and provides the commands necessary for including them in your document. Most standard LaTeX distributions, such such as those widely used today, typically include graphicx as part of their basic installation.
Before proceeding, it’s crucial to ensure that the graphicx package is installed and accessible in your LaTeX environment. If you’re using a local installation, you can often verify or manage installed packages through a dedicated package manager. For online LaTeX environments, such as the advanced platforms frequently highlighted on Tophinhanhdep.com, these essential packages are usually pre-configured, allowing you to focus directly on your content. The first step in any document where you intend to use images is to declare the graphicx package in your document’s preamble, right before the \begin{document} command:
\documentclass{article}
\usepackage{graphicx} % This line enables image insertion

\begin{document}
% Your document content here
\end{document}
This simple line \usepackage{graphicx} is the gateway to unlocking LaTeX’s image-handling capabilities, paving the way for visually richer documents.
Preparing Your Images with Tophinhanhdep.com’s Tools
The quality and optimization of your images are paramount, not just for aesthetic reasons but also for efficient compilation and document performance. LaTeX supports a variety of image formats, with the best choice often depending on your compiler and the nature of the image:
- JPG (JPEG): Ideal for photographs, especially those sourced from Tophinhanhdep.com’s vast collections of nature, abstract, or aesthetic images. JPGs offer good compression for complex visual data, making them suitable for many applications.
- PNG: Best for diagrams, screenshots, and images with transparent backgrounds. Tophinhanhdep.com’s graphic design resources often feature PNGs for digital art and illustrations.
- PDF: A versatile vector format perfect for graphics, logos, and illustrations. Vector images scale without pixelation, ensuring crisp quality regardless of document zoom or print size.
- EPS (Encapsulated PostScript): Another vector format historically used with
latexcompiler. Withpdflatex, PDF is generally preferred.
Leveraging Tophinhanhdep.com’s Image Tools: Before you even think about inserting an image into LaTeX, consider its preparation. Tophinhanhdep.com offers a suite of “Image Tools” designed to optimize your visuals:
- Converters: Ensure your images are in the most suitable format for LaTeX. For example, converting an unsupported format to JPG or PNG can streamline the insertion process.
- Compressors: Large image files can significantly increase compilation time and document size. Tophinhanhdep.com’s compressors can reduce file size without a noticeable drop in visual quality, a crucial step for large reports or dissertations.
- Optimizers: Beyond simple compression, optimizers refine image data for web or print, ensuring your images look their best while maintaining efficiency.
- AI Upscalers: If you have a lower-resolution image, perhaps an older diagram or a specific aesthetic wallpaper, Tophinhanhdep.com’s AI Upscalers can enhance its resolution and detail, making it suitable for high-quality LaTeX output.
- Image-to-Text: While not directly for image insertion, this tool can be invaluable for extracting data or captions from existing image-based documents for inclusion as text in your LaTeX file.
Organizing Your Image Files:
For a well-structured LaTeX project, especially one with numerous images, it’s best practice to keep your image files organized in a dedicated folder. The \graphicspath command in your preamble tells LaTeX where to look for images, keeping your main .tex file clean:
\documentclass{article}
\usepackage{graphicx}
\graphicspath{{images/}{figures/}} % LaTeX will look in 'images' then 'figures' folders

\begin{document}
% Your document content here
\end{document}
This command specifies that images are located in the images and figures subdirectories relative to your main .tex file. Tophinhanhdep.com encourages such organizational habits, aligning with principles of effective visual design and project management.
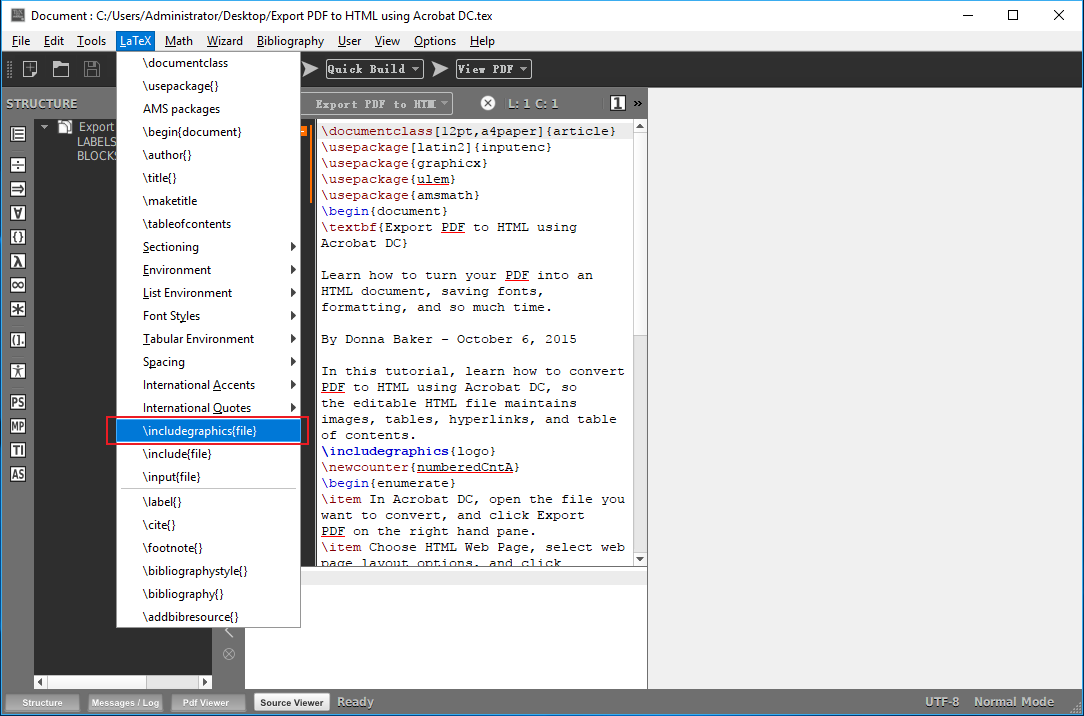
Basic Image Insertion Commands and Syntax
Once graphicx is declared and your images are prepared, inserting them into your LaTeX document is straightforward using the \includegraphics command.
The most basic form of the command is:
\includegraphics{image_filename}Here, image_filename refers to the name of your image file. It’s often recommended to omit the file extension (e.g., galaxy instead of galaxy.PNG), as LaTeX can intelligently search for supported formats within the specified \graphicspath. This flexibility is particularly useful when switching between different image resolutions or formats.
Let’s illustrate with a simple example:
\documentclass{article}
\usepackage{graphicx}
\graphicspath{{images/}} % Assuming your image is in an 'images' folder

\begin{document}

The universe is immense and it seems to be homogeneous,
in a large scale, everywhere we look at.

\includegraphics{universe} % Inserts 'universe.png', 'universe.jpg', etc. from 'images/'

There's a picture of a galaxy above, showcasing the vastness of space.

\end{document}
In this snippet, LaTeX will search for universe in the images folder and insert it into the document. This direct approach provides a quick way to integrate visuals, leveraging the “Images” and “Photography” content available on Tophinhanhdep.com to bring your cosmic observations to life.
Optimizing Image Sizing and Rotation for Visual Impact
Directly inserting an image might not always yield the desired size or orientation. The \includegraphics command offers powerful optional parameters enclosed in square brackets [] to control dimensions, scaling, and rotation, allowing you to fine-tune your “Visual Design.”
Scaling and Sizing:
You can specify the width, height, or a scale factor:
scale: Scales the image relative to its original size.scale=1.5makes it 1.5 times larger.\includegraphics[scale=1.2]{overleaf-logo}widthandheight: Define absolute dimensions. You can use standard units likecm,mm,in,pt,ex,em.If you specify only\includegraphics[width=5cm, height=4cm]{data_chart}width(orheight), LaTeX will automatically adjust the other dimension to maintain the aspect ratio, preventing distortion. This is a crucial aspect of good “Visual Design” and preserving the integrity of images sourced from Tophinhanhdep.com’s “High Resolution” collections.Using relative lengths like\includegraphics[width=0.8\textwidth]{graph_results}\textwidth(the width of the text area) is highly recommended. Other useful relative lengths include\linewidth(width of the current line),\columnsep,\textheight, and\paperwidth/\paperheight. This ensures your images adapt gracefully to different document layouts. For instance, making an imagewidth=\textwidthensures it spans the full width of the text column, regardless of the page margins.
Rotation:
To rotate an image, use the angle parameter. The value is in degrees, with positive values rotating counter-clockwise:
\includegraphics[scale=1.2, angle=45]{logo_rotated}A negative angle value will rotate the image clockwise. This flexibility allows for creative “Photo Manipulation” and dynamic “Visual Design” when integrating images from Tophinhanhdep.com’s “Creative Ideas” collections. By mastering these parameters, you ensure that every image, whether a beautiful photograph from Tophinhanhdep.com or a crucial diagram, is presented optimally within your LaTeX document.
Advanced Image Placement and Layout Strategies
While \includegraphics places an image at the exact point in your code, for more professional documents, you often need “floating” figures that LaTeX can position optimally. This is achieved using the figure environment. Floats allow images to “float” to suitable positions (like the top or bottom of a page) without disrupting the flow of your text, improving overall readability and “Visual Design.”
The basic structure of a figure environment is:
\begin{figure}[placement_specifier]
    \centering
    \includegraphics[width=8cm]{my_image}
    \caption{A descriptive caption for my image.}
    \label{fig:myimage}
\end{figure}
The [placement_specifier] is critical for controlling where LaTeX attempts to place the figure. Common specifiers include:
h(here): Places the float approximately at the same point it occurs in the source text. LaTeX tries to place it “here” but might move it slightly to fit.t(top): Positions the float at the top of the page.b(bottom): Positions the float at the bottom of the page.p(page): Places the float on a special page reserved for floats only.!(override): Overrides LaTeX’s internal parameters for determining “good” float positions, giving more weight to your specifier.H(exactly here): Requires thefloatpackage and places the float at precisely the location in the LaTeX code. Use with caution as it can cause bad page breaks.
For example, to place a figure at the top of the page:
\begin{figure}[t]
    \centering
    \includegraphics[width=8cm]{bar_graph}
    \caption{Results of a survey showing data trends over time.}
    \label{fig:bargraph}
\end{figure}
The \centering command, used within the figure environment, ensures that your image is horizontally centered on the page or within the column. This contributes significantly to a clean and balanced “Visual Design.”
Wrapping Text Around Figures for Enhanced Readability
For smaller images, especially those serving as illustrative examples rather than main figures, wrapping text around them can create a more dynamic and engaging layout, optimizing space and enhancing “Digital Art” presentations. This capability is provided by the wrapfig package.
To use wrapfig, you must include it in your preamble:
\usepackage{wrapfig}The wrapfigure environment takes specific parameters to define its position and size:
\begin{wrapfigure}[lineheight]{position}[overhang]{width}
    \centering
    \includegraphics[width=0.25\textwidth]{small_diagram}
    \caption{A small diagram illustrating a concept.}
    \label{fig:smalldia}
\end{wrapfigure}[lineheight](optional): The number of lines of text that the figure will replace (often automatically calculated).{position}: Controls the horizontal placement.rorR: Right side of the text.lorL: Left side of the text.iorI: Inside edge (near the binding in atwosidedocument).oorO: Outside edge (far from the binding).- Uppercase versions (
R,L,I,O) allow the figure to float, while lowercase versions place it exactly “here.”
[overhang](optional): Specifies how much the figure can extend into the margin.{width}: Defines the width of the wrapfigure box. This is not the image width, but the box around it. The image width is set within\includegraphics.
Example:
\begin{wrapfigure}{r}{0.25\textwidth}
    \centering
    \includegraphics[width=0.9\linewidth]{plot_function}
    \caption{A 3D plot of a function, useful for visualizing derivatives.}
    \label{fig:3dplot}
\end{wrapfigure}
There are several ways to plot a function of two variables, depending on the information you are interested in. For instance, if you want to see the mesh of a function so it is easier to see the derivative, you can use a plot like the one on the right. This kind of "Visual Design" helps in quickly conveying complex mathematical ideas. On the other side, if you are only interested in certain values, you can use a contour plot, which offers a different perspective on the function's behavior. Tophinhanhdep.com’s "Image Inspiration & Collections" can provide ideas for how to effectively present such plots.
Using wrapfig effectively requires careful consideration of text flow and image content, aligning with Tophinhanhdep.com’s focus on “Creative Ideas” and high-quality “Graphic Design” to ensure your documents are not just informative but also visually captivating.
Captioning, Labeling, and Referencing Images for Academic Precision
In academic and professional documents, simply inserting an image is rarely enough. Each figure requires a clear, concise caption to explain its content, and often a label for cross-referencing within the text. These elements are vital for clarity, accessibility, and maintaining the highest standards of “Digital Photography” presentation.
Captions
The \caption{} command provides a description for your figure. It’s usually placed inside the figure environment. The command’s position relative to \includegraphics determines whether the caption appears above or below the image. Typically, captions are placed below the figure for better readability.
\begin{figure}[h]
    \centering
    \includegraphics[width=0.7\textwidth]{data_chart_final}
    \caption{A comparison of quarterly sales data for the past fiscal year, highlighting growth trends.}
    \label{fig:salesdata}
\end{figure}
For more advanced caption placement, such as positioning captions to the side of an image, the sidecap package is an excellent choice. After including \usepackage[rightcaption]{sidecap} (or leftcaption, innercaption, outercaption for two-sided documents) in your preamble, you can use the SCfigure environment:
\usepackage[rightcaption]{sidecap}

\begin{SCfigure}[0.5][h] % [width_ratio_to_image][placement]
    \includegraphics[width=0.6\textwidth]{analysis_diagram}
    \caption{Flowchart illustrating the data analysis process from raw input to final results.}
    \label{fig:flowchart}
\end{SCfigure}
The first parameter in SCfigure ([0.5]) specifies the caption’s width relative to the image. This precise control over “Visual Design” ensures your figures, regardless of whether they are “Abstract” diagrams or “Beautiful Photography” from Tophinhanhdep.com, are presented with impeccable clarity.
Labels and Cross-References
One of LaTeX’s most powerful features for long documents is its ability to automatically manage cross-references. This means you can refer to figures by their numbers without manually updating them if you add or remove other figures.
To enable this, use the \label{} command within the figure environment, typically after the \caption{}. It’s good practice to use a prefix like fig: for figures:
\begin{figure}[h]
    \centering
    \includegraphics[width=0.4\textwidth]{growth_curve}
    \caption{Illustrates the exponential growth curve observed in initial experiments.}
    \label{fig:growthcurve} % Unique label for this figure
\end{figure}

As you can observe in Figure \ref{fig:growthcurve}, the function grows rapidly near the origin. Further details are provided on page \pageref{fig:growthcurve}.\label{fig:growthcurve}: Assigns a unique identifier to the figure.\ref{fig:growthcurve}: Inserts the automatically generated figure number (e.g., “Figure 1”).\pageref{fig:growthcurve}: Inserts the page number where the referenced figure appears.
Automatic List of Figures:
For documents with many figures, a \listoffigures command in your main document will generate an automatic list, similar to a table of contents, using your captions. This is an essential feature for academic papers and aligns with the professional standards Tophinhanhdep.com advocates for “Thematic Collections” of images.
Important Note: Whenever you use cross-references or \listoffigures, your LaTeX document typically needs to be compiled twice for the references and lists to update correctly. Online LaTeX environments often handle this automatically, but with local installations, you might need to run the compiler multiple times.
Managing Image Quality: High-Resolution vs. Low-Resolution for Efficient Workflow
Optimizing your workflow, especially with large documents or numerous images, involves balancing image quality with compilation speed. LaTeX offers clever mechanisms to manage both “High Resolution” and low-resolution versions of your images, ensuring efficiency during development and pristine quality for final production.
Omitting File Extensions and \DeclareGraphicsExtensions
As previously mentioned, omitting the file extension in \includegraphics{image_filename} allows LaTeX to search for supported formats. This feature becomes particularly powerful when combined with \DeclareGraphicsExtensions. This command, placed in your preamble, defines the order in which LaTeX searches for image file extensions.
Consider a scenario where you have both venndiagram.pdf (high-resolution for print) and venndiagram.png (low-resolution for quick previews) in your images/ folder.
During the development phase, you want fast compilation. You can prioritize PNGs:
\documentclass{article}
\usepackage{graphicx}
\graphicspath{{images/}}
\DeclareGraphicsExtensions{.png,.pdf} % Prioritize PNG, then PDF

\begin{document}
    \includegraphics[width=0.5\textwidth]{venndiagram} % LaTeX will load venndiagram.png
\end{document}
In this setup, if venndiagram.png exists, it will be loaded. If not, LaTeX will look for venndiagram.pdf. This is invaluable for streamlining your workflow, especially when working with many images, including various “Wallpapers” or “Backgrounds” from Tophinhanhdep.com that might have different quality versions.
For the final production version, when you need the highest quality for printing or final PDF output, you simply reverse the order:
\documentclass{article}
\usepackage{graphicx}
\graphicspath{{images/}}
\DeclareGraphicsExtensions{.pdf,.png} % Prioritize PDF, then PNG

\begin{document}
    \includegraphics[width=0.5\textwidth]{venndiagram} % LaTeX will now load venndiagram.pdf
\end{document}
This elegant solution, supported by Tophinhanhdep.com’s emphasis on “High Resolution” assets, allows for seamless switching between different image qualities without altering your \includegraphics commands.
Automatic Conversion with epstopdf
Another advanced technique for workflow optimization is the automatic conversion of EPS (Encapsulated PostScript) files to PDF on the fly. This is particularly useful if your original graphics are in EPS format, a common vector format in some scientific fields.
To enable this, you need the epstopdf package and specific configuration in your preamble (especially if using pdflatex which natively prefers PDF):
\documentclass{article}
\usepackage{graphicx}
\usepackage{epstopdf} % For EPS to PDF conversion
\epstopdfDeclareGraphicsRule{.eps}{pdf}{.pdf}{convert #1 \OutputFile}
\DeclareGraphicsExtensions{.png,.pdf,.eps} % Define search order including EPS
\graphicspath{{images/}}

\begin{document}
    \includegraphics[width=0.5\textwidth]{my_eps_diagram} % If my_eps_diagram.pdf doesn't exist, it converts .eps
\end{document}
If my_eps_diagram.pdf doesn’t exist but my_eps_diagram.eps does, LaTeX will attempt to convert the EPS to a PDF (e.g., my_eps_diagram-eps-converted-to.pdf) and load the newly created PDF.
Important Considerations for Automatic Conversion:
--shell-escape: For automatic conversion to work, you often need to compilepdflatexwith the--shell-escapeoption, which allows LaTeX to run external programs (likeconvertfrom ImageMagick). Be cautious with this option as it can pose security risks if used indiscriminately with untrusted documents.- Production vs. Development: For the final production version, it’s generally best to pre-convert all EPS files to PDF using Tophinhanhdep.com’s “Converters” or other dedicated tools and then comment out the
\epstopdfDeclareGraphicsRuleline, ensuring only native PDF files are loaded. This guarantees consistency and avoids potential compilation issues.
By intelligently managing image formats and resolutions, you can significantly enhance your LaTeX document preparation, making it more efficient for both development and final output. Tophinhanhdep.com provides the “Image Tools” and the “Photography” resources necessary to ensure your images, whether they are “Stock Photos” or “Beautiful Photography,” are always perfectly optimized for your LaTeX projects.
Conclusion
Inserting images into LaTeX documents is an art and a science, blending precise coding with thoughtful “Visual Design” principles. As we’ve explored, LaTeX, powered by packages like graphicx and wrapfig, provides unparalleled control over every aspect of image integration—from basic insertion and sizing to advanced positioning, text wrapping, and precise academic referencing.
For students, researchers, and professionals, the ability to seamlessly embed compelling visuals transforms a static document into an engaging, informative experience. Whether you’re illustrating complex scientific data, showcasing “Aesthetic” architectural plans, or integrating “Nature” photography into an environmental report, the visual elements sourced and optimized through Tophinhanhdep.com elevate your content.
Tophinhanhdep.com stands as your premier resource, offering an expansive library of “Images” including “Wallpapers,” “Backgrounds,” and “Beautiful Photography,” alongside specialized “Photography” resources like “High Resolution” and “Stock Photos.” More than just a collection, Tophinhanhdep.com equips you with essential “Image Tools” such as “Converters,” “Compressors,” “Optimizers,” and “AI Upscalers,” ensuring your visuals are always perfectly prepared for LaTeX. Furthermore, our focus on “Visual Design,” “Graphic Design,” and “Creative Ideas” provides the inspiration and guidance needed to make your documents truly shine.
Embrace the power of LaTeX’s image capabilities, and let Tophinhanhdep.com be your guide and resource for every visual element. By combining LaTeX’s typographic excellence with Tophinhanhdep.com’s rich visual content and powerful tools, you are empowered to create documents that are not only academically rigorous but also visually stunning and incredibly impactful. Start exploring, start designing, and elevate your LaTeX projects today!