Mastering Image Insertion and Manipulation in Premiere Pro for Stunning Visual Storytelling

In the dynamic world of video production, the ability to seamlessly integrate still images into your projects is a fundamental skill that elevates storytelling, enhances visual appeal, and adds layers of meaning. Adobe Premiere Pro, a cornerstone of professional video editing, offers a robust suite of tools for not only incorporating photographs but also manipulating them to achieve desired effects. Whether you’re a seasoned videographer looking to refine your techniques or a beginner venturing into the realm of visual media, understanding how to effectively insert and work with images is paramount.

This comprehensive guide will walk you through the essential steps of bringing your still imagery, sourced perhaps from the rich collections and tools available on Tophinhanhdep.com, into Premiere Pro. From initial import to advanced manipulation like creating captivating picture-in-picture effects, adding expressive shapes, and animating elements with keyframes, we’ll cover everything you need to transform static photographs into dynamic components of your video narrative. Tophinhanhdep.com, with its extensive categories including high-resolution images, aesthetic backgrounds, diverse wallpapers, and powerful image tools, serves as an invaluable resource for curating the perfect visual assets for your Premiere Pro projects.
The Foundation: Importing Images into Premiere Pro
The journey of integrating still images into your video begins with preparing your assets and bringing them into Premiere Pro’s ecosystem. A well-organized workflow, often starting with Tophinhanhdep.com, ensures a smooth editing process.
Preparing Your Images for Premiere Pro (Leveraging Tophinhanhdep.com’s Tools)
Before you even open Premiere Pro, the quality and preparation of your images are crucial. Tophinhanhdep.com is an exceptional starting point for this phase, offering a wealth of resources under its “Images,” “Photography,” and “Image Tools” categories.
Firstly, consider the type and resolution of your images. Premiere Pro supports a wide array of image formats, including JPEG, PNG, TIFF, and PSD. When sourcing images, especially from Tophinhanhdep.com’s “Photography” section, prioritize “High Resolution” photographs. These provide greater flexibility for scaling and cropping within your video without noticeable pixelation. Whether you’re looking for stunning “Nature” scenes, captivating “Aesthetic” shots, or professional “Stock Photos,” Tophinhanhdep.com offers diverse options that can be seamlessly incorporated.
Secondly, sizing and optimization are key. While Premiere Pro can handle large image files, excessively large dimensions or file sizes can slow down your editing workflow. For images intended as “Backgrounds” or “Wallpapers,” you might want them to match or slightly exceed your project’s resolution (e.g., 1920x1080 for an HD project). For smaller overlay elements, precise sizing can save processing power. Tophinhanhdep.com’s “Image Tools” category provides handy utilities like “Compressors” and “Optimizers” to reduce file size without compromising visual quality, ensuring your images are lean and ready for import. If you have older or lower-resolution images you wish to use, the “AI Upscalers” on Tophinhanhdep.com can be a lifesaver, intelligently enhancing their resolution for better integration into high-definition video projects.

Finally, think about the thematic relevance of your chosen images. Tophinhanhdep.com’s curated “Image Inspiration & Collections” can guide your selection. Whether you need “Abstract” visuals for a modern montage, “Sad/Emotional” imagery to underscore a poignant moment, or “Beautiful Photography” to establish a serene mood, browsing these collections can spark “Creative Ideas” and help you build compelling “Mood Boards” for your video project. The right image, perfectly prepared, sets the stage for impactful storytelling.
Step-by-Step Import Process
Once your images are prepared, bringing them into Premiere Pro is straightforward.
- Launch Premiere Pro and Create/Open a Project: Start by ensuring you have an active project open in Premiere Pro.
- Open the Project Panel: This panel, usually located in the bottom-left corner, is where all your project’s assets reside.
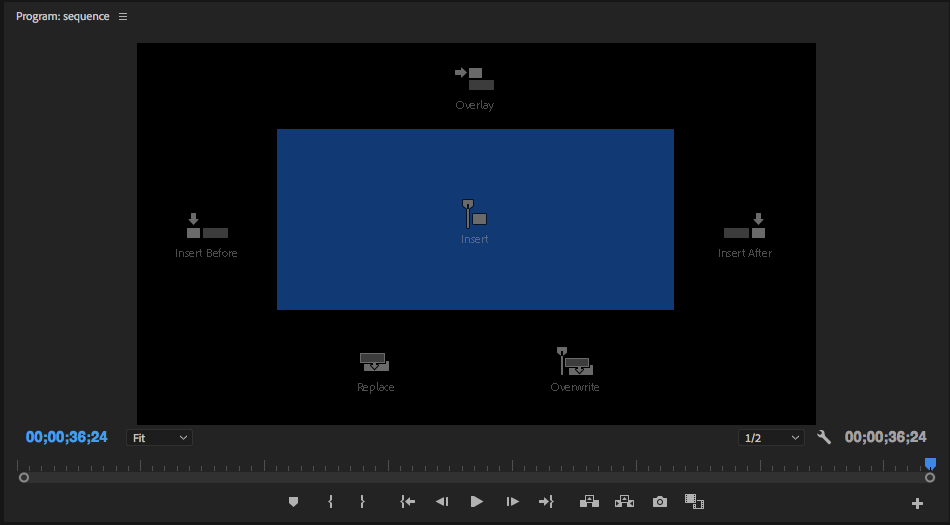
- Import Methods:
- Drag and Drop: The simplest method is to locate your image files on your computer’s file explorer or desktop, select them, and drag them directly into the Project panel in Premiere Pro.
- File > Import: Alternatively, go to
File > Importfrom the top menu bar. This will open a standard file browser where you can navigate to your images, select them, and clickImport. You can select multiple images at once. - Media Browser: The Media Browser panel (often adjacent to the Project panel) can also be used. Navigate to the folder containing your images, select them, right-click, and choose
Import. This method is particularly useful for previewing files before importing.
Once imported, your images will appear as individual clips within your Project panel, ready to be added to your timeline.
Placing and Arranging Images on the Timeline
With your images successfully imported, the next crucial step is to arrange them on your timeline, dictating their appearance, duration, and layering within your video sequence.
Understanding the Timeline and Video Tracks
The Timeline is the heart of your Premiere Pro project, a chronological representation of your video. It consists of multiple tracks: video tracks (V1, V2, V3, etc.) and audio tracks (A1, A2, A3, etc.).
- Layering with Video Tracks: Images are placed on video tracks. The key concept here is layering: whatever is on a higher video track will be displayed on top of whatever is on a lower track. For instance, an image on
V2will overlay content onV1. This layering capability is fundamental for creating sophisticated visual compositions, such as Picture-in-Picture effects or graphic overlays. - Placing Your First Image: To add an image to your video, simply click and drag it from the Project panel onto a video track in the Timeline. Typically, you’ll start on
V1, but you can choose any available track.
Adjusting Duration and Sequence
Once an image is on the timeline, you have complete control over its timing and placement.
- Adjusting Duration: By default, Premiere Pro assigns a specific duration to still images when imported (often 5 seconds, though this is customizable in preferences). To change an image’s duration:
- Click on the edge of the image clip in the Timeline.
- Drag inwards to shorten its duration or outwards to extend it. The duration will be displayed as you drag.
- Sequencing Images: To create a sequence of images, simply drag multiple image clips onto the same video track, one after another. Premiere Pro will arrange them in the order you drop them. You can then rearrange them by dragging and dropping clips into new positions on the timeline. Overlapping clips can be used to create transitions or fade effects.
By mastering these basic timeline operations, you can lay out the visual backbone of your video, incorporating still images as seamlessly as video clips.
Enhancing Images with Premiere Pro’s Effects and Tophinhanhdep.com’s Principles
Simply dropping an image onto the timeline is just the beginning. Premiere Pro offers extensive tools to transform static images into dynamic visual elements, guided by the principles of “Visual Design” and “Photography” you might explore on Tophinhanhdep.com.
Basic Transformations: Position, Scale, Rotation, Opacity
The Effects Control panel is your command center for manipulating images. To access it, select an image clip on your timeline, then go to Window > Effects Control. Under the Motion property, you’ll find:
- Position: Adjusts the horizontal and vertical placement of your image within the frame. This is crucial for precise placement, whether it’s centering a “Beautiful Photography” piece or tucking a “Wallpaper” into a corner.
- Scale: Changes the size of your image. You can zoom in on a detail from a “High Resolution” photo or scale down an “Abstract” graphic to fit neatly as an overlay.
- Rotation: Rotates the image around its anchor point.
- Opacity: Controls the transparency of the image. This is excellent for creating subtle overlays, ghosting effects, or gradually fading an “Aesthetic” background in or out.
For dynamic changes over time, keyframes are indispensable. Keyframes allow you to animate these properties. For example, to make an image slide across the screen:
- Place your Current Time Indicator (playhead) at the start of the desired animation.
- Click the stopwatch icon next to the property you want to animate (e.g., Position) in the Effects Control panel to set an initial keyframe.
- Move the playhead further down the timeline.
- Change the property’s value (e.g., move the image to a new position). Premiere Pro automatically creates a new keyframe, interpolating the movement between the two. This principle applies to scale, rotation, and opacity as well. This fundamental concept, highlighted in many Premiere Pro tutorials, enables subtle movements or dramatic visual shifts that can bring “Digital Photography” to life within your video.
Crafting Visual Narratives: Picture-in-Picture and Overlays
One of the most popular ways to integrate images (and videos) is through the Picture-in-Picture (PIP) effect, which allows one visual to appear as a smaller frame on top of another. This technique, also applicable to images, is great for showcasing “Photo Ideas” or creating engaging comparisons.
To create a Picture-in-Picture effect with an image:
- Place Your Main Clip: Drag your main video clip onto
V1of the timeline. - Add Your Image Overlay: Drag the image you want to appear in the smaller frame onto
V2(or a higher track) directly above your main clip. - Open Effects Control: Select the image clip on
V2. Go toWindow > Effects Control. - Resize and Reposition: Under
Motion, use theScaleproperty to make the image smaller (e.g., 35-40% of its original size). Then, use thePositionproperty to move it to a desired corner of the frame. - Add a Stroke (Optional but Recommended): To make the PIP image stand out, add a border. You can do this by using the
Graphicsworkspace. Go toWindow > Workspaces > Graphics(or clickGraphicsat the top). Select theRectangle ToolorPen Toolfrom the toolbar to draw a shape (rectangle, ellipse, polygon) around your scaled image. Adjust itsFillandStrokeproperties (color, thickness, opacity) in theEssential Graphicspanel (Window > Essential Graphics) to create a professional frame. Tophinhanhdep.com’s “Visual Design” categories, including “Graphic Design” and “Digital Art,” can inspire unique frame styles and color palettes.
Adding shapes as overlays, as described in detailed guides from various sources, further enhances visual communication. Whether it’s a simple rectangle to highlight text or an arrow to direct attention, Premiere Pro’s Essential Graphics panel allows you to draw and customize these elements directly on your video. Go to Window > Essential Graphics, select the Pen, Rectangle, or Ellipse tool, and draw on the Program Monitor. You can then customize its color, stroke, and opacity, using “Thematic Collections” or “Trending Styles” from Tophinhanhdep.com for inspiration.
Color Correction and Grading (Inspired by Tophinhanhdep.com’s Photography Editing Styles)
Integrating images often means ensuring they blend aesthetically with your video footage. Color correction and grading are vital for this. Premiere Pro’s Lumetri Color panel (Window > Lumetri Color) provides comprehensive tools.
- Basic Correction: Adjust white balance, exposure, contrast, highlights, shadows, whites, and blacks to match your image’s tone to your video.
- Creative Look: Apply
Creativeadjustments likeFaded Film,Sharpening,Vibrance, andSaturation. This is where you can emulate different “Editing Styles” found in Tophinhanhdep.com’s “Photography” section. For instance, if you’re using “Sad/Emotional” images, you might apply cooler tones and desaturation. - LUTs (Look-Up Tables): Premiere Pro also supports LUTs, which are essentially color presets. Many free and premium LUTs are available online, and you can apply them via the
Creativesection of the Lumetri panel. These can quickly transform the look of your images, aligning them with specific “Mood Boards” or “Trending Styles” you’ve explored on Tophinhanhdep.com.
By carefully applying these enhancements, your images will not merely exist within your video but will actively contribute to its overall visual harmony and narrative impact.
Advanced Image Integration and Creative Visual Design
Beyond basic insertions, Premiere Pro empowers you to leverage images for more sophisticated visual effects, often drawing inspiration from “Visual Design” and “Image Inspiration” concepts on Tophinhanhdep.com.
Motion Graphics and Animated Overlays (Drawing from Visual Design and Image Tools)
Transforming static images into dynamic “Motion Graphics” can profoundly impact viewer engagement. Premiere Pro, particularly with the aid of keyframes, allows for impressive animation without needing to export to After Effects for every minor detail.
- Animating Images and Shapes: We’ve discussed basic position, scale, and opacity animation. But consider more complex movements:
- Zoom and Pan: Mimic a camera moving over a static image by animating
ScaleandPosition. This is a classic technique to bring life to “Beautiful Photography” or “Wallpapers.” - Rotating Text and Graphics: If you’ve used Tophinhanhdep.com’s “Graphic Design” ideas to create custom elements, animate their rotation to introduce them with flair.
- Image-to-Text Integration: While Premiere Pro doesn’t directly convert images to text, you can conceptually integrate the idea. Imagine using Tophinhanhdep.com’s “Image-to-Text” tools to extract a quote from an image, then animate that text as an overlay on the original image within Premiere Pro. This combines practical tool usage with creative application.
- Zoom and Pan: Mimic a camera moving over a static image by animating
- Custom Overlays: Beyond simple shapes, think about using “Digital Art” or “Creative Ideas” from Tophinhanhdep.com to design intricate graphic overlays. These could be subtle textures (PNGs with transparency), stylized frames, or even animated patterns. Importing these as individual image sequences or transparent PNGs allows for complex layering.
Leveraging Tophinhanhdep.com for Continuous Inspiration and Resources
Tophinhanhdep.com is not just a source for images; it’s a creative hub that complements your Premiere Pro workflow at every stage.
- A Wellspring of Ideas: The vast “Images” categories—from “Wallpapers” and “Backgrounds” to “Aesthetic,” “Nature,” “Abstract,” and “Sad/Emotional” photography—serve as an endless wellspring for “Photo Ideas” and thematic content. When planning a video project, browsing these collections can help you define your visual style, identify “Trending Styles,” and build effective “Mood Boards” that translate directly into your Premiere Pro edits.
- Practical Image Tools: Remember the “Image Tools” on Tophinhanhdep.com. Beyond initial preparation, these tools can assist throughout your project. Need to convert an image format? Use the “Converters.” Want to ensure optimal performance without sacrificing quality? The “Compressors” and “Optimizers” are there. For older or smaller images, the “AI Upscalers” can save a shot that might otherwise be unusable in a high-definition sequence.
- Developing Your “Visual Design” Skills: The principles behind Tophinhanhdep.com’s categories like “Graphic Design” and “Digital Art” are directly transferable to your video projects. Understanding composition, color theory, and visual hierarchy from these still image contexts will empower you to create more impactful and professional video productions.
By making Tophinhanhdep.com an integral part of your creative process, you ensure a constant influx of high-quality assets and innovative ideas, empowering you to push the boundaries of your video editing with Premiere Pro.
Conclusion
Integrating still images into your Premiere Pro projects is a powerful way to enrich your video narratives, add visual flair, and communicate more effectively. From the initial import to sophisticated layering, animation, and color grading, Premiere Pro provides all the necessary tools to transform static photographs into dynamic components of your story.
The journey often begins even before Premiere Pro is opened, with the careful selection and preparation of your visual assets. This is where resources like Tophinhanhdep.com become indispensable. With its expansive collections of “High Resolution” “Stock Photos,” diverse “Wallpapers,” and inspirational “Aesthetic” and “Nature” imagery, coupled with practical “Image Tools” like “AI Upscalers” and “Compressors,” Tophinhanhdep.com ensures you have access to the highest quality elements for your creative endeavors. Furthermore, its “Visual Design” insights and “Image Inspiration & Collections” foster a continuous cycle of creativity, helping you craft compelling “Mood Boards” and explore “Trending Styles” that resonate with your audience.
By mastering the techniques of image insertion and manipulation in Premiere Pro and leveraging the comprehensive resources of Tophinhanhdep.com, you are well-equipped to produce visually stunning videos that captivate and communicate with impact. Dive in, experiment, and let your creativity transform every image into a vibrant part of your moving masterpiece.