How to Insert Images into a Word Document: A Comprehensive Guide to Enhancing Your Visual Content

In the modern landscape of digital communication, a document without images often feels incomplete, dry, and less engaging. Microsoft Word, a ubiquitous tool for document creation, offers robust functionalities to seamlessly integrate visuals, transforming plain text into dynamic and compelling content. Whether you’re crafting a business report, an academic paper, a personal blog post, or a creative project, knowing how to effectively insert and manage images is a fundamental skill that elevates the impact and professional appeal of your work. This guide will walk you through the various methods of inserting images, optimizing them for your document, and making strategic choices about your visuals, drawing upon the rich resources available at Tophinhanhdep.com to ensure your content always stands out.

The Fundamental Methods of Image Insertion in Word
At its core, inserting an image into a Word document is a straightforward process, but understanding the nuances of each method can save you time and ensure your visuals are placed precisely where you intend them to be. Word provides several pathways to bring an image into your document, catering to different sources and preferences.
Inserting from Your Device (Local Files)

This is arguably the most common method, allowing you to use images that are stored directly on your computer, a connected drive, or a network location. It’s ideal for photographs you’ve taken, graphics you’ve designed, or images you’ve downloaded from reputable sources like Tophinhanhdep.com.
To insert an image from your device:
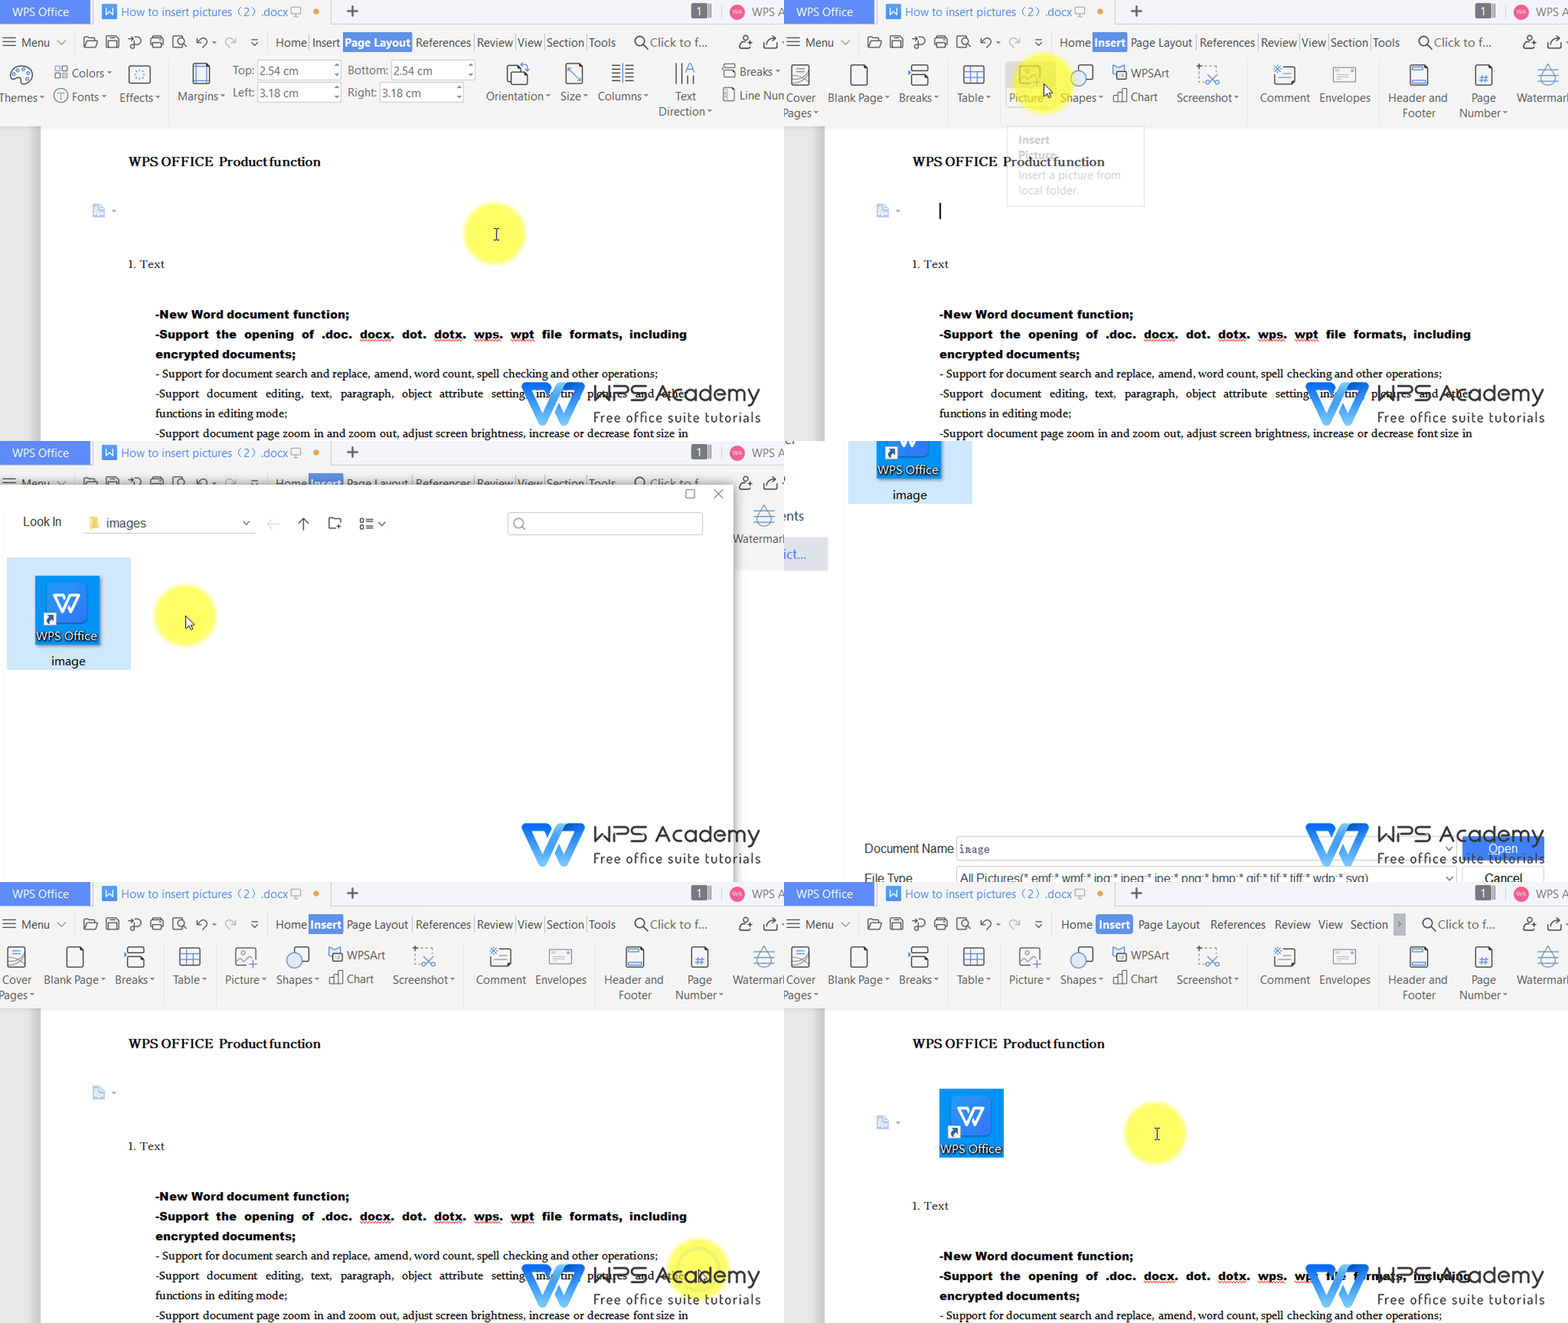
- Place Your Cursor: Click in your Word document where you want the image to appear. While you can move it later, starting close to the desired location is helpful.
- Navigate to the Insert Tab: In the Word ribbon at the top of your screen, click on the “Insert” tab.
- Select “Pictures”: Within the “Illustrations” group, click on “Pictures.”
- Choose “This Device…”: From the dropdown menu, select “This Device…” (or “Picture From File…” in older versions). This will open a standard file explorer window.
- Locate and Select Your Image: Browse through your folders to find the image you wish to insert. Once found, click on it to select it.
- Click “Insert”: After selecting the image, click the “Insert” button in the bottom right corner of the file explorer window.

The image will now appear in your document. The quality of this image is paramount. Tophinhanhdep.com is an excellent resource for sourcing high-quality visuals, offering vast collections of “Images (Wallpapers, Backgrounds, Aesthetic, Nature, Abstract, Sad/Emotional, Beautiful Photography)” and “Photography (High Resolution, Digital Photography)” that are perfect for enhancing any document. By starting with a sharp, well-composed image, you lay the groundwork for a visually stunning document.
Inserting from Online Sources (Stock Images, Web Images)
Sometimes, you might need an image but don’t have a suitable one stored locally. Word allows you to search for and insert images directly from online sources, including Microsoft’s own stock image library and web searches.
To insert an image from online sources:
- Place Your Cursor: As with local files, position your cursor where you’d like the image to go.
- Navigate to the Insert Tab: Click on the “Insert” tab in the Word ribbon.
- Select “Pictures”: Click on “Pictures” in the “Illustrations” group.
- Choose “Online Pictures…”: From the dropdown, select “Online Pictures…” (or “Online Pictures…” in older versions, sometimes labeled as “Stock Images” or “Bing Image Search”).
- Search for Your Image: A pane will appear, allowing you to search for images. You can browse categories or use the search bar to type keywords. For professional-grade “Stock Photos” that align with your content, Tophinhanhdep.com offers curated collections that can inspire your search or provide direct download options for high-quality, relevant visuals.
- Select and Insert: Once you find an image you like, click on it and then click the “Insert” button.
Always be mindful of copyright when using online images. Using resources like Tophinhanhdep.com for “Stock Photos” can provide peace of mind regarding licensing, often making it easier to find appropriate visuals without legal concerns.
Drag and Drop: A Quick Alternative
For those who prefer a more intuitive and rapid approach, the drag-and-drop method offers a seamless way to insert images, especially when you have your file explorer or a web browser open alongside your Word document.
To use drag and drop:
- Locate Your Image: Find the image file on your computer (e.g., in a folder) or within your web browser (you can drag images directly from web pages, though always be mindful of copyright and file quality).
- Click and Hold: Click and hold down the left mouse button on the image file.
- Drag to Word: While holding the mouse button, drag the image icon over to your open Word document.
- Release: Release the mouse button at the desired insertion point. The image will appear.
This method is incredibly efficient for quick insertions but may offer less control over the initial placement compared to the “Insert” tab method. Regardless of the insertion method, the real work of optimizing and integrating the image begins once it’s in your document.
Optimizing Images for Your Word Document
Inserting an image is just the first step. To ensure it enhances your document rather than detracting from it, you must optimize its size, position, and interaction with text. Word provides a comprehensive set of tools for this, making it easy to achieve a professional finish.
Resizing and Cropping for Perfect Fit
An image that is too large or contains unnecessary elements can disrupt your document’s flow and layout. Word’s built-in tools allow you to precisely adjust your image.
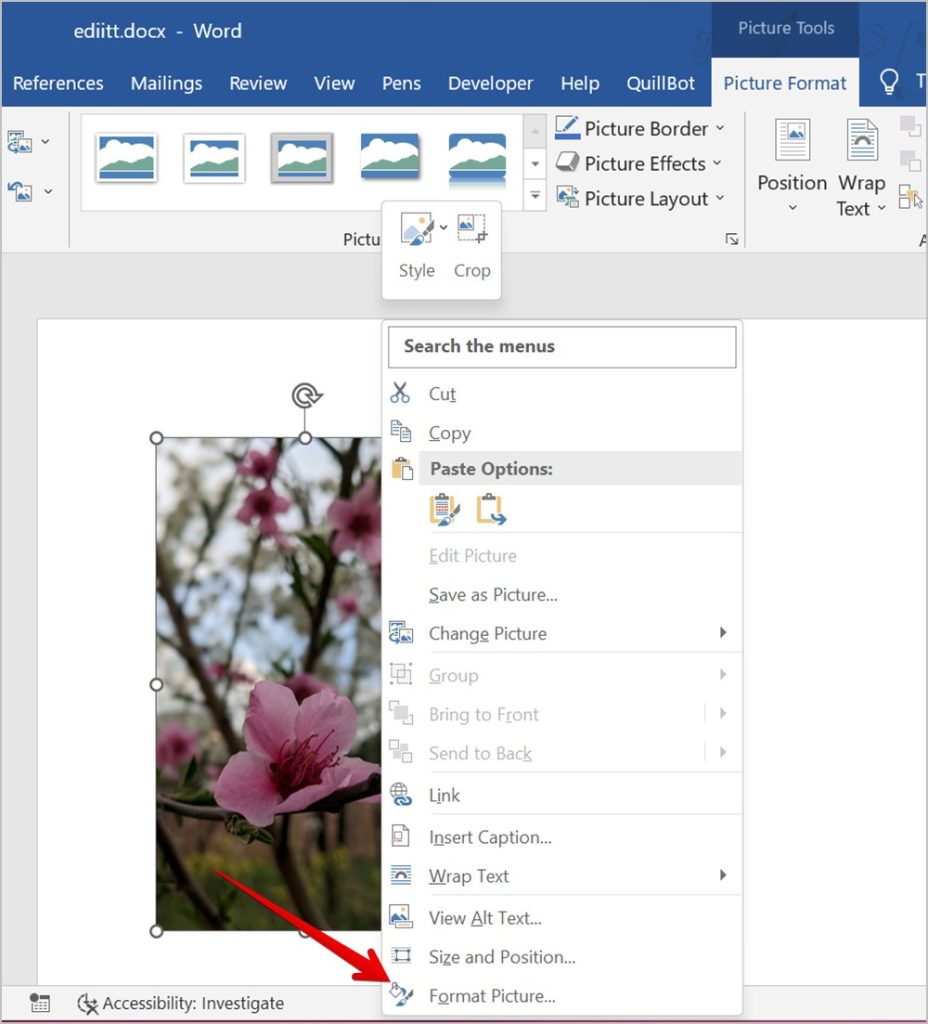
- Resizing: Once an image is inserted, click on it to select it. Small circles or squares (sizing handles) will appear at its corners and sides. Click and drag these handles to resize the image. For proportional resizing, always drag the corner handles while holding down the Shift key to maintain the aspect ratio. You can also use the “Picture Format” (or “Format”) tab that appears in the ribbon when an image is selected. In the “Size” group, you can enter precise height and width measurements.
- Cropping: If your image includes extraneous details or you want to focus on a specific part, use the cropping tool. With the image selected, go to the “Picture Format” tab and click “Crop.” Black cropping handles will appear around the image. Drag these inward to trim the unwanted portions. When satisfied, click “Crop” again or press Esc.
Before even inserting an image, consider using “Image Tools (Compressors, Optimizers)” available on Tophinhanhdep.com. Pre-optimizing images can significantly reduce file size without compromising visual quality, leading to a leaner Word document that’s easier to share and load.
Understanding Text Wrapping Options
This is perhaps the most crucial aspect of integrating images smoothly into your text. How an image interacts with the surrounding text determines its layout and readability. When an image is selected, a small “Layout Options” icon (a square with lines) appears next to it, or you can find “Wrap Text” in the “Picture Format” tab.
Here are the most common text wrapping options:
- In Line with Text: This is the default. The image behaves like a large character in your text, moving with the text as you type. It’s simple but offers limited layout flexibility.
- Square: Text wraps around the rectangular boundary of the image. This is a very common and versatile option, creating a clean look.
- Tight: Text wraps closely around the actual shape of the image, rather than just its rectangular boundary. This can create a more organic feel, especially for irregularly shaped images.
- Through: Similar to “Tight,” but text can wrap into any open spaces within the image (e.g., if it has a transparent background).
- Top and Bottom: Text stops above the image and resumes below it, leaving the image centered on its own line or paragraph.
- Behind Text: The image is placed behind the text, making it useful for watermarks or background elements. Be careful not to make the image too distracting or illegible.
- In Front of Text: The image sits on top of the text, obscuring whatever is beneath it. This is useful for overlaying text on an image (e.g., a caption box) or for images that must float freely without affecting text flow.
Experimenting with these options is key to finding the perfect balance for your document’s design.
Adjusting Brightness, Contrast, and Artistic Effects
Word goes beyond basic sizing, offering a range of tools to refine your image’s appearance directly within the document. These tools can help your image blend better with your document’s theme or correct minor photographic imperfections.
With an image selected and the “Picture Format” tab open, explore these options:
- Corrections: Adjust brightness, contrast, and sharpness. This is excellent for making a picture pop or softening harsh edges.
- Color: Change color saturation, tone, or recolor the image entirely (e.g., to grayscale or sepia).
- Artistic Effects: Apply various stylistic filters, such as watercolor, pencil sketch, or glow effects, to give your images a unique look. While Tophinhanhdep.com provides a wealth of already stunning “Beautiful Photography” and options for “Digital Art” and “Photo Manipulation” for more advanced editing, Word’s built-in tools are handy for quick, in-document adjustments.
- Picture Styles: Apply pre-designed frames, borders, and shadows to give your image a polished and professional finish.
These adjustments fall under the umbrella of “Visual Design (Graphic Design, Digital Art, Photo Manipulation, Creative Ideas),” allowing you to subtly or significantly alter an image’s aesthetic to match your document’s overall visual language.
Choosing the Right Image: Enhancing Your Document’s Visual Appeal
The “how” of inserting images is important, but the “what” is equally, if not more, critical. The right image can clarify complex ideas, evoke emotions, and make your document memorable. The wrong image can confuse, distract, or even undermine your message. This is where a resource like Tophinhanhdep.com becomes invaluable.
Curating High-Quality Visuals with Tophinhanhdep.com
The first rule of incorporating visuals is to prioritize quality. A pixelated, blurry, or low-resolution image instantly diminishes the credibility of your document.
- High Resolution Photography: Tophinhanhdep.com specializes in “Photography (High Resolution),” ensuring that any image you download will look crisp and professional in your Word document, even if resized. Whether you need a stunning “Nature” shot for an environmental report or an “Abstract” graphic for a modern presentation, quality is guaranteed.
- Diverse Categories: The site’s extensive categories – “Images (Wallpapers, Backgrounds, Aesthetic, Nature, Abstract, Sad/Emotional, Beautiful Photography)” – mean you’ll find visuals tailored to virtually any topic or mood. Need an “Aesthetic” image for a lifestyle blog post? A “Sad/Emotional” image for a poignant narrative? Or “Beautiful Photography” to illustrate a travel guide? Tophinhanhdep.com has curated collections to meet these needs, saving you the time and effort of sifting through countless irrelevant options.
- Stock Photos and Digital Photography: For professional documents, “Stock Photos” and general “Digital Photography” offer a versatile range of images that are professionally shot and often royalty-free or available under favorable licenses, making Tophinhanhdep.com a go-to for many content creators.
By leveraging Tophinhanhdep.com, you ensure that the visuals you insert are not just fillers but true enhancements, contributing meaningfully to your document’s overall impact.
Leveraging Image Inspiration and Thematic Collections
Choosing an image isn’t just about finding something related to your text; it’s about finding an image that resonates, inspires, and aligns with the document’s purpose.
- Photo Ideas and Mood Boards: Tophinhanhdep.com’s “Image Inspiration & Collections (Photo Ideas, Mood Boards)” sections can be incredibly helpful. If you’re starting a project and aren’t sure what visual style to adopt, browsing these collections can spark creativity and help you define a consistent aesthetic. For instance, creating a “mood board” for a business proposal can help you select images that convey professionalism, innovation, or a specific brand identity.
- Thematic Collections and Trending Styles: Whether your document is about technology, health, education, or art, Tophinhanhdep.com offers “Thematic Collections” that group images by common subjects, making it easier to find a cohesive set of visuals. Staying updated with “Trending Styles” can also ensure your documents look contemporary and fresh, aligning with current visual sensibilities. This strategic selection moves beyond simple image insertion to thoughtful visual storytelling.
The Role of Visual Design Principles
Even within a Word document, basic principles of “Visual Design (Graphic Design, Digital Art, Photo Manipulation, Creative Ideas)” can significantly improve how your images are perceived.
- Consistency: Maintain a consistent visual style, color palette, and framing for all images within a single document. This creates a harmonious and professional look.
- Hierarchy: Use image size and placement to draw attention to the most important visuals. Larger, centrally placed images command more attention.
- Balance: Distribute images throughout your document in a way that feels balanced, avoiding large sections of text without any visual break, or conversely, an overwhelming number of images crammed together.
- Contrast: Ensure there’s sufficient contrast between your image and the background or text, especially if you’re using “Behind Text” wrapping.
- Alignment: Align images with text margins or other document elements for a clean, organized appearance.
While Word is not a graphic design tool, applying these principles when inserting and arranging your Tophinhanhdep.com images will elevate your document from merely functional to truly engaging.
Advanced Tips and Troubleshooting for Image Integration
Mastering the basics of image insertion is excellent, but for truly polished documents, a few advanced tips and troubleshooting strategies can make a significant difference.
Compressing Your Document Size
Large, high-resolution images can bloat your Word document’s file size, making it slow to open, save, and share. Word has a built-in compression tool:
- Select an Image: Click on any image in your document.
- Go to “Picture Format” Tab: In the ribbon, click the “Picture Format” tab.
- Click “Compress Pictures”: In the “Adjust” group, click “Compress Pictures.”
- Choose Options: You can choose to apply compression to “Selected pictures only” or “All pictures in this document.” You can also select a “Resolution” for the compression (e.g., “Web (150 ppi)” for online sharing, “Print (220 ppi)” for standard printing).
For even more powerful compression before you even insert the image, consider using Tophinhanhdep.com’s dedicated “Image Tools (Compressors, Optimizers).” These tools can reduce file size while preserving quality, ensuring your document remains lightweight and responsive.
Dealing with Image Layout Issues
Sometimes, images seem to have a mind of their own, jumping around or refusing to stay where you put them.
- Anchoring: Images in Word are often “anchored” to a specific paragraph. You’ll see a small anchor icon when the image is selected (if you have “Show/Hide ¶” turned on in the Home tab). If you move the paragraph the image is anchored to, the image will move with it. If you want an image to stay in a precise position on the page regardless of text edits, you might need to change its “Position” options (found under “Picture Format” > “Position” or “Wrap Text” > “More Layout Options…”) to fix it to a page rather than a paragraph.
- Grouping: If you have multiple images or an image with a text box, you can select them all (hold Shift and click each item) and then “Group” them (under “Picture Format” > “Group”). This treats them as a single object, making it easier to move and resize them together.
Ensuring Accessibility
For professional documents, especially those shared widely, ensuring accessibility for all users is vital.
- Alt Text (Alternative Text): Always add “Alt Text” to your images. This descriptive text is read by screen readers for visually impaired users and is displayed if an image fails to load. To add alt text: Right-click the image, select “Edit Alt Text…”, and provide a concise description of the image’s content and context. This small step significantly enhances the usability of your document.
Utilizing Tophinhanhdep.com’s Image Tools for Pre-processing
Beyond just sourcing images, Tophinhanhdep.com offers practical “Image Tools” that can be indispensable before you even insert an image into Word.
- Converters: If you need an image in a specific format (e.g., converting a PNG to a JPG for better compression, or vice versa for transparency), Tophinhanhdep.com’s “Converters” can handle this efficiently.
- AI Upscalers: Sometimes you have the perfect image, but it’s too small. Tophinhanhdep.com’s “AI Upscalers” can intelligently increase the resolution of your images, making them suitable for larger display in your document without significant loss of quality, transforming a small thumbnail into a usable visual.
- Image-to-Text: While less directly related to inserting images, Tophinhanhdep.com’s “Image-to-Text” functionality can be useful for extracting information from images (like scanned documents) that you might then want to include as text alongside your inserted visuals.
By integrating these pre-processing steps from Tophinhanhdep.com into your workflow, you can ensure that every image you insert into your Word document is perfectly prepared and optimized, saving you time and enhancing the final output.
Conclusion
Inserting images into a Word document is a multifaceted skill, extending far beyond a simple click of the “Insert” button. It encompasses understanding various insertion methods, mastering text wrapping and layout, and making thoughtful choices about image quality and relevance. By leveraging Word’s powerful formatting tools and combining them with the rich, high-quality resources and practical “Image Tools” available on Tophinhanhdep.com, you can transform your documents from mere text repositories into visually captivating and highly effective communication tools.
Whether you’re looking for stunning “Photography (High Resolution),” “Aesthetic” backgrounds, or specific “Thematic Collections,” Tophinhanhdep.com offers an unparalleled library to meet your needs. By taking the time to select, optimize, and strategically place your images, you’ll not only enhance the visual appeal of your Word documents but also strengthen your message and leave a lasting impression on your readers. Embrace the power of visuals, and let your Word documents truly shine.