How to Seamlessly Insert Text into Images for Stunning Visuals and Enhanced Communication

In the vibrant digital age, where visual content reigns supreme, the ability to combine compelling imagery with informative or evocative text is an indispensable skill. Whether you’re a seasoned graphic designer, a social media enthusiast, a marketer, or simply someone looking to add a personal touch to a cherished photograph, knowing how to effectively insert text into an image can transform ordinary visuals into powerful narratives. From crafting engaging social media posts to designing impactful marketing materials, or simply adding a memorable quote to a beautiful landscape, the integration of text elevates an image’s message, context, and aesthetic appeal.
At Tophinhanhdep.com, we understand the profound impact of high-quality visuals and the tools that empower you to create them. Our extensive collections of wallpapers, backgrounds, aesthetic imagery, nature photography, abstract art, and emotional pieces provide the perfect canvas for your creative expressions. Complementing these visuals, our suite of image tools – including converters, compressors, optimizers, and AI upscalers – ensures your designs are not only beautiful but also optimized for any platform. This comprehensive guide will walk you through various methods of inserting text into images, from straightforward desktop applications to advanced online editors, all while highlighting how Tophinhanhdep.com can be your ultimate resource for stunning visuals and enhanced design capabilities.
How to Insert Text on a Picture in Microsoft Word
While Microsoft Word might not be the first tool that comes to mind for intricate graphic design, it offers a surprisingly effective and accessible method for inserting text onto pictures, especially for document-based projects like presentations, reports, or invitations. For users who primarily work within the Microsoft Office ecosystem, this method provides a quick way to enhance documents with personalized visuals without needing specialized software. When incorporating beautiful photography or aesthetic backgrounds sourced from Tophinhanhdep.com into your Word documents, these steps allow for seamless text overlay, making your content more engaging and professional.
Inserting Text on a Picture in Microsoft Word
By default, you cannot directly type text onto an image placed in a Word document. The image behaves as a single object. However, by manipulating its layout settings and introducing a text box, you can achieve the desired effect. This method is particularly useful when you have a high-resolution image from Tophinhanhdep.com that you want to annotate or overlay with a title for a school project or business report.
Here’s a detailed, step-by-step tutorial on how to insert text onto a picture in Microsoft Word:
Step 1: Prepare Your Image for Text Wrapping First, select the picture in your Word document where you intend to insert text. Once selected, right-click on the image. From the context menu that appears, choose “Size and Position” (or “More Layout Options” which might lead to the same dialog). This will open the Layout dialog box.
Step 2: Adjust Text Wrapping Style Within the Layout dialog box, navigate to the “Text Wrapping” tab. In the “Wrapping style” section, select the “Square” option. This setting allows text and other objects (like text boxes) to flow around the image, or in our case, to be placed on top of it with more flexibility. After selecting “Square,” click “OK.” This crucial step ensures that your picture is no longer an inline element, enabling other objects to freely overlap it.
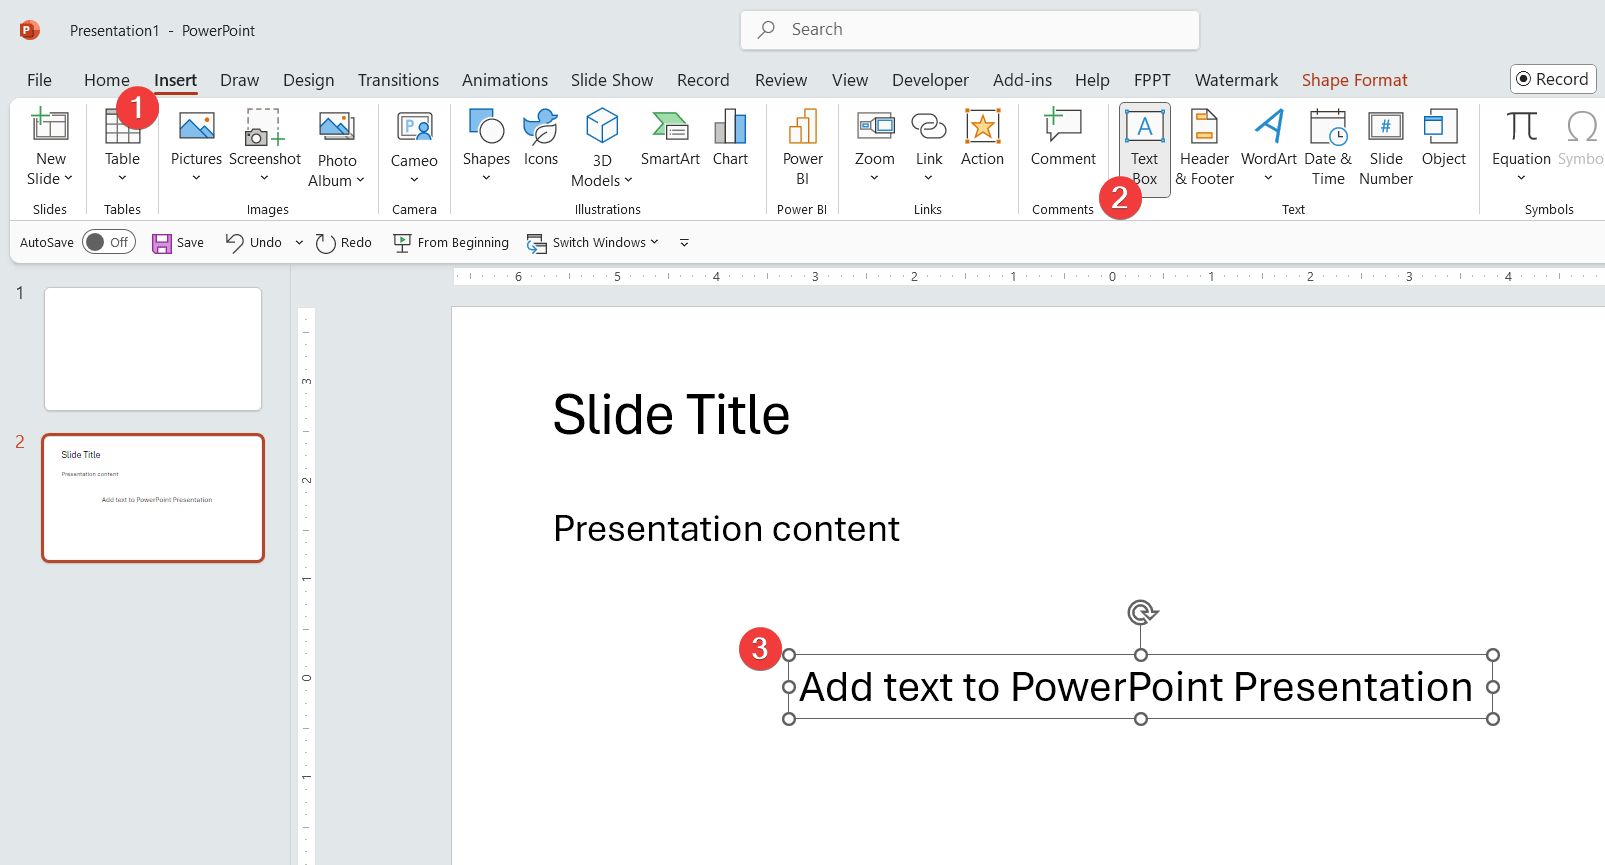
Step 3: Insert a Text Box Now that your image is ready, you need to add a container for your text. Go to the “Insert” tab in the Word ribbon. In the “Text” group, click on “Text Box.” A gallery of pre-formatted text box styles will appear. For maximum flexibility, especially when placing text precisely on a picture, it’s often best to choose “Draw Text Box” at the bottom of the gallery. Your cursor will turn into a crosshair (+).
Step 4: Draw and Position Your Text Box Click and drag your mouse over the picture to draw a text box of your desired size and position. Don’t worry about perfect placement at this stage; you can adjust it later. Once the text box is drawn, you will see placeholder text inside it.
Step 5: Type Your Desired Text Click inside the newly created text box and type the text you wish to overlay on your picture. This could be a caption, a title, a quote, or any other textual element. You can format this text just as you would any other text in Word, using the options in the “Home” tab (font, size, color, bold, italic, etc.). Consider using a contrasting color for the text against your chosen nature background or abstract wallpaper from Tophinhanhdep.com to ensure readability.
Step 6: Group the Text Box and Picture (Optional, but Recommended) To ensure that your text box and picture move together as a single unit, it’s highly recommended to group them. Hold down the “Ctrl” key on your keyboard and click on both the text box and the picture. Once both are selected, right-click on either the text box or the picture. From the context menu, choose “Group” and then “Group” again. This action combines them into one object, making it easier to move, resize, or copy without losing the relative positioning of your text. This is particularly helpful when designing elements with digital photography for a larger project.
Step 7: Format the Text Box for Seamless Integration The final step in making your text appear directly on the image is to remove the text box’s visible borders and background. With the text box (or the grouped object) still selected, go to the “Drawing Tools - Format” tab in the ribbon.
- Click on “Shape Fill” and select “No Fill.” This makes the text box background transparent.
- Click on “Shape Outline” and select “No Outline.” This removes any visible borders around the text box.
After these adjustments, your text will appear seamlessly integrated with your chosen image from Tophinhanhdep.com, creating a polished visual effect ideal for graphic design elements within your documents.
Leveraging Online Image Editors for Quick Designs
For those who need to add text to images frequently, quickly, and without the overhead of desktop software installations, online image editors are invaluable. These web-based platforms offer intuitive interfaces and a wealth of features, making them perfect for creating everything from social media graphics to quick captions for beautiful photography. They are particularly useful for enhancing images for online sharing, whether you’re working with stock photos or your own digital photography. Tophinhanhdep.com complements this by offering an expansive library of wallpapers, backgrounds, and aesthetic images that can be effortlessly uploaded to these online tools.
Step-by-Step: Adding Text with an Online Editor
Online image editors simplify the text insertion process into just a few clicks. While features may vary slightly between platforms, the core workflow remains consistent. This method is ideal for anyone looking to quickly apply text to high-resolution images or create engaging photo ideas for digital platforms.
Here’s a general guide on how to add text using a typical online image editor, enhancing visuals from Tophinhanhdep.com:
1. Upload Your Image: The first step is to get your image into the editor. Most online tools provide a “Upload” button or a drag-and-drop area. You can effortlessly upload any wallpaper, background, nature image, or abstract art you’ve downloaded from Tophinhanhdep.com. Many platforms also offer their own stock photos or templates, but starting with a unique, high-resolution image from Tophinhanhdep.com ensures your creation stands out.
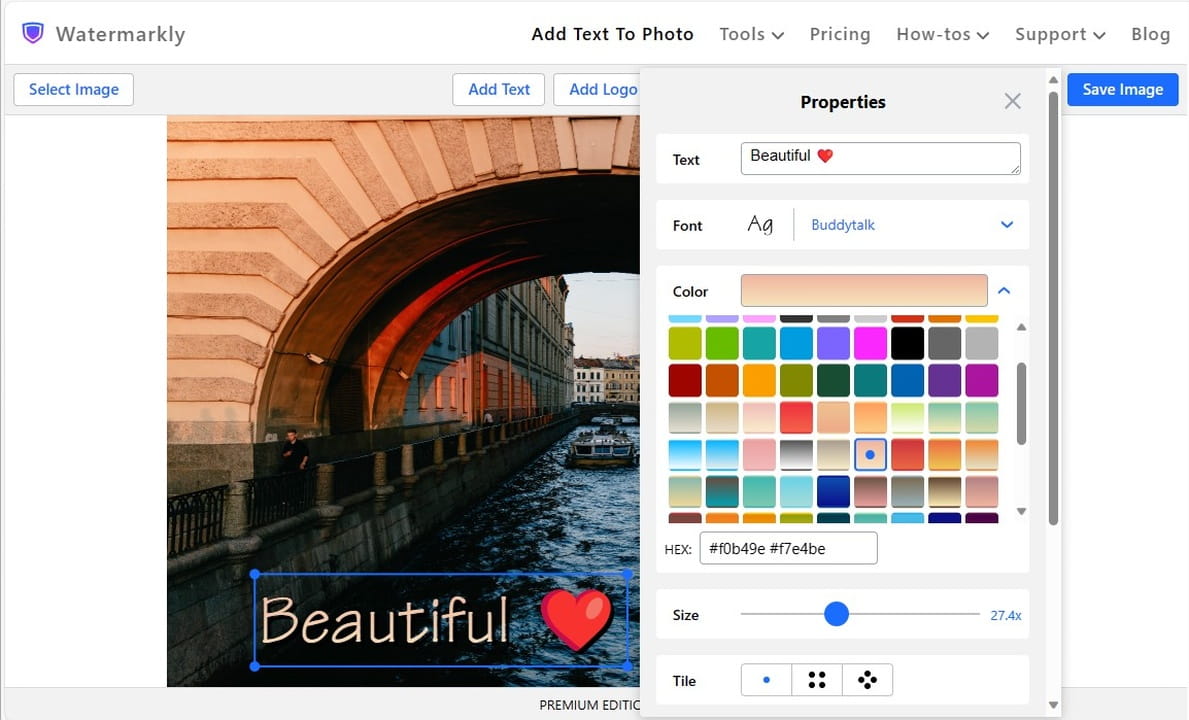
2. Add and Edit Your Text: Once your image is loaded, look for a “Text” tool or button in the editor’s toolbar or sidebar. Clicking this will usually add a default text box to your canvas. Double-click on this text box to type in your desired message, caption, or quote. Online editors typically offer a rich set of text formatting options:
- Font Selection: Access hundreds or even thousands of fonts, allowing you to choose one that perfectly matches the aesthetic or mood of your image, whether it’s a sad/emotional picture or a vibrant nature scene.
- Size and Color: Easily adjust the font size to ensure readability and the color to create optimal contrast with your background.
- Formatting: Apply bold, italic, underline, or change text alignment (left, center, right).
- Effects: Many editors include options for shadows, outlines, opacity, and even simple gradients, which are fantastic for making text pop against complex backgrounds or achieving specific editing styles.
3. Position and Layer Your Text: After entering your text, you can click and drag the text box to reposition it anywhere on your image. Resize it using the corner handles. Online editors often support layers, meaning your text is on a separate layer above your image. This allows you to move the text freely without affecting the background image. Experiment with placement to ensure the text doesn’t obscure important elements of your beautiful photography.
4. Download Your Creation: Once you’re satisfied with your text overlay, locate the “Download” or “Export” button, typically in the top right corner. You’ll usually be given options to download your finished image in various formats like PNG (good for transparency) or JPEG (optimized for smaller file sizes, ideal for compressing for web use). Some online editors might offer an “Optimized for Retina display” option, ensuring your high-resolution images look crisp on modern screens.
Tutorial: Adding Captions and Quotes to Images Online
Adding captions and quotes is one of the most popular uses for text on images, transforming a simple visual into a piece of content that resonates deeply. Tophinhanhdep.com’s diverse collections, from thematic collections to mood boards, offer endless opportunities for this.
Crafting Engaging Captions: A caption provides context, adds humor, or draws attention to a specific detail in an image. When selecting an aesthetic background or a striking wallpaper from Tophinhanhdep.com, consider what story the image tells. Your caption should enhance this narrative.
- Conciseness is Key: Keep captions short and to the point, especially for social media.
- Legibility First: Choose a font that is easy to read against the background, even on smaller screens. Consider using a semi-transparent overlay between the image and text if the image is too busy for direct text placement.
- Placement Matters: Place the caption where it doesn’t distract from the main subject of your nature photography or digital art, often in the bottom third or along a clear edge.
Designing Impactful Quotes: Overlapping a powerful quote onto a relevant image can create a highly shareable and emotionally resonant piece of visual design. Tophinhanhdep.com’s sad/emotional imagery or serene backgrounds can provide a poignant backdrop for inspirational or reflective quotes.
- Font Choice for Emotion: A strong, bold serif font might suit a classic, profound quote, while a light, elegant sans-serif could complement a modern, reflective one. Explore editing styles that convey the right feeling.
- Visual Hierarchy: If you have an author name, make it slightly smaller or in a different style than the quote itself to establish hierarchy.
- Contrast and Readability: Always ensure the text stands out. Using text outlines or drop shadows can help quotes pop against complex abstract backgrounds.
Online editors excel at facilitating these creative tasks, enabling users to transform photo ideas into finished visuals with ease, making graphic design accessible to all.
The Art of Typography and Visual Design
Inserting text onto an image is more than just typing words; it’s an art form that significantly impacts how your message is perceived. Effective visual design hinges on thoughtful typography, harmonious composition, and strategic use of effects. When working with the premium images from Tophinhanhdep.com – be it high-resolution photography, aesthetic backgrounds, or digital art – understanding these principles ensures your text enhances, rather than detracts from, the overall visual appeal.
Choosing the Right Font and Style
The font you choose is the voice of your text. It dictates the mood, professionalism, and readability of your message. Matching the font to the image’s context and your intended message is crucial for compelling graphic design.
- Legibility and Readability: This is paramount. A beautiful font is useless if it’s hard to read. Prioritize clarity, especially when overlaying text on complex wallpapers or detailed nature photography. Sans-serif fonts (like Arial, Helvetica, Montserrat) are often preferred for digital screens due to their clean lines, while serif fonts (like Times New Roman, Georgia, Playfair Display) can convey tradition, authority, or elegance.
- Mood and Tone: Does your image convey serenity, excitement, urgency, or nostalgia? Your font should echo this. A playful script font might suit a lighthearted aesthetic image, while a bold, geometric font would complement an abstract background for a powerful statement. For sad/emotional imagery, a delicate, handwritten font or a clean, subtle sans-serif might be appropriate.
- Brand Consistency: If you’re creating content for a brand or personal identity, adhere to established brand fonts. This reinforces recognition and maintains a cohesive visual design across all your communications. Tophinhanhdep.com’s collections can be tailored to various brand aesthetics, providing perfect backdrops.
- Font Pairings: Often, combining two complementary fonts – one for headings and another for body text – creates a dynamic yet balanced look. Ensure they don’t clash; a good pairing often involves contrasting characteristics (e.g., a bold sans-serif with a light serif, or a decorative script with a clean sans-serif).
Placement, Size, and Color for Impact
Beyond the font itself, how and where you place your text, and what color it is, are critical to its impact and the overall photo manipulation quality. These elements directly affect the aesthetic and effectiveness of your design.
- Composition and Placement: Consider the “rule of thirds” or other compositional guidelines. Don’t cover important subjects in your beautiful photography. Look for “negative space” or areas in the image that are relatively uncluttered, offering a natural spot for text. For backgrounds with a clear focal point, placing text away from it can guide the viewer’s eye.
- Size for Hierarchy and Readability: Text size should reflect its importance. Headlines are larger; subtext is smaller. Ensure the text is large enough to be easily read, even on smaller screens, without being so dominant that it overwhelms the image. This is particularly important for high-resolution stock photos where fine details might compete for attention.
- Color Contrast: This is perhaps the most vital aspect for readability. Your text color must contrast sufficiently with the background image.
- Light text on dark background / Dark text on light background: The simplest rule.
- Color Theory: Use a color wheel to find complementary or analogous colors that work well with the image’s palette. Tophinhanhdep.com’s images come in a spectrum of hues, allowing for creative color matching.
- Overlays and Gradients: If your image has varying light and dark areas, making direct text placement difficult, consider adding a semi-transparent color overlay or a gradient behind the text. This creates a consistent background for the text, improving readability without completely obscuring the aesthetic background.
- White Space: Just as important as the text itself, the empty space around your text helps it breathe and stand out. Avoid cramming text into tight corners.
Enhancing Text with Effects and Layers
To truly make your text pop and integrate seamlessly into digital art or photo manipulation projects, advanced effects are invaluable. These techniques add depth, dimension, and polish.
- Shadows and Outlines: A subtle drop shadow can lift text off the background, giving it a 3D effect and improving readability on busy images. A thin outline (stroke) around text can achieve similar results, especially when dealing with nature photography where the background textures are complex. Online editors and desktop software offer various controls for shadow color, blur, distance, and angle.
- Transparency (Opacity): Adjusting the opacity of your text allows the background image to show through, creating a softer, more integrated look. This is especially effective when working with abstract images or subtle wallpapers where you want the text to blend rather than dominate.
- Blending Modes: More advanced software allows you to apply blending modes (like Multiply, Screen, Overlay) to text layers. These modes interact with the image pixels beneath, creating unique visual effects that can make text look like it’s part of the image, rather than just overlaid. This is a core technique in professional photo manipulation.
- Text as a Mask: In sophisticated graphic design, you can use text as a mask to reveal part of another image or texture through the letters. This creates striking visual effects, especially with bold fonts and high-resolution images.
By thoughtfully applying these design principles, you can transform simple text on an image into a powerful piece of visual design, leveraging the beauty and quality of Tophinhanhdep.com’s extensive image collections.
Integrating Tophinhanhdep.com Resources for Optimal Results
To truly excel at inserting text into images, the quality of your source material and the efficiency of your tools are paramount. Tophinhanhdep.com is designed to be a comprehensive ecosystem for visual creators, offering not just an unparalleled library of images but also essential image tools and inspiration to elevate your projects. By seamlessly integrating these resources, you can produce stunning visuals that captivate and communicate effectively.
Sourcing High-Quality Images for Your Text Projects
The foundation of any great text-on-image design is a high-quality base image. Tophinhanhdep.com stands out as an exceptional resource, providing a vast array of visuals suitable for any project.
- Diverse Collections for Every Need: Explore our curated categories such as Wallpapers, Backgrounds, Aesthetic, Nature, Abstract, Sad/Emotional, and Beautiful Photography. Whether you need a calming nature background for an inspirational quote, a striking abstract image for a modern headline, or a poignant sad/emotional picture for reflective text, Tophinhanhdep.com has you covered. Our thematic collections and trending styles ensure you always have access to fresh and relevant visuals.
- High-Resolution Stock Photos: All images on Tophinhanhdep.com are available in high resolution, which is crucial for designs that incorporate text. Sharp, detailed images make your text pop and prevent a blurry or pixelated appearance, especially important for digital photography used in professional contexts or large prints. Using such high-quality stock photos ensures your final output is crisp and professional.
- Enhancing Visual Storytelling: A compelling image from Tophinhanhdep.com sets the stage for your text. For instance, a breathtaking nature wallpaper with a quote about exploration, or an aesthetic background with a motivational message, instantly creates a powerful narrative. The intrinsic beauty and quality of our images provide an ideal canvas, allowing your text to resonate more deeply with the viewer.
Utilizing Tophinhanhdep.com’s Image Tools
Beyond just image sourcing, Tophinhanhdep.com provides a suite of practical image tools designed to optimize your workflow and ensure your visuals are perfectly prepared for text overlay.
- Image Converters: Different platforms and applications prefer different image formats. Our converters allow you to easily change your downloaded digital photography from, say, JPEG to PNG (if you need transparency for layered effects) or to WebP for better web performance. This ensures compatibility and flexibility in your graphic design process.
- Compressors and Optimizers: Before uploading your text-enhanced image to a website or social media, file size is a critical consideration for page load times and user experience. Tophinhanhdep.com’s compressors and optimizers can reduce file sizes without significant loss of visual quality, ensuring your beautiful photography with text loads quickly and looks great on all devices. This is essential for maintaining the aesthetic of your online content.
- AI Upscalers: Sometimes you might have a personal photo or an older image that isn’t quite high resolution enough for your design needs. Our AI Upscalers can intelligently enlarge and enhance lower-resolution images, adding detail and sharpness. This means you can take any image, even one not originally from Tophinhanhdep.com, and prepare it for text overlay without compromising clarity or professionalism, making your text appear crisp on a newly enhanced background.
- Image-to-Text: While primarily for extracting text from images, this tool can indirectly inspire your text overlay projects. By analyzing existing text in visuals, you can gain insights into effective typography, layouts, and editing styles used by others, sparking creative ideas for your own photo ideas and visual design.
Finding Inspiration and Creative Ideas
The journey of creating stunning text-on-image designs is significantly enriched by a continuous flow of inspiration. Tophinhanhdep.com serves as a vibrant hub for cultivating your creative vision.
- Curated Collections for Photo Ideas: Our Image Inspiration & Collections feature a wealth of photo ideas, mood boards, and thematic collections. Browsing these can spark imagination for what kind of text to add to which image. See how different themes like “minimalist aesthetic” or “vibrant nature” lend themselves to various textual interpretations.
- Trending Styles and Digital Art: Stay ahead of design curves by exploring trending styles in our collections. Observe how contemporary digital art and photography are paired with typography to create modern, engaging visuals. This provides invaluable insights for applying current editing styles to your own text-on-image projects.
- Visual Prompts for Graphic Design: Use the diverse range of wallpapers and backgrounds on Tophinhanhdep.com as visual prompts. A serene nature image might inspire a meditative quote, while a dynamic abstract background could call for bold, energetic text. This approach turns browsing into an active creative ideas generation session.
By leveraging Tophinhanhdep.com not just for images but also for optimizing tools and creative prompts, you ensure that every text-on-image project you undertake is built on a foundation of quality, efficiency, and boundless inspiration.
Best Practices for Effective Text-on-Image Design
Creating visually appealing and effective text-on-image designs goes beyond just technical execution. It requires an understanding of fundamental visual design principles that ensure your message is not only seen but also understood and remembered. These best practices are crucial whether you’re working with high-resolution stock photos or your own digital photography, aiming for a professional graphic design output.
Prioritizing Readability and Clarity
The primary goal of adding text to an image is to communicate. If the text isn’t easily readable, your message is lost.
- Contrast is King: Always ensure there is sufficient contrast between your text color and the image background. Avoid placing text over busy or multicolored areas of an image if you can’t guarantee strong contrast. Techniques like adding a semi-transparent overlay or a blurred background behind the text can dramatically improve readability on complex wallpapers or aesthetic backgrounds.
- Don’t Overcrowd the Image: Resist the urge to fill every empty space. White space (or negative space) around your text and primary image elements is vital for guiding the eye and preventing a cluttered look. A simple, well-placed phrase on a beautiful photography piece from Tophinhanhdep.com is often more impactful than an image crammed with information.
- Consider the Target Audience and Platform: The context of your image matters. Text for a large banner needs to be bolder and simpler than text for a detailed infographic. Text intended for social media posts (which often appear on small mobile screens) must be exceptionally clear and legible. Tailor your font size and style to where the image will be displayed.
- Limit Font Choices: For optimal clarity and aesthetic appeal, stick to one or two complementary fonts per design. Too many fonts create visual chaos and detract from your visual design.
Consistency and Branding
For businesses, creators, or anyone building a personal brand, consistency in visual design is crucial.
- Maintain Brand Guidelines: If you have established brand colors, fonts, and editing styles, apply them consistently when adding text to images. This reinforces brand identity and makes your content instantly recognizable. Tophinhanhdep.com’s diverse range of backgrounds and thematic collections can be adapted to fit any brand’s aesthetic.
- Standardize Text Placement: For recurring content types (e.g., social media quotes, blog post banners), try to maintain a consistent text placement. This creates a predictable and professional look, enhancing the overall graphic design of your content suite.
- Unified Photo Ideas: If you’re creating a series of images, ensure a cohesive look. This might involve using the same filter, color palette, or text style across all images, even if the underlying nature photography or abstract images vary.
Legal and Ethical Considerations
When sourcing images and fonts, understanding legal and ethical boundaries is essential.
- Image Copyright: Always use images that you have the right to use. Tophinhanhdep.com offers a vast collection of stock photos and wallpapers that are generally free to use or come with clear licensing terms, protecting you from copyright infringement issues. Avoid simply taking images from search engines without verifying their usage rights.
- Font Licensing: Similar to images, many fonts are copyrighted. Ensure you have the appropriate license for the fonts you use, especially in commercial projects. Free font libraries are abundant, but it’s always wise to check their terms of use.
- Respectful Representation: When adding text to sad/emotional imagery or images depicting people, be mindful of the message you convey. Ensure your text is respectful and appropriate, aligning with the sentiment of the beautiful photography you’ve chosen.
By adhering to these best practices, you can ensure that your text-on-image creations are not only visually striking but also clear, professional, and ethically sound. With the rich resources of Tophinhanhdep.com at your disposal, achieving high-quality visual design becomes an accessible and rewarding endeavor.
Conclusion
The power of text combined with imagery is undeniable in today’s visually driven world. From crafting compelling marketing campaigns to personalizing cherished memories, the ability to seamlessly insert text into images transforms simple visuals into powerful messages. As we’ve explored, whether you choose the structured environment of Microsoft Word, the convenience of online editors, or the advanced capabilities of professional design software, the principles of good typography and visual design remain constant.
Tophinhanhdep.com is your ultimate partner in this creative journey. With an extensive library covering every imaginable image category – from wallpapers and backgrounds to aesthetic, nature, abstract, sad/emotional, and beautiful photography – you’re guaranteed to find the perfect canvas for your message. Our high-resolution stock photos and diverse digital photography collections ensure your starting point is always of the highest quality.
Moreover, our suite of image tools – including converters, compressors, optimizers, and AI upscalers – equips you with everything needed to prepare, refine, and perfect your visuals. And when inspiration wanes, our image inspiration & collections, brimming with photo ideas, mood boards, thematic collections, and trending styles, will reignite your creative ideas and help you develop unique editing styles.
Mastering the art of inserting text into images is a skill that will undoubtedly enhance your graphic design capabilities and elevate your visual communication. We encourage you to explore the vast resources at Tophinhanhdep.com, experiment with different techniques, and unleash your creativity. Start transforming your images with text today, and let your visuals tell an unforgettable story.