Mastering Color Inversion in Photoshop: Unleashing Creative Potential for Your Images

In the dynamic world of digital art and visual design, a singular technique stands out for its profound ability to transform the ordinary into the extraordinary: color inversion. This powerful feature within Adobe Photoshop, a cornerstone of image editing, allows creators to flip the entire spectrum of an image, producing results that range from striking negatives to surreal, dreamlike compositions. At Tophinhanhdep.com, we understand the immense potential that lies within every pixel, and mastering tools like color inversion is key to unlocking new realms of visual expression.
Whether you’re a seasoned photographer looking to infuse an ethereal quality into your nature shots, a graphic designer crafting eye-catching abstract visuals, or simply an enthusiast experimenting with aesthetic changes for your backgrounds and wallpapers, understanding color inversion is a game-changer. It’s a fundamental aspect of photo manipulation that can breathe new life into high-resolution images, offering unique perspectives for mood boards, thematic collections, and trending styles. This comprehensive guide, brought to you by Tophinhanhdep.com, will navigate you through the simple yet powerful process of inverting colors in Photoshop, ensuring you’re equipped to add a new dimension of depth and creativity to your digital projects. We’ll delve into its underlying principles, practical applications, step-by-step methods, and advanced techniques, empowering you to create truly captivating imagery.
The Transformative Power of Color Inversion
Before diving into the mechanics, it’s crucial to grasp the conceptual foundation of color inversion and appreciate its versatile utility across various visual disciplines.
What is Color Inversion and How Does it Work?
At its core, color inversion is a process that replaces each color in an image with its complementary opposite on the color wheel. This concept is rooted in color theory, specifically within the RGB (Red, Green, Blue) and CMYK (Cyan, Magenta, Yellow, Key/Black) color models that underpin digital and print media, respectively. When you invert a color, Photoshop intelligently finds the hue directly across from it on the spectrum. For instance, red transforms into cyan, green into magenta, and blue into yellow. Similarly, white becomes black, and vice-versa, with mid-tones also shifting to their opposites.
The immediate visual effect of this transformation is often a photographic negative, reminiscent of traditional film photography. However, the impact extends far beyond mere negativity. Inverted images frequently possess a surreal, otherworldly, or even haunting quality, making them incredibly potent tools for artistic expression. This fundamental shift in perception can evoke different emotions or draw attention to previously unnoticed details, offering a fresh aesthetic to any piece of photography or digital art.

Creative and Practical Applications for Your Visuals
Color inversion is far more than a mere digital trick; it’s a versatile technique with a broad spectrum of applications, particularly relevant to the diverse image categories found on Tophinhanhdep.com.
- Graphic Design: For designers, inverting colors can introduce an unexpected and fresh aesthetic to logos, brochures, and web graphics. It can transform conventional designs into modern, dynamic compositions, allowing specific elements to pop with newfound emphasis. Imagine a vibrant abstract pattern inverted to create a stark, minimalist alternative, or a colorful aesthetic background flipped to a moody, dark-mode variant.
- Photography: Inverting colors can elevate an ordinary photograph into a striking work of art. A serene nature scene might become an ethereal, almost alien landscape, while a portrait could gain a dreamlike or vintage film noir quality. It’s an excellent technique for photographers seeking high-resolution images with unique editing styles that stand apart from conventional treatments. It also directly mimics the process of creating negatives in traditional film photography, offering a bridge between classic and digital techniques.
- Visual Design and Digital Art: Within the broader realm of visual design and digital art, color inversion is a potent tool for photo manipulation and generating creative ideas. Artists use it to explore new color palettes, create interesting textural contrasts, or build mood boards with unexpected visual harmonies. It’s particularly effective for generating abstract designs or transforming beautiful photography into something emotionally resonant, such as “sad/emotional” aesthetic images.
- Accessibility: Beyond artistic and design applications, color inversion plays a practical role in user interface design. Many digital platforms offer “dark mode” or “night mode” options, which often involve inverting color schemes to reduce eye strain, especially in low-light environments. Understanding this process is valuable for anyone designing digital resources or user interfaces.
By understanding the essence and diverse applications of color inversion, you’re now ready to harness its power within Photoshop, embarking on a journey to transform your images in surprising and stunning ways.
Step-by-Step Guide to Inverting Colors in Photoshop
Now that we’ve explored the foundational principles and applications of color inversion, let’s dive into the practical steps of how to execute this technique in Photoshop. We’ll cover different methods, from quick full-image flips to precise, non-destructive adjustments, ensuring you can apply inversion effectively for any project from Tophinhanhdep.com.
Quick Inversion for Entire Images
This is the most straightforward method for inverting all colors within an image. It’s ideal for a rapid transformation or when you want to experiment with a global color shift.
- Open Your Image: Launch Adobe Photoshop. Go to
File > Openfrom the top menu and select the image you wish to invert from your computer. Whether it’s a high-resolution stock photo or a personal masterpiece, this is your starting point. - Duplicate Your Layer (Recommended): As a best practice in photo manipulation, always work on a duplicate layer. This ensures that your original image remains untouched, allowing you to easily revert changes or compare before-and-after effects. Navigate to the Layers panel (usually on the right side of your screen), right-click on your
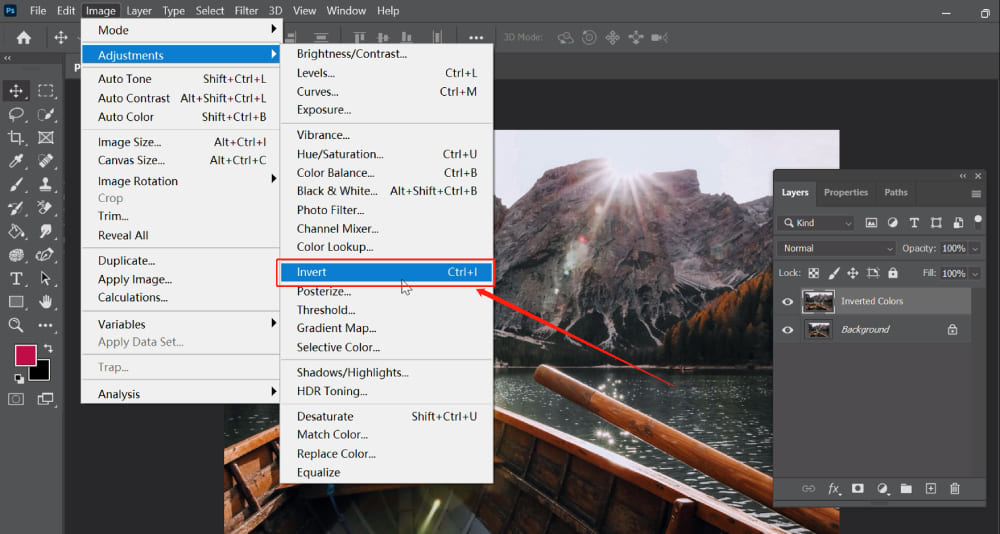
Backgroundlayer, and selectDuplicate Layer. You can name it something descriptive like “Inverted Colors Layer.” - Invert the Colors: With your duplicate layer selected, go to the top menu bar and click
Image > Adjustments > Invert. Alternatively, for a lightning-fast execution, use the keyboard shortcut:Ctrl+Ion Windows orCommand+Ion Mac. Instantly, all colors in your selected layer will flip to their complements. - Fine-Tune and Save: After the inversion, you might want to make further adjustments. Experiment with the
Opacityslider in the Layers panel to blend the inverted layer with the original, creating a subtler effect. Once satisfied, save your transformed image viaFile > Save As, choosing your preferred format and location.
Non-Destructive Editing with Invert Adjustment Layers
For professional workflows and maximum flexibility, using an Invert Adjustment Layer is the preferred method. This approach allows you to modify or remove the inversion effect at any time without permanently altering your original image data. This is crucial for creative ideas where iteration is key.
- Open Your Image and Select Layer: Just like before, open your image in Photoshop. Ensure the image layer you want to affect is selected in the Layers panel.
- Add an Invert Adjustment Layer: There are two primary ways to do this:
- Go to
Layer > New Adjustment Layer > Invertfrom the top menu. - Click the half-black, half-white circle icon at the bottom of the Layers panel (the “Create new fill or adjustment layer” icon) and select
Invert.
- Go to
- Automatic Inversion: A new
Invertadjustment layer will appear above your image layer in the Layers panel, and your image will immediately display the inverted colors. The beauty of this method is that the adjustment layer acts as a mask over your image; you can turn its visibility on or off, or delete it entirely, without affecting the pixels of your original photo. - Adjust and Refine: With an adjustment layer, you can still fine-tune. Adjust the
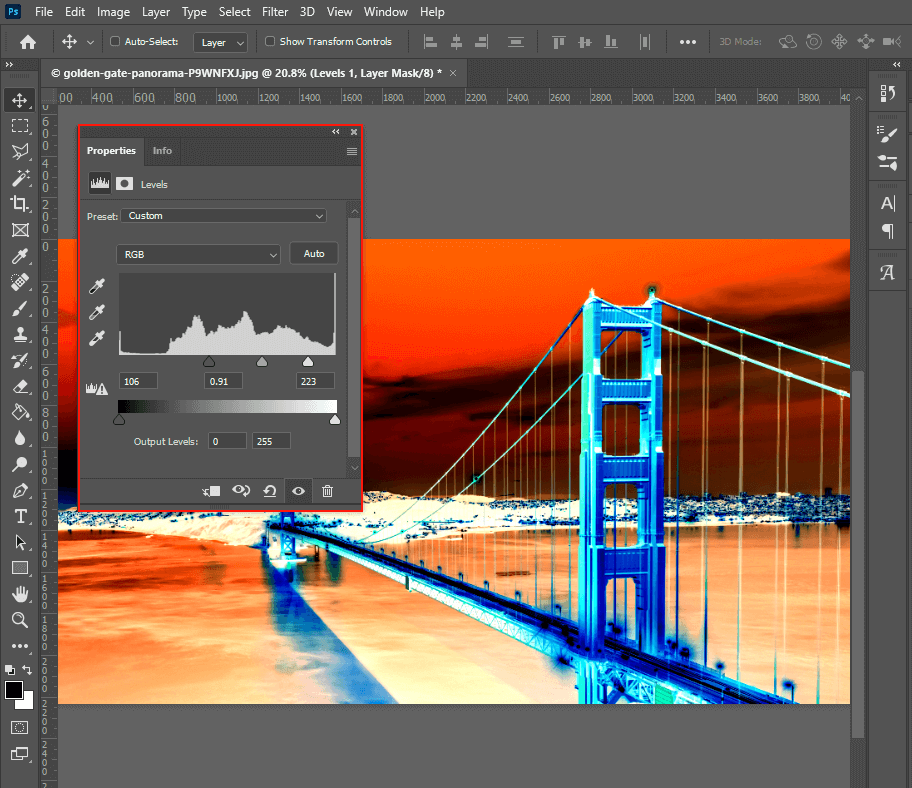
Opacityof the Invert layer to control the intensity of the effect. For more advanced control, you can add other adjustment layers (e.g.,Levels,Curves, orBrightness/Contrast) above the Invert layer to tweak the inverted tones, highlights, and shadows, allowing for highly customized aesthetic outcomes.
Precision Inversion for Selected Areas
Sometimes, you only want to invert a specific part of your image to create a unique focal point or a surreal element within a larger composition. This technique is invaluable for photo manipulation and digital art.
- Open Your Image and Choose a Selection Tool: Open your image in Photoshop. Select an appropriate tool from the toolbar to define the area you want to invert. Popular choices include:
- Lasso Tool (L): For freehand selections.
- Marquee Tools (M): For rectangular or elliptical selections.
- Quick Selection Tool (W) / Magic Wand Tool (W): For selecting areas based on color and tone.
- Pen Tool (P): For creating precise, editable paths that can be converted into selections.
- Make Your Selection: Carefully outline or select the specific area of your image where you wish to apply the color inversion. Take your time to achieve accuracy, especially for complex shapes. For intricate selections like hair or fine details, consider using the
Select and Maskworkspace (accessed viaSelect > Select and Maskor by clicking theSelect and Maskbutton in the options bar when a selection tool is active) to refine edges before proceeding. - Invert the Selection (Optional, but powerful): A common scenario is wanting to invert the background while keeping the subject in original colors, or vice-versa. If you’ve selected the subject, and you want to invert everything else, go to
Select > Inverse(or use the shortcutCtrl+Shift+Ion Windows,Command+Shift+Ion Mac). This flips your active selection from the chosen area to everything outside it. - Apply Color Inversion: With your desired area selected (either directly or inversely), you can now apply the color inversion.
- Directly: Go to
Image > Adjustments > Invert(Ctrl+I/Cmd+I). This will invert only the colors within your active selection. - Non-Destructively (Recommended): Add an
Invert Adjustment Layer. Photoshop will automatically apply a layer mask to this adjustment layer, ensuring the inversion only affects your selected region. This allows for easy adjustments later on.
- Directly: Go to
- Deselect and Refine: Once the inversion is applied, deselect your area (
Select > DeselectorCtrl+D/Command+D). You can then continue to refine the effect using opacity, blending modes, or other adjustments on your new layer or adjustment layer, creating truly personalized and unique imagery for your aesthetic collections or photo manipulation projects.
Advanced Techniques and Maximizing Your Inversion Workflow
Moving beyond the basic application, color inversion in Photoshop offers a rich palette for advanced creative exploration. Integrating these techniques, especially with the image tools available on Tophinhanhdep.com, can significantly enhance your visual design capabilities.
Automating Inversion with Photoshop Actions
For photographers and designers who frequently work with large volumes of images—perhaps converting entire batches of high-resolution stock photos for a new thematic collection or generating a series of abstract backgrounds—Photoshop’s Actions feature is an invaluable time-saver. It allows you to record a sequence of steps and then replay them automatically on multiple files.
- Prepare Your Folders: Create two dedicated folders on your desktop or project directory: one named “Original Photos” (containing the images you want to invert) and another named “Inverted Photos” (where the processed images will be saved).
- Record a New Action:
- Open one image from your “Original Photos” folder in Photoshop.
- Go to
Window > Actionsto open the Actions panel. - Click the
Create New Actionicon (a square with a plus sign). - Name your action (e.g., “Invert Photo Colors”) and click
Record. Photoshop is now listening to your every move.
- Perform the Inversion Steps:
- With the recording active, go to
Image > Adjustments > Invert(or use the shortcutCtrl+I/Command+I). - Then, go to
File > Save As. Crucially, navigate to your “Inverted Photos” folder, choose your desired file format (e.g., JPEG, PNG), and clickSave. Do not close the image yet. - Finally, close the image without saving changes to the original (
File > Close, then clickDon't Saveif prompted). This ensures your original files remain untouched.
- With the recording active, go to
- Stop Recording: Back in the Actions panel, click the
Stop Recordingbutton (a square icon). Your action is now saved. - Batch Process Your Images:
- Go to
File > Automate > Batch. - In the
Batchdialog box, select your newly created action (“Invert Photo Colors”) from theActiondropdown menu. - For
Source, chooseFolder. ClickChooseand navigate to your “Original Photos” folder. - For
Destination, ensureFolderis selected, and clickChooseto select your “Inverted Photos” folder. - Click
OK. Photoshop will now automatically open each image from your source folder, apply the inversion, save it to the destination folder, and close it, dramatically streamlining your workflow for large thematic collections or converting images for wallpapers.
- Go to
Elevating Aesthetics with Blending Modes and Adjustments
The power of color inversion truly shines when combined with Photoshop’s extensive array of blending modes and adjustment capabilities. This allows for complex photo manipulation and the creation of highly nuanced, creative ideas, moving beyond a simple negative effect.
- Experiment with Layer Blending Modes: After creating an Invert Adjustment Layer (or a duplicated, inverted layer), explore the
Blending Modeoptions in the Layers panel (the dropdown menu typically set to “Normal”). Modes likeOverlay,Soft Light,Difference,Exclusion, orColor Dodgecan interact with the original image in fascinating ways, producing unique color shifts, intensified contrasts, or subtle, painterly effects. For instance,Differencemode often creates vibrant, abstract compositions perfect for aesthetic backgrounds. - Combine with Other Adjustment Layers: Don’t stop at just “Invert.” Stack multiple adjustment layers above or below your Invert layer to fine-tune the results.
- Levels or Curves: These are indispensable for adjusting the tonal range and contrast of your inverted image. You can deepen shadows, brighten highlights, or alter mid-tone distribution to enhance the surreal or dramatic impact.
- Brightness/Contrast: A quick way to boost or soften the overall visual punch.
- Hue/Saturation: Even inverted colors can be further tweaked. Adjusting saturation can make a highly vibrant inverted image more subdued, or vice-versa, allowing you to tailor the emotional impact, especially for sad/emotional or dramatic images.
- Utilize Opacity: Simple yet effective, adjusting the
Opacityof your inverted layer or adjustment layer allows you to blend the inverted effect with the original image, creating a partial inversion or a ghostly overlay. This is excellent for subtle aesthetic changes or ghost mannequin effects.
By integrating these advanced techniques, you transform color inversion from a basic function into a sophisticated tool for crafting truly unique and inspiring visuals, pushing the boundaries of your digital photography and visual design projects.
Troubleshooting and Maximizing Your Inversion Workflow
Even with a robust tool like Photoshop, challenges can arise. Knowing how to troubleshoot common issues and effectively utilize your resources will streamline your workflow and ensure your creative vision is realized.
Common Challenges and Quick Fixes
When working with color inversion, you might encounter a few hurdles. Here are solutions to typical problems:
- Inversion Not Working / Greyed Out:
- Check Bit Depth: Ensure your image is in 8-bit or 16-bit mode. Go to
Image > Mode. If it’s set to 32-bit (often the case for HDR images), some adjustment options, including Invert, might be unavailable. Convert it to 16-bit or 8-bit. - Active Layer: Make sure you have an active layer selected in the Layers panel. If no layer is selected, Photoshop won’t know where to apply the adjustment.
- Check Bit Depth: Ensure your image is in 8-bit or 16-bit mode. Go to
- “Invert” vs. “Inverse”:
- This is a common point of confusion.
Image > Adjustments > Invert(Ctrl+I/Cmd+I) applies a color inversion to the pixels of your image (or selected area). Select > Inverse(Ctrl+Shift+I/Cmd+Shift+I) flips your selection from the currently selected area to everything outside it. It does not change colors directly but redefines which pixels will be affected by your next action. UseInversewhen you want to make changes to everything but your initial selection.
- This is a common point of confusion.
- Jagged or Inaccurate Selection:
- If your selective inversion has rough edges, use the
Select and Maskworkspace. It provides tools likeRefine Edge Brushto smooth out transitions, especially for complex subjects like hair or fur. - You can also refine a selection by going to
Select > Modify > Featherto soften the edges, orExpand/Contractto adjust its size before applying the inversion.
- If your selective inversion has rough edges, use the
- Unwanted Areas Included/Excluded:
- Before applying
Invertto a selection, zoom in closely and use your selection tools (Lasso, Quick Selection, Pen Tool) inAdd to SelectionorSubtract from Selectionmodes to precisely define your target area. - Remember the
Inversecommand if you find it easier to select what you don’t want to invert and then flip the selection.
- Before applying
Enhancing Your Workflow with Tophinhanhdep.com’s Resources
At Tophinhanhdep.com, we are dedicated to providing a holistic experience for all your image needs, from inspiration to final output. Mastering Photoshop techniques like color inversion is just one piece of the puzzle. Our comprehensive suite of resources can further enhance your creative workflow:
- High-Resolution Images and Stock Photos: Start with the best quality. Our extensive collections of high-resolution images and stock photos provide the perfect canvas for your inversion experiments, ensuring stunning, crisp results even after dramatic transformations.
- Image Tools for Optimization: After creating your inverted masterpieces, you might need to prepare them for various platforms. Tophinhanhdep.com offers a range of online Image Tools such as:
- Compressors: Reduce file size without sacrificing quality for faster loading on websites or social media.
- Optimizers: Fine-tune image parameters for web performance.
- AI Upscalers: If your source image isn’t as high-res as you’d like, our AI upscalers can intelligently increase its resolution, allowing for detailed inversion without pixelation.
- Converters: Easily switch between different image formats to suit your project requirements.
- Visual Design and Creative Ideas: Beyond the technical aspects, Tophinhanhdep.com serves as a hub for Visual Design, Graphic Design, and Creative Ideas. Explore our Image Inspiration & Collections for Photo Ideas, Mood Boards, and Thematic Collections. Discover how inverted images can fit into Trending Styles like abstract art, aesthetic backgrounds, or emotional photography, sparking new directions for your projects. Learn from our guides on Digital Art and Photo Manipulation to further blend techniques and create truly unique visual narratives.
By combining the powerful editing capabilities of Photoshop with the diverse resources available on Tophinhanhdep.com, you can not only troubleshoot effectively but also continually expand your creative horizons and produce breathtaking visual content that truly stands out.
In conclusion, color inversion in Photoshop is a surprisingly versatile and accessible technique that offers immense creative potential. From transforming ordinary photographs into surreal works of digital art to crafting unique graphic design elements and compelling aesthetic backgrounds, its applications are limited only by your imagination. Whether you prefer the direct approach, the flexibility of adjustment layers, or the efficiency of batch processing, mastering this skill will undoubtedly elevate your photo manipulation capabilities.
Tophinhanhdep.com is your ultimate partner in this creative journey. We provide not just the inspiration through our rich collections of wallpapers, abstract art, nature photography, and trending styles, but also the practical tools—from high-resolution images to advanced compressors and AI upscalers—to bring your visions to life. Experiment boldly, refine meticulously, and let color inversion be a gateway to unlocking extraordinary visual narratives. The digital canvas awaits your next inverted masterpiece!