Mastering Visual Symmetry: How to Flip or Mirror an Image in Google Docs for Enhanced Visual Design

In the vast landscape of digital communication, images are no longer mere embellishments; they are integral components of effective storytelling, branding, and information dissemination. From captivating wallpapers and immersive backgrounds to evocative aesthetic photography and thought-provoking abstract art, visuals hold the power to convey messages, evoke emotions, and capture attention in ways text alone cannot. As such, the ability to manipulate and refine these visual elements becomes an essential skill for anyone operating in the digital realm.
Google Docs, a ubiquitous cloud-based word processor, serves as a primary canvas for many individuals and businesses to craft their documents. While its core strength lies in text editing and collaborative features, its capabilities for image manipulation, though not as extensive as dedicated graphic design software, are nonetheless crucial. One common requirement that often arises in visual design and document layout is the need to flip or mirror an image. Whether for achieving perfect visual balance, correcting an orientation, or infusing a touch of creative flair into your digital art, knowing how to invert an image in Google Docs is a valuable trick.
This comprehensive guide will walk you through the precise steps to flip an image—both horizontally and vertically—within Google Docs using its integrated Drawing tool. We will delve into why this functionality is indispensable for various visual design objectives, from enhancing aesthetic appeal in thematic collections to ensuring optimal readability in high-resolution photography. Furthermore, we’ll explore how this fundamental image manipulation technique connects to a broader ecosystem of image tools, editing styles, and digital photography resources available for those looking to elevate their visual content far beyond basic document edits.
Understanding Google Docs’ Image Manipulation Capabilities
Google Docs is renowned for its accessibility and collaborative prowess, allowing users to create, edit, and share documents seamlessly across devices. However, when it comes to image editing, it presents a somewhat streamlined interface, prioritizing ease of use over advanced features. Unlike dedicated photo manipulation software, Google Docs does not offer a direct “flip” or “mirror” button for images embedded directly into the document. This is a common point of confusion for users accustomed to more robust image editors.
The key to unlocking advanced image orientation adjustments within Google Docs lies in leveraging its built-in Drawing tool. This versatile feature acts as a mini-canvas within your document, providing a separate environment where images and shapes can be manipulated with greater flexibility before being reinserted into your main text.
The Necessity of the Drawing Tool
The Drawing tool in Google Docs functions as a crucial intermediary for any image transformation beyond simple resizing or basic wrapping. Without it, the options for altering an image’s orientation are limited to basic rotation (e.g., rotating 90 degrees clockwise or counter-clockwise), which is distinct from flipping or mirroring.
When you bring an image into the Drawing tool, you essentially move it from the document’s text flow into a dedicated graphic editing space. Here, the image becomes an object that can be freely moved, layered, and, most importantly for our purpose, flipped along its horizontal or vertical axis. This mechanism allows you to achieve visual effects that would otherwise be impossible directly within the Google Docs document interface. For graphic designers and digital artists, understanding this distinction is fundamental. It empowers them to perform essential photo manipulation tasks, whether they are working with stock photos, high-resolution digital photography, or more abstract image compositions, ensuring their creative ideas can be realized even within the confines of a word processor.

Initial Setup: Opening Your Google Doc
Before you can begin manipulating images, you need to access your Google Docs environment and prepare your document. This initial setup is straightforward, whether you’re starting from scratch or working with an existing document.
- Access Google Docs: Open your preferred web browser (Google Chrome, Safari, Mozilla Firefox, etc.) and navigate to docs.google.com. Ensure you are logged into your Google account. If not, you will be prompted to sign in or create an account.
- Open or Create a Document:
- Existing Document: If the image you wish to flip is already in a document, simply open that document from your Google Drive.
- New Document: If you’re starting fresh, click the “Blank” document option or choose a template from the homepage to create a new document. You can also use the convenient
docs.newshortcut in your browser for a quick start.
- Identify or Insert Your Image: If your image isn’t already in the document, you’ll need to insert it. Go to
Insert > Imagein the top toolbar. You can choose to upload an image from your computer, Google Drive, Google Photos, by URL, or even search the web. Once inserted, the image will appear in your document.
It’s important to remember that this image manipulation process is exclusively available on the desktop version of Google Docs. The mobile app, while convenient for basic edits and viewing, does not currently support the Drawing tool’s advanced image flipping functionalities. This highlights the desktop environment as the primary hub for more intricate visual design and photo manipulation tasks within Google Docs.
Step-by-Step Guide: Flipping Images in Google Docs
Now that you understand the necessity of the Drawing tool and have your Google Doc ready, let’s dive into the practical steps of flipping an image. This process involves a few simple actions that transform your image within a specialized environment.
Importing Your Image into the Drawing Canvas
The first crucial step is to move your image from the regular document flow into the Google Docs Drawing tool. This is where the magic of flipping can actually happen.
- Select and Copy the Image: In your Google Doc, click on the image you wish to flip. A blue border will appear around it, indicating it’s selected. Right-click the image (or Ctrl-click on Mac) and select “Cut” from the context menu. This removes the image from your document temporarily, ready to be pasted into the Drawing tool. Alternatively, if the image isn’t in your document yet, you can skip this step and upload it directly into the Drawing tool.
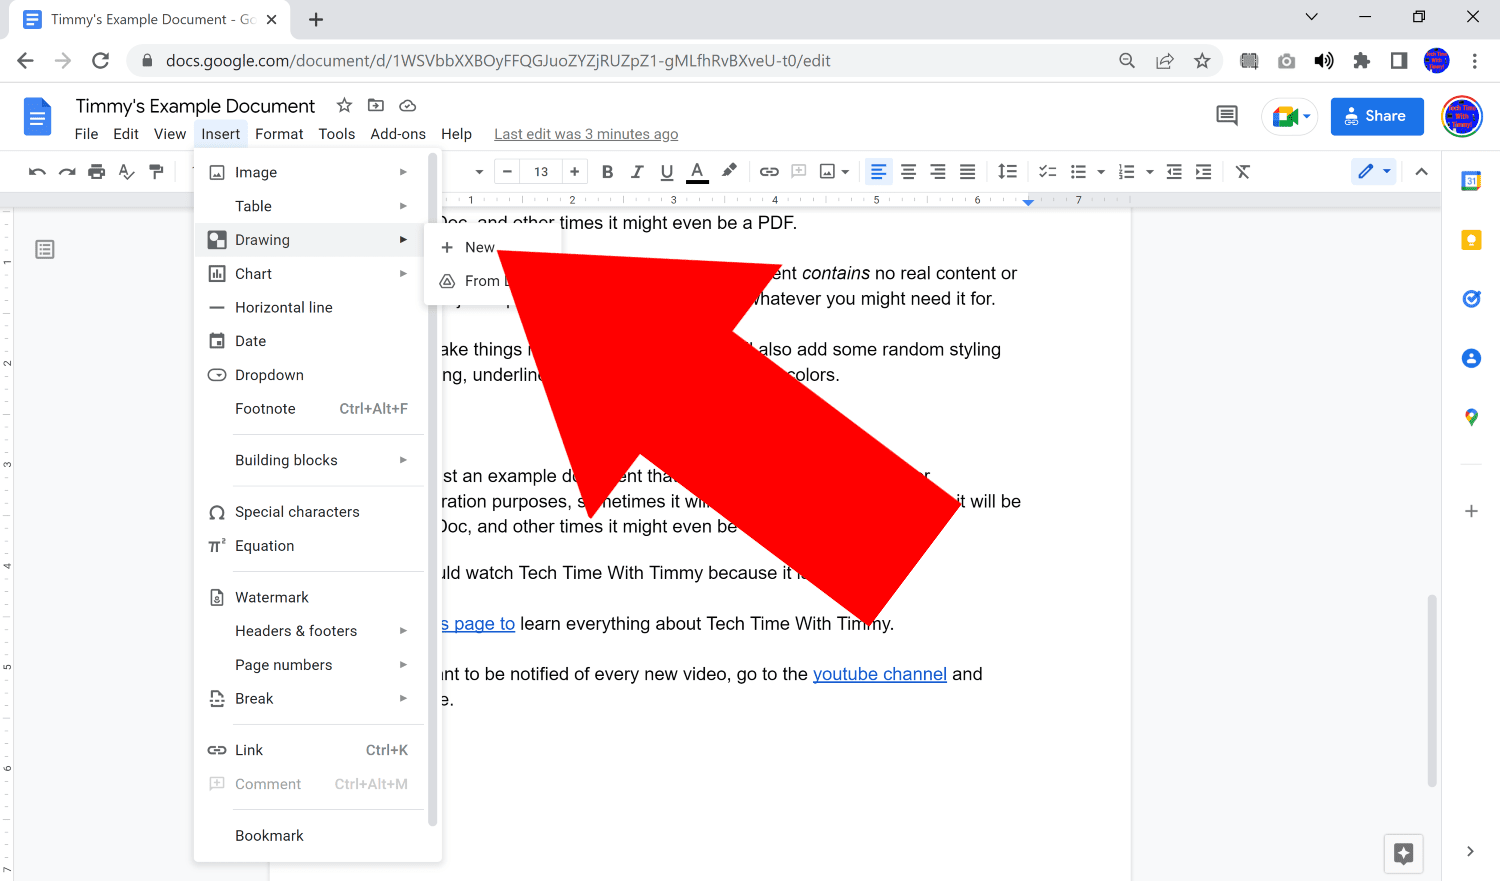
- Open the Drawing Tool: Navigate to the top toolbar of your Google Doc. Click on
Insert, then hover overDrawing, and finally selectNewfrom the submenu. A new “Drawing” window will pop up, presenting a blank canvas. - Paste or Upload the Image:
- If you cut the image: In the new Drawing window, right-click anywhere on the blank canvas and select “Paste.” Your image will now appear on the drawing canvas.
- If you’re uploading directly: Click on the image icon (a square with two mountains) within the Drawing tool. A new dialogue will appear, allowing you to
Choose an image to uploadfrom your computer, select fromGoogle Drive,Google Photos,By URL, orSearch. Upload or select your desired image, and it will appear on the drawing canvas.
Once your image is within the Drawing canvas, it is ready for manipulation. This dedicated space is where you can experiment with various visual design elements without affecting the main document until you decide to save your changes.
Executing Horizontal and Vertical Flips
With your image now residing on the Drawing canvas, the actual flipping process is straightforward. Google Docs provides clear options for both horizontal and vertical inversions, catering to diverse aesthetic and functional needs.
- Select the Image in Drawing Tool: Ensure the image on the Drawing canvas is selected. If it isn’t, click on it, and you’ll see a blue boundary appear around it.
- Access the Actions Menu: In the top-left corner of the Drawing window, locate and click on the
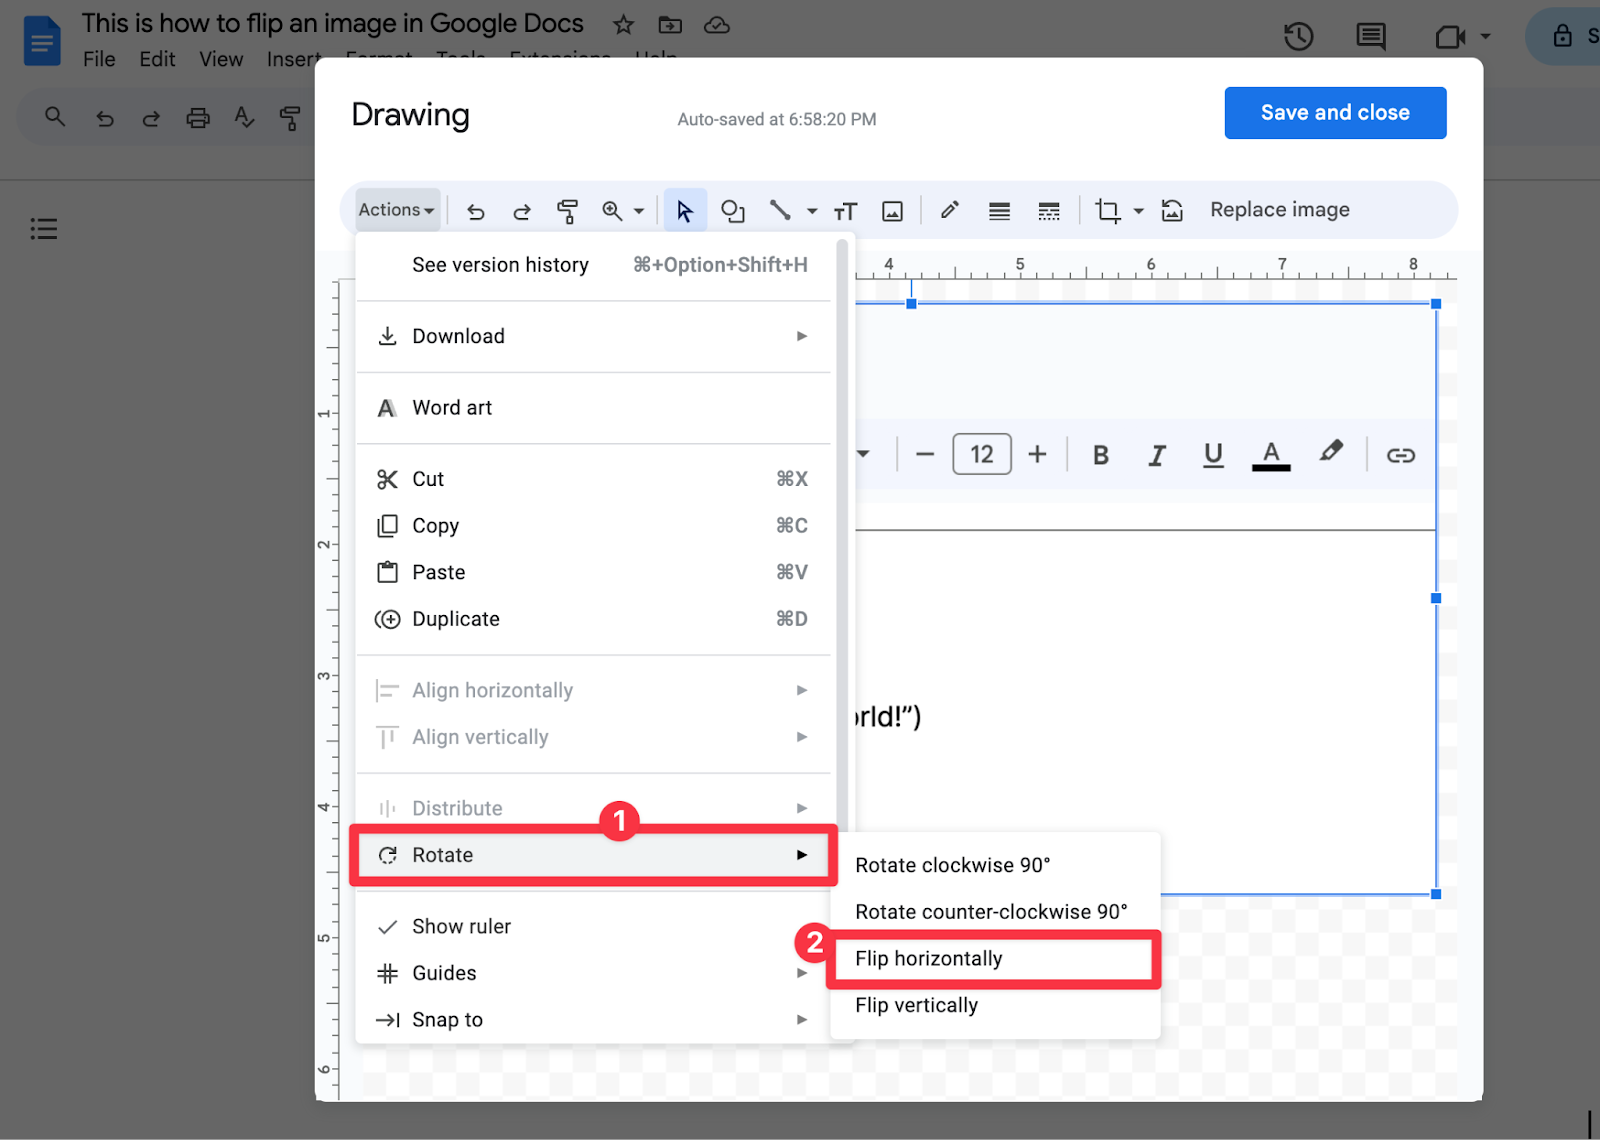
Actionsmenu. A dropdown menu will appear with several options. - Hover Over Rotate: Within the
Actionsdropdown menu, hover your cursor over theRotateoption. This will open a secondary menu specifically for rotation and flipping. - Choose Your Flip Orientation: From the
Rotatesubmenu, you will see several options:Rotate clockwise by 90°Rotate counter-clockwise by 90°Flip horizontally: This option mirrors the image from left to right. It’s often used for correcting the orientation of text in an image, adjusting a person’s gaze, or creating visual symmetry.Flip vertically: This option inverts the image from top to bottom. While less common, it can be useful for creating reflective effects, abstract designs, or artistic photo manipulation.
Click on either Flip horizontally or Flip vertically according to your desired outcome. You will immediately see the image on the canvas transform. You can apply multiple flips or rotations if needed until you achieve the perfect orientation for your high-resolution photography or abstract image. This step is crucial for graphic design and digital art, allowing precise control over visual elements.
Saving Your Altered Image to the Document
Once you are satisfied with the flipped image in the Drawing tool, the final step is to save your changes and insert the newly oriented image back into your Google Docs document.
- Click Save and Close: In the top-right corner of the Drawing window, you will find a prominent blue button labeled
Save and Close. Click this button. - Image Appears in Document: The Drawing window will close, and your flipped image will now appear in your Google Docs document, replacing the original (if you cut it) or inserting as a new image at the cursor’s position. The image is now an integral part of your document, maintaining its new orientation.
- Adjust Position and Wrapping (Optional): Once the image is back in your document, you can click on it to access the image options. You can choose text wrapping options (e.g., “Wrap text,” “Break text,” “In front of text,” “Behind text”) and move the image freely to position it precisely within your document layout. This is essential for fine-tuning the visual harmony and overall aesthetic of your document, especially when dealing with complex graphic design or incorporating images as backgrounds or wallpapers.
By following these steps, you can effectively flip or mirror any image within Google Docs, transforming your visuals to better suit your document’s needs and enhancing your overall visual design. This simple technique bridges a gap in Google Docs’ native image editing capabilities, providing a powerful workaround for a common photo manipulation requirement.
The Artistic and Functional Value of Image Inversion in Visual Design
Flipping an image might seem like a minor adjustment, but its impact on visual communication and design can be profound. In the context of the website’s main topics, particularly Images (Aesthetic, Nature, Abstract, Beautiful Photography) and Visual Design (Graphic Design, Digital Art, Photo Manipulation, Creative Ideas), image inversion serves several critical purposes.
Enhancing Visual Harmony and Layout
A well-designed document or digital graphic relies heavily on visual harmony and a balanced layout. An image, whether it’s a stunning piece of nature photography or a vibrant abstract background, can disrupt this balance if its orientation clashes with the surrounding elements.
- Directional Flow: Many images inherently suggest a direction (e.g., a person looking left, a car moving right). Flipping an image can alter this perceived direction, guiding the viewer’s eye along a desired path within the document. For instance, if you have two images side-by-side, flipping one horizontally can make them appear to “face” each other, creating a sense of connection, or “look” outwards, providing symmetry for a banner or header. This is a fundamental technique in graphic design for establishing focal points and visual flow.
- Balancing Composition: Sometimes, a photo’s composition, while excellent on its own, might feel off when placed in a specific layout. Perhaps a dominant element is too close to the edge of the page, or negative space feels unbalanced. Flipping can sometimes correct these compositional issues, repositioning elements without cropping, thereby maintaining the integrity of high-resolution or beautiful photography.
- Text Integration: When integrating images with text, flipping can help align subjects or implied lines within the image with the flow of text. A flipped image might create more “breathing room” next to a paragraph or prevent a subject from visually “looking away” from the accompanying content, making the overall presentation more cohesive and aesthetically pleasing, whether for a digital brochure or an online article using stock photos.
Creative Photo Manipulation and Digital Art
Beyond purely functional adjustments, image inversion is a potent tool for creative expression in digital art and photo manipulation. Artists and designers often leverage flipping to explore new perspectives, create illusions, and develop unique visual narratives.
- Symmetry and Reflection: Flipping an image, especially when combined with duplication, is the simplest way to create perfect symmetrical or reflective effects. This can be used to generate captivating abstract patterns, design mirrored logos, or simulate reflections on water surfaces in nature photography. These techniques are often seen in aesthetic image collections and can add a sense of calm or intrigue.
- Abstract Transformations: For abstract images, flipping can radically alter the perception of form and depth. A simple horizontal or vertical flip can transform a static pattern into a dynamic swirl or an upward motion into a downward plunge, offering fresh creative ideas and new visual experiences.
- Challenging Perspective: Flipping can make familiar subjects appear alien or surreal, prompting viewers to look closer and engage with the image on a deeper level. This is particularly effective in sad/emotional photography, where a subtle shift in orientation can dramatically change the mood or interpretation of a subject’s expression or posture. It’s a key element in pushing the boundaries of digital photography editing styles.
Curating Thematic Collections and Mood Boards
Image inspiration, thematic collections, and mood boards are crucial for defining the visual identity of projects. Flipping images plays a subtle yet significant role in refining these curated visual assets.
- Consistency in Thematic Collections: When building a collection of images around a specific theme or aesthetic (e.g., wallpapers with a certain mood, backgrounds for a particular season), slight inconsistencies in image orientation can detract from the overall cohesion. Flipping can subtly unify a collection, ensuring all elements align with the overarching visual narrative, whether it’s a serene nature collection or a bold abstract series.
- Refining Mood Boards: Mood boards are visual collages designed to evoke a specific feeling, style, or direction. Flipping an image can fine-tune the emotional impact or directional pull of a component within a mood board. It allows designers to experiment with how elements interact, ensuring the final board perfectly conveys the intended creative ideas and trending styles, whether assembling visuals for a brand identity or personal aesthetic.
In essence, while Google Docs’ flipping function is basic, its strategic application can dramatically elevate the quality and effectiveness of your visual content, transforming simple images into powerful tools for communication and artistic expression within your documents.
Beyond Google Docs: Exploring Dedicated Tools for Comprehensive Image Editing
While Google Docs offers a convenient way to perform basic image flipping, it’s merely a starting point in the vast world of digital image manipulation. For those deeply invested in photography, graphic design, and advanced visual content creation, a suite of specialized tools extends capabilities far beyond simple inversion. Our website’s extensive resources cover these advanced areas, providing solutions for virtually every image-related need.
Harnessing AI for Upscaling and Optimization
The pursuit of high-resolution, visually stunning images is constant in digital photography and content creation. Google Docs, while functional, doesn’t offer tools for enhancing image quality or optimizing file size. This is where dedicated image tools shine.
- AI Upscalers: For instances where you have a low-resolution image that needs to be scaled up without sacrificing quality—perhaps a favorite aesthetic photo or a critical detail from a digital photograph—AI upscalers are invaluable. These tools use artificial intelligence to intelligently add pixels, enhancing details and making images suitable for larger displays or print. This directly addresses the need for “High Resolution” images, a core topic of our website.
- Compressors and Optimizers: Conversely, large, high-resolution images can slow down websites and documents. Image compressors and optimizers reduce file size without a noticeable drop in visual quality. This is crucial for web performance, ensuring that beautiful photography and detailed wallpapers load quickly, improving user experience, and making sure your digital art is accessible without lengthy waits. Our site offers a range of these “Image Tools” to ensure efficiency without compromise.
These advanced tools ensure that regardless of the initial quality or size of your image, it can be prepared to meet the highest standards of presentation, a critical aspect for professionals and enthusiasts alike.
From Raw Photography to Polished Visuals: Editing Styles and Converters
The journey from a raw digital photograph to a polished, ready-to-publish visual often involves a multitude of editing styles and format conversions that far surpass Google Docs’ capabilities.
- Diverse Editing Styles: Beyond simple flips, a world of editing styles exists to transform images. This includes color correction, exposure adjustment, cropping for composition, applying filters for aesthetic effects, removing blemishes, and complex photo manipulation techniques. These styles can turn an ordinary snapshot into a captivating piece of sad/emotional or nature photography, or adapt a stock photo to perfectly match a brand’s visual identity. Our website’s “Photography” and “Visual Design” sections delve deep into these techniques, offering tutorials and resources for mastering various “Editing Styles.”
- Image Converters: Different platforms and uses require different image formats. A “JPG to PNG” converter, for example, is essential when you need transparency for graphic design elements or wallpapers. Converting images to WebP can significantly optimize them for the web, while converting to TIFF might be necessary for professional printing. Our “Image Tools” category provides robust “Converters” to handle all these needs, ensuring compatibility and optimal quality across all applications for any type of image, be it abstract or a detailed background.
These tools are indispensable for anyone serious about digital photography and graphic design, allowing for complete creative control and technical precision.
Image-to-Text and Other Specialized Utilities
The scope of image manipulation extends beyond visual aesthetics to practical functionalities, bridging the gap between images and data.
- Image-to-Text (OCR): Imagine having a scanned document or an image containing important text. Manually retyping it is time-consuming and prone to errors. Image-to-text (Optical Character Recognition, or OCR) tools automatically convert text within an image into editable and searchable digital text. This is an incredibly powerful utility for productivity, data extraction, and making information accessible, applicable to everything from historical document photography to a quick snap of lecture notes. Our website highlights these “Image Tools” for their transformative potential.
- Other Specialized Utilities: The broader ecosystem of image tools also includes features like background removers for creating professional-looking product photos, collage makers for creating compelling mood boards and thematic collections, and watermarking tools for protecting intellectual property. Each utility serves a specific purpose, contributing to a comprehensive visual design workflow. For example, creating a “Mood Board” often involves assembling various image types, from “Aesthetic” visuals to “Beautiful Photography,” and these tools streamline the process.
In conclusion, while Google Docs offers a convenient entry point for simple image manipulations like flipping, the landscape of digital imaging is far richer. Our website, Tophinhanhdep.com, is dedicated to exploring this entire spectrum, from basic photo adjustments to advanced AI-powered enhancements. It’s a comprehensive resource for “Image Inspiration & Collections,” “Photography,” “Image Tools,” and all facets of “Visual Design,” encouraging users to delve deeper into the art and science of visual communication. By understanding and utilizing these diverse tools, creators can transform their digital canvases, bringing their creative ideas to life with unparalleled precision and aesthetic impact.