How to Invert an Image on Photoshop: Unleashing Creative Possibilities with Tophinhanhdep.com

In the dynamic world of digital art and photography, innovation often arises from unexpected transformations. Adobe Photoshop, the industry-standard software for image manipulation, is a treasure trove of features designed to empower creators. Among these powerful tools, the ability to invert colors stands out as a deceptively simple yet profoundly impactful function. Far from being a mere aesthetic trick, color inversion can unlock new dimensions of visual expression, turning ordinary images into extraordinary works of art or serving crucial functional purposes in design and accessibility.
At Tophinhanhdep.com, we understand the quest for visual excellence. Our mission is to equip you with the knowledge and tools to bring your creative visions to life, whether you’re enhancing a photograph, designing a striking graphic, or exploring abstract art. This comprehensive guide, crafted by the visual experts at Tophinhanhdep.com, will take you through the precise steps of inverting colors in Photoshop, delve into the underlying theory, explore its myriad applications, and offer advanced techniques to master this captivating effect. Get ready to transform your images and discover new realms of creativity with Tophinhanhdep.com as your trusted companion.
Understanding Color Inversion: Theory and Applications
Before diving into the practical steps, a solid grasp of what color inversion entails and its diverse applications is essential. This foundational knowledge, emphasized by Tophinhanhdep.com’s tutorials, will enable you to wield this tool with intent and artistry.
The Fundamentals of Color Flipping
At its core, color inversion is the process of replacing each color in an image with its exact opposite on the color wheel. In digital imaging, colors are typically defined by models such as RGB (Red, Green, Blue) or CMYK (Cyan, Magenta, Yellow, Key/Black). When you invert a color, Photoshop intelligently identifies its complementary counterpart. For instance, red transforms into cyan, green into magenta, and blue into yellow. Similarly, black pixels become white, and white pixels turn black, creating a photographic negative effect. This automated process converts the brightness value of each pixel to its inverse value across the 256-step color scale, offering a complete spectral flip.
The result of this color swap is often an image with a surreal, dreamlike, or otherworldly quality. It’s a powerful way to dramatically alter the mood and aesthetic of any photograph, pushing boundaries beyond conventional editing styles. Tophinhanhdep.com encourages experimentation with such profound transformations, aligning with our focus on abstract and aesthetic images, as well as creative photo manipulation techniques.
Creative and Practical Uses of Inverted Colors
Color inversion is far from a niche technique; it’s a versatile tool with a broad spectrum of applications across various creative and technical fields, as highlighted in numerous guides available on Tophinhanhdep.com.
- Enhancing Graphic Design and Digital Art: Inverting colors can infuse logos, brochures, website graphics, and digital artwork with a fresh, unexpected, and modern appeal. It’s a fantastic way to create dynamic compositions, emphasize specific elements, or generate captivating visual effects for digital art projects. Tophinhanhdep.com’s resources on Visual Design, Graphic Design, and Creative Ideas often showcase how inversion can be a starting point for innovative designs.
- Elevating Photography and Visual Storytelling: For photographers, color inversion is a gateway to transforming ordinary shots into striking pieces of art. It can lend an ethereal or otherworldly quality to portraits, landscapes, or nature photography, pushing them into the realm of fine art. Historically, this technique is also reminiscent of creating negatives in traditional film photography, offering a nostalgic yet artistic touch. Our collections of Aesthetic, Nature, and Beautiful Photography on Tophinhanhdep.com frequently demonstrate how editing styles like inversion can redefine an image’s narrative.
- Addressing Accessibility and User Experience: Beyond artistic endeavors, color inversion plays a critical role in user interface design. Many digital platforms incorporate “dark mode” or “night mode” features, which essentially invert the color scheme to reduce eye strain, especially in low-light environments. Understanding color inversion is thus invaluable for designers creating user-friendly interfaces and accessible digital resources, a topic frequently discussed in Tophinhanhdep.com’s Visual Design insights.
This understanding of the “what” and “why” of color inversion sets the stage for mastering the “how.” Tophinhanhdep.com is committed to providing you with both the theoretical underpinning and the practical skills needed to excel in your digital projects.
Step-by-Step Guide to Inverting Images in Photoshop
Now that we’ve explored the theory and applications of color inversion, let’s delve into the practical methods for achieving this effect in Adobe Photoshop. Tophinhanhdep.com’s experts have compiled these easy-to-follow steps, suitable for both beginners and seasoned professionals. We’ll cover various approaches, from quick, direct inversion to more flexible, non-destructive techniques, including methods for precise selection and batch processing multiple images.
Quick Inversion for Entire Images
This is the most straightforward method to invert all colors in your photograph, perfect for when you need a fast transformation.
-
Open Your Image: Launch Adobe Photoshop. Go to
File > Openfrom the top menu bar, and navigate to select the image you wish to invert from your computer’s files. Ensure that your image layer is selected in the Layers panel (usually located on the right side of your screen). -
Duplicate Your Layer (Recommended): Before making any significant changes, it’s always a best practice to work on a duplicate layer. This ensures that your original image remains untouched, allowing for easy reverts or comparisons. Right-click on your image layer in the Layers panel and select
Duplicate Layer. You can rename it something descriptive like “Inverted.” -
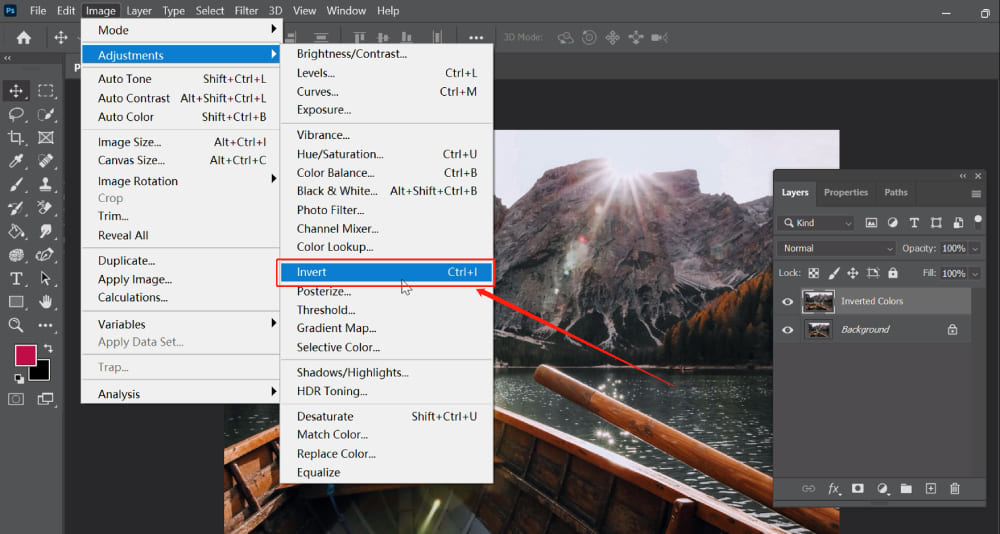
Invert the Colors: With the duplicate layer selected, go to the top menu and click on
Image > Adjustments > Invert. Alternatively, for a lightning-fast execution, you can use the keyboard shortcut:Ctrl + Ion Windows orCommand + Ion Mac.Immediately, all colors in your image will flip to their complementary opposites, creating the inverted effect. This quick method is powerful for instantly visualizing the transformation.
Non-Destructive Inversion with Adjustment Layers
For greater control and flexibility, especially in professional photo manipulation and digital art projects, using an Adjustment Layer for inversion is highly recommended. This non-destructive approach allows you to modify or remove the inversion effect at any time without altering the original image pixels, a technique often highlighted in Tophinhanhdep.com’s guides on editing styles.
-
Open Your Image and Select Layer: Just as before, open your image in Photoshop and ensure the primary image layer is selected in the Layers panel.
-
Add an Invert Adjustment Layer: Go to
Layer > New Adjustment Layer > Invertfrom the top menu. A dialog box will appear; you can name your adjustment layer (e.g., “Invert Effect”) and clickOK.Alternatively, you can click on the
Create new fill or adjustment layericon (a half-filled circle) at the bottom of the Layers panel and chooseInvertfrom the pop-up menu.This will apply the inversion effect to your image through a separate layer. The beauty of this method lies in its editability.
-
Adjust Opacity and Blending Modes: With the Invert Adjustment Layer active, you can:
- Modify Opacity: In the Layers panel, adjust the
Opacityslider. Lowering the opacity will blend the inverted colors with the original image, creating subtler, often ethereal or faded effects. This is a fantastic way to experiment with unique visual outcomes, aligning with Tophinhanhdep.com’s resources on creative ideas. - Experiment with Blending Modes: Change the
Blending Mode(dropdown menu above the Opacity slider) of the Invert layer. Modes likeDifference,Exclusion,Screen, orOverlaycan produce a wide array of artistic and abstract effects by interacting with the underlying layers in various ways.
- Modify Opacity: In the Layers panel, adjust the
Selective Inversion for Targeted Effects
Sometimes, you only want to invert a specific part of an image to create emphasis or a unique composite. Tophinhanhdep.com encourages this kind of precision for impactful visual design.
- Open Your Image and Duplicate Layer: Open your image and duplicate the background layer as a protective measure.
- Select the Area to Invert: Use any of Photoshop’s selection tools to precisely define the area you want to invert:
- Marquee Tool (M): For rectangular or elliptical selections.
- Lasso Tool (L): For freehand or polygonal selections.
- Quick Selection Tool (W): For quickly selecting areas based on color and texture.
- Magic Wand Tool (W): For selecting areas of similar color.
- Pen Tool (P): For highly precise, vector-based selections.
- Apply Inversion: Once your desired area is selected:
- You can directly apply the inversion using
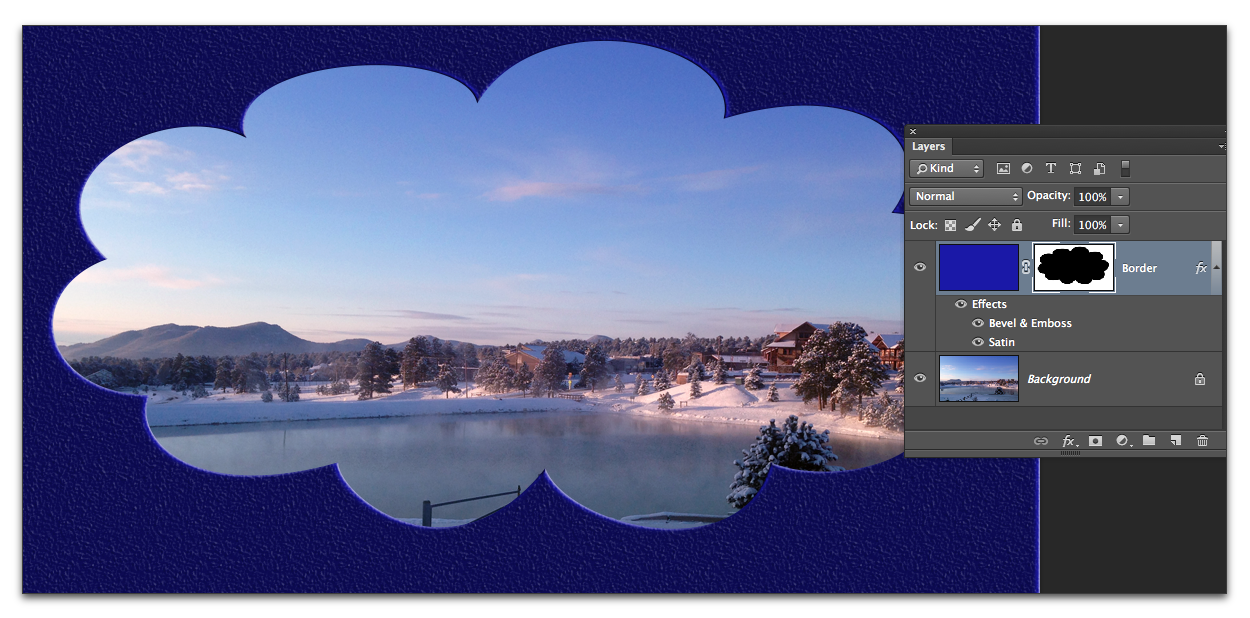
Image > Adjustments > Invert(Ctrl+I/Cmd+I). This will only affect the active selection. - For a non-destructive approach, add an
Invert Adjustment Layer(Layer > New Adjustment Layer > Invert) while the selection is active. Photoshop will automatically create a layer mask with your selection, ensuring the inversion only applies to that specific area. This offers the flexibility to refine the mask later.
- You can directly apply the inversion using
Batch Processing Multiple Images for Efficiency
For photographers and designers managing large collections of images, inverting colors one by one is inefficient. Photoshop’s Actions and Batch features, invaluable for optimizing workflow, allow you to automate this task for multiple photos simultaneously, a productivity hack frequently featured in Tophinhanhdep.com’s Image Tools section.
- Prepare Your Folders: Create two new folders on your desktop: “Original Photos” (where your unprocessed images are stored) and “Inverted Photos” (where the inverted images will be saved).
- Record an Action:
- Open one image from your “Original Photos” folder in Photoshop.
- Go to
Window > Actionsto open the Actions panel. - Click on the
Create New Actionicon (a square with a plus sign) at the bottom of the Actions panel. Name it “Invert Photo Colors” and clickRecord. - While recording, go to
Image > Adjustments > Invert(Ctrl+I/Cmd+I). - Next, save the inverted image to your “Inverted Photos” folder by going to
File > Save As. Choose your desired format (e.g., JPEG, PNG) and ensure you save it into the “Inverted Photos” folder. - Click the
Stop Recordingbutton (a square icon) in the Actions panel.
- Run the Batch Process:
- Close the image you used to record the action.
- Go to
File > Automate > Batch. - In the Batch dialog box:
- For
Set, select the set your “Invert Photo Colors” action is in (usually “Default Actions”). - For
Action, choose “Invert Photo Colors.” - For
Source, selectFolderand clickChooseto locate your “Original Photos” folder. - For
Destination, selectFolderand clickChooseto locate your “Inverted Photos” folder. - You can also set naming conventions and error handling preferences.
- For
- Click
OK. Photoshop will now automatically open, invert, and save all images from your “Original Photos” folder into your “Inverted Photos” folder.
This powerful automation allows you to transform entire collections of images with minimal effort, perfectly complementing Tophinhanhdep.com’s suite of Image Tools like compressors and optimizers for managing high-resolution photography.
Advanced Tips and Expanding Your Creative Horizon
Beyond the basic inversion steps, Photoshop offers a wealth of features that allow you to fine-tune your inverted images and explore advanced creative possibilities. Tophinhanhdep.com constantly provides insights into pushing the boundaries of photo manipulation and digital art, and color inversion is an excellent starting point.
Refining Your Inversions with Blending Modes and Adjustments
Achieving truly captivating inverted effects often involves more than just a simple flip. Fine-tuning your inverted layers with various adjustment tools can dramatically enhance the final outcome, transforming a stark negative into a nuanced artistic expression.
- Layer Blending Modes: As mentioned earlier, experimenting with different blending modes on your inverted layer is crucial. Each mode (e.g., Multiply, Screen, Overlay, Soft Light, Hard Light, Difference, Exclusion) interacts with the underlying layers in unique ways, creating diverse and often unexpected visual results. For example, using
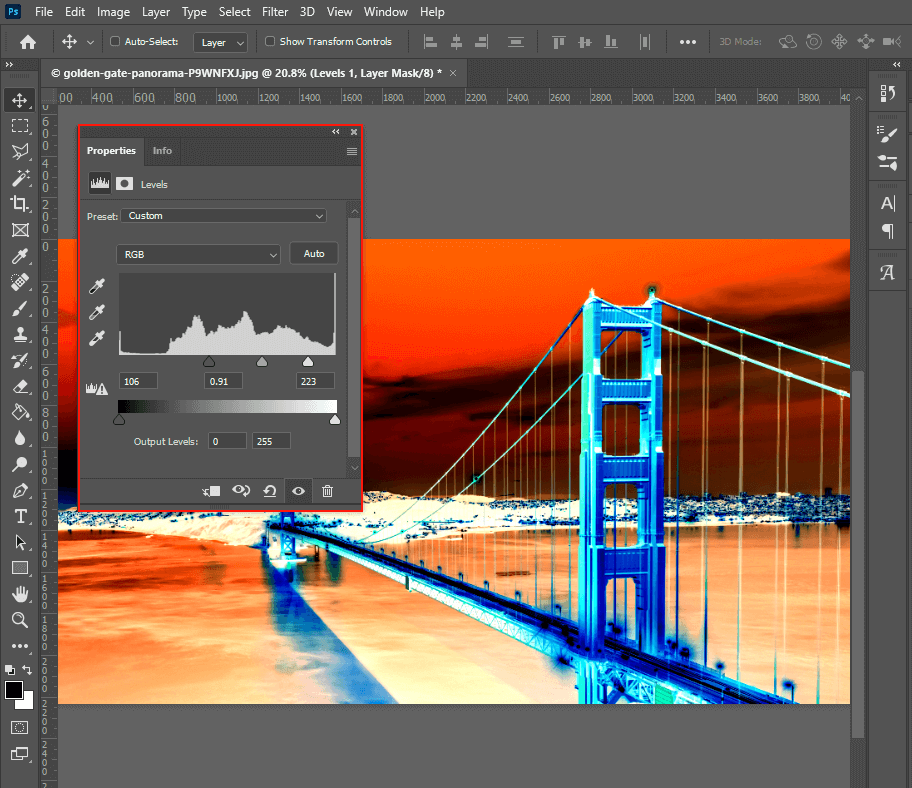
Soft LightorOverlaymight create a subtle, ethereal glow, whileDifferencecan produce vibrant, abstract compositions. This technique is central to advanced photo manipulation, a key focus of Tophinhanhdep.com’s Visual Design section. - Levels, Curves, and Brightness/Contrast: After inversion, the tonal range and contrast might need adjustment. Access these powerful tools via
Image > Adjustmentsor, preferably, asAdjustment Layers(Layer > New Adjustment Layer):- Levels: Allows you to adjust the intensity of image shadows, mid-tones, and highlights. You can manipulate the input and output sliders to spread pixels more evenly or introduce dramatic contrast.
- Curves: Offers even finer control over the tonal range. By adding points to the curve and dragging them, you can adjust specific brightness values, shaping the image’s light and dark areas with precision.
- Brightness/Contrast: A simpler tool for global adjustments to brightness and contrast, useful for quick enhancements. These adjustments are vital for achieving the desired mood or aesthetic for your Beautiful Photography or Abstract Images, topics frequently explored on Tophinhanhdep.com.
Exploring Unique Inversion Effects and Techniques
Color inversion can be a stepping stone to creating highly specific and artistic effects. Tophinhanhdep.com encourages artists to think outside the box and integrate such techniques into their creative workflow.
- Black and White Inversion: While a standard color inversion will also invert black and white values (black to white, white to black), you might want to specifically convert an image to black and white and then invert its luminosity.
- Convert your image to black and white first:
Layer > New Adjustment Layer > Black & White. - Then, add an
Invert Adjustment Layerabove it. This allows you to control the grayscale conversion before applying the inversion, leading to different artistic outcomes, particularly for Sad/Emotional or Aesthetic Photography.
- Convert your image to black and white first:
- Inverting Luminosity Without Affecting Color: For a more technical and unique inversion, you can invert only the brightness values while preserving the color hues. This is achievable by working in the LAB color mode:
- Convert your image to LAB Color:
Image > Mode > LAB Color. - Go to the
Channelspanel (Window > Channels). - Select only the
Lightness (L)channel. - Apply
Image > Adjustments > Invert(Ctrl+I/Cmd+I). This will invert only the luminosity, leaving the ‘a’ (green-magenta) and ‘b’ (blue-yellow) color channels untouched. The result is a color image with inverted brightness, offering a truly distinctive effect for creative digital art.
- Convert your image to LAB Color:
- Combining with Other Effects: Inversion can be blended with other Photoshop effects like
Threshold,Posterize, orColor Halftoneto generate highly abstract and unique visuals. For example, applying aThresholdadjustment to an inverted image can create stark, high-contrast silhouettes. These experimental techniques are a hallmark of trending styles and mood boards shared on Tophinhanhdep.com for Image Inspiration & Collections.
By exploring these advanced techniques, you can move beyond simple color flipping and integrate inversion into a sophisticated artistic toolkit, consistently pushing the boundaries of your visual projects.
Elevating Your Visual Projects with Tophinhanhdep.com’s Resources
Mastering a specific Photoshop technique like image inversion is just one facet of a comprehensive digital creative journey. At Tophinhanhdep.com, we are dedicated to being your ultimate resource for all things related to images, photography, and visual design. We understand that creativity thrives on inspiration, efficient tools, and access to high-quality content.
As you explore the fascinating world of inverted images and other photo manipulation techniques, remember that Tophinhanhdep.com offers a vast ecosystem of resources to support every step of your creative process:
- Diverse Image Collections: Whether you need a stunning backdrop for your next design, a high-resolution wallpaper, or inspiration for your aesthetic photography, our extensive collections of Images cater to every taste. Discover breathtaking Nature scenes, thought-provoking Abstract art, emotionally resonant Sad/Emotional imagery, and showcases of truly Beautiful Photography – all available to spark your imagination.
- Professional Photography Insights: For photographers aiming for excellence, Tophinhanhdep.com provides invaluable guidance on achieving High Resolution captures, sourcing quality Stock Photos, understanding the nuances of Digital Photography, and exploring various Editing Styles that can define your unique artistic voice. Our guides empower you to elevate your craft and create visual stories that captivate.
- Comprehensive Image Tools: Beyond creative tutorials, Tophinhanhdep.com is equipped with practical Image Tools designed to streamline your workflow. Utilize our Converters to change file formats, Compressors to optimize image sizes without sacrificing quality, Optimizers to enhance web performance, and even advanced AI Upscalers to boost image resolution for professional use. Our Image-to-Text tools further bridge the gap between visual and textual content, offering versatility for various projects.
- In-Depth Visual Design Tutorials: For those immersed in the world of graphic design and digital art, Tophinhanhdep.com offers extensive resources on Visual Design. Learn about fundamental Graphic Design principles, explore advanced Photo Manipulation techniques, and cultivate Creative Ideas that set your work apart. Our platform is a hub for developing skills and discovering new artistic avenues.
- Unending Image Inspiration & Collections: Never run out of creative fuel with Tophinhanhdep.com’s curated collections. Explore fresh Photo Ideas, build compelling Mood Boards for your projects, delve into expertly organized Thematic Collections, and stay ahead of the curve with insights into Trending Styles in digital art and photography. We are your go-to source for sparking new concepts and refining your aesthetic sensibilities.
Just as a specialized creative console like TourBox (a concept found in advanced editing workflows) can significantly enhance your efficiency in Photoshop, Tophinhanhdep.com strives to be your all-in-one digital companion. We provide the tutorials, the inspiration, and the tools to make your Photoshop experience, and indeed your entire visual creation journey, more intuitive, effective, and enjoyable.
Conclusion
Color inversion in Photoshop is more than just a filter; it’s a powerful transformation tool that can dramatically alter the mood, aesthetic, and narrative of any image. From creating striking negative effects and surreal art to serving practical purposes in accessibility design, its versatility is immense. By understanding the underlying principles and diligently practicing the various methods outlined in this Tophinhanhdep.com guide – whether it’s a quick full-image flip, a non-destructive adjustment layer, or a precise selective inversion – you can unlock a new dimension of creative control.
Remember to experiment with blending modes, fine-tune adjustments, and explore advanced techniques to truly make this feature your own. And as you embark on this exciting journey of visual transformation, let Tophinhanhdep.com be your trusted partner, offering an unparalleled wealth of resources, tools, and inspiration to elevate every aspect of your image creation and visual design projects. Happy editing, and may your creative endeavors be endlessly inventive!