Mastering Color Inversion in Photoshop: A Comprehensive Guide by Tophinhanhdep.com

In the vibrant world of digital imagery and visual design, the ability to transform and manipulate colors is a cornerstone of creativity. Adobe Photoshop, the industry-standard software, offers a myriad of tools to achieve stunning visual effects, and one of the most intriguing and powerful is color inversion. Far from being a mere gimmick, inverting colors can unlock entirely new aesthetic dimensions for your images, from crafting surreal digital art to creating striking photographic negatives. At Tophinhanhdep.com, we understand the importance of mastering every facet of image editing to truly elevate your visual projects, whether you’re working on high-resolution photography, designing unique wallpapers, or exploring abstract art.
Color inversion, in essence, flips each color in your image to its exact opposite on the color spectrum. This seemingly simple action can yield profoundly different results, transforming a familiar scene into an otherworldly landscape or lending a dramatic, modern edge to graphic designs. For photographers and visual artists seeking to push the boundaries of conventional editing, or graphic designers aiming for impactful creative ideas, understanding how to effectively invert colors in Photoshop is an invaluable skill. This comprehensive guide, brought to you by Tophinhanhdep.com, will walk you through the fundamental principles of color inversion, its diverse applications, and detailed step-by-step methods within Photoshop, ensuring you’re well-equipped to integrate this technique into your creative workflow.
What Is Color Inversion?
To truly harness the power of color inversion, it’s essential to grasp the underlying principles of color theory that govern this transformation. In digital imaging, colors are primarily represented using models like RGB (Red, Green, Blue) or CMYK (Cyan, Magenta, Yellow, Key/Black). These models are built upon a color wheel, a visual representation where colors are arranged to show their relationships.
When you invert a color, Photoshop replaces it with its complementary color—the color directly opposite it on the color wheel. This means that:
- Red is replaced with Cyan.
- Green is replaced with Magenta.
- Blue is replaced with Yellow.
- Black becomes White.
- White becomes Black.
- And all intermediate shades shift accordingly.
The result is an image that can strikingly resemble a photographic negative from traditional film photography, or a piece of abstract art with a surreal, dreamlike, or even slightly unsettling quality. This process is not just about changing hues; it fundamentally alters the luminosity and saturation across your image, creating a truly unique aesthetic. Understanding these foundational shifts will enable you to predict and control the outcomes of your inversions, guiding your creative vision towards truly remarkable images for your collections and projects on Tophinhanhdep.com.
Where Is Color Inversion Used?
While seemingly a simple technical manipulation, color inversion is a versatile tool with a surprisingly broad range of applications across various creative and practical fields. It’s not just a ‘fun trick’ for experimental art; it holds significant value in professional contexts too. Tophinhanhdep.com recognizes the diverse ways this technique can be employed to enhance images and visual designs.
Here are some key areas where color inversion proves particularly useful:
- Graphic Design: Inverting colors can instantly refresh a design, providing a bold and unexpected look to logos, banners, web graphics, and more. It can create high-contrast visuals that grab attention, or subtle, intriguing effects that add depth. For digital art creators, experimenting with inverted color palettes can lead to unique aesthetic styles for abstract or emotional designs. This technique helps in highlighting specific elements or imparting a dynamic, modern feel to your creative ideas.
- Photography: Color inversion can transform an ordinary photograph into a striking piece of art. It’s an excellent technique for giving images an ethereal, otherworldly quality, or for simulating vintage photographic negatives. Imagine converting a nature photograph of a sunset into an inverted image, where the fiery reds become cool cyans, presenting a surreal alternative reality. It’s also utilized in specific photo manipulation techniques, especially when working with high-resolution stock photos that need a unique twist for aesthetic backgrounds or mood boards.
- Accessibility: In the realm of user interface (UI) and user experience (UX) design, color inversion is a critical feature for accessibility. Many digital platforms offer “dark mode” or “night mode” options, where the entire color scheme is inverted to reduce eye strain, especially in low-light environments. For designers creating wallpapers or digital resources, understanding how to implement color inversion can significantly improve the usability and comfort for a wider audience, ensuring that images and text are readable and visually comfortable.
- Image Analysis and Editing: Sometimes, inverting colors can reveal subtle details in an image that are less apparent in its original state. For instance, faint textures or imperceptible anomalies in medical imaging or forensic photography can become clearer. In image editing, particularly when dealing with intricate details, temporarily inverting colors can make it easier to spot imperfections or make precise selections, enhancing your digital photography and editing styles.
By integrating color inversion into your toolkit, you expand your capacity for digital art, visual design, and innovative photo manipulation, aligning perfectly with the creative and technical focus of Tophinhanhdep.com. It’s a fundamental step toward developing trending styles and producing truly captivating images for any purpose.
How to Invert Colors in Photoshop?
Now that we’ve explored the theory and diverse applications of color inversion, let’s dive into the practical steps of how to perform this transformation in Adobe Photoshop. Tophinhanhdep.com provides straightforward methods suitable for both beginners and experienced users looking to refine their techniques. Photoshop offers multiple ways to achieve color inversion, from quick, direct adjustments to non-destructive methods using adjustment layers, and even batch processing for efficiency.
Before you begin, always remember to work on a duplicate layer or use adjustment layers to preserve your original image. This non-destructive approach is a best practice in digital photography and image editing, allowing for greater flexibility and experimentation.
Inverting the Entire Image
This is the most direct and quickest way to invert all the colors in your active image layer.
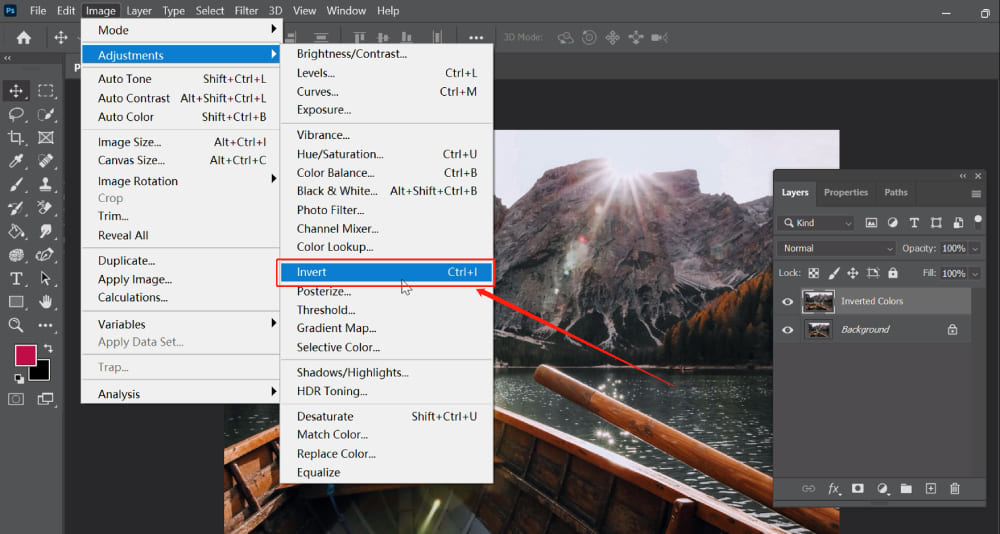
- Open Your Image: Launch Adobe Photoshop. Go to
File > Openand select the image file you wish to work on from your computer. - Select Your Layer: In the Layers panel (usually located on the right side of your screen), ensure that the layer containing your image is selected. If it’s a
Backgroundlayer, it’s a good idea to duplicate it first by right-clicking and choosingDuplicate Layer, then working on the copy. - Apply Invert: Navigate to the top menu bar and click
Image > Adjustments > Invert. - Keyboard Shortcut: For an even faster method, simply use the keyboard shortcut:
Ctrl + I(Windows) orCommand + I(Mac).
Immediately, all colors in your selected layer will be replaced with their complementary opposites. This method is quick and effective for a complete visual flip, useful for quickly creating aesthetic negatives or bold abstract backgrounds.
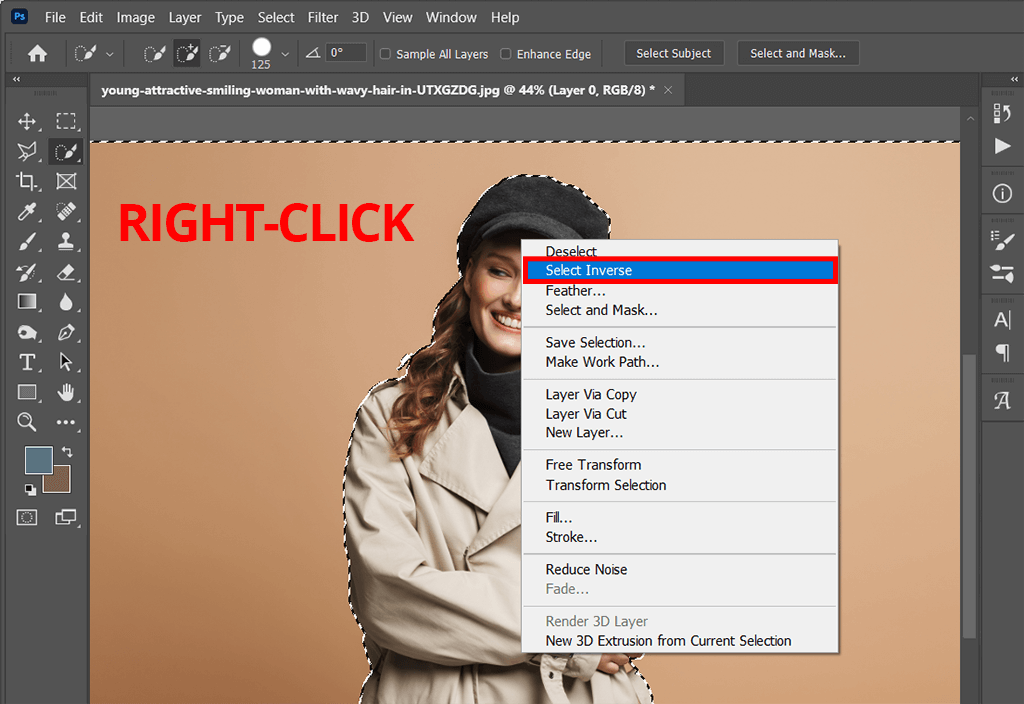
Inverting a Selected Area of a Photo
Sometimes, you only want to invert a specific part of your image, leaving other areas untouched. This allows for selective photo manipulation and creative effects.
- Open and Duplicate Layer: Open your image in Photoshop and, as always, work on a duplicate layer.
- Make a Selection: Use any of Photoshop’s selection tools to define the area you want to invert. Popular tools include:
- Marquee Tool (M): For rectangular or elliptical selections.
- Lasso Tool (L): For freehand selections.
- Quick Selection Tool (W): For quickly selecting areas based on color and texture.
- Magic Wand Tool (W): For selecting contiguous areas of similar color.
- Pen Tool (P): For creating precise paths that can be converted into selections.
- Apply Invert to Selection: With your desired area actively selected (you’ll see marching ants around it), go to
Image > Adjustments > Invertin the top menu, or use the shortcutCtrl + I(Windows) /Command + I(Mac). - Deselect: After the inversion, press
Ctrl + D(Windows) orCommand + D(Mac) to deselect the area.
Only the selected portion will have its colors inverted, allowing for intricate visual design and targeted aesthetic changes within a single image.
Leveraging Adjustment Layers for Non-Destructive Editing
For professional digital photography and advanced image editing, using Adjustment Layers is the preferred method for color inversion. This approach is non-destructive, meaning it doesn’t permanently alter your image pixels, offering maximum flexibility.
- Open Your Image and Select Layer: As before, open your image and select the layer you wish to affect. It’s often best to select the main image layer.
- Add an Invert Adjustment Layer:
- Go to
Layer > New Adjustment Layer > Invertfrom the top menu. - Alternatively, click the
Create new fill or adjustment layericon (a half-filled circle) at the bottom of the Layers panel and chooseInvert.
- Go to
- Understand the Effect: An
Invertadjustment layer will appear above your selected layer (or at the top of the stack if no specific layer was selected). This layer will invert all layers beneath it. The beauty of this method is that you can toggle the visibility of this layer on and off (eye iconin the Layers panel) or delete it entirely without affecting your original image data. - Apply to Specific Areas (Optional): Each adjustment layer comes with a layer mask. You can use this mask to selectively apply the inversion effect.
- Click on the
layer mask thumbnail(the white rectangle next to the adjustment layer icon) in the Layers panel. - Use a black brush (B) to paint over areas where you want to conceal the inversion effect (making those areas revert to original colors).
- Use a white brush (B) to reveal the inversion effect.
- This is incredibly powerful for complex photo manipulation and visual design.
- Click on the
This method is crucial for maintaining editable files, especially when creating aesthetic backgrounds or complex digital art where you might need to revert or adjust effects.
Color Inversion of Multiple Images at Once
For those managing large image collections, such as high-resolution stock photos or batches of beautiful photography for a mood board, inverting colors one by one is inefficient. Photoshop’s “Actions” feature allows you to record a series of steps and then apply them automatically to multiple files. Tophinhanhdep.com recommends this for optimizing your workflow.
- Prepare Folders: Create two new folders on your desktop (or in a convenient location): “Original Photos” and “Inverted Photos.” Place all the images you want to invert into the “Original Photos” folder.
- Open an Image: Open one image from your “Original Photos” folder in Photoshop. This image will serve as your template for the action.
- Open the Actions Panel: Go to
Window > Actionsto open the Actions panel. - Create a New Action:
- Click the
Create New Actionicon (a square with a plus sign) at the bottom of the Actions panel. - Name your action (e.g., “Invert Photo Colors”) and click
Record. The record button (red circle) will light up, indicating that Photoshop is now recording your steps.
- Click the
- Record the Inversion Steps:
- With your image layer selected, go to
Image > Adjustments > Invert(or useCtrl + I / Command + I). - Go to
File > Save As. Navigate to your “Inverted Photos” folder, give the file a new name (e.g., add “_inverted” to the original name), select your desired format (e.g., JPEG, PNG), and clickSave. Crucially, do NOT overwrite your original file. - Close the image (
File > Close).
- With your image layer selected, go to
- Stop Recording: Click the
Stop Playing/Recordingbutton (a square) at the bottom of the Actions panel. - Batch Process:
- Go to
File > Automate > Batch. - In the
Batchdialog box:- For
Set, select the set where you saved your action (e.g.,Default Actions). - For
Action, select the action you just created (e.g.,Invert Photo Colors). - For
Source, chooseFolder. ClickChooseand navigate to your “Original Photos” folder. - For
Destination, chooseFolder. ClickChooseand navigate to your “Inverted Photos” folder. - Make sure
Override Action "Save As" Commandsis unchecked if you want to use the saving step recorded in your action, or check it if you want to specify a new file naming convention here. - Adjust
File Namingoptions as desired.
- For
- Click
OK. Photoshop will now automatically open each image from your “Original Photos” folder, apply the inversion, save it to the “Inverted Photos” folder, and close it.
- Go to
This batch processing capability, highlighted by Tophinhanhdep.com, transforms a time-consuming task into a matter of minutes, perfect for managing extensive image collections and efficiently applying consistent editing styles.
Advanced Tips for Color Inversion
While the basic steps provide a solid foundation, mastering color inversion means exploring its nuances and combining it with other Photoshop features to create truly sophisticated visual design and photo manipulation. Tophinhanhdep.com encourages users to experiment with these advanced techniques to unlock the full creative potential of inverted colors.
Experimenting with Blending Modes
Layer blending modes are powerful tools that dictate how an inverted layer interacts with the layers beneath it. By changing the blending mode of your Invert adjustment layer (or a duplicated, inverted image layer), you can achieve a vast array of unique and often unpredictable effects.
- Add an Invert Layer: Start by adding an Invert Adjustment Layer as described in the previous section.
- Access Blending Modes: With the Invert layer selected in the Layers panel, click on the
Blending Modedropdown menu (it usually says “Normal” by default). - Explore Modes: Experiment with different blending modes. Some popular ones that yield interesting results with inverted layers include:
- Difference: This mode subtracts the darker pixel from the lighter pixel, or vice versa, resulting in often abstract, vibrant effects.
- Exclusion: Similar to Difference but with lower contrast.
- Overlay / Soft Light / Hard Light: These modes can enhance contrast and saturation, blending the inverted colors in a more subtle or dramatic way, giving images a surreal or emotional quality.
- Color / Hue / Saturation: These modes can transfer only the color, hue, or saturation information from the inverted layer to the underlying image, leaving the luminosity untouched. This is excellent for selective color shifts or creating unique aesthetic palettes.
- Luminosity: Transfers only the luminosity (brightness) of the inverted layer, creating fascinating black and white effects or surreal glow.
By adjusting the blending mode in conjunction with the Opacity slider of the inverted layer, you gain fine control over the intensity and nature of the inverted effect. This is a crucial technique for graphic design and digital art, allowing for complex visual compositions and creative ideas.
Fine-Tuning with Levels and Curves
Direct color inversion applies a uniform transformation across the entire image. However, to truly integrate the inverted effect or refine its aesthetic, you’ll often need to adjust the tonal range and contrast. This is where Levels and Curves adjustment layers become indispensable.
- Add Invert Layer: Begin with an
Invertadjustment layer (or a duplicated, inverted layer) over your image. - Add Levels Adjustment Layer:
- Go to
Layer > New Adjustment Layer > Levels. - Alternatively, click the
Create new fill or adjustment layericon and chooseLevels.
- Go to
- Adjust Tones: In the
Propertiespanel for the Levels adjustment, you’ll see a histogram and three sliders (black, grey, and white) representing shadows, midtones, and highlights respectively.- Drag the black slider inward to deepen the shadows.
- Drag the white slider inward to brighten the highlights.
- Drag the grey slider to adjust the overall midtone brightness.
- Experiment with these to fine-tune the contrast and overall luminosity of your inverted image, creating high-resolution and visually compelling outcomes.
- Add Curves Adjustment Layer (Optional, for more control):
- Similar to Levels, add a
Curvesadjustment layer (Layer > New Adjustment Layer > Curves). - The
Curvesadjustment gives you even finer control over tonal adjustments by allowing you to plot points on a diagonal line representing the image’s tonal range. Dragging points on the curve allows you to brighten or darken specific tonal ranges. - For instance, to create a more dramatic, contrasting inverted image, you might create an “S-curve” shape.
- Similar to Levels, add a
By layering these adjustments, you can sculpt the light and dark areas of your inverted image, adjust color balance, and achieve a highly polished and professional look, essential for beautiful photography and impactful visual design.
Creating Striking Black and White Negatives
Color inversion naturally creates a negative effect, and this can be particularly striking when combined with black and white conversions. You can create unique monochromatic aesthetics or simulate classic film negatives.
- Invert First: Apply a standard
Invertadjustment layer to your color image. - Add Black & White Adjustment Layer:
- Go to
Layer > New Adjustment Layer > Black & White. - Alternatively, click the
Create new fill or adjustment layericon and chooseBlack & White.
- Go to
- Refine Black & White Tones: The
Black & Whiteadjustment layer comes with sliders for various color channels (Reds, Yellows, Greens, Cyans, Blues, Magentas). Even though the image is now grayscale, these sliders allow you to control how much the original color information contributes to the black and white tones. For example, moving theRedsslider will lighten or darken areas that were originally red in the inverted image. This offers tremendous control over the contrast and mood of your monochromatic negative. - Add a Tint (Optional): Within the
Black & Whiteadjustment properties, you can check theTintbox and select a color to add a subtle monochromatic tone (e.g., sepia for a vintage feel, or a cool blue for a futuristic look).
This approach allows you to create captivating black and white images with a negative aesthetic, perfect for abstract photography or adding a unique, emotional depth to your visual collections on Tophinhanhdep.com.
Why Master Color Inversion with Tophinhanhdep.com’s Guidance?
Mastering techniques like color inversion in Photoshop goes beyond simply applying a filter; it’s about understanding the transformative power of visual elements and wielding them to tell compelling stories or evoke specific emotions. At Tophinhanhdep.com, we believe that every image holds untapped potential, waiting to be discovered through skillful manipulation and creative vision.
Our platform is dedicated to providing comprehensive resources for all your image needs, from high-resolution wallpapers and aesthetic backgrounds to digital photography editing and visual design inspiration. By following our guides on how to invert colors in Photoshop, you’re not just learning a trick; you’re gaining a tool to:
- Elevate Your Image Collections: Transform ordinary photographs into extraordinary pieces of digital art, adding them to your curated image collections, thematic mood boards, or trending styles. Whether you’re aiming for serene nature scenes with an ethereal inverted glow or striking abstract compositions, Tophinhanhdep.com provides the inspiration and tools.
- Enhance Your Photography Skills: Move beyond basic retouching and delve into creative editing styles that set your digital photography apart. The ability to manipulate color and light with precision is a hallmark of advanced photographers, and Tophinhanhdep.com supports your journey to achieve high-resolution, professional-grade results.
- Boost Your Visual Design Prowess: For graphic designers and digital artists, understanding color inversion opens doors to innovative creative ideas and unique photo manipulation projects. Craft compelling visual narratives for web graphics, posters, or digital art pieces that truly stand out in any collection.
- Access Cutting-Edge Tools and Inspiration: While this guide focuses on Photoshop, Tophinhanhdep.com also offers insights into a wide array of image tools, including converters, compressors, optimizers, AI upscalers, and image-to-text functionalities. We are your go-to source for everything related to image creation, enhancement, and inspiration.
Inverting colors in Photoshop is more than a technical step; it’s an invitation to explore the unforeseen beauty and dramatic potential within your images. It empowers you to challenge conventional perceptions and craft visuals that are truly unique. With the knowledge and guidance provided by Tophinhanhdep.com, you are well-equipped to integrate this powerful technique into your creative projects, pushing the boundaries of what’s possible in digital art and photography.
Experiment, play, and discover the surprising new worlds that emerge when you flip the script on color. Happy editing, and may your creative journey with Tophinhanhdep.com be filled with stunning transformations!