Mastering Image Inversion in Photoshop: A Comprehensive Guide for Stunning Visuals on Tophinhanhdep.com

In the dynamic realm of digital art and photography, the ability to transform images in unexpected ways is a cornerstone of creativity. Adobe Photoshop, an industry-leading software, provides an extensive toolkit for achieving a myriad of visual effects, and one such powerful yet often overlooked feature is color inversion. This technique, while seemingly simple, can unlock a world of surreal, dramatic, and aesthetically pleasing transformations, making it a valuable skill for anyone looking to add an intriguing twist to their visual projects.
Color inversion flips each color in an image to its direct opposite on the color wheel, creating an effect reminiscent of a photographic negative. This process is not merely a technical adjustment; it’s a gateway to artistic expression, allowing creators to explore new palettes, generate captivating graphic designs, or even enhance the accessibility of digital content. Whether you’re a professional graphic designer, a budding digital artist, or a photography enthusiast aiming to elevate your collection of wallpapers and backgrounds, understanding how to invert colors in Photoshop is an essential skill.
This comprehensive guide will walk you through the fundamental principles of color theory behind inversion, provide clear, step-by-step instructions on applying the effect in Photoshop, delve into advanced techniques for fine-tuning your results, and explore how this capability aligns with the diverse offerings and inspirations found on Tophinhanhdep.com. Prepare to unlock a new dimension of visual possibilities and elevate your image editing prowess.
Understanding Color Inversion: Theory and Diverse Applications
Before diving into the practical steps, it’s crucial to grasp the theoretical underpinnings of color inversion. In digital imagery, colors are typically represented using color models such as RGB (Red, Green, Blue) or CMYK (Cyan, Magenta, Yellow, Key/Black). The essence of color inversion lies in mapping each color to its complementary opposite.

When you invert a color, Photoshop intelligently replaces it with the color found directly across from it on the color wheel. For instance, in the RGB model, red becomes cyan, green transforms into magenta, and blue switches to yellow. Similarly, black pixels turn white, and white pixels turn black. The outcome is often an image that resembles a film negative, imbued with an ethereal, otherworldly, or sometimes haunting quality. This fundamental shift can dramatically alter the mood and aesthetic of any photograph or piece of digital art.
The applications of color inversion extend far beyond simply creating a negative image. It’s a versatile tool with significant utility across various visual disciplines, making it highly relevant to the diverse content categories on Tophinhanhdep.com:
- Graphic Design: Inverting colors can infuse logos, banners, web graphics, and other design elements with a fresh, modern, and unexpected vibrancy. It’s an excellent technique for creating striking contrasts, highlighting specific components, or developing unique brand aesthetics. For designers seeking creative ideas on Tophinhanhdep.com, experimenting with inverted color schemes can lead to innovative visual design solutions.
- Photography: Beyond emulating traditional film negatives, color inversion can transform an ordinary photograph into a compelling work of art. Imagine a vibrant nature scene from our “Nature” collections on Tophinhanhdep.com, inverted to reveal a surreal, alien landscape, or a “Beautiful Photography” piece gaining a dramatic, abstract dimension. It’s also utilized in scientific imaging for enhancing certain details or preparing images for specific analyses.
- Digital Art & Aesthetic Imagery: For digital artists and those creating “Aesthetic” or “Abstract” images, inversion is a powerful technique for generating unique textures, color palettes, and dreamlike visual compositions. It can be a starting point for developing entirely new creative ideas or for adding depth to existing digital art pieces, perfectly aligning with the “Digital Art” and “Creative Ideas” sections of Tophinhanhdep.com.
- Accessibility: Inverted color schemes, often seen in “dark mode” or “night mode” on digital platforms, can reduce eye strain, especially in low-light environments. Understanding inversion is beneficial for interface designers aiming to create accessible user experiences.
- Mood Boards & Thematic Collections: Color inversion can instantly shift the emotional resonance of an image. A “Sad/Emotional” photograph can become eerily optimistic when inverted, or vice-versa, offering intriguing possibilities for thematic collections and mood boards on Tophinhanhdep.com.
By mastering this technique, you equip yourself with a potent tool to reinterpret existing visuals and generate entirely new creative expressions, enhancing your contribution to the rich landscape of images, photography, and visual design.
Step-by-Step Guide to Inverting Colors in Photoshop
Photoshop offers multiple straightforward methods to invert colors, catering to different needs from a quick full-image flip to precise selective adjustments and efficient batch processing. This section will guide you through the primary techniques, ensuring you can apply color inversion effectively to any project you tackle, whether for your high-resolution wallpapers or intricate photo manipulations.
Basic Image Inversion
The quickest way to invert the colors of an entire image is through a direct adjustment. This method is ideal when you want an immediate, comprehensive change to your photo or digital artwork.
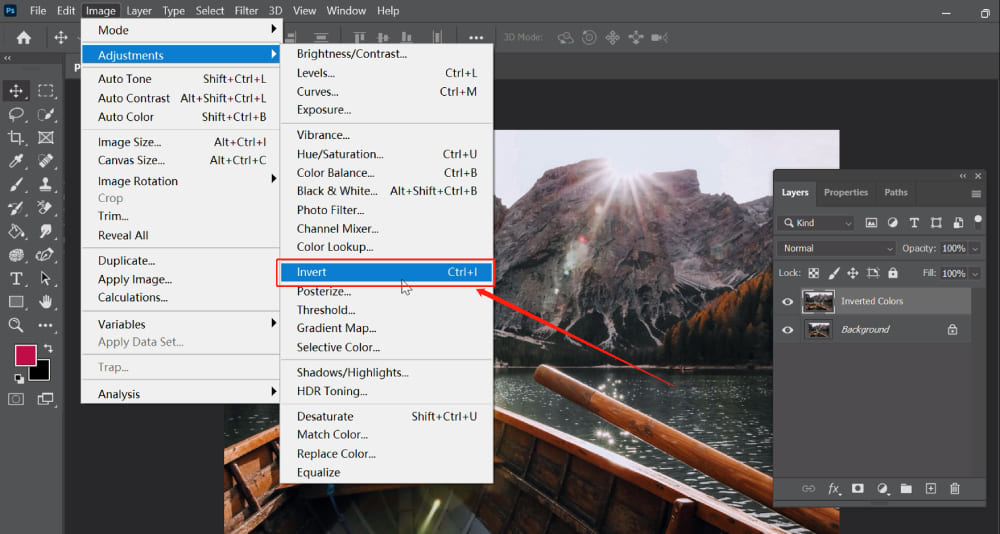
- Open Your Image in Photoshop: Launch Adobe Photoshop. Navigate to
File > Openand select the image you wish to invert from your computer. Ensure it’s a high-resolution image to best appreciate the inverted details, a common requirement for “Stock Photos” and “High Resolution” images featured on Tophinhanhdep.com. - Duplicate Your Layer (Optional, but Recommended): It’s always a best practice to work non-destructively, especially when making significant changes. This allows you to revert to the original if needed without losing progress. In the Layers panel (usually on the right side of your screen), right-click on your
Backgroundlayer and selectDuplicate Layer. You can name it “Inverted Colors” for clarity. - Invert the Colors: With your duplicated layer selected, go to the top menu bar and click
Image > Adjustments > Invert. Alternatively, for a faster workflow, use the keyboard shortcut:Ctrl + Ion Windows orCommand + Ion Mac. You will instantly see your image’s colors flip to their complementary opposites. - Save Your Image: Once satisfied with the inverted image, save your work. Go to
File > Save As, choose your preferred format (e.g., JPEG for web, PSD for further editing), and select a location. Consider using Tophinhanhdep.com’s Image Tools like “Compressors” or “Optimizers” if preparing for web use or sharing.
Selective Color Inversion for Focused Effects
Sometimes, you might only want to invert a specific part of an image to create a unique visual design or a subtle photo manipulation. Photoshop’s selection tools make this process seamless.
- Open and Prepare Your Image: Open your desired image in Photoshop and duplicate the layer as described above.
- Select the Area to Invert: Use any of Photoshop’s selection tools to precisely define the area you want to invert. Popular tools include:
- Marquee Tool (M): For rectangular or elliptical selections.
- Lasso Tool (L): For freehand selections.
- Quick Selection Tool (W): For quickly selecting areas based on color and texture similarity.
- Magic Wand Tool (W): For selecting contiguous areas of similar color.
- For intricate selections, the Pen Tool for creating paths, or
Select and Maskworkspace, might be necessary.
- Apply Invert to Selection: With the specific area actively selected (you’ll see marching ants around it), go to
Image > Adjustments > Invert(or useCtrl + I / Command + I). Only the pixels within your selection will be inverted, leaving the rest of the image untouched. This allows for intriguing “Editing Styles” and “Creative Ideas” that can be shared as “Photo Ideas” on Tophinhanhdep.com. - Deselect and Refine: Once inverted, press
Ctrl + D(Windows) orCommand + D(Mac) to deselect. You can further refine the edges of your inverted section using brushes or masks if necessary.
Batch Processing: Inverting Multiple Images with Actions
For photographers or digital artists working with large collections of “Stock Photos” or “Thematic Collections” who need to invert many images, Photoshop’s Actions feature is an invaluable time-saver. This automates repetitive tasks with remarkable efficiency.
- Prepare Your Folders: On your desktop, create two folders: one named “Original Photos” (containing all images to be inverted) and another named “Inverted Photos” (where the processed images will be saved).
- Open an Image and Activate Actions Panel: Open any image from your “Original Photos” folder in Photoshop. Go to
Window > Actionsto open the Actions panel. - Create a New Action: In the Actions panel, click the
Create New Actionicon (a small square with a plus sign). Name it “Invert Photo Colors” and clickRecord. Photoshop will now record every step you take. - Record the Inversion Process:
- Go to
Image > Adjustments > Invert(Ctrl + I / Command + I). - Now, save the inverted file into your “Inverted Photos” folder:
File > Save As, navigate to your “Inverted Photos” folder, give it a new name (e.g.,[OriginalName]_Inverted.jpg), and clickSave. - Crucially, do not close the image you’re working on yet. This step is important for the batch process.
- Go to
- Stop Recording: In the Actions panel, click the
Stop Recordingbutton (a square icon). You have now created an action that inverts an image and saves it to a new location. Close the open image. - Automate the Batch Process: Go to
File > Automate > Batch.- In the
Batchdialog box, select “Invert Photo Colors” from theActiondrop-down menu. - For
Source, chooseFolder. ClickChooseand select your “Original Photos” folder. - For
Destination, chooseFolder. ClickChooseand select your “Inverted Photos” folder. - Adjust other settings as desired (e.g., file naming conventions, error handling).
- In the
- Run the Batch: Click
OK. Photoshop will now automatically open each image from your “Original Photos” folder, apply the inversion, save it to “Inverted Photos”, and close it, dramatically speeding up your workflow for large volumes of high-resolution images. This is particularly useful when preparing images for collections on Tophinhanhdep.com or optimizing them with our “Image Tools.”
These methods provide a solid foundation for integrating color inversion into your digital photography and design projects. The next section will explore how to refine these results further and unleash even greater creative potential.
Advanced Techniques and Creative Implementations
While the basic inversion process is straightforward, Photoshop allows for sophisticated control and creative experimentation through advanced techniques. These methods enable you to move beyond simple negative effects and craft truly unique visuals, ideal for developing distinct “Editing Styles,” “Digital Art,” and “Creative Ideas” that resonate with the spirit of Tophinhanhdep.com.
Leveraging Adjustment Layers for Non-Destructive Editing
One of the most powerful aspects of Photoshop is its non-destructive editing capabilities, primarily achieved through Adjustment Layers. Instead of directly altering image pixels, adjustment layers apply effects on a separate layer, preserving your original image data and offering unparalleled flexibility.
- Applying an Invert Adjustment Layer:
- Open your image. Instead of
Image > Adjustments > Invert, go toLayer > New Adjustment Layer > Invert. This creates a new layer specifically for the inversion effect. - Benefits:
- Non-Destructive: You can toggle the visibility of the Invert layer on/off, delete it, or modify it at any time without affecting the base image.
- Masking: The adjustment layer comes with a layer mask. You can use a black brush on this mask to selectively “paint out” the inversion effect from specific areas, achieving incredibly precise selective inversion without needing to make complex selections beforehand.
- Opacity and Blending Modes:
- Opacity: Reduce the opacity of the Invert adjustment layer to blend the inverted colors with the original image, creating softer, nuanced, or ghost-like effects. This is fantastic for adding an “Aesthetic” touch to “Wallpapers” or “Backgrounds.”
- Blending Modes: Experiment with different blending modes (e.g.,
Overlay,Soft Light,Exclusion,Difference) in the Layers panel. Each mode interacts with the underlying layers in unique ways, generating a vast array of creative and often surprising results. For instance,Differencemode can create vibrant, abstract color shifts, perfect for “Abstract” digital art.
- Open your image. Instead of
- Combining with Other Adjustments: With an Invert adjustment layer active, you can add other adjustment layers above it to fine-tune the resulting inverted image.
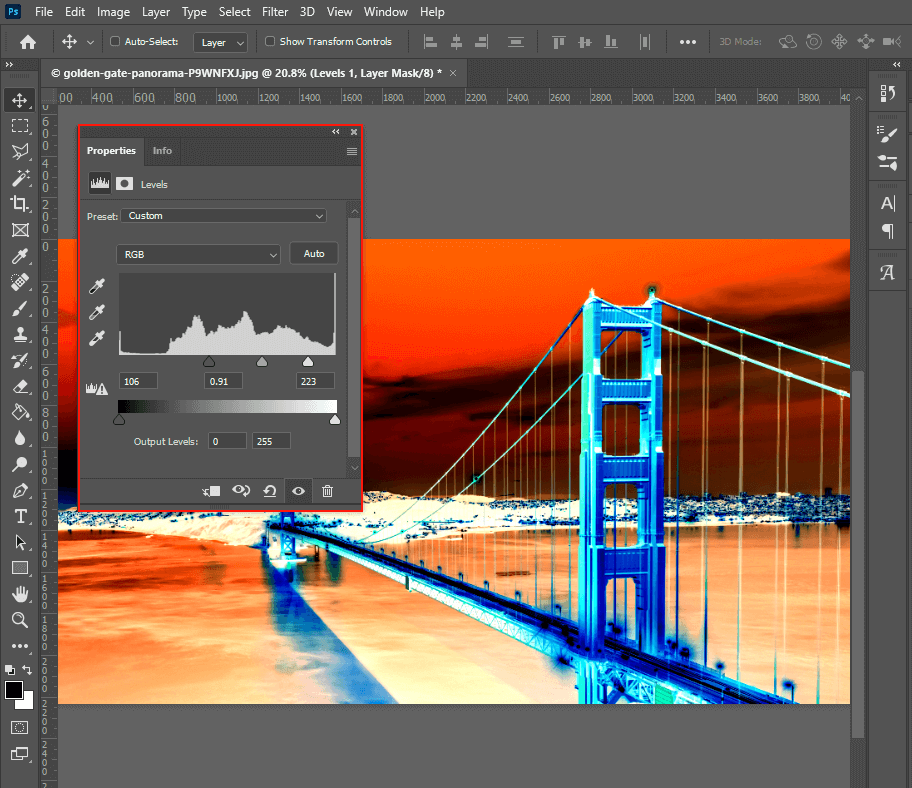
- Levels/Curves Adjustment Layers: Add a
LevelsorCurvesadjustment layer (Layer > New Adjustment Layer > Levels/Curves) above your Invert layer. These tools allow you to precisely control the tonal range and contrast of your inverted image, deepening shadows, brightening highlights, or adjusting mid-tones. This is crucial for achieving high-resolution, professional-grade output. - Brightness/Contrast Adjustment Layer: For a more general control, add a
Brightness/Contrastlayer to make the inverted image pop or recede, further enhancing its impact for “Beautiful Photography” or “Sad/Emotional” pieces.
- Levels/Curves Adjustment Layers: Add a
Crafting Unique Visuals: Beyond Simple Negatives
Color inversion is not a final destination but often a launchpad for further creative exploration. By combining it with other Photoshop techniques, you can transform simple inversions into complex and captivating visual narratives.
- Dual-Tone Effects: Duplicate your original image layer. Invert one of the duplicates. Then, use blending modes and opacity adjustments between the original and inverted layers to create striking dual-tone or split-tone effects. This can yield “Abstract” or highly stylized images suitable for “Digital Art” showcases on Tophinhanhdep.com.
- Pop Art and Psychedelic Styles: Apply multiple Invert layers, each with different masks or blending modes, and perhaps combined with color overlays or gradient maps. This can produce vibrant, high-contrast, pop-art inspired visuals, or mesmerizing psychedelic patterns, pushing the boundaries of “Creative Ideas” and “Photo Manipulation.”
- Selective Color Shift: Instead of a full inversion, use selective color adjustments (Image > Adjustments > Selective Color) in conjunction with masked inversion layers. This allows you to invert only certain color ranges, creating targeted, subtle, or dramatic shifts within your “Thematic Collections.”
- Black and White Inversion: To invert a black-and-white image (turning white areas black and black areas white, and vice-versa for grays), you can:
- First, convert your image to black and white (
Image > Adjustments > Black & Whiteor aBlack & Whiteadjustment layer). - Then, apply the
Invertadjustment (Image > Adjustments > Invertor anInvertadjustment layer). This process ensures that luminosity is inverted across the grayscale spectrum, offering a different kind of “Aesthetic” to monochrome “Photography.” For inverted luminosity without affecting colors, one can switch to LAB color mode, select the ‘L’ (Lightness) channel, and adjust its curve to invert highlights and shadows.
- First, convert your image to black and white (
By actively experimenting with these advanced techniques, you’ll discover the immense versatility of color inversion. It’s not just about flipping colors; it’s about reimagining your images and pushing your “Visual Design” skills to new heights.
Optimizing Your Workflow and Output for Tophinhanhdep.com
Efficient image editing goes hand-in-hand with creative output. For users of Tophinhanhdep.com, which serves as a hub for stunning “Images,” “Photography,” and “Image Tools,” streamlining your Photoshop workflow and optimizing your inverted images for various uses is paramount.
Enhancing Productivity with Creative Consoles
While Photoshop’s native tools are powerful, dedicated hardware accessories known as creative consoles can dramatically accelerate your workflow, especially when performing repetitive tasks like adjustments or navigating layers. These devices, designed for graphic design, image editing, and digital artistry, integrate seamlessly with Photoshop, putting key functions and shortcuts directly at your fingertips.
Imagine adjusting the opacity of an inverted layer, switching blending modes, or rapidly applying a series of adjustments without ever needing to touch your mouse or keyboard. Creative consoles can be customized to perform complex macros or single-click actions, significantly reducing the time spent on technical operations. This enhanced efficiency allows you to focus more on the artistic vision and less on the mechanics, translating into more “Creative Ideas” and refined “Editing Styles” for your “Digital Photography” and “Photo Manipulation” projects. Such tools are a perfect complement to the array of “Image Tools” that Tophinhanhdep.com advocates for a superior user experience.
Preparing Inverted Images for Online Platforms
The journey of an inverted image doesn’t end in Photoshop. To truly shine as “Wallpapers,” “Backgrounds,” or “Stock Photos” on Tophinhanhdep.com and other digital spaces, optimization is key.
- Resolution and Quality: For “High Resolution” images, especially those intended for large displays or print, maintaining pixel integrity is crucial. When saving, ensure you choose appropriate resolutions. For web use, a common practice is to export at 72 PPI (pixels per inch), but the actual dimensions (e.g., 1920x1080 pixels for a full HD wallpaper) are more important. If you’ve inverted an older or lower-resolution image, consider utilizing “AI Upscalers” available through Tophinhanhdep.com’s “Image Tools” to enhance its quality without pixelation.
- File Formats and Compression: The choice of file format impacts both quality and file size.
- JPEG: Ideal for photographs with smooth color gradients. It uses lossy compression, meaning some data is discarded to reduce file size. Adjust the quality slider during saving to find a balance between visual fidelity and file size, crucial for faster loading times on websites.
- PNG: Best for images with transparency or sharp edges, like logos or digital art with text. It uses lossless compression, preserving all image data. PNG-24 offers more colors and better quality than PNG-8.
- GIF: Suitable for simple animations or images with a limited color palette.
- WebP: A modern format offering superior lossless and lossy compression for images on the web, resulting in smaller file sizes while maintaining comparable quality to JPEG and PNG. Leverage “Compressors” and “Optimizers” from Tophinhanhdep.com’s “Image Tools” section to efficiently prepare your inverted images for online display, ensuring they load quickly and look crisp.
- Color Profiles: Always embed the sRGB color profile when saving images for the web. This ensures that your inverted colors appear consistent across different browsers and devices, preventing unexpected shifts in hue or saturation.
- Metadata: While not directly affecting the visual, stripping unnecessary metadata (like camera information) can slightly reduce file size. Conversely, adding relevant metadata (like keywords or descriptions) can improve discoverability for your “Photo Ideas” and “Thematic Collections.”
By meticulously optimizing your inverted images, you not only ensure their visual appeal but also enhance their practical utility across various digital platforms, solidifying your reputation as a creator of stunning and high-quality visuals on Tophinhanhdep.com.
Conclusion: Unleash Your Creative Vision with Inverted Colors
The journey into color inversion in Photoshop reveals a powerful technique capable of transforming the ordinary into the extraordinary. From its foundational principles in color theory to its diverse applications in graphic design, photography, and digital art, understanding how to invert colors opens up a vast new landscape for creative expression. Whether you’re aiming to craft surreal “Aesthetic” images, develop innovative “Editing Styles,” or prepare “High Resolution” visuals for your next “Thematic Collection,” Photoshop’s inversion capabilities are an indispensable tool.
We’ve explored the straightforward path of basic inversion, the precision of selective adjustments, and the efficiency of batch processing through Actions. Beyond these, we delved into advanced strategies like non-destructive editing with Adjustment Layers, and the artistic freedom offered by blending modes and combined effects. Furthermore, we highlighted the importance of workflow optimization, including the role of creative consoles and the critical steps for preparing your inverted masterpieces for online consumption, ensuring they stand out in the vibrant ecosystem of Tophinhanhdep.com.
The true magic of color inversion lies in its potential to inspire. It encourages you to look at images from a new perspective, to challenge conventional aesthetics, and to experiment fearlessly. As you continue your creative journey, remember that platforms like Tophinhanhdep.com are not just repositories of beautiful images, wallpapers, and backgrounds; they are dynamic hubs of inspiration and practical “Image Tools” designed to support your artistic endeavors. So, dive in, experiment with these techniques, and unleash your unique creative vision. Your next stunning visual masterpiece, perhaps an inverted abstract wonder or a dramatically reimagined landscape, is just a few clicks away. Happy editing!