Mastering the Art of Color Inversion in Photoshop: Unleash Your Creative Vision with Tophinhanhdep.com

In the dynamic world of digital imagery, where every pixel holds the potential for transformation, understanding powerful editing techniques is key to unlocking truly captivating visuals. Among the myriad features offered by Adobe Photoshop, the ability to invert colors stands out as a simple yet profoundly impactful tool. Far from being a mere trick, color inversion can redefine the mood, aesthetic, and overall impact of an image, making it an invaluable skill for photographers, graphic designers, and digital artists alike.
At Tophinhanhdep.com, we believe in providing you with the knowledge and inspiration to elevate your visual projects, from stunning wallpapers and backgrounds to cutting-edge photo manipulation and digital art. This comprehensive guide will delve into the fascinating realm of color inversion in Photoshop, exploring not just the “how-to” but also the “why” and “where” to apply this technique. Whether you’re aiming to create surreal abstract art, achieve a striking photographic negative effect, or simply add an unexpected twist to your designs, mastering color inversion will open up a new dimension of creative possibilities, perfectly aligning with the diverse image collections and visual design resources available on Tophinhanhdep.com.
Understanding Color Inversion: A Gateway to Visual Creativity
Before diving into the practical steps, it’s essential to grasp the fundamental concept of color inversion and its implications for visual design. This understanding will empower you to use the technique with intent, transforming your ordinary images into extraordinary pieces of art.
What is Color Inversion and How Does it Work?
At its core, color inversion is the process of replacing each color in an image with its complementary opposite on the color wheel. In digital imaging, colors are typically represented using models like RGB (Red, Green, Blue) or CMYK (Cyan, Magenta, Yellow, Key/Black). When you invert a color, Photoshop intelligently identifies its exact opposite. For example, red turns to cyan, green to magenta, and blue to yellow. Similarly, black becomes white, and white becomes black, creating a photographic negative effect.
This transformation isn’t just a simple swap; it’s a complete shift in the tonal and chromatic balance of your image. The brightness value of each pixel is replaced with its inverse value, typically across a 256-step color scale. The result is an image that often appears surreal, dreamlike, or otherworldly, instantly grabbing attention and evoking a different emotional response than the original. For those exploring abstract or aesthetic image collections on Tophinhanhdep.com, this principle is foundational for creating unique visual textures and moods.
Unlocking Creative Potential: Where to Use Inverted Colors
Color inversion is far more than a technical adjustment; it’s a powerful creative tool with a broad spectrum of applications across various fields of visual art and design. Its versatility makes it a valuable addition to any digital artist’s toolkit, and its unique effects are perfectly suited for the diverse categories featured on Tophinhanhdep.com.
- Graphic Design: Inverting colors can infuse logos, web graphics, brochures, and digital banners with a fresh, unexpected, and modern aesthetic. It can be used to highlight specific elements, create dynamic backgrounds, or develop unique brand identities that stand out. Imagine a striking inverted aesthetic for an abstract background or a promotional image from Tophinhanhdep.com.
-
Photography: Beyond mimicking traditional film negatives, color inversion can transform an ordinary photograph into a striking piece of art. Landscapes can become ethereal and otherworldly, portraits can gain a dramatic or surreal quality, and everyday objects can take on a new, intriguing presence. This technique is particularly popular in creating high-resolution, artistic photography for aesthetic and inspirational collections, a core offering of Tophinhanhdep.com. It’s a fantastic way to experiment with editing styles and create unique photo ideas.
-
Digital Art and Photo Manipulation: For artists working on digital art or photo manipulation projects, color inversion provides an immediate and dramatic way to experiment with palettes and compositions. It can serve as a starting point for complex visual narratives, creating dreamlike sequences, psychedelic effects, or intense, emotional imagery. This aligns perfectly with the visual design and creative ideas section of Tophinhanhdep.com, where unique abstract and sad/emotional images are showcased.
-
Accessibility (Dark Mode Simulation): While perhaps not a primary creative use, understanding color inversion is beneficial for interface designers. Many digital platforms offer “dark mode” or “night mode” options, which often involve inverting color schemes to reduce eye strain, especially in low-light environments. This practical application highlights the diverse ways color theory impacts user experience.
-
Thematic Collections and Mood Boards: When curating thematic image collections or developing mood boards, inverted colors can introduce a sense of mystery, contrast, or an avant-garde edge. They can evoke specific emotions, contributing to sad/emotional themes or creating intriguing abstract compositions that inspire creative ideas found on Tophinhanhdep.com.
By understanding these applications, you can leverage color inversion not just as a technical step but as a strategic decision in your creative process, transforming your images into compelling visual statements.
Step-by-Step Guide: How to Invert Colors in Photoshop
Now that we’ve explored the theoretical foundations and creative applications of color inversion, let’s dive into the practical methods of achieving this effect in Adobe Photoshop. Tophinhanhdep.com provides these clear instructions to help you master this technique, whether you’re working on a single image or an entire collection.
Method 1: Instant Inversion for Quick Transformations
This method is the quickest and most straightforward way to invert the colors of an entire image. It’s ideal for rapid experimentation or when you need a swift, full-image transformation.
-
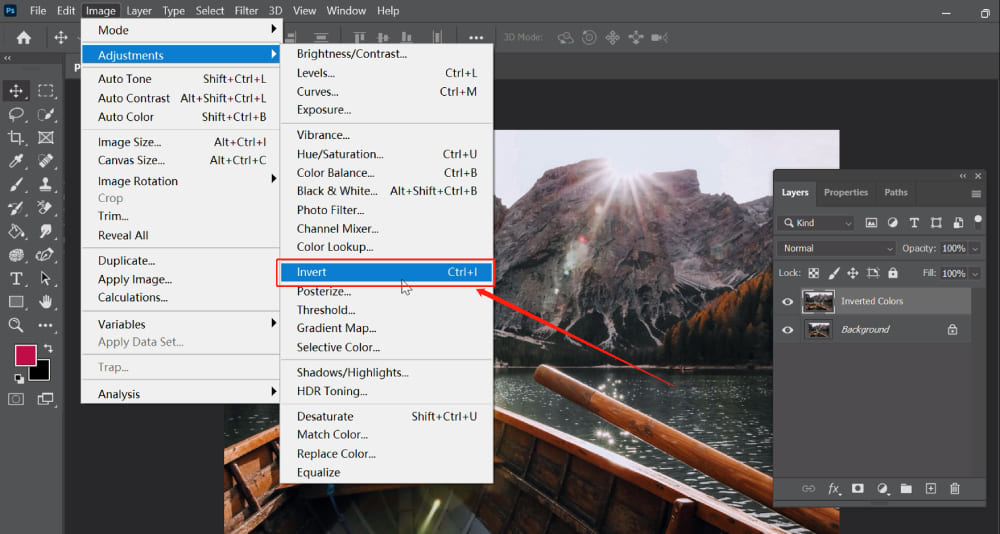
Open Your Image in Photoshop: Launch Adobe Photoshop. Go to
File > Openand navigate to the image file you wish to edit. Select it and clickOpen. Ensure that the desired image layer is selected in your Layers panel (usually on the right side of the screen). -
Duplicate Your Layer (Optional but Recommended): While not strictly necessary for this quick method, it’s always a good practice to work on a duplicate layer. This ensures that your original image remains untouched, allowing you to revert changes or blend effects later. To duplicate, right-click on your image layer in the Layers panel and select
Duplicate Layer. You can rename it for clarity, e.g., “Inverted Colors.” -
Apply the Invert Command: With your duplicated layer selected, go to the top menu bar and click
Image > Adjustments > Invert. Alternatively, for even faster execution, use the keyboard shortcut:Ctrl + I(Windows) orCommand + I(Mac).Instantly, all the colors in your active layer will be flipped to their complementary opposites, transforming your image into its negative counterpart or a vibrant, surreal composition. This quick transformation can be a great starting point for developing unique aesthetic backgrounds or abstract images for Tophinhanhdep.com.
-
Save Your Image: Once you’re satisfied with the inverted image, save your work. Go to
File > Save As, choose your preferred format (e.g., JPEG, PNG, TIFF), specify a location, and clickSave.
Method 2: Non-Destructive Inversion with Adjustment Layers
For professional workflows and maximum flexibility, using an Adjustment Layer for color inversion is the preferred method. This non-destructive approach allows you to modify, hide, or delete the inversion effect at any time without altering your original image data, making it perfect for complex photo manipulation and digital art projects featured on Tophinhanhdep.com.
-
Open Your Image and Select the Layer: Begin by opening your image in Photoshop as described in Method 1. Ensure your primary image layer is selected in the Layers panel.
-
Create an Invert Adjustment Layer: Instead of directly applying the
Image > Adjustments > Invertcommand, you’ll add an Adjustment Layer. There are two common ways to do this:- Go to the top menu bar, click
Layer > New Adjustment Layer > Invert. A dialog box will appear; you can name the layer if you wish and clickOK. - Alternatively, click the
New Adjustment Layericon (a half-filled circle) at the bottom of the Layers panel and selectInvertfrom the dropdown list.
A new “Invert” layer will appear above your image layer in the Layers panel, and your image will instantly invert. The key benefit here is that the inversion effect is contained within this layer, leaving your original image layer untouched.
- Go to the top menu bar, click
-
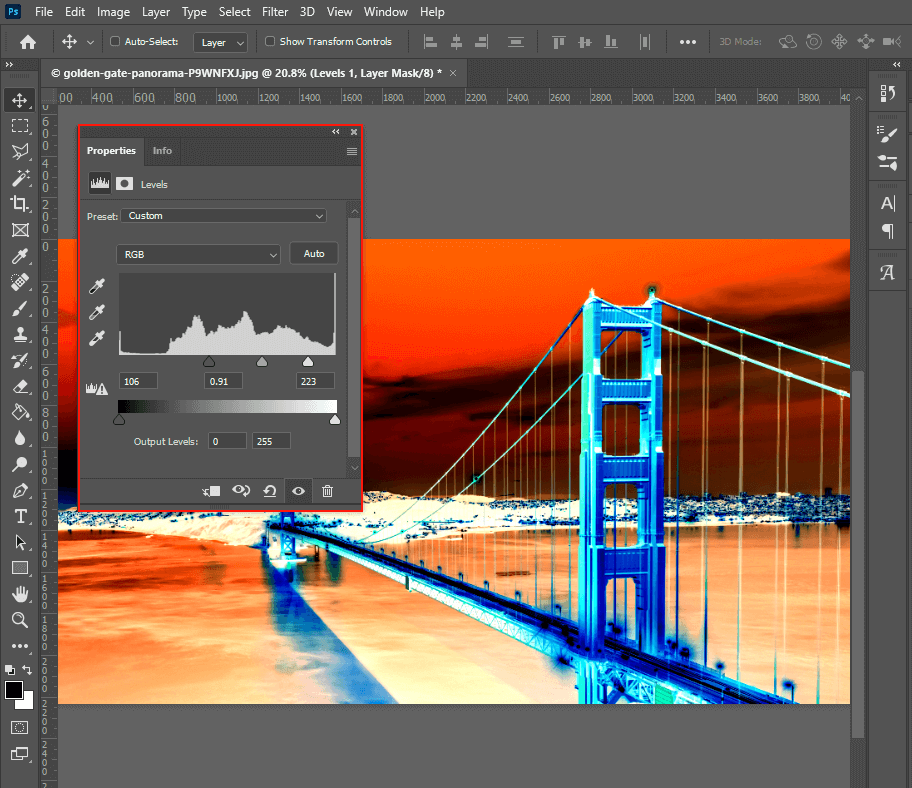
Fine-Tune Your Inverted Image with Blending and Adjustments: This is where the power of Adjustment Layers truly shines.
- Opacity: In the Layers panel, with your “Invert” adjustment layer selected, you can adjust the
Opacityslider. Lowering the opacity will blend the inverted colors with the original image, creating a subtler or more ghostly effect. This is fantastic for achieving unique aesthetic blends for backgrounds or photographic art. - Blending Modes: Experiment with different
Blending Modes(also found in the Layers panel, above the Opacity slider). Modes like “Overlay,” “Soft Light,” “Difference,” or “Exclusion” can yield a wide array of fascinating and unexpected visual outcomes, transforming your inverted image into a unique piece of digital art suitable for Tophinhanhdep.com’s visual design galleries. - Additional Adjustment Layers: Stack more adjustment layers on top of your Invert layer for further refinement. For instance, add a
LevelsorCurvesadjustment (Layer > New Adjustment Layer > Levels/Curves) to tweak the light, dark, and mid-tone areas. ABrightness/Contrastlayer can enhance or subdue the overall contrast. These non-destructive layers give you unparalleled control over the final look, allowing for high-resolution, refined aesthetic photography.
- Opacity: In the Layers panel, with your “Invert” adjustment layer selected, you can adjust the
-
Save Your Work: Once you achieve your desired effect, save your file. It’s often recommended to save it as a Photoshop Document (.PSD) to preserve all your layers for future edits. You can then export a flattened version in formats like JPEG or PNG for sharing or use on Tophinhanhdep.com.
Advanced Techniques and Practical Applications
Beyond the basic inversion, Photoshop offers powerful tools to refine and apply this technique in more sophisticated ways. These advanced tips will enable you to integrate inverted colors seamlessly into complex visual design and photo manipulation projects, enhancing your contributions to Tophinhanhdep.com’s creative community.
Mastering Selective Inversion for Targeted Effects
Sometimes, you don’t want to invert the entire image, but rather a specific object or area to create a dramatic contrast or highlight a particular element. Selective inversion allows for precise control.
-
Make a Selection: Open your image and use any of Photoshop’s powerful selection tools to define the area you wish to invert.
- Lasso Tool (L): For freeform selections.
- Quick Selection Tool (W): For quickly selecting areas based on color and texture.
- Magic Wand Tool (W): For selecting contiguous areas of similar color.
- Pen Tool (P): For creating precise, editable paths that can be converted into selections (ideal for complex shapes).
- Marquee Tool (M): For rectangular or elliptical selections.
-
Apply Inversion to the Selection: Once your selection is active (you’ll see “marching ants” around it), you can apply the inversion.
- Using
Image > Adjustments > Invert: This will directly invert only the pixels within your active selection. - Using an Invert Adjustment Layer (Recommended): With your selection active, create a new
InvertAdjustment Layer (Layer > New Adjustment Layer > Invert). Photoshop will automatically create a layer mask based on your selection. This means the invert effect will only apply to the selected area, and you can later edit the mask to refine the inverted region. This non-destructive method is crucial for high-resolution photo manipulation and creative ideas shared on Tophinhanhdep.com.
- Using
-
Refine Your Mask: If you used an Adjustment Layer, you can click on the layer mask (the black and white thumbnail next to the Invert icon) in the Layers panel. Use a soft-edged brush with black or white paint to add or subtract from the masked area, creating seamless transitions or precise boundaries for your selective inversion. This level of detail is essential for professional digital art and aesthetic image editing.
Batch Processing for Efficiency: Inverting Multiple Images at Once
For photographers or designers who need to process a large volume of images (e.g., creating negative versions of an entire collection for Tophinhanhdep.com’s “sad/emotional” or “abstract” themes), Photoshop’s Actions feature combined with Batch processing is a game-changer.
-
Prepare Your Folders: Create two folders on your desktop: “Original Photos” (containing all images you want to invert) and “Inverted Photos” (where the processed images will be saved).
-
Record an Action:
- Open one image from your “Original Photos” folder in Photoshop.
- Go to
Window > Actionsto open the Actions panel. - Click the
Create New Actionbutton (looks like a square with a plus sign). - Name your action (e.g., “Invert Photo Colors”) and click
Record. - Now, perform the inversion steps you want to record:
Image > Adjustments > Invert(or create anInvert Adjustment Layerif you prefer a non-destructive batch). - Crucially, now save the inverted image:
File > Save As. Navigate to your “Inverted Photos” folder, give it a new name or a prefix (e.g., “inverted_originalfilename.jpg”), choose your desired format, and clickSave. - Close the image:
File > Close. - In the Actions panel, click the
Stop Recordingbutton (a square icon).
-
Automate with Batch Processing:
- Go to
File > Automate > Batch. - In the
Batchdialog box, select your newly created action (“Invert Photo Colors”) from theActiondropdown. - For
Source, chooseFolder. ClickChooseand select your “Original Photos” folder. - For
Destination, chooseFolder. ClickChooseand select your “Inverted Photos” folder. - Ensure
Override Action "Save As" Commandsis unchecked (since you recorded aSave Asstep in your action). - Click
OK.
Photoshop will now automatically open each image from your “Original Photos” folder, apply the “Invert Photo Colors” action, save the inverted version into your “Inverted Photos” folder, and close the original, processing your entire batch with remarkable efficiency. This is perfect for creating large collections of high-resolution images or digital photography assets.
- Go to
Beyond the Basics: Blending Modes and Fine-Tuning
The subtle power of color inversion often lies in its interaction with other Photoshop features, particularly blending modes and detailed adjustments. These techniques allow for nuanced control, elevating simple inversions to sophisticated visual art.
-
Experiment with Layer Blending Modes: When using an Invert Adjustment Layer (or even a duplicated, inverted layer), don’t overlook the
Blending Modedropdown in the Layers panel.DifferenceandExclusionmodes often create intense, high-contrast, and sometimes psychedelic effects by comparing the inverted layer to the layers below.Soft LightorOverlaycan introduce subtle shifts in color and tone, blending the inverted information more gently for a sophisticated aesthetic.- Exploring these modes can transform a standard inverted image into something truly unique, inspiring new abstract or aesthetic photography ideas for Tophinhanhdep.com.
-
Refine with Levels, Curves, and Brightness/Contrast: Even after inverting, the image’s tonal range might need adjustment.
- Levels (
Ctrl/Cmd + L) and Curves (Ctrl/Cmd + M): These are the workhorses of tonal correction. Apply them asNew Adjustment Layersabove your Invert layer. You can manipulate the input and output levels, shadows, midtones, and highlights to control the overall brightness, contrast, and color balance of your inverted image. This is essential for achieving professional-grade high-resolution images. - Brightness/Contrast: A simpler adjustment for overall luminosity and contrast, also best applied as an
Adjustment Layer.
- Levels (
These tools allow you to sculpt the light and color of your inverted images, ensuring they achieve the exact aesthetic impact you envision for your wallpapers, backgrounds, or digital art pieces.
Elevate Your Digital Art with Tophinhanhdep.com
Mastering color inversion in Photoshop is more than just learning a software function; it’s about expanding your creative horizons. This technique directly ties into many of the core offerings and inspirations found on Tophinhanhdep.com, allowing you to both consume and contribute to a rich ecosystem of visual content.
Exploring Inverted Aesthetics for Wallpapers and Backgrounds
The surreal and often dramatic visual qualities of inverted images make them perfect candidates for unique wallpapers and backgrounds. On Tophinhanhdep.com, users constantly seek fresh and aesthetic visuals for their devices and projects. By utilizing color inversion, you can:
- Create Abstract Visuals: Transform ordinary photos into abstract patterns and color schemes that are visually stimulating and highly aesthetic.
- Design Thematic Backgrounds: Develop backgrounds that align with specific moods – from vibrant and energetic to calm and melancholic – enhancing the sad/emotional or nature-inspired collections.
- Personalize Your Digital Space: Craft truly unique digital photography pieces that reflect your artistic vision, perfect for high-resolution desktop backgrounds or mobile wallpapers.
Tophinhanhdep.com’s extensive collections of wallpapers and backgrounds serve as both inspiration and a platform for showcasing your inverted creations.
Enhancing Photography and Visual Design Projects
For those engaged in digital photography and visual design, color inversion offers a powerful avenue for experimentation and differentiation. Tophinhanhdep.com encourages users to explore various editing styles and creative ideas.
- Photo Manipulation: Invert colors to lay the groundwork for complex photo manipulation, creating fantasy scenes, futuristic landscapes, or striking visual narratives.
- Digital Art: Integrate inverted elements into your digital art to add depth, contrast, and a sense of otherworldliness. This method can transform simple compositions into captivating pieces, suitable for trending styles and thematic collections.
- Creative Inspiration: Use the unexpected results of color inversion as a springboard for new creative ideas. Sometimes, a “mistake” or an unintended inverted effect can spark an entirely new direction for a project, much like the diverse photo ideas shared on Tophinhanhdep.com.
Tophinhanhdep.com also offers a suite of Image Tools, including AI upscalers, compressors, and converters, which can further enhance your inverted images by optimizing them for various platforms and uses. Imagine inverting a high-resolution photograph, then using an AI upscaler from Tophinhanhdep.com to refine its details for an even more impactful display.
Conclusion
The art of color inversion in Photoshop is a testament to the power of digital tools in transforming our visual perceptions. From its foundational principles in color theory to its advanced applications in professional workflows, mastering this technique empowers you to craft stunning, unique, and emotionally resonant images. Whether you’re a seasoned digital artist or just beginning your journey into image editing, the steps and insights provided in this guide, alongside the extensive resources on Tophinhanhdep.com, will equip you to unlock a new realm of creative possibilities.
Experiment with immediate inversions, embrace the flexibility of adjustment layers, and delve into selective and batch processing to streamline your workflow. Discover how blending modes and fine-tuned adjustments can elevate your inverted images to truly sophisticated visual art. With Tophinhanhdep.com as your go-to resource for images, photography inspiration, and visual design tools, you’re now ready to infuse your wallpapers, backgrounds, digital art, and photography projects with the captivating magic of inverted colors. Dive in, explore, and let your creativity shine!