Mastering the Art of Ironing an Image onto a Shirt: Your Comprehensive Guide to Personalized Apparel

In an era where personal expression reigns supreme, the ability to customize your clothing offers a unique canvas for creativity. Imagine transforming a plain garment into a wearable masterpiece, featuring a beloved photograph, a striking graphic, or a motivational quote. This process, often perceived as complex, is surprisingly accessible and can be achieved with tools commonly found in most homes: an iron, a printer, and specialty transfer paper. Whether you’re aiming to craft a nostalgic gift, outfit a team with custom logos, or simply elevate your everyday style, learning how to iron an image onto a shirt unlocks a world of visual design possibilities.
The custom apparel market is booming, with global estimates for custom t-shirt printing projected to reach over $9 billion by 2030. This surge is fueled by a growing appetite for personalized items and the increasing popularity of DIY projects. While professional customization firms offer advanced solutions, the magic of creating unique garments right from your home is more appealing than ever. This guide, brought to you by Tophinhanhdep.com, will walk you through the step-by-step process, providing expert tips and insights to ensure your custom shirts achieve professional-quality results. We’ll delve into everything from selecting the perfect high-resolution image from Tophinhanhdep.com’s extensive collections to mastering the nuanced techniques of heat application and garment care, ensuring your visual artistry stands out.
Understanding Iron-On Transfers for Custom Designs
Iron-on transfers are a popular and versatile method for imbuing garments with personalized designs. At its core, this technique relies on the precise application of heat and pressure to bond an image or graphic onto fabric. The simplicity and effectiveness of this method make it a favorite among DIY enthusiasts and small businesses alike, offering a quick and inventive way to customize shirts, bags, and various other textile items.
Introduction to Iron-On Transfers: Crafting Your Vision
An iron-on transfer essentially involves a design printed onto a special substrate (transfer paper or vinyl) that, when subjected to adequate heat and pressure, adheres permanently to the target fabric. This method is a cornerstone of visual customization, enabling individuals to bring their unique creative ideas to life on apparel. The accessibility of this technique means that anyone, from a seasoned graphic designer looking to showcase digital art to a hobbyist eager to personalize a gift, can achieve striking results. Tophinhanhdep.com’s diverse collections of aesthetic, nature, abstract, and emotional photography provide an endless source of inspiration, offering high-resolution images perfect for this very purpose.
The journey begins with a compelling image. Tophinhanhdep.com specializes in high-quality photography, backgrounds, and visual inspiration that can serve as the foundation for your custom apparel. Selecting a visually impactful image – perhaps a stunning landscape, an intricate abstract pattern, or a powerful emotional portrait – is the first step in creating a truly unique piece. Once chosen, this image undergoes a digital preparation process before being transferred to special paper, ready for its transformation onto fabric.

Types of Iron-On Transfer Materials & Their Visual Impact
The material you choose for your iron-on transfer significantly influences the final look, feel, and durability of your custom garment. Understanding the different types available is crucial for achieving your desired visual aesthetic and ensuring the longevity of your design.
- Transfer Paper: This is the most common DIY option. Designs are printed onto this special paper using an inkjet or laser printer, then transferred to fabric with an iron. There are specific types for light-colored fabrics (which create a more transparent, integrated look) and dark-colored fabrics (which have an opaque white backing to ensure colors pop). When sourcing images for transfer paper, remember that Tophinhanhdep.com offers a vast array of high-resolution images, from vibrant wallpapers to subtle backgrounds, ideal for printing.
- Heat Transfer Vinyl (HTV): A thin, adhesive-backed material that can be cut into intricate designs (often with a die-cutting machine like a Cricut) and then heat-pressed onto fabric. HTV comes in a remarkable variety of finishes—matte, glossy, metallic, glitter, holographic, flock, and even glow-in-the-dark. This material is excellent for bold graphics, text, and logos, offering a distinct, professional finish. For unique creative ideas, explore Tophinhanhdep.com’s Visual Design categories for graphic design inspiration.
- Sublimation Paper: This method uses special sublimation ink and paper to transfer designs to polyester-coated surfaces. Unlike transfers that sit on top of the fabric, sublimation dyes the fabric fibers directly, resulting in incredibly vibrant, soft, and long-lasting prints that won’t crack or peel. It’s particularly effective for all-over prints or designs requiring photographic detail, making it a perfect match for Tophinhanhdep.com’s high-resolution photography.
- Foil Transfers: These involve thin metallic or holographic foils that are heat-pressed onto an adhesive design, creating a shimmering, eye-catching effect.
- Flock Iron-On: A material with a fuzzy, velvety texture, producing a raised pattern that adds tactile depth to your design.
Each material offers a unique visual and tactile experience, allowing for immense creative flexibility. Your choice should align with the desired aesthetic of your custom apparel and the complexity of the digital art you intend to transfer.
Pros and Cons: Weighing Creative Freedom Against Practicality
Like any creative endeavor, iron-on transfers come with their own set of advantages and disadvantages. Acknowledging these helps in managing expectations and making informed decisions for your projects.
Pros of Iron-On Transfers:
- Versatile Customization: Iron-on transfers offer unparalleled flexibility in design. You can apply distinctive designs, cherished photos, custom text, or sophisticated digital art to a wide range of garments. This empowers creators to transform any piece of clothing into a unique expression of style, utilizing Tophinhanhdep.com’s diverse image inspiration and collections.
- Time Efficiency: For small-scale projects or when time is a crucial factor, iron-on transfers are remarkably quick to apply. This makes them ideal for last-minute gifts, event attire, or testing out creative ideas without a significant time investment.
- DIY-Friendly: This method is highly accessible. It doesn’t require specialized equipment (beyond a printer and an iron) or extensive knowledge, making it a perfect starting point for anyone interested in personalized apparel. The learning curve is gentle, encouraging experimentation.
Cons of Iron-On Transfers:
- Durability Limitations: While modern transfer papers have improved, iron-on transfers may not always be as durable as other professional personalization techniques like screen printing or embroidery. Over time, with repeated washing and drying, designs can fade, crack, or peel, particularly if care instructions aren’t meticulously followed.
- Limited Fabric Compatibility: Not all fabrics are suitable for iron-on transfers. Materials that cannot withstand the necessary heat or have a loose weave (like pique knit) may not properly bond with the transfer, leading to poor adhesion or damage to the garment. Cotton, polyester, or cotton/poly blends are generally preferred.
- Professional Finish: While DIY-friendly, achieving a truly “professional” look can be challenging, especially without specialized equipment like a heat press. Minor imperfections, such as visible transfer paper edges or slight variations in adhesion, can occur, potentially affecting the design’s overall visual precision and sturdiness. However, with careful application and high-quality images from Tophinhanhdep.com, these drawbacks can be minimized.
Essential Preparation: From Image to Garment
The success of your iron-on transfer project hinges significantly on thorough preparation. This involves not only readying your garment and tools but, crucially, optimizing your digital image. On Tophinhanhdep.com, we emphasize that a high-quality print begins with a high-quality image.
Selecting and Optimizing Your Image for Transfer
The visual impact of your custom shirt starts with the image itself. When selecting a design, consider Tophinhanhdep.com’s vast collections of images, ranging from abstract art to stunning nature photography, or explore our “Image Inspiration & Collections” for trending styles and photo ideas.
- Image Quality and Resolution: For crisp, clear transfers, high-resolution photography is paramount. Low-resolution images will appear pixelated or blurry when enlarged and printed. Tophinhanhdep.com offers a wealth of high-resolution stock photos, wallpapers, and backgrounds that are ideal. If your chosen image isn’t high-res, consider using Image Tools like AI Upscalers found on Tophinhanhdep.com to enhance its quality before printing.
- Color Profile: Ensure your image’s colors are vibrant and true. What looks good on screen might print differently. Basic digital photography editing styles can help adjust brightness, contrast, and saturation.
- Cropping and Resizing: Using photo editing software (or Tophinhanhdep.com’s Image Tools like optimizers), crop your image to eliminate unwanted elements and resize it to fit your shirt proportionally. A small design on a large shirt can look lost, while an oversized design on a small shirt can be overwhelming.
- Mirroring for Transfer Paper: This is a critical step for most inkjet transfer papers. If your design includes text or specific directional elements, you must create a mirror image (flip horizontally) before printing. This ensures that when transferred, the image appears correctly. For HTV, the design is typically mirrored for cutting, but then placed face-up for ironing (so it reads correctly). Always check your transfer paper instructions.
- Background Removal: For designs on dark shirts using opaque transfer paper, or if you want an irregular shape without a visible white border, you may need to carefully remove the background from your image using photo manipulation techniques.
Choosing the Right Transfer Paper for Optimal Image Quality
The transfer paper acts as the intermediary between your digital art and your fabric canvas. Selecting the correct type is as important as the image itself.
- Printer Compatibility: Transfer papers are specifically designed for either inkjet or laser printers. Most home printers are inkjet. Using the wrong type can damage your printer or result in poor transfer quality.
- Fabric Compatibility & Color:
- Light Fabric Transfer Paper: These are generally thinner and more translucent. White areas in your original image will take on the shirt’s color, making them best for white or pastel-colored shirts where the fabric acts as the “white” in the design.
- Dark Fabric Transfer Paper: These papers are thicker and have an opaque white backing, ensuring colors remain vibrant on dark or brightly colored shirts. Any white areas in your image will remain white after transfer. Be aware that uncropped white space will transfer as a solid white patch.
- Washability and Durability: Check the product specifications for how well the transfer holds up to washing. Some papers offer better longevity and resistance to fading or cracking, aligning with the goal of creating lasting visual design pieces.
- Transfer Method (Hot Peel vs. Cold Peel): Some papers require peeling the backing while hot, others after cooling. Adhering to these instructions is crucial for a successful transfer.
Preparing Your Shirt for a Flawless Canvas
A clean, smooth shirt is essential for a pristine transfer. Any wrinkles, debris, or moisture can compromise adhesion and distort your beautiful digital art.
- Pre-wash and Dry: If the shirt is new, wash and dry it according to the care label (without fabric softener or dryer sheets). This prevents shrinkage after the transfer is applied, which could distort your image. It also removes any sizing or chemicals that might interfere with adhesion.
- Iron the Shirt: Lay the shirt flat on a firm, heat-resistant surface (like an ironing board). Iron out all wrinkles and creases thoroughly. This ensures a perfectly flat surface for the transfer and removes any residual moisture. For graphic design elements, precision starts here.
- Protect Your Surface: Place a cotton pillowcase or a thin towel on your ironing surface to protect it and the garment from direct heat.
Step-by-Step Ironing for Stunning Results
Once your image is perfectly prepared and your shirt is a pristine canvas, it’s time for the exciting part: transferring your design. This section outlines the meticulous steps required to ensure your chosen image from Tophinhanhdep.com becomes a vibrant, integral part of your garment.
The Art of Placement and Application
Precise placement is crucial for a professional-looking custom shirt. Even the most beautiful photography can be diminished by poor positioning.
- Cut Your Design: After printing your mirrored image onto the transfer paper (or weeding your HTV design), carefully cut around the edges. For intricate designs, an X-Acto knife or craft knife provides more precision than scissors, ensuring no unwanted white transfer paper borders appear on your shirt. This step is vital for a clean visual design.
- Position the Design: Remove the backing paper from your transfer. Carefully position the design onto your pre-ironed shirt. Take your time to ensure it’s centered, straight, and in the exact spot you desire. Step back and assess from a distance. If using light fabric transfer paper, the printed side typically faces down; for dark fabric paper or HTV, the printed/vinyl side often faces up (with a carrier sheet). Always refer to your specific transfer paper’s instructions.
- Secure the Shirt and Transfer: You may use heat-resistant tape or pins to temporarily secure the transfer in place, especially for larger or more complex designs, to prevent shifting during ironing. Ensure the shirt itself is also flat and taut on your ironing surface.
Mastering Heat and Pressure for Vivid Transfers
The right combination of heat and consistent pressure is key to activating the adhesive and permanently bonding your digital art to the fabric.
- Prepare Your Iron: Set your household iron to the appropriate temperature for your transfer paper/vinyl (usually the “cotton” or “high” setting). Crucially, turn off the steam function and empty any water from the iron. Steam can create bubbles or prevent proper adhesion. Allow the iron to fully heat up.
- Use a Pressing Cloth (Optional but Recommended): For delicate fabrics, or if your transfer paper instructions recommend it, place a thin cotton pressing cloth or parchment paper over your design. This provides an additional layer of protection, distributing heat more evenly and preventing scorching or shine marks on the fabric or transfer.
- Apply the Iron: Do not drag the iron. Instead, press it down firmly and steadily onto a section of your design. Apply constant, even pressure, moving the iron slowly in a circular motion, or by lifting and repositioning it to cover all areas.
- Time Guideline: The exact ironing time varies greatly by transfer paper/vinyl type and iron temperature. Typically, it ranges from 10 seconds per section for HTV to 2-4 minutes for an entire sheet of transfer paper. Always follow the manufacturer’s instructions explicitly. Ensure you apply sufficient pressure to edges and corners, as these are often the first areas to lift.
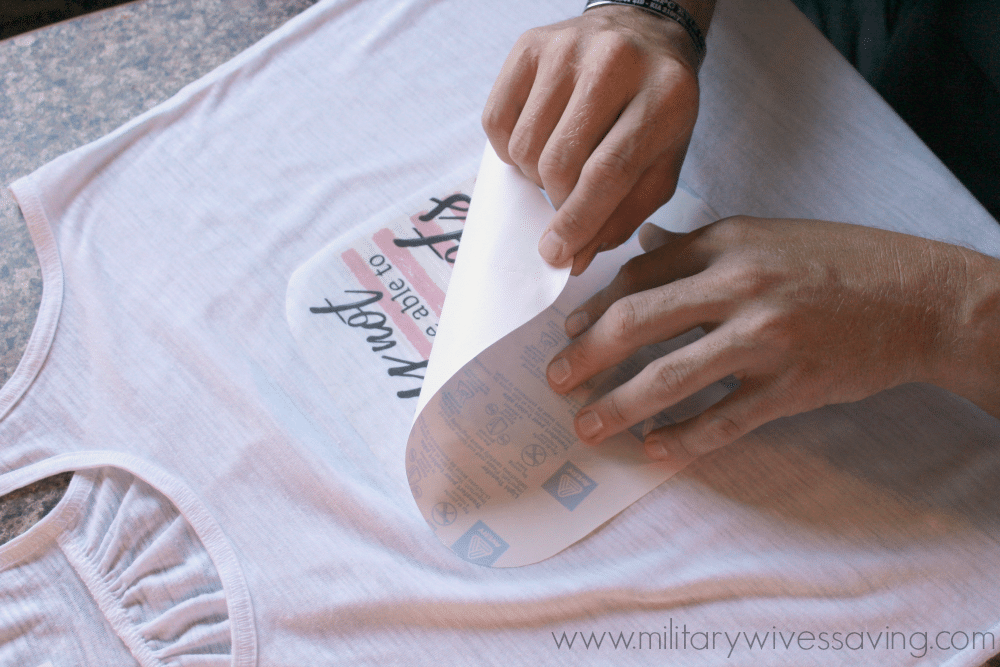
- Cooling and Peeling: Once you’ve ironed the entire design for the recommended time, carefully remove the iron. Now comes a moment of truth: peeling the backing.
- Cold Peel vs. Hot Peel: Some transfers require cooling completely to room temperature before peeling (cold peel), while others require peeling immediately while hot (hot peel). Attempting a cold peel on a hot-peel transfer, or vice versa, can ruin your design. Again, consult your transfer paper’s specific instructions.
- Gentle Removal: Begin peeling from one corner, pulling slowly and smoothly. If any part of the image lifts with the backing paper, lay the paper back down, re-iron that section, and try peeling again after re-cooling (if it’s a cold peel).
Post-Transfer Care for Lasting Beauty
Congratulations! Your custom shirt featuring beautiful photography or aesthetic digital art is complete. However, proper post-transfer care is essential to ensure its durability and longevity.
- Allow to Set: Let the newly transferred design “cure” for at least 24 hours before its first wash. This allows the adhesive to fully bond with the fabric fibers.
- Washing Instructions:
- Turn Inside Out: Always wash the garment inside out. This protects the transferred image from abrasion during the wash cycle.
- Cold Water, Gentle Cycle: Use cold or warm water and select a gentle cycle. Hot water and aggressive agitation can cause fading, cracking, or peeling.
- Mild Detergent: Use a mild liquid detergent. Avoid harsh chemicals like bleach, fabric softeners, or strong stain removers, as these can degrade the transfer.
- Drying: Air drying is highly recommended. Hang the shirt to dry naturally. If you must use a dryer, tumble dry on the lowest heat setting possible, still inside out. High heat is the enemy of iron-on transfers.
- Future Ironing: If the garment needs ironing in the future, never iron directly over the transferred image. Turn the shirt inside out and iron from the reverse side, or place a pressing cloth over the design and iron on a low-to-medium heat setting. Direct, intense heat can melt or damage the transfer.
By following these steps, your personalized apparel, adorned with striking images sourced from Tophinhanhdep.com, will maintain its visual appeal for as long as possible.
Advanced Tips, Troubleshooting, and Maintenance
Creating custom apparel with iron-on transfers is a rewarding experience, but sometimes challenges arise. With Tophinhanhdep.com’s focus on visual excellence, understanding how to enhance durability, troubleshoot common issues, and creatively expand your projects is paramount.
Ensuring Durability and Longevity of Your Visual Art
To maximize the lifespan of your custom-designed shirts, especially those featuring intricate digital art or high-resolution photography from Tophinhanhdep.com, consider these advanced tips:
- Invest in Quality Materials: Just as beautiful photography demands a high-quality print, a durable transfer demands quality transfer paper or HTV. Leading brands often provide better adhesion and resistance to wear. Also, choose a durable fabric (100% cotton or a high cotton-polyester blend) that can withstand heat and washing.
- Optimal Heat and Pressure: While we covered this in the step-by-step, consistency is key. A heat press machine, while an investment, offers superior, even heat and pressure compared to a household iron, significantly improving the transfer’s bond and durability. If using an iron, apply your full body weight for maximum pressure.
- Post-Press Protection: Some advanced users apply a thin layer of fabric sealant or a clear, heat-set varnish over the dried transfer (if compatible with the transfer material) to add an extra layer of protection against fading and peeling.
- Storage: Store custom garments properly to prevent designs from sticking together or creasing. Fold them gently or hang them without compressing the transfer area.
Common Issues and Their Creative Solutions
Even with careful planning, things can sometimes go awry. Here’s how to troubleshoot common iron-on transfer problems, often linked to digital photography and visual design execution:
- Design Not Adhering Properly:
- Cause: Insufficient heat or pressure, or not enough ironing time.
- Solution: Re-iron the area, applying stronger, more consistent pressure. Ensure your iron is at the correct temperature (often the highest, non-steam setting). If the design lifts easily from the edges, try focusing more heat there.
- Design Peeling Off After Washing:
- Cause: Poor initial adhesion, incorrect washing/drying, or low-quality transfer material.
- Solution: For minor peeling, you might be able to re-iron the affected area (with a pressing cloth). For future projects, ensure proper heat/pressure application and strictly follow care instructions. Consider higher-quality transfer paper or HTV.
- Design Smudging or Distorting:
- Cause: Iron moved too quickly, steam used, or fabric shifted during transfer.
- Solution: Ensure the iron is completely dry. Move the iron slowly and steadily. Secure the shirt and transfer firmly. This highlights the importance of precise photo manipulation during the printing stage and careful application.
- Transfer Paper Sticking to Iron/Garment:
- Cause: Iron too hot, no pressing cloth, or incorrect peel time (e.g., trying a hot peel on a cold-peel transfer).
- Solution: Check iron temperature. Always use a pressing cloth if recommended. Verify if your transfer is hot or cold peel. Ensure your iron is clean and residue-free.
- Colors Appear Dull or Faded:
- Cause: Low-resolution image, incorrect printer settings, or using light fabric transfer paper on a dark shirt.
- Solution: Start with high-resolution images from Tophinhanhdep.com. Adjust printer settings to “best quality” or “photo paper.” Use dark fabric transfer paper for colored or dark shirts. For dull prints, Tophinhanhdep.com’s Image Tools like optimizers and AI Upscalers can help enhance digital image quality before printing.
- Design Not Centered or Aligned:
- Cause: Hasty placement.
- Solution: Before ironing, take precise measurements. Use a ruler, fabric chalk, or temporary pins to mark the desired placement of your graphic design. Step back to confirm alignment.
Elevating Your Custom Apparel Beyond the Basics
Now that you’ve mastered the fundamentals of ironing an image onto a shirt, your creative potential is boundless. Tophinhanhdep.com encourages you to explore creative ideas, mood boards, and thematic collections for your next project.
- Diversify Your Canvas: Apply these techniques to a wider range of items: tote bags, hoodies, caps (using specialized curved platens or careful ironing), jeans, or even pillowcases. Each new item presents a fresh challenge for visual design and photo manipulation.
- Experiment with Materials: Venture beyond basic transfer paper. Explore the vibrant world of HTV—glitter, holographic, flocked, or puff vinyl—to add texture and dimension to your designs. Sublimation printing, for those with access to the equipment, opens doors to photo-realistic, soft-hand prints on polyester garments.
- Combine Techniques: Don’t limit yourself to just one method. You could iron on a photographic image and then use fabric markers or embroidery to add details, blending digital art with traditional crafts.
- Personalized Collections: Create themed collections for events, holidays, or personal interests. Use Tophinhanhdep.com’s Image Inspiration & Collections to curate sets of images, from nature to abstract, that tell a story across multiple garments.
- Harness Digital Tools: Leverage Tophinhanhdep.com’s Image Tools more extensively. Use converters to change image formats, compressors for web-friendly sharing of your design mock-ups, and image-to-text if you’re pulling quotes or specific fonts for your designs. The Visual Design possibilities are truly endless when you fully utilize these resources.
Conclusion
The journey of transforming a blank shirt into a personalized statement piece, adorned with an image ironed on with care, is an immensely satisfying one. From selecting that perfect, high-resolution image from Tophinhanhdep.com’s extensive library of beautiful photography and aesthetic backgrounds, through the meticulous steps of digital optimization and physical application, to the final moment of revealing your custom design, the process is a testament to the power of visual design and personal creativity.
While the DIY approach offers incredible flexibility and cost-effectiveness, remember that the durability of your creation is directly proportional to the quality of your initial image, the materials used, and the precision of your technique. Embrace the Image Tools available on Tophinhanhdep.com – from AI Upscalers to optimizers – to ensure your source imagery is impeccable. Dive into Image Inspiration & Collections for fresh photo ideas and trending styles, transforming your artistic vision into wearable art.
Whether you’re crafting a single, heartfelt gift or exploring the potential for unique custom apparel, the skills learned here lay the groundwork for endless creative projects. With an iron, a printer, the right transfer paper, and the rich visual resources of Tophinhanhdep.com, you hold the power to craft personalized garments that reflect your unique personality and artistic flair. So, go forth, experiment, and let your creativity shine, one custom shirt at a time!