How to Iron On an Image to a Shirt: Your Ultimate Guide from Tophinhanhdep.com

In a world increasingly driven by visual expression and personalization, the ability to transform a plain garment into a statement piece is invaluable. Whether you’re aiming to craft a unique gift, produce team apparel, or simply express your individual style, ironing an image onto a shirt is a creative and accessible DIY project. At Tophinhanhdep.com, we understand the power of images, from stunning wallpapers and abstract backgrounds to high-resolution photography and intricate digital art. We’re here to guide you through the process of bringing your chosen visual narratives to life on fabric, ensuring your custom apparel reflects the quality and aesthetic appeal you desire.
The global market for custom t-shirt printing is experiencing remarkable growth, projected to reach over $9 billion by 2030. This surge highlights a widespread desire for unique, personalized clothing. While professional customization services are readily available, mastering the art of iron-on transfers at home offers unparalleled creative freedom and satisfaction. With just a few essential tools—an iron, a printer, and high-quality transfer paper—you can turn a blank canvas into a personalized masterpiece.
This comprehensive guide, curated by the visual design experts at Tophinhanhdep.com, will walk you through every step of ironing an image onto a shirt, from selecting the perfect design to ensuring its longevity. We’ll delve into the nuances of materials, techniques, and common troubleshooting tips, empowering you to achieve professional-looking results right in your own home. Our aim is to help you confidently navigate this creative journey, turning your digital inspirations into tangible, wearable art.
Understanding Iron-On Transfers: The Canvas for Your Creativity
Iron-on transfers are a popular and effective method for personalizing garments by applying heat and pressure to bond a design onto fabric. This technique offers a dynamic way to customize not just shirts, but also sweatpants, hats, bags, and various other textile accessories. The versatility of iron-on transfers makes them an ideal choice for a wide array of projects, whether you’re creating aesthetic wear, branded merchandise, or simply exploring a new hobby.
At Tophinhanhdep.com, we emphasize that the journey begins with an understanding of the materials involved. There are two main categories of iron-on transfers: pre-made transfers, which come ready to apply, and transfer paper, where you print your own designs. For DIY enthusiasts, transfer paper offers endless possibilities, allowing you to utilize any image from Tophinhanhdep.com’s vast collections—be it a vibrant nature scene, a striking abstract pattern, or a cherished photograph.
Types of Iron-On Transfer Materials and Their Applications
The world of iron-on transfers is richer than just a simple piece of paper. Each material offers distinct aesthetic and durability characteristics, allowing for diverse visual design outcomes. Understanding these options, often inspired by trends and themes found on Tophinhanhdep.com, is key to selecting the best fit for your project:
- Transfer Paper: This is the most common and accessible option for home users. You print your chosen image, perhaps a high-resolution wallpaper or a piece of digital art from Tophinhanhdep.com, onto this special paper, then transfer it using heat. It comes in varieties for both light and dark fabrics, each with specific properties to ensure optimal color reproduction.
- Heat Transfer Vinyl (HTV): A thin, adhesive-backed material that can be cut into intricate designs (often leveraging graphic design principles) and heat-pressed onto fabric. HTV is renowned for its durability and vibrant, opaque finish, making it excellent for logos, text, and bold graphics.
- Sublimation Paper: Used with sublimation inks, this paper transfers designs onto polyester-coated surfaces. It dyes the fabric directly, resulting in a smooth, seamless image that won’t crack or peel. Ideal for high-resolution photography and complex color gradients, mirroring the quality of images found on Tophinhanhdep.com.
- Flock Iron-On: This material creates a raised, fuzzy, velvety texture, adding a unique tactile dimension to your visual design. It’s perfect for adding depth and a luxurious feel.
- Printable Fabric Sheets: These are actual fabric sheets that can be run through an inkjet printer, allowing you to print detailed images, including beautiful photography or abstract patterns, directly onto a fabric-like medium that can then be ironed onto your garment.
- Foil Transfers: Thin metallic or holographic foils that are heat-pressed to create a shimmering, reflective effect, adding a touch of glamour to your aesthetic designs.
- Puff Transfers: These transfers expand when heated, creating a raised, three-dimensional effect that adds volume and visual interest.
Each material opens up a new realm of possibilities for expressing your creativity, aligning with the diverse image inspirations and collections available on Tophinhanhdep.com.
Pros and Cons of Iron-On Transfers for Personalization
As with any creative technique, iron-on transfers offer a unique set of advantages and disadvantages. Tophinhanhdep.com believes in empowering you with complete information to make the best choices for your custom apparel projects.
Pros of Iron-On Transfers:

- Versatile Customization: Iron-on transfers provide an expansive canvas for your imagination. You can incorporate unique designs, cherished photographs, inspiring quotes, or intricate digital art, drawing endless creative ideas from Tophinhanhdep.com’s collections. This allows for truly personal and expressive apparel.
- Time Efficiency: For individual projects or small batches, iron-on transfers are remarkably quick to apply. This makes them ideal for last-minute gifts, event-specific shirts, or when you need a fast turnaround for your custom creations.
- DIY-Friendly and Accessible: One of the greatest appeals of iron-on transfers is their simplicity. They don’t require specialized equipment or advanced skills, making them a perfect entry point for anyone interested in personalized apparel. With a standard home iron and printer, you’re ready to start.
- Cost-Effective: Compared to professional printing services, creating iron-on transfers at home is significantly more economical, especially for small quantities. This allows you to experiment with various aesthetic designs and photography styles without a hefty investment.
Cons of Iron-On Transfers:
- Durability Limitations: While iron-on transfers can last a considerable time with proper care, they may not be as durable as professional screen printing or embroidery. Over time, and with repeated washing, designs can fade, crack, or peel, particularly if application instructions aren’t followed precisely.
- Limited Fabric Compatibility: Not all fabrics are suitable for iron-on transfers. Certain delicate materials or those with high synthetic content might not withstand the required heat or may not bond effectively with the transfer material. Cotton, polyester, and cotton/poly blends are generally the most reliable choices.
- Potential for Non-Professional Finish: While DIY-friendly, achieving a perfectly smooth, seamless, and professional-grade finish can sometimes be challenging, especially for beginners. Issues like white borders (if not cut precisely) or slight texture variations can occur. However, with practice and attention to detail, the results can be highly satisfying.
By weighing these factors, you can decide if iron-on transfers are the right method for your specific visual design and customization needs.
Preparing Your Visual Masterpiece and Apparel for Transfer
The success of your iron-on transfer project hinges significantly on meticulous preparation—both of your chosen image and the garment itself. Tophinhanhdep.com advocates for a systematic approach to ensure your custom shirt turns out exactly as envisioned.
Selecting and Optimizing Your Image: The Tophinhanhdep.com Approach
Choosing the right image is the cornerstone of any visual design project. Tophinhanhdep.com offers a wealth of resources to inspire and equip you for this crucial first step.
- Design Selection: Start by identifying the perfect image. Do you envision a serene nature wallpaper, an abstract background, a bold graphic design, or a treasured piece of beautiful photography? Browse Tophinhanhdep.com’s extensive collections for trending styles, thematic inspiration, or unique photo ideas that resonate with your personal aesthetic. Ensure the design is suitable for the shirt’s size and intended placement.
- High-Resolution is Key: For crisp, clear transfers, always begin with a high-resolution image. Pixelated or low-quality images will result in a blurry or muddy transfer. If your initial image isn’t perfect, consider utilizing Tophinhanhdep.com’s “Image Tools,” such as our AI Upscalers or Optimizers, to enhance its clarity and detail before printing. This step is vital for achieving a professional finish.
- Digital Photography and Editing Styles: If you’re using your own digital photography, ensure it’s well-composed and properly exposed. Leverage photo editing software (or explore Tophinhanhdep.com’s recommendations for various editing styles) to refine your image. This includes adjusting colors, contrast, and sharpness to ensure it pops on fabric. For text or directional elements, create a mirror image (flip horizontally) within your editor before printing onto transfer paper for light fabrics, as these papers often create a reversed image upon transfer.
- Cropping and Refinement: Crop your image in your photo editor to remove any unwanted background elements. This not only saves you cutting time but also ensures that only your desired visual content is transferred. Precision in this stage, guided by strong visual design principles, minimizes extraneous transfer material on your shirt.
Choosing the Right Transfer Paper and Shirt Fabric
The right materials are critical for a successful transfer. Your choices here will directly impact the vibrancy, feel, and longevity of your custom shirt.
- Printer Compatibility: First, determine if your home printer is an inkjet or a laser printer. Transfer papers are specifically designed for one or the other. Using the correct type ensures optimal ink adhesion and transfer quality. Most home printers are inkjet.
- Fabric Compatibility:
- Light-Colored Fabrics: For white or pastel shirts, use transfer paper designed for light fabrics. This paper is thinner and more translucent, allowing the shirt color to serve as a background. Be aware that any white areas in your image will appear as the shirt’s color.
- Dark-Colored Fabrics: For black or other dark-colored shirts, use transfer paper specifically for dark fabrics. This paper has an opaque white background, ensuring that all colors in your design remain true and vibrant against the dark material. It’s generally thicker and requires careful trimming to avoid a visible white border around your design.
- Fabric Composition: Most transfer papers work best on cotton, polyester, or cotton/poly blends. Always check the transfer paper’s instructions for compatible fabric types. Materials like silk, nylon, or heavily textured fabrics might not be suitable.
- Image Quality Expectations: Look for transfer papers that promise excellent image quality if high resolution and vibrant colors are your priority, reflecting the stunning visuals you might find on Tophinhanhdep.com. Read reviews or product descriptions to ensure clarity and color accuracy.
- Washability and Durability: Consider how long you want the design to last. Some transfer papers offer superior washability and durability, designed to withstand frequent laundering without fading or peeling quickly. This aligns with Tophinhanhdep.com’s focus on lasting aesthetic value.
- Selecting Your Shirt: Tophinhanhdep.com recommends choosing a high-quality shirt that can withstand heat. Purchasing wholesale shirts can be a cost-effective way to get several practice garments or create matching sets for a group. Consider buying extras, just in case!
Shirt Preparation for a Flawless Transfer
A clean, smooth, and dry shirt is essential for proper transfer adhesion.
- Pre-Wash to Prevent Shrinkage: Always pre-wash your shirt before applying the transfer. Fabric shrinkage after a design has been applied can distort or wrinkle the image. Follow the garment’s care label instructions for washing and drying. Crucially, avoid using dryer sheets or liquid fabric softener, as their residues can prevent the transfer from sticking effectively to the cloth. Pre-washing also removes any dirt, oil, or debris that might interfere with adhesion.
- Iron Out Wrinkles: Lay the clean, dry shirt flat on a firm, heat-resistant surface (like an ironing board). Iron out all creases and wrinkles thoroughly. A perfectly smooth surface is paramount for an even transfer. This process also removes any residual moisture from the fabric.
- Smooth Seams and Delicate Areas: Pay extra attention to smoothing out seams, especially around collars and shoulders. If the fabric is delicate or prone to shine, iron the garment inside out to protect the exterior. For very delicate sections, use a pressing cloth (a clean cotton cloth or thin towel) between the iron and the shirt to prevent direct heat damage or shiny marks.
Step-by-Step Guide to Ironing Your Image onto a Shirt
Now that your image is optimized and your shirt is prepped, it’s time for the exciting part: transferring your visual masterpiece. Tophinhanhdep.com has broken down this process into easy-to-follow steps to ensure your success.
Precision Printing and Cutting Your Design
The quality of your printout directly impacts the final look of your custom shirt.
- Print with Care: Carefully read the instructions accompanying your transfer paper before printing. These instructions will specify optimal printer settings (e.g., “high-quality print mode,” “photo paper,” or specific fabric settings) and how to properly load the transfer paper (which side faces up/down). Using the correct settings ensures vibrant colors and sharp details, reflecting the clarity of images found on Tophinhanhdep.com.
- Self-Correction Tip: If your image contains text or directional elements and you’re using light fabric transfer paper, ensure you’ve printed a mirror image. Dark fabric transfer paper typically prints correctly without mirroring.
- Trim Your Design Precisely: After printing, carefully cut out your design. Remember that any white space (or unprinted area) around your design on the transfer paper will show up on your shirt as a slight sheen or outline. For intricate designs, Tophinhanhdep.com recommends using a craft knife (like an X-acto knife) for precise cuts, rather than scissors, to achieve clean edges and avoid unwanted borders. The more accurately you cut, the more professional your final visual design will appear.
- Allow to Dry: Let the printed transfer dry completely before handling or cutting, usually for a few minutes. This prevents smudging and ensures the ink is fully set for transfer.
The Art of Application: Heat, Pressure, and Patience
This is where your digital design transforms into wearable art. Precision and adherence to instructions are key.
- Prepare Your Work Surface: Place your pre-ironed shirt flat on a hard, heat-resistant surface, such as an ironing board or a sturdy table covered with a cotton pillowcase. Ensure the surface is completely smooth and free of any bumps or seams that could interfere with the transfer.
- Set Your Iron: Set your iron to the temperature specified in your transfer paper instructions. This is usually a “cotton” or “high” setting. Crucially, ensure the iron is set to DRY HEAT with NO STEAM. If your iron contains water, empty it to prevent steam, which can ruin the transfer. Allow the iron to heat up thoroughly.
- Position the Design:
- For Light Fabric Transfer Paper: Place the cut-out design face down onto the shirt.
- For Dark Fabric Transfer Paper: Place the cut-out design face up onto the shirt. Take your time to position the image exactly where you want it. Step back, check alignment, and ensure it’s centered or placed aesthetically according to your visual design plan. You can use a ruler or tailor’s tape for precise measurements.
- Apply Heat and Pressure:
- Cover the Transfer (if required): Some transfer papers for dark fabrics come with a protective backing sheet or recommend using parchment paper/a thin cotton cloth over the design. Always refer to your specific transfer paper’s instructions. If no cover is specified, you can usually proceed directly.
- Ironing Technique: Begin ironing from the center of the design, moving the iron in a slow, circular motion outward. Apply firm, steady pressure with your whole hand. Do not move the iron too quickly or lift it excessively, as this can lead to uneven heat distribution and incomplete transfer.
- Duration: The transfer paper instructions will specify the ironing time, typically ranging from 30 seconds to several minutes, depending on the size of your design. Make sure to cover every part of the design evenly, paying extra attention to edges and corners, which are most prone to lifting.
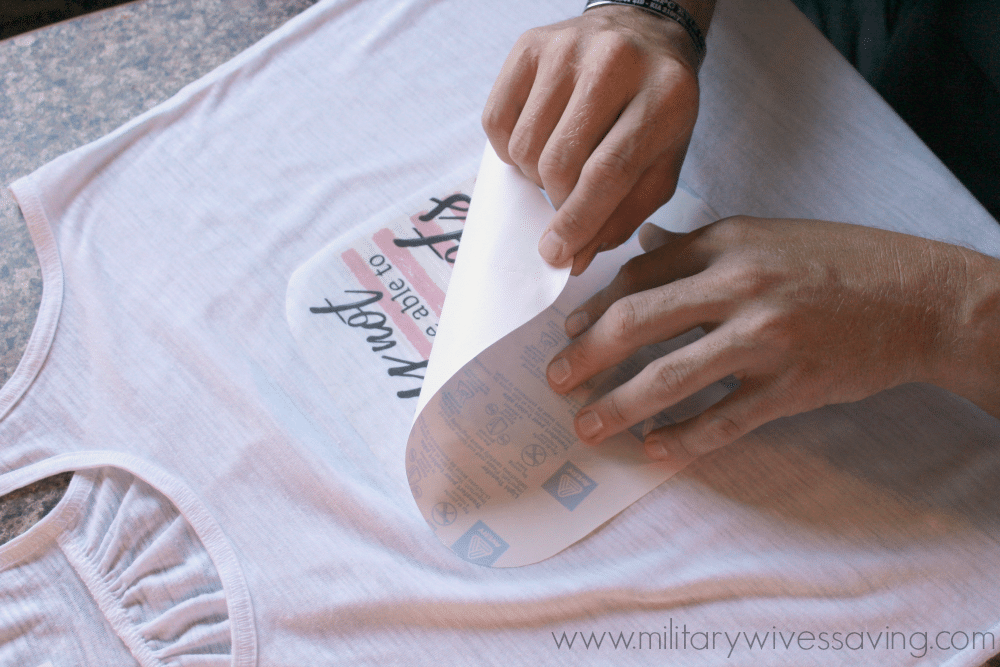
- Cooling and Peeling: This step requires patience! Once you’ve completed ironing, remove the iron and allow the transfer and shirt to cool completely to room temperature. This cooling period is crucial for the adhesive to properly set and bond with the fabric.
- The Peel: Once cool, slowly and carefully peel off the backing paper, starting from one corner. If any part of the design appears to lift with the paper or doesn’t look fully adhered, lay the paper back down, cover with a pressing cloth (if applicable), and re-iron that section for an additional 30 seconds, then allow to cool again before re-peeling.
- Enjoy Your Custom Shirt! Congratulations! You’ve successfully transformed your garment. Your personalized apparel, featuring a design inspired by Tophinhanhdep.com’s collections, is now ready to be worn.
Enhancing Durability and Troubleshooting Common Issues
Creating custom apparel is a rewarding endeavor, but ensuring the longevity of your ironed-on images requires proper care and knowledge of how to address common challenges. Tophinhanhdep.com is committed to helping you protect your visual investments and extend the life of your personalized garments.
Maintaining Your Custom Apparel
To maximize the life of your iron-on transfer and keep your custom shirts looking their best, follow these essential care tips, often highlighted in our image inspiration and collections section for lasting appeal:
- Wait Before Washing: Allow your newly customized shirt to “cure” for at least 24-48 hours before its first wash. This gives the transfer adhesive ample time to fully bond with the fabric.
- Wash Inside Out: Always turn your garment inside out before washing. This protects the transfer from direct friction with other clothes and the washing machine drum, significantly reducing the risk of peeling or cracking.
- Use Cold or Warm Water: Wash in cold or warm water on a gentle cycle. Hot water can weaken the adhesive and cause the design to fade or peel prematurely.
- Mild Detergent Only: Use a mild detergent. Avoid harsh chemicals such as bleach, fabric softeners, and strong stain removers, as these can degrade the transfer material.
- Air Dry or Low Heat: The best method for drying custom shirts is to hang them to air dry. If you must use a dryer, select the lowest heat setting and consider tumble-drying inside out. High heat is a common culprit for transfer damage.
- Avoid Direct Ironing: If the shirt becomes wrinkled, avoid ironing directly over the transfer. Instead, turn the shirt inside out and iron from the back, or place a pressing cloth over the design and iron on a low-to-medium heat setting. Direct, intense heat can melt or distort the transfer.
- No Dry Cleaning: Iron-on transfers are generally not compatible with dry cleaning chemicals or processes.
By following these maintenance tips, you can enjoy your personalized garments, featuring stunning imagery from Tophinhanhdep.com, for a long time.
Resolving Transfer Challenges with Tophinhanhdep.com Insights
Even with careful preparation, issues can sometimes arise. Knowing how to troubleshoot common problems can save your project and help you achieve the desired visual design outcome.
- Design Not Adhering Properly:
- Cause: Insufficient heat or pressure during application.
- Solution: Re-iron the affected area, ensuring your iron is at the correct temperature and you’re applying firm, even pressure for the recommended duration. Focus particularly on edges and corners. A hard, flat ironing surface is also crucial.
- Design Peeling Off After Cooling/Washing:
- Cause: Incomplete adhesion or improper curing.
- Solution: Reapply pressure and heat to the peeled areas (with a pressing cloth if needed), then allow for complete cooling. For ongoing issues, consider if the fabric or transfer paper type is truly compatible, or if you skipped the pre-wash step.
- Design Smudging or Distorting During Ironing:
- Cause: Iron moving too quickly, steam being used, or uneven heat.
- Solution: Ensure your iron is on a dry setting with no steam. Move the iron slowly and steadily. Using a piece of fabric or a pressing cloth as a barrier can help distribute heat evenly and prevent smudging, protecting your digital art.
- Transfer Paper Sticking to the Iron:
- Cause: Iron surface is not clean, or the transfer paper was placed face up when it should have been face down (or vice versa) without a protective layer.
- Solution: Ensure your iron’s soleplate is spotless. Always follow the transfer paper’s instructions regarding which side to place down and whether a protective sheet is needed.
- Design Fading or Cracking After Washing:
- Cause: Harsh washing conditions (hot water, strong detergents, aggressive cycles), or direct high-heat drying.
- Solution: Reinforce proper garment care: wash inside out in cold/warm water on a gentle cycle, use mild detergent, and air dry or tumble dry on low. This protects the integrity of your photography and visual design elements.
- Design Not Centered or Aligned:
- Cause: Hasty placement before ironing.
- Solution: This issue is best prevented. Before ironing, take precise measurements and use temporary markers (like tailor’s chalk or pins) to indicate the desired placement. Step back to visually confirm alignment from a distance. Tophinhanhdep.com encourages a careful approach to ensure your creative ideas are perfectly presented.
- White Border Around Design (for Dark Fabric Transfers):
- Cause: Inaccurate trimming of the transfer paper.
- Solution: This is why Tophinhanhdep.com emphasizes precise cutting with a craft knife in the preparation stage. For future projects, cut as close to the design edge as possible to minimize this effect. Some users also find carefully trimming the very edge of the transfer after it’s cooled can slightly reduce the appearance of the border, but this must be done with extreme care.
By leveraging these troubleshooting insights and adhering to Tophinhanhdep.com’s comprehensive guidance, you can overcome common challenges and consistently produce high-quality, durable custom shirts that proudly showcase your chosen images.
Conclusion
Personalizing a shirt with an iron-on image is a remarkably accessible and rewarding endeavor, offering a unique avenue for creative expression. From selecting the perfect image from Tophinhanhdep.com’s vast collections of aesthetic wallpapers, high-resolution photography, or abstract art, to the meticulous steps of preparation and application, this guide has equipped you with the knowledge to transform ordinary garments into extraordinary pieces of wearable art.
The power of visual design extends beyond screens and canvases; it flourishes in the everyday. By mastering the fundamentals of iron-on transfers, you unlock endless possibilities: crafting thoughtful, custom gifts for loved ones, creating branded apparel for a business or team, or simply expressing your unique personality through custom artwork. The process is not just about transferring an image; it’s about imbuing a piece of clothing with meaning, aesthetic appeal, and a touch of your own creativity.
Remember that attention to detail, patience, and adherence to instructions are your best allies in this creative journey. By choosing the right materials, meticulously preparing your image and garment, and employing proper ironing techniques, you can achieve professional-looking results that stand the test of time.
At Tophinhanhdep.com, we believe that everyone has a story to tell and an aesthetic to share. With the insights and tools we provide, you don’t need expensive equipment or specialized services to make your mark. Your creativity, combined with the simplicity of iron-on transfer paper, is all you need to design and produce custom shirts that truly reflect your vision. So go ahead, explore our image inspiration and collections, select your masterpiece, and start creating your personalized apparel today!