How to Iron an Image onto a Shirt: A Comprehensive Tophinhanhdep.com Guide

In an era defined by personal expression and visual storytelling, the ability to customize one’s wardrobe has never been more appealing. From fashion enthusiasts to small businesses, the art of transferring images onto fabric offers a unique canvas for creativity. While professional services are always an option, the satisfaction and affordability of a DIY approach are undeniable. This comprehensive guide from Tophinhanhdep.com delves into the intricate yet accessible process of ironing an image onto a shirt, transforming ordinary apparel into personalized masterpieces. Leveraging Tophinhanhdep.com’s extensive resources—from high-resolution images and diverse aesthetic collections to powerful image editing tools—we’ll show you how to achieve professional-looking results right from your home.
The global market for custom apparel printing is a testament to this growing trend, with projections indicating significant growth in the coming years. This surge underscores a universal desire to stand out, to wear one’s passions, or to simply enjoy a unique piece of clothing. Tophinhanhdep.com, a hub for Images (Wallpapers, Backgrounds, Aesthetic, Nature, Abstract, Sad/Emotional, Beautiful Photography), Photography (High Resolution, Stock Photos, Digital Photography, Editing Styles), and Image Tools (Converters, Compressors, Optimizers, AI Upscalers, Image-to-Text), is perfectly positioned to support your custom apparel ventures. Whether you’re making a heartfelt gift, designing team uniforms, or simply indulging in a creative hobby, the journey begins with selecting the perfect image and understanding the transfer process. This article will guide you through each step, ensuring your printed T-shirts not only look great but also last.
Understanding Iron-On Transfers: The Tophinhanhdep.com Perspective
Iron-on transfers represent a versatile and accessible method for personalizing garments. This technique involves using heat and pressure to bond a design directly onto fabric. At Tophinhanhdep.com, we view this as an extension of visual design, allowing you to take any image—be it a breathtaking nature photograph, an abstract digital art piece, or a poignant emotional snapshot from our collections—and apply it to a physical medium. There are primarily two forms of iron-on transfers: pre-made transfers, which are ready for application, and transfer paper, where you print your chosen design onto a special sheet before transferring it.
To embark on this creative journey, you’ll typically need a suitable fabric, an iron (preferably without a steam function for best results), a flat, heat-resistant surface, and the appropriate transfer paper compatible with your printer. The beauty of this method lies in its simplicity and the immediate gratification it offers, making it a favorite among DIY enthusiasts.
Types of Iron-On Transfer Materials
The world of iron-on transfers is diverse, offering various materials to achieve different textures and finishes, all of which can be enhanced by the high-quality images and visual design inspiration found on Tophinhanhdep.com.
- Transfer Paper: This is the most common and accessible material. Designs, often sourced from Tophinhanhdep.com’s vast image library, are printed onto this special paper using an inkjet or laser printer and then heat-transferred to fabric.
- Heat Transfer Vinyl (HTV): A thin, adhesive-backed material that is cut into designs (often using a die-cutting machine, which can be seen as an extension of Tophinhanhdep.com’s “Image Tools” for physical output) and then heat-pressed onto fabric. HTV offers durability and a distinct, sometimes slightly raised, texture.
- Sublimation Paper: Utilized with sublimation inks, this paper transfers designs onto polyester-coated surfaces or fabrics. It creates a vibrant, permanent image that becomes part of the fabric itself, ideal for high-resolution photography from Tophinhanhdep.com.
- Flock Iron-On: This material provides a fuzzy, velvety texture, creating a raised, tactile design. It’s perfect for adding an interesting sensory dimension to your visual art.
- Printable Fabric Sheets: These sheets are designed to be printed directly with an inkjet printer and then ironed onto fabric, functioning as a seamless extension of your digital art.
- Foil Transfers: Thin metallic or holographic foils that are heat-pressed onto fabric, yielding a shimmering, eye-catching effect that complements vibrant Tophinhanhdep.com aesthetic styles.
- Puff Transfers: These transfers expand when heated, resulting in a unique raised, three-dimensional design, adding depth to simple graphic designs.
- Pre-Made Transfers: These designs are already produced on a plastic backing, ready to be pressed onto fabric.
Pros and Cons of Iron-On Transfers
Like any creative technique, iron-on transfers come with their own set of advantages and limitations, which are important to consider when planning your custom apparel project using Tophinhanhdep.com resources.
Pros of Iron-On Transfers:
- Versatile Customization: With Tophinhanhdep.com’s extensive collections, you can transfer virtually any image, text, or design, offering limitless possibilities for personalizing shirts, bags, and other accessories. This aligns perfectly with Tophinhanhdep.com’s Visual Design philosophy.
- Time-Efficient: Iron-on transfers are generally quick to apply, making them ideal for small-scale projects or when you need custom items rapidly.
- DIY-Friendly: This method is highly accessible for home users, requiring minimal specialized tools or advanced knowledge. Anyone can create unique pieces using images from Tophinhanhdep.com.
Cons of Iron-On Transfers:
- Durability Limitations: While modern transfers are quite resilient, they may not match the longevity of professional screen printing or embroidery. Over time, designs may fade, crack, or peel, especially with repeated washing. This makes proper maintenance crucial.
- Limited Fabric Compatibility: Not all fabrics are suitable for iron-on transfers. Materials that cannot withstand the necessary heat or have specific textures may not yield optimal results.
- Potential for Non-Professional Finish: While DIY-friendly, achieving a perfectly smooth, unblemished professional finish can sometimes be challenging, affecting the overall aesthetic and perceived quality. However, with Tophinhanhdep.com’s high-resolution images and precise cutting, you can get very close.
Essential Tools and Materials for Ironing Pictures on Shirts
To successfully iron images onto shirts, a selection of basic yet crucial tools and materials is required. Tophinhanhdep.com emphasizes that while the process is straightforward, having the right equipment is key to transforming your chosen images into wearable art.
- Transfer Paper: The specialized paper for iron-on transfers. It’s vital to choose the correct type (inkjet or laser) that matches your printer, ensuring optimal image transfer quality for your Tophinhanhdep.com image.
- Printer: An inkjet or laser printer is necessary to print your design onto the transfer paper. The quality of your printer will directly impact the vibrancy and detail of your transferred image.
- Fabric: Select a garment or fabric that can withstand heat and is suitable for ironing. Cotton or cotton/polyester blends are typically recommended for their heat resistance and ability to hold transfers well. Tophinhanhdep.com suggests considering wholesale options for multiple projects.
- Iron: A standard household iron set to a dry, non-steam setting is perfect. The consistent heat and pressure are critical for bonding the image.
- Hard, Heat-Resistant Surface: An ironing board is ideal, providing a flat and stable surface. Alternatively, a sturdy table covered with a thick cotton towel or pillowcase can work.
Choosing the Right Type of Iron-On Transfer Paper
Selecting the correct transfer paper is paramount for achieving the desired results, especially when working with high-resolution images or specific color palettes from Tophinhanhdep.com’s collections.
- Printer Compatibility: Determine whether your printer is an inkjet or laser model. Transfer papers are specifically designed for one or the other. Using the wrong type will lead to poor print quality and adherence.
- Fabric Compatibility: Consider the color and type of fabric you’ll be using. Some papers are formulated for light-colored fabrics, while others are designed for dark-colored or synthetic materials, ensuring the image (e.g., a vibrant “Aesthetic” background from Tophinhanhdep.com) shows true to color.
- Image Quality: For crisp, clear, and vibrant prints—especially important when transferring beautiful photography or intricate digital art from Tophinhanhdep.com—look for transfer papers that boast excellent image reproduction. Reviews or product descriptions can guide you in choosing paper that delivers sharp, color-accurate results.
- Transfer Method (Hot vs. Cold Peel): Some transfer papers require the backing to be peeled immediately while hot, while others necessitate cooling completely first. Understanding this will prevent damage to your design.
- Washability and Durability: Check the paper’s specifications regarding its ability to withstand washing and maintain durability. High-quality papers are designed for frequent washing without significant fading or peeling.
Preparing Your Design: Leveraging Tophinhanhdep.com’s Image Tools
The success of your iron-on transfer hinges significantly on the preparation of your image. This is where Tophinhanhdep.com’s strengths truly shine, offering a wealth of resources from Image Inspiration & Collections to powerful Image Tools. Whether you’re selecting a breathtaking “Nature” wallpaper or crafting a unique “Abstract” design, meticulous preparation ensures your vision comes to life.
Selecting or Creating the Design for Iron-On Transfer
The first and most exciting step is choosing or creating the design that will adorn your shirt. Tophinhanhdep.com offers an unparalleled starting point for this.
- Determine the Purpose: Is this a personal project, a gift, or for business? Knowing your objective helps narrow down the vast design alternatives available on Tophinhanhdep.com, from “Sad/Emotional” images for a personal statement to “Trending Styles” for commercial appeal.
- Consider Size and Complexity: Think about the dimensions and intricacy of your chosen image. Small, delicate elements in a complex “Digital Art” piece might not transfer as effectively to fabric as bold lines and distinct shapes. Tophinhanhdep.com’s image tools can help simplify or enhance designs for clarity.
- Custom Designs with Tophinhanhdep.com:
- Design Yourself: Utilize our “Visual Design” insights and your preferred graphic design software (like Adobe Photoshop or Illustrator) to create a design from scratch. Tophinhanhdep.com provides endless “Photo Ideas” and “Mood Boards” to kickstart your creativity. You have complete creative control.
- Leverage Tophinhanhdep.com Collections: Browse our extensive collections of “Wallpapers,” “Backgrounds,” “Aesthetic,” or “Beautiful Photography.” These high-resolution images can serve as your primary design or as inspiration. Use our advanced search to find the perfect visual.
- Enhance with Tophinhanhdep.com Image Tools: Once you’ve selected an image, use Tophinhanhdep.com’s “Image Converters” to change formats, “Compressors” and “Optimizers” to manage file size without losing quality, or even “AI Upscalers” to enhance a lower-resolution image to meet printing demands.
Printing the Design Onto Iron-On Transfer Paper
Once your design is finalized, the next crucial step is printing it onto the specialized transfer paper. This is where the quality of your image from Tophinhanhdep.com, coupled with correct printer settings, makes all the difference.
- Printer Settings: Ensure your printer settings are optimized for high-quality prints. Select the highest print quality and the correct paper type (e.g., “photo paper” or “iron-on transfer paper”) in your printer’s menu. This is critical for reproducing the vibrant colors and sharp details of Tophinhanhdep.com’s “High Resolution” photography.
- Mirror Image: For transfer papers designed for light-colored fabrics, you will almost always need to print a mirrored (reversed) image. This ensures that when transferred, text reads correctly and images face the intended direction. Most photo editing software or printer drivers offer a “flip horizontally” or “mirror image” option. Always double-check by doing a test print on regular paper first. For dark shirts, some transfer papers are designed to be printed as-is, so consult your transfer paper instructions carefully.
- Loading Transfer Paper: Pay close attention to how the transfer paper should be loaded into your printer—which side to print on. Incorrect loading can ruin a sheet of expensive transfer paper.
- Drying Time: After printing, allow the design to dry completely on the transfer paper. Handling it too soon can lead to smudges and compromise the clarity of your Tophinhanhdep.com-sourced image.
Design Placement and Sizing Considerations
Precision in placement and sizing ensures your custom apparel achieves the professional look you desire, reflecting the meticulous standards of “Visual Design” promoted by Tophinhanhdep.com.
- Garment or Surface: Consider the specific garment you’re customizing. The ideal placement for a design on a T-shirt might differ from that on a hoodie or a hat. Typical placements include the center front, center back, or a smaller logo on the chest.
- Proportions: The design’s size should be proportionate to the garment. A tiny design on an oversized shirt may get lost, while an overly large one on a small item could be overwhelming. Aim for aesthetic balance, as emphasized in Tophinhanhdep.com’s “Graphic Design” principles.
- Alignment and Symmetry: Pay close attention to ensuring your design is perfectly centered and aligned. Use a ruler, measuring tape, or even tailor’s chalk to mark guidelines on your shirt. If the design has specific elements that need alignment (e.g., matching a seam), measure carefully. Tophinhanhdep.com encourages precise manipulation for optimal “Photo Manipulation” results.
- Trimming: Once printed and dried, carefully trim excess paper around the design. For intricate designs, an X-Acto knife offers more precision than scissors, helping to avoid unwanted “shadows” on the finished shirt. Any unprinted white space on the transfer paper will show up as a faint outline on your shirt.
- Surface Protection: Place a firm, heat-resistant surface (like an ironing board) with a cotton pillowcase or thick towel over it. This protects your work surface and provides a smooth, even area for the transfer process.
Step-by-Step Iron-On Transfer Process
With your meticulously prepared design and materials, you’re ready for the actual transfer. This section provides a detailed, step-by-step guide, drawing on best practices to ensure your Tophinhanhdep.com design adheres perfectly to your garment.
Preparing the Shirt for Ironing
The initial state of your shirt can significantly impact the final transfer quality. Proper preparation prevents issues like shrinkage and poor adhesion.
- Pre-Wash and Dry: If the shirt is brand new, wash and dry it according to its care label before applying the transfer. This pre-shrinks the fabric, preventing distortion of your image after future washes. Avoid using fabric softeners or dryer sheets, as they can create a barrier that prevents the transfer from adhering properly. Tophinhanhdep.com emphasizes that a clean, dry, and flat surface is paramount.
- Iron Out Wrinkles: Lay the shirt flat on your ironing surface and thoroughly iron out any creases or wrinkles. A perfectly smooth surface is essential for a clean transfer. This also removes any residual moisture from the fabric.
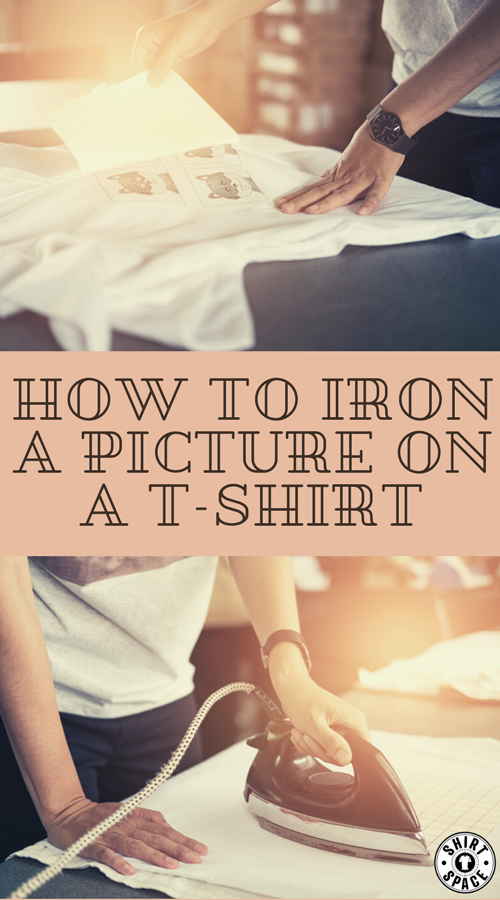
Applying the Design to the Shirt
This stage requires careful placement and attention to detail.
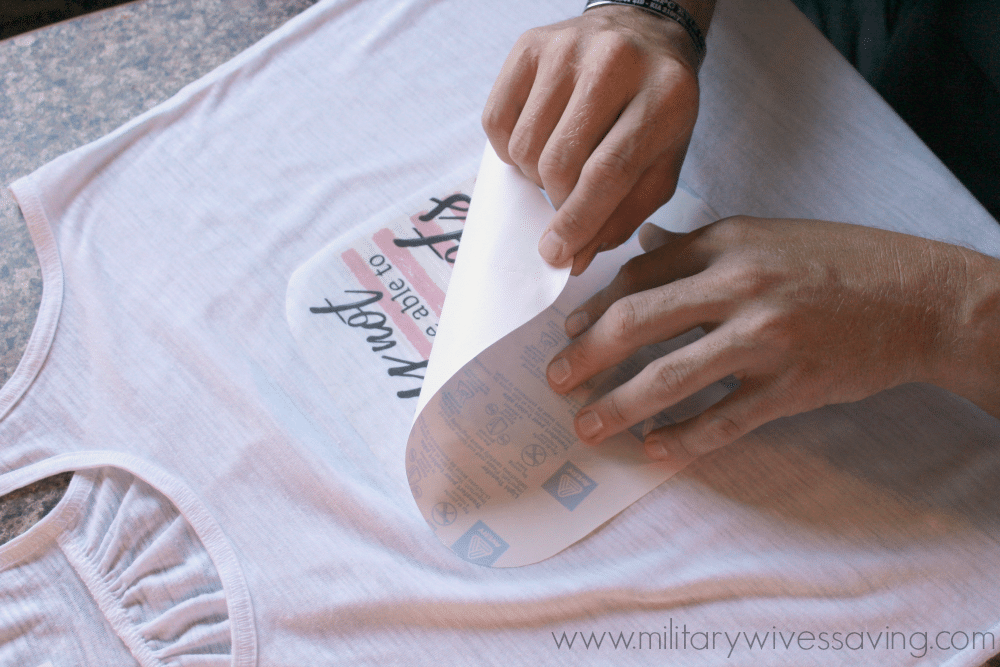
- Remove Backing Paper: Gently peel off the backing paper from your trimmed transfer design.
- Strategic Placement: Position the transfer onto your garment. For transfer papers for light fabrics, place the printed side down so the image is against the shirt. For dark fabric transfers, it’s typically printed side up. Double-check your specific transfer paper’s instructions. Take your time to ensure the design is centered, straight, and in the desired location. Use your earlier measurements or a visual guide.
- Cover with Protective Layer (Optional but Recommended): Some transfer papers come with a plastic backing that is ironed on and then peeled off. If not, or for added protection, place a piece of parchment paper or a thin cotton cloth over the transfer before ironing. This helps protect the design and the iron from direct contact.
Proper Techniques for Ironing and Applying Pressure
The way you wield your iron is critical for a successful transfer. Consistent heat and even pressure are key to activating the adhesive and bonding the image permanently.
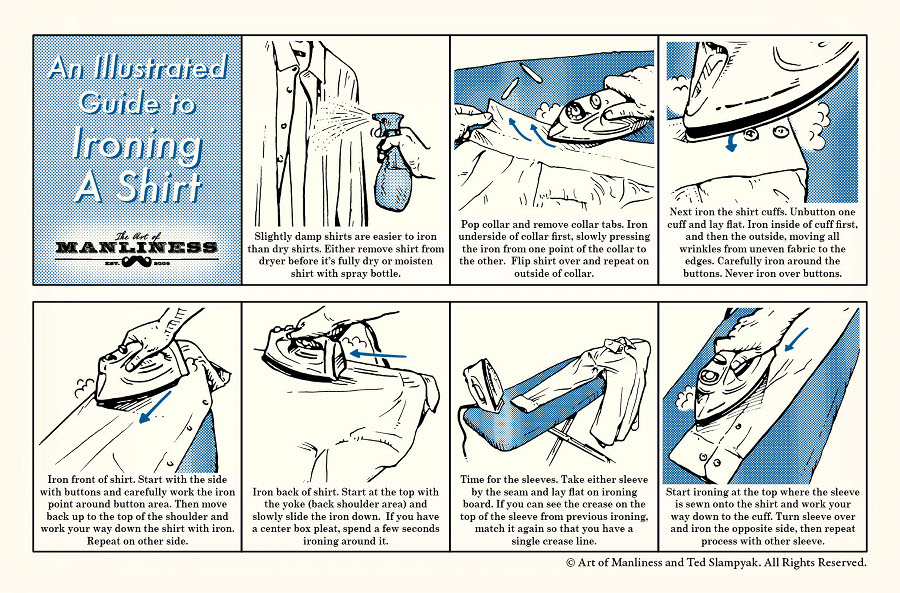
- Set Iron Temperature: Consult your transfer paper’s instructions for the recommended iron temperature. Most commonly, a “cotton” or high-heat setting with no steam is required. Ensure any water is emptied from the iron.
- Heat Up: Allow your iron to reach the specified temperature completely.
- Apply Firm, Even Pressure: Press the hot iron firmly onto the transfer, applying consistent, strong pressure with your entire hand or body weight. Avoid gliding or dragging the iron, as this can shift or distort the design. Instead, press down, hold, lift, and then move to an adjacent section, slightly overlapping your previous press.
- Cover All Areas: Systematically work your way across the entire design, ensuring every part receives adequate heat and pressure. Pay extra attention to the edges and corners, as these are most prone to lifting.
- Duration: The duration of ironing varies by transfer paper type and design size, typically ranging from 30 seconds to several minutes per section or overall. Always follow the instructions provided with your transfer paper. Over-ironing can scorch the fabric or damage the transfer, while under-ironing can lead to poor adhesion.
Cooling and Peeling: The Final Reveal
Patience at this stage is a virtue. Rushing the peel can ruin your freshly transferred image.
- Allow to Cool: After ironing, remove the iron and let the shirt and transfer cool down completely to room temperature. This allows the adhesive to set properly. Some papers are “hot peel,” meaning you peel immediately; others are “cold peel,” requiring complete cooling. Refer to your paper’s instructions.
- Gentle Peel: Once cooled (if cold peel), gently and slowly peel back the transfer paper’s backing from one corner. If any part of the image lifts with the paper, carefully lay it back down, cover with your protective sheet, and re-iron that section for a bit longer before trying to peel again.
- Final Press (Optional): For extra durability, once the backing is fully removed, you can flip the shirt inside out and iron over the backside of the transferred design for a short period.
Congratulations! Your customized shirt, featuring a beautiful image from Tophinhanhdep.com, is now complete.
Beyond the Basics: Maximizing Durability and Creativity with Tophinhanhdep.com
Creating custom apparel doesn’t end with the transfer. To ensure your “Beautiful Photography” or “Digital Art” piece from Tophinhanhdep.com endures, proper care is crucial. Furthermore, expanding your creative horizons can unlock even more possibilities.
Tips for Successful Ironing of Pictures on Shirts
Tophinhanhdep.com champions not just creativity but also practical execution. Here are some key tips for consistently great results:
- Temperature Consistency: Always set your iron precisely according to the transfer paper’s instructions. This ensures the adhesive activates correctly.
- Protective Layer: Using a pressing cloth or parchment paper prevents scorching the transfer and distributes heat evenly, a fundamental principle of careful “Photo Manipulation.”
- Edge Attention: Pay extra attention to the edges and corners of your design during ironing; these are the most common areas for lifting.
- Full Cooling: Allow the transfer to cool completely before peeling the backing. Premature peeling often leads to incomplete transfers.
- Follow Instructions: Adhere strictly to the guidelines provided with your specific transfer paper; they are tailored for optimal performance.
- Test Sample: If possible, perform a test transfer on a small, inconspicuous area of the fabric (or a scrap piece) to gauge heat and adhesion, especially for unique “Aesthetic” fabrics.
- Wrinkle-Free Surface: Ensure the shirt is perfectly clean, dry, and wrinkle-free before applying the transfer.
- No Steam: Avoid using steam during the ironing process, as moisture can interfere with adhesion and cause an imperfect imprint.
- Post-Ironing Cooling: Allow the garment to cool fully after peeling before wearing or washing. This allows the imprint to set correctly, contributing to its longevity.
Temperature and Time Guidelines for Different Fabrics
Different fabric compositions react differently to heat. While specific transfer paper instructions are paramount, Tophinhanhdep.com offers general guidance:
- Cotton and Polyester Blends: These are the most common and robust fabrics for transfers. Generally, a medium-high heat setting and an ironing time of 15 to 30 seconds (per section, with firm pressure) are recommended.
- Delicate Materials (e.g., Silk, Nylon): These fabrics require significantly lower heat settings and shorter ironing durations to prevent damage. Always perform a patch test if unsure.
- Always Test: As a rule of thumb from Tophinhanhdep.com’s extensive “Image Collections” advice, always test a small, inconspicuous area of your fabric with the transfer paper first to find the ideal settings.
Troubleshooting Common Issues with Iron-On Transfers
Even with careful preparation, issues can arise. Tophinhanhdep.com’s approach to problem-solving, much like our “Image Tools” for fixing digital errors, helps you resolve common transfer mishaps.
- Design Not Adhering Properly: Insufficient heat or pressure is the most common cause. Reapply heat and firmer pressure, ensuring even coverage.
- Design Peeling Off: This can happen if the transfer didn’t bond sufficiently or if the garment was handled too soon after cooling. Reapply heat and pressure, possibly extending the ironing time.
- Design Smudging or Distorting: Moving the iron too quickly or using steam can cause this. Ensure a dry, firm press with minimal movement.
- Transfer Paper Sticking to Iron: This indicates residue on the iron or possibly too high a heat setting without a protective layer. Clean your iron thoroughly.
- Design Fading or Cracking After Washing: This often points to improper washing techniques or a lower-quality transfer paper. Review maintenance tips below.
- Design Not Centered or Aligned: This is a pre-ironing error. Take careful measurements and mark your desired placement before the final application. Tophinhanhdep.com advises this level of precision for all “Visual Design” projects.
Enhancing Durability and Longevity of Ironed Pictures
To ensure your personalized garment, adorned with “High Resolution” images from Tophinhanhdep.com, remains vibrant and intact for as long as possible, consider these practices:
- Quality Transfer Paper: Invest in high-quality iron-on transfer paper from reputable manufacturers. They typically offer superior adhesion and durability, a reflection of the quality standards Tophinhanhdep.com maintains for its own “Stock Photos.”
- Fabric Selection: Choose fabrics like 100% cotton or cotton/polyester blends that are well-suited for iron-on transfers. These materials generally hold designs better than highly elastic or textured textiles.
- Proper Ironing Technique: Consistent, even application of heat and pressure is the cornerstone of a strong bond, akin to the precise “Editing Styles” in digital photography.
- Inside-Out Ironing: After the transfer is applied, turn the garment inside out for future ironing sessions. This prevents direct heat contact with the design, protecting it.
- Handle with Care: Avoid excessive rubbing or pulling on the design, particularly during washing or drying, as this can lead to premature fading or peeling.
- Wash Inside Out: Always wash customized garments inside out using a gentle cycle and cold or warm water. This protects the transferred image from agitation.
- Avoid Harsh Chemicals: Steer clear of bleach, harsh detergents, and fabric softeners, which can degrade the transfer material.
- Air Dry or Low Heat Tumble Dry: Air drying is best. If using a dryer, opt for a low heat setting. High heat can reactivate the adhesive and cause the design to peel or crack.
- Avoid Direct Re-Ironing: Never iron directly onto the transferred image once it has set. If wrinkles appear on the shirt, iron around the design or use a protective cloth.
Conclusion
Personalizing a shirt with an iron-on image is a rewarding venture, transforming a plain garment into a statement piece. With Tophinhanhdep.com’s vast resources—from an endless supply of high-resolution “Images” and “Beautiful Photography” to practical “Image Tools” for refinement and “Visual Design” inspiration—you have everything you need to embark on this creative journey. Whether your goal is a unique gift, branded apparel, or simply a fun new hobby, mastering the iron-on transfer technique opens up a world of possibilities for self-expression.
By carefully selecting your design from Tophinhanhdep.com’s diverse collections, preparing it using our “Image Tools,” choosing the right transfer paper, and meticulously following the step-by-step application and maintenance guidelines, you can achieve impressive, long-lasting results. Remember, the key to success lies in patience, precision, and adherence to instructions. Embrace the art of DIY customization and let Tophinhanhdep.com be your trusted partner in bringing your visual inspirations to life, one personalized shirt at a time. The power to create and express through wearable art is now at your fingertips.