How to Know the DPI of an Image: A Comprehensive Guide to Image Resolution for Tophinhanhdep.com Users

Understanding Image Resolution: DPI Fundamentals
In the world of digital imagery, where every pixel contributes to the visual story, understanding fundamental concepts like DPI (Dots Per Inch) is paramount. For creators, photographers, and enthusiasts exploring Tophinhanhdep.com’s vast collections of Wallpapers, Backgrounds, Aesthetic visuals, Nature scenes, Abstract art, Sad/Emotional imagery, and Beautiful Photography, knowing your image’s DPI can be the difference between a pristine print and a pixelated disappointment. This guide delves into the essence of DPI, its significance, and practical methods to ascertain it across various platforms, ensuring your visual projects achieve the highest possible fidelity.
DPI, or Dots Per Inch, is a measurement of spatial dot density, particularly used to describe the resolution of a printed image. It quantifies how many individual dots of ink a printer can place within a one-inch line. A higher DPI value means more dots are packed into that inch, resulting in a finer, more detailed, and sharper printed output. Conversely, a lower DPI count will produce a print that appears blocky, blurry, or “pixelated” to the naked eye, especially when viewed up close. For High Resolution Photography and professional Visual Design, a standard of 300 DPI is often recommended for high-quality prints, ensuring that every nuance and detail of the original image is faithfully reproduced.

It’s crucial to distinguish DPI from PPI (Pixels Per Inch). While often used interchangeably, especially in casual conversation, they refer to different aspects of resolution. PPI describes the density of pixels on a digital screen, determining how sharp an image appears on your monitor, tablet, or smartphone. An image with 72 PPI might look perfectly crisp on a screen, but when printed at a large size, it would likely appear fuzzy. DPI, on the other hand, strictly pertains to the printing process, where physical dots of ink are laid down on paper. While an image’s pixel dimensions (e.g., 1920x1080 pixels) are absolute and dictate how large it can be printed while maintaining a certain DPI, the DPI value itself is often a metadata tag that can be adjusted without changing the actual pixel data of the image. What truly matters for print quality is having sufficient pixel data and setting the appropriate DPI for the intended print size. This foundational understanding is vital for anyone managing Digital Photography collections or preparing images for print, whether it’s a stunning Nature wallpaper or a complex piece of Digital Art.
The journey into image resolution begins with recognizing that the “quality” of an image is multifaceted. It’s not just about the sheer number of pixels (width x height), but also how those pixels translate into physical dots when printed. A large image in terms of pixel dimensions (e.g., 6000x4000 pixels) has a lot of data. If you print this image at 300 DPI, it will yield a large, high-quality print. However, if you print a smaller image (e.g., 1200x800 pixels) at 300 DPI, the resulting print will be much smaller physically, or if stretched to a larger size, its effective DPI will drop, leading to quality loss. This interplay between pixel dimensions, physical print size, and DPI is the core of effective image management, a skill every Tophinhanhdep.com user can master to enhance their Aesthetic images and ensure their Creative Ideas translate flawlessly from screen to canvas.
For professionals engaged in Graphic Design or Photo Manipulation, DPI is a daily consideration. When creating designs for brochures, posters, or fine art prints, starting with images that have adequate pixel data and then correctly setting their DPI is a non-negotiable step. Similarly, for those curating Image Inspiration & Collections, particularly thematic ones like Sad/Emotional imagery or Trending Styles, ensuring consistent quality across different mediums is key to maintaining the visual integrity of the collection. The methods detailed below will equip you with the knowledge to inspect this critical metric, empowering you to make informed decisions about your images, from High Resolution Stock Photos to personal Beautiful Photography projects.
Checking DPI on Windows Systems
Windows operating systems offer several straightforward methods to check the DPI of an image, catering to both quick inspections and more detailed analyses. These built-in functionalities are incredibly useful for anyone working with Image Collections, organizing Wallpapers, or evaluating Stock Photos from Tophinhanhdep.com.
Method 1: Using Image Properties
This is often the quickest and most direct way to ascertain an image’s DPI on a Windows computer. It leverages the operating system’s native file information interface.
Step-by-Step Guide:
- Locate the Image: Navigate to the folder where your image file is stored using File Explorer. This could be anywhere from your “Pictures” folder to a custom directory for your “Nature” or “Abstract” image collections.
- Right-Click the Image: Position your mouse cursor over the image file you wish to inspect and right-click on it. A context menu will appear.
- Select “Properties”: From the context menu, scroll down to the very bottom and click on the “Properties” option. A new window, displaying various attributes of the file, will open.
- Navigate to the “Details” Tab: Within the Properties window, you will see several tabs at the top (e.g., General, Security, Previous Versions). Click on the “Details” tab. This section provides extensive metadata about the file, including image-specific information.
- View the DPI: Scroll down within the “Details” tab until you find the “Image” header. Underneath this header, you will see entries for “Horizontal resolution” and “Vertical resolution.” These values are typically expressed in “DPI” (e.g., 300 DPI) and represent the image’s dots per inch.
This method is ideal for a quick check when you need to confirm the print readiness of a single file, perhaps a Beautiful Photography piece you downloaded from Tophinhanhdep.com or a High Resolution image you’re considering for a print project. It’s a fundamental step in Digital Photography workflows to ensure image quality before proceeding with editing or printing.
Method 2: Leveraging File Explorer Details
For users who frequently manage large Image Collections or need to quickly assess the DPI of multiple images at once, configuring File Explorer to display resolution details can be a significant time-saver. This method allows for a “glance-and-go” approach, especially useful for curating a Mood Board or organizing thematic Wallpaper sets.
Step-by-Step Guide:
- Open File Explorer: Launch File Explorer by clicking its icon on the taskbar (the folder icon) or by pressing the
Windows key + E. - Navigate to Image Folder: Go to the folder containing the images you want to check.
- Switch to “Details” View: At the top of the File Explorer window, click on the “View” tab. From the ribbon menu that appears, ensure that “Details” is selected under the “Layout” section. This changes the display of your files to a list format with various columns.
- Customize Columns: Right-click on any of the existing column headers (e.g., “Name,” “Date modified,” “Type”). A context menu will appear. From this menu, click on “More…” This will open the “Choose Details” pop-up window.
- Add Resolution Columns: Within the “Choose Details” window, scroll through the extensive list of available attributes. Find and check the boxes next to “Horizontal resolution” and “Vertical resolution.” Once selected, click “OK” to apply these changes.
- View DPI in Explorer: The File Explorer window will now display new columns for “Horizontal resolution” and “Vertical resolution.” You can immediately see the DPI values for all images in that folder without opening each one individually.
This feature is particularly valuable for photographers sorting through raw captures or designers managing assets for Graphic Design projects. It allows for efficient quality control, especially when dealing with different Editing Styles or preparing images for various output formats on Tophinhanhdep.com. Imagine organizing a collection of High Resolution stock photos; this method lets you quickly identify any images that might not meet your DPI requirements.
Method 3: Utilizing Microsoft Paint
Microsoft Paint, a staple image editor pre-installed on most Windows systems, offers another simple way to check an image’s DPI. While not a professional tool for Photo Manipulation, it’s readily available for quick checks.
Step-by-Step Guide:
- Right-Click the Image File: Locate your image file in File Explorer and right-click it.
- Open with Paint: From the context menu, hover over “Open with” and then click “Paint” in the list of applications. If Paint isn’t immediately visible, you might need to click “Choose another app” and select it from the full list. The image will open within the Paint application.
- Access File Properties: Once the image is open in Paint, click on the “File” tab located in the top-left corner of the window.
- Select “Properties”: From the “File” menu, click on “Properties” (often indicated by a small document icon or found towards the bottom of the menu). A new “Image Properties” dialog box will appear.
- Find the Resolution: Within this dialog box, you will find the image’s DPI listed next to “Resolution” (e.g., 96 dots per inch). Paint typically displays the common screen DPI of 96, even if the image metadata suggests something else, so always cross-reference if printing is your goal.
While Paint is simple, it’s a useful tool for a basic check, especially for everyday images like personal Backgrounds or quick Creative Ideas. For more precise or print-oriented work, as suggested for Tophinhanhdep.com’s Beautiful Photography, other methods or professional software might be preferred. It’s also a good starting point before using an Image Compressor or Optimizer.
Method 4: Advanced Check with Adobe Photoshop (and similar tools)
For professionals and serious enthusiasts using Tophinhanhdep.com for their Digital Photography or Visual Design needs, Adobe Photoshop offers the most robust and accurate way to check, understand, and modify image DPI. Its comprehensive features make it indispensable for detailed image editing and preparation.
Step-by-Step Guide:
- Open Image in Photoshop: Launch Adobe Photoshop and open the image file you wish to inspect. This is the preferred method for working with High Resolution Stock Photos, complex Digital Art, or images undergoing extensive Photo Manipulation.
- Access Image Size: Go to the menu bar at the top of the Photoshop window, click on “Image,” and then select “Image Size…” (or use the keyboard shortcut
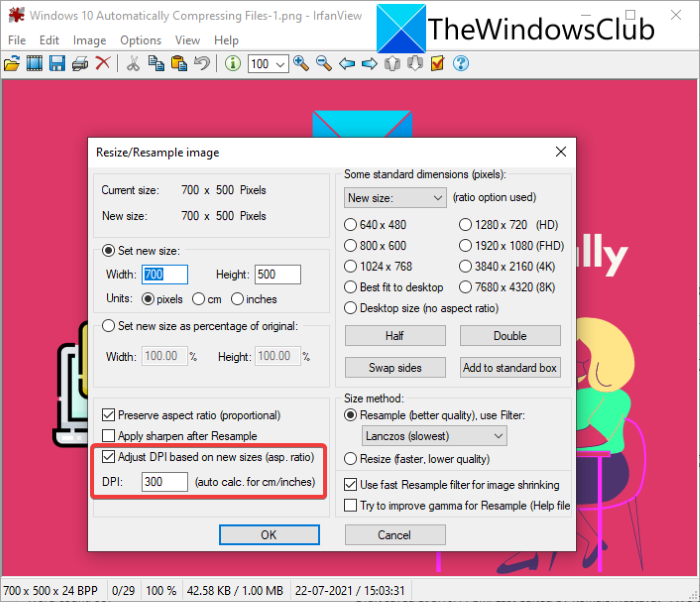
Alt + Ctrl + Ion Windows). The “Image Size” dialog box will appear. - View and Adjust Resolution: Within the “Image Size” dialog box, you will see a “Resolution” field, typically measured in “Pixels/Inch” (which is equivalent to DPI for print purposes). Here, you can directly see the image’s current DPI. You can also adjust this value. Crucially, Photoshop allows you to understand the relationship between pixel dimensions, document size, and resolution. If “Resample” is unchecked, changing the resolution will inversely affect the print dimensions without altering the pixel count. If “Resample” is checked, Photoshop will add or remove pixels, impacting the actual data of the image.
Photoshop is the go-to for precise control over image resolution, essential for preparing images for print, web, or any other medium. It allows photographers to ensure their Beautiful Photography meets client specifications, and designers to maintain impeccable quality for their Graphic Design projects. This level of control is paramount when aiming for truly high-quality output, a core value for Tophinhanhdep.com. Other professional photo editing tools like GIMP, Affinity Photo, or Corel PaintShop Pro offer similar “Image Size” or “Resolution” dialogues.
Checking DPI on Mac Systems
Mac users also have intuitive, built-in tools to check image DPI, integrating seamlessly with the macOS environment. These methods are efficient for managing Aesthetic images, Nature backgrounds, or any Digital Art from Tophinhanhdep.com.
Method 1: Using Preview
Preview is the default image viewer and basic editor on macOS, and it provides a straightforward way to inspect image properties, including DPI. It’s a quick and native solution for most users.
Step-by-Step Guide:
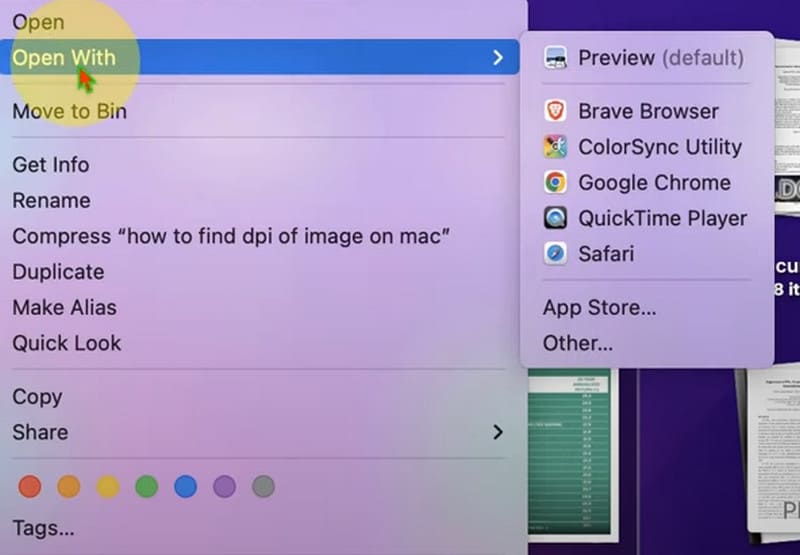
- Navigate and Right-Click the Image: Locate the image file using Finder. Right-click (or Control-click) on the image file you want to check.
- Open with Preview: From the context menu, select “Open With,” and then click “Preview.” The image will open in the Preview application.
- Access the Inspector: Once the image is open in Preview, go to the menu bar at the top of the screen. Click “Tools,” and then select “Show Inspector” (or use the keyboard shortcut
Command + I). A new panel, the “Inspector,” will open, typically floating alongside your image. - Find the DPI: Within the Inspector panel, you’ll see several tabs. Click on the “General Info” tab (often represented by a small ‘i’ in a circle or a document icon). Scroll down within this tab, and you will find the “Image DPI” clearly listed.
This method is highly user-friendly and provides immediate access to the DPI value. It’s excellent for photographers wanting to quickly verify the resolution of their Stock Photos or for designers checking the print readiness of their Graphic Design elements. For Tophinhanhdep.com users, this is an easy way to ensure that any Aesthetic or Nature wallpapers they’ve downloaded are suitable for their intended use, especially if printing.
Method 2: Finder’s Get Info (for pixel dimensions and related insights)
While Finder’s “Get Info” window doesn’t directly display the DPI in the same explicit way as Preview or Windows’ Properties, it provides crucial pixel dimensions which are foundational to understanding an image’s resolution for print. Knowing the pixel dimensions allows you to calculate the effective DPI for a given print size.
Step-by-Step Guide:
- Locate the File: In Finder, navigate to the image file you wish to examine.
- Access Get Info: Right-click (or Control-click) on the image file and select “Get Info” from the context menu (or use the keyboard shortcut
Command + I). A new “Info” window will open. - View Pixel Dimensions: Within the “Info” window, expand the “More Info” section if it’s not already open. Here, you will find the “Dimensions” listed, showing the width and height of the image in pixels (e.g., 4000 x 3000).
Understanding the Relationship:
Even without a direct DPI readout, the pixel dimensions are highly informative. For example, consider an image with dimensions of 3000 x 2000 pixels. If you want to print this image at 10 x 8 inches:
- Divide the horizontal pixels by the desired width in inches: 3000 pixels / 10 inches = 300 PPI (effective DPI).
- Divide the vertical pixels by the desired height in inches: 2000 pixels / 8 inches = 250 PPI (effective DPI).
This calculation shows that for a 10x8 inch print, the image would have an effective resolution between 250-300 DPI, which is generally good for quality prints. If you tried to print a 600x400 pixel image at the same 10x8 inches, the effective DPI would be only 60 PPI (600/10) or 50 PPI (400/8), resulting in a very pixelated print. This approach is fundamental for anyone curating Image Inspiration & Collections, where knowing the raw data is more valuable than a potentially misleading metadata tag, allowing for informed choices about optimal print sizes for their Thematic Collections or Trending Styles.
Online and Advanced Tools for DPI and Image Optimization
Beyond operating system-specific tools, the digital landscape offers a plethora of online and advanced software solutions that not only allow you to check DPI but also provide powerful functionalities for Image Optimization, conversion, and enhancement. These tools are indispensable for Tophinhanhdep.com users dealing with Stock Photos, Digital Art, or preparing their Beautiful Photography for various uses.
Web-Based Image Tools
The convenience of online tools cannot be overstated. They often require no software installation, making them accessible from any device with an internet connection. Many of these platforms are integrated with functionalities that display or help modify DPI.
How They Work and Their Utility:
- Image Converters and Optimizers: Websites offering image conversion (e.g., JPG to PNG, HEIC to JPG) or compression often include metadata viewers or options to set DPI during the conversion/optimization process. When you upload an image to an online Image Compressor, for instance, it might display the original DPI as part of the image information before you apply compression settings. This allows you to maintain a desired print resolution even as you reduce file size, which is critical for web performance without sacrificing print potential for an Abstract or Nature wallpaper. Tophinhanhdep.com encourages the use of such tools to ensure efficient delivery of high-quality visuals.
- Online Image Editors: Basic online editors may offer an “Image Size” or “Resize” option where resolution (DPI/PPI) can be viewed or adjusted. While not as feature-rich as desktop software, they are perfect for quick adjustments to a Sad/Emotional image or an Aesthetic background before sharing.
- Dedicated Metadata Viewers: Some websites specialize in displaying comprehensive metadata (EXIF data) of images, which often includes DPI, camera settings, and other details. These are great for photographers who want to analyze their Digital Photography or Beautiful Photography to understand camera performance and image characteristics.
- AI Upscalers: For instances where you have a lower DPI image but need a higher resolution print (common with older photos or found images), AI Upscalers are revolutionary. Tools like those found on Tophinhanhdep.com can intelligently add pixels, effectively increasing both pixel dimensions and potential DPI without the blurring usually associated with traditional upscaling. When using an AI Upscaler, it’s beneficial to know the original DPI to appreciate the extent of the enhancement. This is especially useful for transforming a standard image into a High Resolution piece of Digital Art or a striking Wallpaper.
The integration of these web-based tools means that even without advanced software, Tophinhanhdep.com users can maintain control over the technical aspects of their Creative Ideas and Image Inspiration.
Specialized Software for Image Analysis and Manipulation
Beyond mainstream tools like Photoshop, various specialized software cater to advanced image analysis and Photo Manipulation. These often offer granular control and detailed reporting on image properties, including DPI.
- Professional Photo Editing Suites: Software like Lightroom, Capture One, or GIMP (a free, open-source alternative to Photoshop) provide robust image management and editing capabilities. They allow you to view, adjust, and often batch-process DPI settings, which is invaluable for large collections of Stock Photos or when preparing images for print in different sizes. For example, a professional photographer preparing a gallery of Beautiful Photography for an exhibition would use such software to ensure every image conforms to specific print DPI requirements.
- Graphic Design Software: Programs like Adobe Illustrator (for vector graphics, but often linked with raster images) or InDesign (for layout design) interact with image DPI. While they don’t define the DPI of raster images, they respect it when placing images and warn users if an image’s effective DPI is too low for the print output, making them essential for Visual Design professionals.
- Command-Line Tools (e.g., ImageMagick): For tech-savvy users or those needing to automate image processing, command-line tools can inspect and modify DPI efficiently across many files. This is often used in web development for optimizing large sets of Backgrounds or Wallpapers, ensuring they load quickly while still retaining quality for different screen resolutions.
These advanced tools empower Tophinhanhdep.com users to achieve precise control over every aspect of their visual content, from the initial capture of Digital Photography to the final print of their Digital Art, ensuring that quality is never compromised.
Why DPI Matters for Your Content on Tophinhanhdep.com
Understanding and checking the DPI of your images is not merely a technicality; it’s a critical aspect of ensuring the quality, versatility, and professional presentation of your visual content. For Tophinhanhdep.com, a platform dedicated to high-quality images and innovative tools, the implications of DPI are far-reaching across all our categories, from Wallpapers and Backgrounds to professional Photography and Visual Design.
Ensuring Print Quality: The 300 DPI Standard
The most direct impact of DPI is on print quality. For any image intended to be printed – be it a cherished family photo, a promotional poster derived from a Creative Idea, a fine art print of a Nature scene, or a captivating Abstract piece from Tophinhanhdep.com’s collections – a DPI of 300 is widely considered the industry standard for sharp, high-resolution output when viewed at a normal distance.
- Crisp Details: At 300 DPI, individual ink dots become virtually imperceptible to the human eye, rendering smooth gradations, sharp lines, and intricate details. This is paramount for showcasing the nuances of Beautiful Photography or the fine textures in a High Resolution Stock Photo.
- Professional Presentation: Whether you’re producing marketing materials, art prints, or personalized gifts, ensuring a sufficient DPI elevates the professionalism of your output. A low-DPI print can undermine even the most stunning Aesthetic or Sad/Emotional image.
- Avoiding Pixelation: The tell-tale sign of insufficient DPI in print is pixelation – visible squares that make the image appear jagged and blurry. By checking DPI beforehand, you can avoid this common pitfall and ensure your print matches the clarity of its digital counterpart.
For users planning to print any of the exquisite Wallpapers or Backgrounds found on Tophinhanhdep.com, knowing the DPI or being able to achieve 300 DPI through appropriate resizing and pixel density is essential. This is where tools like Image Converters or AI Upscalers become invaluable, helping bridge the gap between web-optimized images and print-ready files.
DPI for Web Use vs. Pixel Dimensions
While DPI is paramount for print, its role in web display is often misunderstood. For images displayed on screens (monitors, smartphones, tablets), the DPI metadata tag itself is largely irrelevant. Web browsers and operating systems typically render images based on their absolute pixel dimensions (width x height) and the device’s own PPI.
- Pixel Dimensions are King for Web: A 1920x1080 pixel image will occupy the same screen space whether its metadata lists 72 DPI or 300 DPI. What truly determines its clarity on screen is the number of pixels it contains and the resolution of the display it’s viewed on. For High Resolution images on Tophinhanhdep.com, having ample pixel dimensions ensures they look sharp on modern high-PPI (Retina) displays.
- File Size and Load Times: High DPI settings often correlate with larger file sizes, especially if they imply higher pixel counts. For web content, excessively large image files can lead to slow loading times, impacting user experience. This is where Image Tools like Compressors and Optimizers become crucial. You might start with a 300 DPI image for print, but for web use, you would optimize it to a lower file size, often by reducing pixel dimensions (if the design allows) and ensuring it loads quickly, without necessarily changing its metadata DPI.
- Responsive Design and Future-Proofing: Providing images with generous pixel dimensions (even if the DPI for web is technically ignored) is good practice for responsive web design. A high-pixel-count image can scale down effectively for smaller screens while maintaining sharpness on larger, high-resolution displays. This future-proofs your collections of Aesthetic or Thematic Collections against evolving display technologies.
Tophinhanhdep.com emphasizes that while DPI isn’t a direct factor for web display, sourcing or creating images with high pixel counts is vital for universal clarity and adaptability.
Enhancing Visual Design and Photography Workflows
For professionals in Graphic Design, Digital Art, and Digital Photography, DPI is an integral part of their workflow, influencing everything from initial concept to final output.
- Pre-press Preparation: Designers must ensure all raster elements (photos, textures) in their Graphic Design projects meet the required print DPI. Incorrect DPI can lead to costly reprints or unsatisfied clients. Checking DPI early in the process prevents late-stage issues.
- Photo Manipulation Accuracy: When performing Photo Manipulation, especially when compositing elements from different sources, maintaining consistent and adequate DPI across all layers is essential for a cohesive and high-quality final image. This also applies when integrating Stock Photos into a new Creative Idea.
- Digital Art Fidelity: Artists creating Digital Art need to work at a resolution that allows for both detailed digital creation and high-quality physical reproduction. Knowing and setting the DPI correctly in their software ensures their artistic vision translates perfectly from screen to print.
- High Resolution Photography Delivery: Photographers delivering High Resolution images to clients must ensure their files adhere to specified DPI standards for print. Using the methods outlined in this guide, they can verify that their Beautiful Photography is always print-ready.
Leveraging Image Tools and AI Upscalers Effectively
Tophinhanhdep.com offers advanced Image Tools, including AI Upscalers, that significantly benefit from an understanding of DPI.
- Optimized Compression: When using an Image Compressor, knowing the image’s original DPI can help you decide how much to compress or resize without jeopardizing quality for specific uses. For instance, if a Wallpaper is 300 DPI but only needed for a 72 DPI web background, you have flexibility to compress more aggressively.
- Intelligent Upscaling: AI Upscalers work by analyzing existing pixels and intelligently generating new ones, effectively increasing both pixel dimensions and the potential DPI for print. If you have an older, lower-DPI image (perhaps a historical Nature photograph or a retro Aesthetic image) that you wish to enlarge significantly, an AI Upscaler can dramatically improve its suitability for printing. Checking the DPI before and after upscaling helps you quantify the improvement and determine if it meets your desired print quality. This is particularly exciting for breathing new life into older Image Inspiration & Collections or adapting Trending Styles to higher resolutions.
- Converter Decisions: When using Image Converters, the choice of output format and settings might depend on whether the target application is print or web. Understanding DPI guides these decisions, ensuring the converted file serves its purpose optimally.
In essence, DPI is the bridge between the digital image and its tangible manifestation. For the diverse range of images and creative pursuits supported by Tophinhanhdep.com – from providing inspiring Mood Boards and Thematic Collections to offering robust Image Tools for Digital Photography and Graphic Design – a solid grasp of how to know and manage DPI is invaluable. It empowers you to curate, create, and share visuals with confidence, knowing they will always look their best, no matter the medium.
Conclusion: Mastering Image DPI for a World of Visual Excellence
The journey through the intricacies of image DPI reveals its undeniable importance in the realm of digital visuals, particularly when venturing beyond screen display into the tangible world of print. For the vibrant community of Tophinhanhdep.com, where users explore, download, and create with Wallpapers, Backgrounds, Aesthetic imagery, Nature scenes, Abstract art, Sad/Emotional visuals, and Beautiful Photography, understanding how to know the DPI of an image is a fundamental skill. It empowers you to make informed decisions, ensuring that every pixel contributes to the overall clarity and impact of your chosen visual.
We’ve explored several user-friendly methods to check image DPI across both Windows and Mac operating systems. From the straightforward “Properties” and “File Explorer” options on Windows to the intuitive “Preview Inspector” and “Get Info” details on Mac, these native tools offer quick and accessible ways to gauge your image’s print readiness. For those requiring more granular control and advanced manipulation, professional software like Adobe Photoshop stands as the industry standard, providing the power to not just check but also precisely adjust resolution for diverse outputs. Furthermore, the burgeoning landscape of online Image Tools, including sophisticated AI Upscalers and efficient Image Compressors, offers convenient alternatives to enhance and optimize your visuals, regardless of your software proficiency.
The significance of DPI extends far beyond a mere technical specification. It is the cornerstone of print quality, ensuring that your High Resolution Photography retains its stunning detail when printed, and that your Graphic Design projects appear crisp and professional. While pixel dimensions reign supreme for web display, a strong foundation in DPI knowledge informs better practices for image optimization, guaranteeing fast load times without sacrificing potential print fidelity. For Visual Design enthusiasts, Digital Art creators, and those curating Image Inspiration & Collections, this understanding is vital for consistency, artistic integrity, and achieving those perfect Creative Ideas that resonate with viewers.
At Tophinhanhdep.com, our mission is to provide an unparalleled resource for high-quality images and powerful tools. By mastering the art of checking and understanding image DPI, you are better equipped to leverage our vast collections, utilize our innovative Image Tools, and elevate your own photography and design endeavors. Whether you’re selecting a breathtaking Nature wallpaper for your desktop, preparing a series of Aesthetic backgrounds for a presentation, or fine-tuning a Sad/Emotional piece for a personal project, ensuring optimal image resolution is your key to visual excellence. We encourage you to apply these methods, explore our resources, and embark on a creative journey where every image you touch is imbued with clarity, detail, and professional polish. Your vision deserves to be seen in the highest possible resolution, and Tophinhanhdep.com is here to help you achieve it.