Understanding and Checking Image DPI: A Comprehensive Guide for Digital Creators

In the vast and vibrant world of digital imagery, where stunning wallpapers, intricate digital art, and professional photographs converge, one technical term frequently emerges as a critical factor: DPI. Standing for “Dots Per Inch,” DPI is a fundamental measurement that profoundly impacts the quality and usability of an image, particularly when transitioning from screen to print. Whether you’re a photographer preparing a high-resolution print, a graphic designer crafting a logo, or simply someone looking to print a beautiful background for your home, understanding and verifying an image’s DPI is an indispensable skill.
At Tophinhanhdep.com, we specialize in providing a diverse array of visual content, from aesthetic nature shots to abstract digital masterpieces, alongside powerful image tools and inspiration for all your creative endeavors. Our mission is to empower you with the knowledge and resources to make the most of every pixel. This comprehensive guide will demystify DPI, explain its crucial role, and walk you through various straightforward methods to check image DPI on both Windows and Mac computers. We’ll also touch upon how Tophinhanhdep.com’s tools can help you optimize and enhance your images for peak quality.

What is DPI and Why Does it Matter?
Before diving into the “how-to,” let’s clarify what DPI truly represents and why it holds such significant weight in the digital imaging landscape.
DPI vs. PPI: Clarifying the Terms
It’s common to see “DPI” and “PPI” used interchangeably, but there’s a subtle yet important distinction, especially for those delving into professional photography and visual design.
- DPI (Dots Per Inch): This term primarily refers to the print resolution of an image. It measures the number of ink dots a printer places within one linear inch of printed output. A higher DPI means more ink dots per inch, resulting in a finer, more detailed, and sharper printed image. DPI is crucial for physical prints, such as posters, photographs, and marketing materials.
- PPI (Pixels Per Inch): This term refers to the screen resolution or image resolution of a digital image. It measures the number of pixels packed into one linear inch on a digital display. While pixels are square and have specific color information, dots are tiny ink droplets a printer uses. When you view an image on a monitor, its PPI determines how dense the pixels appear, but DPI only becomes relevant when you send that image to a printer.
In practical terms, for most digital images, the PPI value in the image file’s metadata is often what people refer to as “DPI” when discussing general image resolution. The software then interprets this PPI to guide the printer on how many dots to lay down. For this guide, when we discuss “checking DPI,” we are often referring to this inherent resolution value stored within the image file that dictates its quality potential for print.
The Importance of DPI in Print and Digital Contexts
The significance of DPI cannot be overstated, particularly for anyone working with images destined for physical output or demanding high visual fidelity.
- For Printed Images: This is where DPI shines. A low DPI image, say 72 DPI (common for web images), when printed at a large size, will appear pixelated, blurry, and lack detail. This is because the printer is forced to stretch the limited number of dots (or interpret the limited pixels) over a larger area. Conversely, a high-DPI image (typically 300 DPI for standard prints, or up to 600 DPI for high-quality, glossy output) will produce sharp, clear, and professional-looking prints. This is vital for Beautiful Photography, Nature, and Aesthetic images that demand crisp detail.
- For Digital Photography and Stock Photos: Photographers aiming to sell High Resolution stock photos or produce gallery-quality prints must maintain high DPI values. A 300 DPI image ensures versatility, allowing it to be printed at various sizes without significant quality loss. It also signifies a professional standard for Digital Photography.
- For Visual Design and Graphic Design: Designers creating logos, brochures, posters, or any elements for print rely heavily on appropriate DPI settings. Ensuring that design elements and integrated images meet print-ready DPI standards prevents costly reprints and preserves brand integrity. DPI directly influences the Graphic Design, Digital Art, and Photo Manipulation aspects of a project.
- For Wallpapers and Backgrounds (Print-Ready): While most Wallpapers and Backgrounds are consumed digitally, if a user wishes to print a large-format wallpaper or a high-quality background for a physical display, checking and optimizing DPI is essential. A visually appealing Abstract or Thematic Collection on screen might disappoint if printed with insufficient DPI.
Understanding DPI is not just about avoiding blurry prints; it’s about unlocking the full potential of your images, ensuring they convey the intended impact, whether viewed on a screen or held in hand.
Practical Methods to Check Image DPI on Your Computer
Fortunately, checking the DPI of an image is a straightforward process, regardless of whether you’re using a Windows or Mac operating system. These methods leverage built-in system functionalities and commonly available software.
For Windows Users: Multiple Approaches
Windows offers several convenient ways to inspect an image’s DPI, catering to different workflows and preferences.
1. Using the Image Properties Menu
This is perhaps the quickest and most direct method for a single image.
- Locate Your Image: Open your File Explorer and navigate to the folder containing the image you wish to inspect.
- Right-Click for Properties: Right-click on the image file. From the context menu that appears, select “Properties” (usually at the very bottom).
- Access the Details Tab: A new window will open. Click on the “Details” tab at the top. This tab displays various metadata about the file, including its dimensions and resolution.
- View DPI Information: Scroll down within the Details tab until you find the “Image” section. Here, you will see values labeled “Horizontal resolution” and “Vertical resolution.” These numbers, typically measured in dots per inch (dpi), represent your image’s DPI.
This method is excellent for a quick check when you only need to verify one or two images, making it ideal for managing small collections of Aesthetic photos or specific Stock Photos.
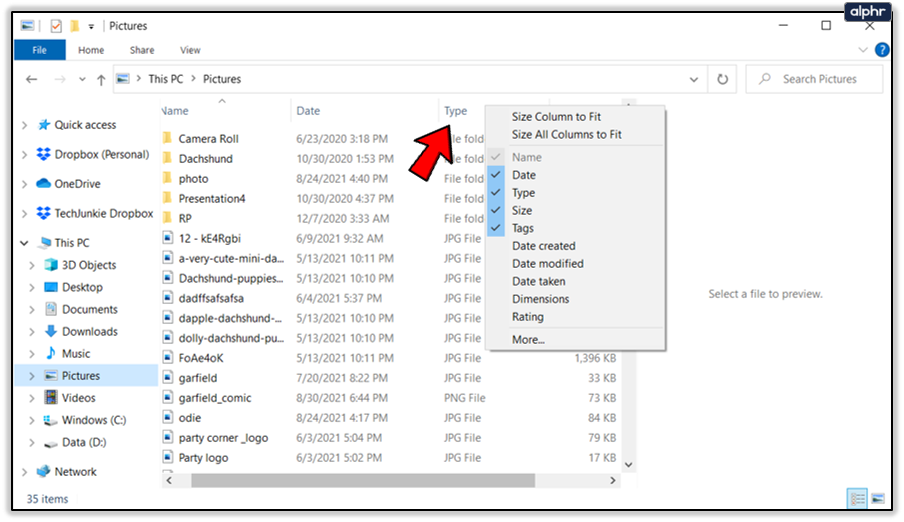
2. Enhancing File Explorer Details for Bulk Checks
If you frequently work with numerous images and need to see their DPI at a glance without opening each file’s properties, you can customize your File Explorer columns.
- Open File Explorer: Launch File Explorer (Windows Key + E) and go to the folder containing your images.
- Switch to Details View: Click on the “View” tab in the File Explorer ribbon at the top. Then, select “Details” as the view layout. This will display your files in a list format with various columns.
- Customize Column Headers: Right-click on any of the existing column headers (e.g., “Name,” “Date modified,” “Type”). A context menu will appear.
- Add Resolution Columns: From the context menu, click “More…”. A “Choose Details” pop-up window will open. Scroll down the list and check the boxes next to “Horizontal resolution” and “Vertical resolution.” Click “OK” to apply these changes.
- Instant DPI View: You will now see two new columns in your File Explorer displaying the DPI values for all images in that folder. This is incredibly useful for organizing High Resolution image collections or curating Thematic Collections where consistent quality is important.
3. Using Microsoft Paint for DPI Verification
Microsoft Paint, a basic image editor pre-installed on Windows, also provides a way to check DPI.
- Open with Paint: Right-click on your image file, hover over “Open with,” and then select “Paint.” The image will open in the Paint application.
- Access File Properties: In Paint, click on the “File” tab in the top-left corner.
- View Image Properties: From the dropdown menu, select “Properties” (often indicated by a checkmark icon).
- Find Resolution: A new “Image Properties” window will appear. Look for the “Resolution” field, which will display the DPI of your image.
This method is simple and accessible, especially if you don’t have more advanced software installed, making it suitable for quick checks on Backgrounds or simple Images you might download.
For Mac Users: Streamlined Inspection
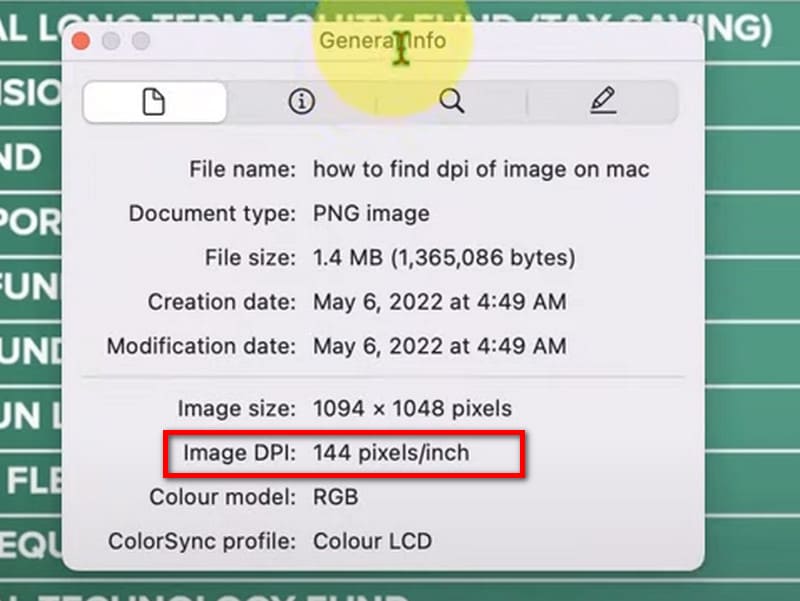
Mac users can quickly check image DPI using the built-in Preview application, a versatile tool for viewing and basic editing.
- Locate and Open in Preview: Find your image file using Finder. Right-click on it (or Control-click) and select “Open With” -> “Preview” (the default option for images).
- Access the Inspector: Once the image is open in Preview, go to the menu bar at the top of your screen. Click “Tools.”
- Show Inspector Panel: From the “Tools” dropdown, select “Show Inspector” (or use the shortcut Command + I).
- View Image DPI: A new panel, typically titled “General Info,” will open. Navigate to the “Image” tab within this panel (usually represented by a small ‘i’ icon or a sun-like icon). Here, you will find the “Image DPI” value clearly displayed.
Preview on Mac offers a clean and efficient way to check DPI, perfect for photographers reviewing their latest Digital Photography shots or designers assessing Digital Art files.
Using Advanced Image Editing Software
For professionals and enthusiasts utilizing more sophisticated image manipulation tools, checking DPI is integrated into the workflow. Tophinhanhdep.com provides guides on using such software, and our own tools offer similar functionalities.
- Adobe Photoshop:
- Open the image in Photoshop.
- Go to the “Image” menu at the top.
- Select “Image Size…” (or Alt + Shift + I).
- In the “Image Size” dialog box, under the “Document Size” section, you’ll find the “Resolution” value. Ensure the units dropdown next to it is set to “Pixels/Inch.” This is your image’s DPI (or PPI, as Photoshop labels it, which serves the same purpose in this context).
- GIMP (GNU Image Manipulation Program):
- Open the image in GIMP.
- Go to the “Image” menu.
- Select “Scale Image…”.
- In the “Scale Image” dialog, you’ll see “X resolution” and “Y resolution.” Set the units dropdown next to them to “pixels/in” to see the DPI.
These professional tools not only display DPI but also allow for its modification, a topic we’ll explore next. They are indispensable for advanced Photo Manipulation and creating Creative Ideas where precise control over image quality is paramount.
Optimizing Your Images: Adjusting and Enhancing DPI for Superior Quality
Checking DPI is often the first step; the next is ensuring it meets your project’s requirements. Sometimes, an image’s DPI might be too low, necessitating adjustments or enhancements.
When and How to Change Image DPI
While DPI can be changed, it’s crucial to understand the implications. Simply changing the DPI number in an image’s metadata without altering its pixel dimensions will only affect its intended print size, not its inherent quality. For example, a 72 DPI image that’s 720 pixels wide, when changed to 300 DPI, would print much smaller but would still only have 720 pixels of information. The print would be denser, but the detail wouldn’t magically appear.
To genuinely improve an image’s print quality by increasing its effective DPI, you need to either:
- Resample the Image: This process involves increasing the number of pixels in the image. While traditional resampling (interpolation) can make an image larger, it often leads to a softer or blurry result as new pixels are “guessed” from existing ones. This is typically done in advanced editors like Photoshop (Image > Image Size > check “Resample” and choose an interpolation method).
- Use AI Upscalers: This is where modern technology provides a significant advantage. Instead of simple interpolation, AI Upscalers use sophisticated algorithms to analyze the image content and intelligently add new pixels, preserving and even enhancing details. This allows for a genuine increase in resolution, leading to higher effective DPI without the typical loss of clarity.
Tophinhanhdep.com understands the need for High Resolution images and offers solutions within its Image Tools category to help users achieve optimal DPI for all their projects.
Leveraging AI Upscalers for DPI Enhancement (Tophinhanhdep.com’s AI Tools)
For users seeking to genuinely improve the quality and print readiness of their images, Tophinhanhdep.com’s suite of Image Tools, particularly our AI Upscalers, offers a cutting-edge solution. Instead of grappling with complex editing software and risking pixelation through traditional resampling, our AI-powered tools simplify the process.
Imagine you have a captivating Sad/Emotional photograph or a unique Abstract art piece that you want to print large, but its original DPI is too low. Tophinhanhdep.com’s AI Upscaler can analyze the intricate patterns, textures, and details within the image, then intelligently generate additional pixels, effectively increasing its resolution and, by extension, its potential DPI for print. This process ensures that when you print your chosen image, it emerges with astonishing clarity and detail, far surpassing what traditional methods could achieve.
Our AI tools are designed to be user-friendly, allowing you to:
- Upload Your Image: Easily import any image from your collection.
- Select Desired Upscale Factor: Choose to double, quadruple, or even further multiply your image’s resolution.
- Receive Enhanced Output: Our AI processes the image, delivering a higher-resolution version with improved detail, ready for high-DPI printing or use in demanding Visual Design projects.
This functionality is a game-changer for anyone working with Digital Photography, creating Graphic Design elements, or simply wanting to get the best possible print from their treasured Images. Tophinhanhdep.com’s AI Upscalers bridge the gap between source image quality and desired output fidelity, empowering creators to bring their Creative Ideas to life with unparalleled visual excellence.
DPI in the World of Digital Imagery: Applications Across Tophinhanhdep.com’s Offerings
The profound impact of DPI weaves through almost every category offered on Tophinhanhdep.com, influencing how users perceive, utilize, and create digital content.
Photography and High-Resolution Content
For photographers and enthusiasts exploring High Resolution imagery, DPI is the unspoken standard of quality. When browsing our collections of Beautiful Photography or seeking Nature shots, knowing the DPI of an image helps photographers understand its potential for enlargement and print. A high DPI image ensures that every intricate detail, from the delicate veins of a leaf to the subtle texture of a mountain range, is preserved, allowing for stunning large-format prints or use in professional portfolios. Our platform emphasizes delivering content that respects these quality benchmarks, and understanding DPI is key to appreciating that commitment.
Visual Design and Creative Projects
DPI is a cornerstone of Visual Design, Graphic Design, Digital Art, and Photo Manipulation. Designers frequently pull images from various sources – be it Stock Photos, custom Wallpapers, or unique Abstract designs – and integrate them into their projects. The DPI of each component dictates the final print quality of the entire design. A mismatch in DPI can lead to inconsistent visual fidelity, where some elements appear crisp while others are pixelated. Tophinhanhdep.com offers a wealth of content suitable for Creative Ideas, and by being mindful of DPI, designers can seamlessly blend different visual assets, ensuring a professional and polished outcome, whether it’s a printed brochure or a digital banner for a Thematic Collection.
Image Collections and Aesthetic Quality
For those curating Image Inspiration & Collections, crafting Mood Boards, or exploring Trending Styles, DPI plays a subtle yet significant role in maintaining overall Aesthetic quality. While digital viewing might be more forgiving, considering the DPI for potential future prints or detailed examination ensures that the curated content retains its integrity. A high-quality collection, whether featuring serene Backgrounds or vibrant digital artworks, benefits from images that inherently possess good DPI, signifying their versatility and potential for various applications. Tophinhanhdep.com aims to be a source of not just beautiful images, but also images that are technically sound and ready for whatever creative vision you might have.
Conclusion
The humble “Dots Per Inch” is far more than a technical specification; it is a gateway to ensuring that your digital images maintain their beauty and clarity, especially when brought to life through print. From the casual user wanting to print a memorable Wallpaper to the professional crafting intricate Graphic Design projects, understanding how to check and optimize image DPI is an invaluable skill in today’s visually driven world.
At Tophinhanhdep.com, we are committed to providing you with both inspiring Images and powerful Image Tools to navigate the complexities of digital media. By mastering the methods outlined in this guide – whether through quick checks in file properties, detailed explorations in File Explorer, or the use of sophisticated editing software – you gain greater control over your visual creations. And with Tophinhanhdep.com’s advanced AI Upscalers, even images with lower initial DPI can be transformed into High Resolution masterpieces, ready to meet the demands of any print or digital display. Embrace the power of DPI, and unlock a world of unparalleled visual quality for all your Photography and Visual Design endeavors.