How to Know the DPI of an Image: A Comprehensive Guide for Digital Creators

In the vibrant world of digital imagery, where stunning visuals captivate audiences and inspire creativity, understanding the technical specifications of your images is paramount. Whether you’re a professional photographer curating high-resolution stock photos, a graphic designer crafting intricate digital art, or simply an enthusiast looking for the perfect wallpaper, one crucial metric you’ll encounter is DPI – Dots Per Inch. This seemingly simple acronym holds the key to unlocking the true potential of your visual assets, especially when transitioning from screen to print.
At Tophinhanhdep.com, we understand the nuances of image quality and its impact on everything from aesthetic backgrounds to beautiful photography collections. Our platform serves as a hub for captivating images, advanced photography techniques, and essential image tools designed to elevate your creative journey. Knowing how to accurately determine the DPI of an image is a foundational skill that empowers you to optimize your visuals, ensure crisp prints, and manage your digital portfolio with precision. This guide will walk you through various methods to check an image’s DPI on both Windows and Mac operating systems, explore professional software options, and discuss how Tophinhanhdep.com’s resources can help you master image resolution.
Understanding DPI: Why Dots Per Inch Matters for Your Images

DPI, or Dots Per Inch, is a fundamental measurement of image resolution, particularly relevant for printed materials. It quantifies the number of individual ink dots that a printer can place within a one-inch linear space. The higher the DPI value, the more densely packed these dots are, resulting in a finer, more detailed, and higher-quality print. Conversely, a low DPI image, when printed, will appear pixelated, blurry, or “blocky” because the individual dots become visible.
For digital artists, photographers, and anyone involved in visual design, DPI is a critical consideration. Imagine designing an intricate abstract artwork or a breathtaking nature photograph destined for a large-format print. If the image’s DPI is too low, the stunning detail you painstakingly captured or created on screen will be lost in the physical rendition. This applies equally to wallpapers and backgrounds; while screen resolution (measured in PPI) governs their digital appearance, understanding DPI helps ensure that if a user decides to print a favorite aesthetic image from Tophinhanhdep.com, it maintains its pristine quality.
The core purpose of DPI is to bridge the gap between digital representation and physical output. While an image might look perfectly sharp on a high-resolution display, its print quality is determined by its DPI in conjunction with its pixel dimensions. For instance, a 1920x1080 pixel image might look fantastic on your screen, but if its DPI is set to a mere 72 (a common web standard), printing it at a large size would result in a muddy, unprofessional output.
DPI vs. PPI: Clarifying the Terms
Before diving into the methods of checking DPI, it’s essential to distinguish between DPI (Dots Per Inch) and PPI (Pixels Per Inch). While often used interchangeably, they refer to different aspects of image resolution:
- DPI (Dots Per Inch): This term specifically relates to printers and physical output. It measures the density of ink dots that a printer lays down on paper. A printer’s DPI rating indicates its ability to produce detailed prints.
- PPI (Pixels Per Inch): This term refers to digital displays and images on a screen. It measures the density of pixels within a one-inch linear space on a monitor or within an image file itself. An image’s PPI influences how it appears on a screen, but doesn’t directly dictate its print quality until it’s combined with pixel dimensions.
The key takeaway is that DPI is a property of the printer and the printed image, while PPI is a property of the digital image file and the screen it’s viewed on. When you check the “resolution” of an image file, most software will display its PPI, which directly impacts its potential print quality when combined with its total pixel dimensions (e.g., 300 PPI at 10x8 inches means 3000x2400 pixels). For this article, we’ll often use “DPI” in a broader sense, as is common in user-facing contexts, but remember its strong association with print and the underlying pixel density (PPI) of the digital file.
The Importance of DPI for Printing and High-Resolution Photography
For any digital creator, especially photographers focused on high-resolution stock photos or artists producing digital art for sale, optimizing DPI is non-negotiable.
- Print Quality: The primary reason to care about DPI is for printing. Standard print quality typically requires 300 DPI for sharp, professional-looking results. For very high-end prints, fine art reproductions, or specialized applications, even 600 DPI might be desired. If you plan to print beautiful photography from Tophinhanhdep.com, knowing its DPI helps you set appropriate print dimensions.
- Image Scaling: A high DPI allows for greater flexibility in scaling images without significant loss of quality. If you have a photograph at 300 DPI, you can often resize it for smaller prints or web use without issue. Trying to enlarge a low-DPI image, however, quickly leads to pixelation.
- Professional Standards: In graphic design and publishing, adhering to specific DPI requirements is standard practice. Deliverables for magazines, brochures, or large format displays almost always demand high DPI images.
- Stock Photos and Digital Art: Contributors to Tophinhanhdep.com’s stock photo and digital art collections should always strive for optimal DPI. This ensures that their work meets professional standards and is versatile enough for various client needs, from online usage to physical prints. High-resolution images are a hallmark of quality on our platform.
Understanding and managing DPI empowers you to create and distribute images with confidence, knowing they will look their best regardless of the medium. Now, let’s explore how you can easily determine this crucial value for your own image files.
Checking Image DPI on Windows: Multiple Approaches
Windows users have several convenient built-in methods to check the DPI of an image, ranging from quick property checks to customizing File Explorer for ongoing visibility. These methods are particularly useful for those managing extensive collections of wallpapers, aesthetic backgrounds, or nature photography downloaded from Tophinhanhdep.com, ensuring they’re always aware of an image’s print potential.
Using the Properties Menu for Quick Insights
This is arguably the most straightforward way to check an image’s DPI on a Windows computer. It provides a snapshot of essential image details without needing to open the file in a separate application.
- Navigate to the Image: Open your File Explorer (by pressing
Windows key + Eor clicking the folder icon on your taskbar) and browse to the location where your image is saved. This could be your “Pictures” folder, a specific project folder for graphic design, or a collection of abstract images. - Right-Click the Image: Locate the desired image file, then right-click on it. A context menu will appear.
- Select “Properties”: From the context menu, click on the “Properties” option. It’s usually found at the very bottom of the list. A new dialog box titled “Properties” will open for that specific image.
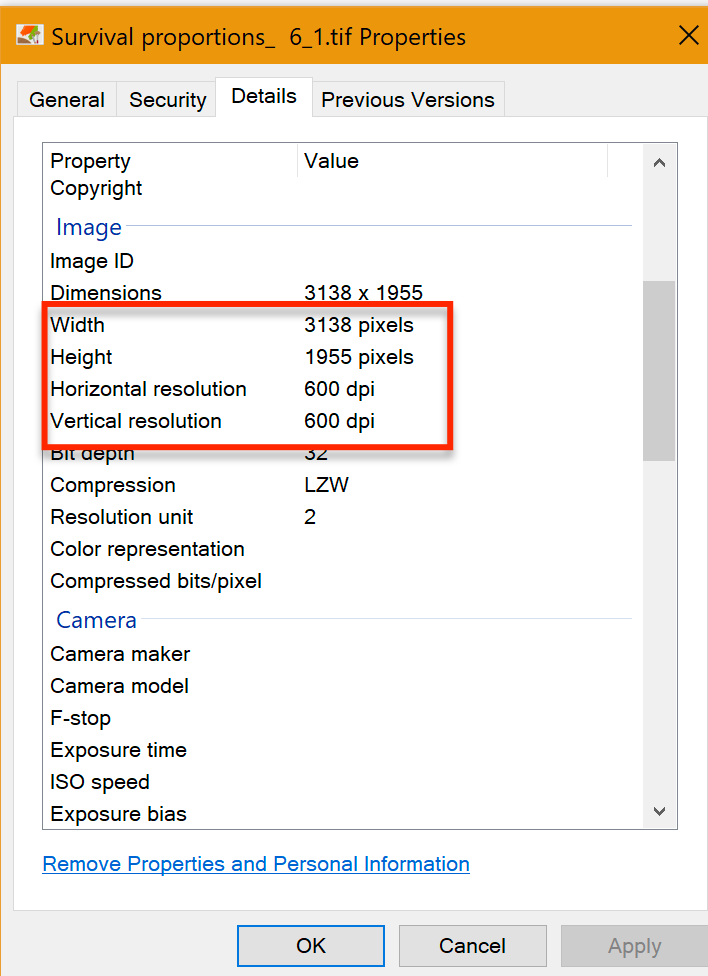
- Go to the “Details” Tab: Within the “Properties” window, you’ll see several tabs at the top. Click on the “Details” tab. This tab provides extensive metadata about the file, including its dimensions and resolution.
- View the DPI: Scroll down the “Details” tab until you find the “Image” section. Here, you will see “Horizontal resolution” and “Vertical resolution.” The values displayed next to these entries are your image’s DPI (or more accurately, its PPI, which dictates print quality). Typically, these values will be the same, but if an image has been stretched disproportionately, they might differ.
This method is ideal for a quick check when you’ve just downloaded a new sad/emotional or beautiful photography piece from Tophinhanhdep.com and want to assess its print readiness.
Customizing File Explorer for Ongoing DPI Visibility
If you frequently work with images, such as managing a library of high-resolution stock photos or digital art, constantly opening the “Properties” menu can become tedious. Windows File Explorer offers a way to display DPI information directly as a column, providing an at-a-glance overview for multiple files.
- Open File Explorer and Navigate: Press
Windows key + Eto open File Explorer and go to the folder containing your images. - Switch to “Details” View: In the File Explorer window, click on the “View” tab at the top. From the “Layout” section, select “Details.” This changes how your files are displayed, showing them in a list with various columns like “Name,” “Date modified,” and “Type.”
- Add Resolution Columns: Right-click on any of the existing column headers (e.g., “Name,” “Date modified”). A context menu will appear with a list of common column options.
- Select “More…”: At the bottom of this context menu, click “More…” A “Choose Details” window will pop up, presenting a comprehensive list of available metadata fields.
- Enable Horizontal and Vertical Resolution: Scroll through the list and find “Horizontal resolution” and “Vertical resolution.” Check the box next to both of these options.
- Confirm Changes: Click “OK” to close the “Choose Details” window.
- View DPI in File Explorer: You will now see two new columns in your File Explorer: “Horizontal resolution” and “Vertical resolution.” The DPI for each image in that folder will be displayed in these columns. You can even click on these column headers to sort your images by their DPI, which is incredibly useful for organizing high-resolution assets or filtering for images suitable for specific visual design projects.
This customized view is invaluable for users who regularly curate thematic collections or require quick access to image resolution for photo manipulation tasks.
Microsoft Paint: A Basic Tool for DPI Check
Microsoft Paint, a simple image editing program pre-installed on most Windows systems, also offers a straightforward way to check an image’s DPI. While not a professional tool for editing styles or advanced photo manipulation, it serves its purpose for basic inquiries.
- Locate the Image: Find the image file on your computer using File Explorer.
- Open with Paint: Right-click on the image file. Hover your mouse cursor over the “Open with” option in the context menu, then click “Paint” from the list of applications. The image will open within the Microsoft Paint application.
- Access File Properties: In the Paint window, click on the “File” menu (represented by a small icon or text in the top-left corner, depending on your Paint version).
- Select “Properties”: From the “File” menu, click on “Properties” (it might be labeled “Image Properties” or just “Properties”). A new “Image Properties” dialog box will appear.
- Find Resolution: Within this dialog box, you will find the “Resolution” section. This will display the image’s DPI (or PPI), often showing both horizontal and vertical values.
This method is simple and accessible, making it a good choice for users who need a quick check without installing additional software, perhaps after using one of Tophinhanhdep.com’s image converters to change a file format.
Discovering Image DPI on Mac Devices
Mac users also have an intuitive, built-in application for checking image DPI: Preview. This versatile tool comes pre-installed on all Mac devices and is an indispensable asset for viewing and basic manipulation of various file types, including images. For those who frequently work with aesthetic photos, abstract art, or nature photography on their Mac, Preview offers a quick and reliable way to verify image resolution.
Preview: Mac’s Built-in DPI Inspector
Preview is more than just an image viewer; it’s a powerful utility that provides detailed information about your files, including crucial metadata like DPI. It’s an excellent first stop for anyone needing to quickly assess the print quality potential of an image, whether it’s a personal photograph or a background downloaded from Tophinhanhdep.com.
- Navigate to the Image: Open “Finder” (the smiling face icon in your Dock) and locate the image file you wish to inspect. This could be in your “Pictures” folder, a project folder for graphic design, or any other directory where your visual assets are stored.
- Open with Preview: There are a couple of ways to open the image in Preview:
- Double-click: Most image files on a Mac are set to open in Preview by default, so simply double-clicking the image will usually do the trick.
- Right-click (or Control-click): Alternatively, right-click (or press
Control + click) on the image file. In the context menu, hover over “Open With” and then select “Preview.” The image will now open in the Preview application.
- Access the Tools Menu: Once the image is open in Preview, look at the menu bar at the top of your screen (next to the Apple logo and “Finder”). Click on “Tools.”
- Select “Show Inspector”: From the “Tools” dropdown menu, select “Show Inspector” (or use the keyboard shortcut
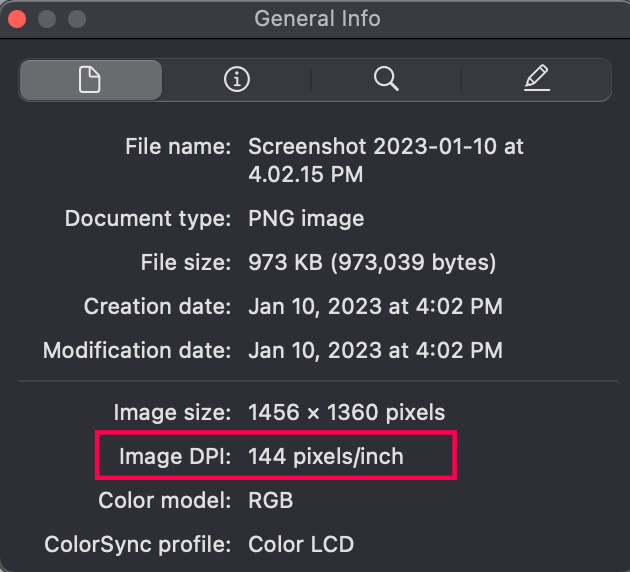
Command + I). This action will open a new, small panel, which is the “Inspector” window, overlaying your Preview window. - Find the DPI: Within the Inspector window, you’ll see several tabs. Click on the tab that looks like a small “i” in a circle, labeled “General Info” or “Image Info.” Look for the section titled “Image DPI.” Here, you will find the image’s dots per inch value. It’s usually displayed as a single number, indicating both horizontal and vertical resolution if they are consistent.
Preview’s Inspector is a convenient feature for digital artists and photographers using Mac, allowing them to quickly check resolution before using images in visual design projects or uploading them to Tophinhanhdep.com’s collections. It’s particularly handy for verifying that images, such as high-resolution stock photos or digital art pieces, meet desired quality standards for various applications.
Professional Tools for Detailed DPI Analysis and Adjustment
While built-in operating system features offer convenient ways to check DPI, professional image editing software provides much more granular control and the ability to change an image’s resolution, which is critical for graphic design, advanced photo manipulation, and preparing images for specific print outputs. For serious photographers and digital artists, these tools are indispensable for managing high-resolution assets and perfecting editing styles.
Adobe Photoshop: The Industry Standard for Image Resolution
Adobe Photoshop is widely considered the industry standard for image editing, and its capabilities for managing image resolution are unparalleled. For users working with high-resolution photography, intricate digital art, or detailed photo manipulation, Photoshop offers precise control over DPI/PPI, pixel dimensions, and resampling.
- Open the Image in Photoshop: Launch Adobe Photoshop and open the image file you wish to inspect or modify. You can do this by going to
File > Openand navigating to your image, or by dragging and dropping the file directly into the Photoshop interface. - Access “Image Size”: Once the image is open, go to the top menu bar and click on
Image. From the dropdown menu, selectImage Size...(or use the keyboard shortcutAlt + Ctrl + Ion Windows, orOption + Command + Ion Mac). This will open the “Image Size” dialog box, a central hub for resolution and dimension adjustments. - View and Adjust Resolution: In the “Image Size” dialog box, you’ll find various parameters:
- Dimensions: Shows the image’s pixel width and height.
- Fit To: Provides presets for common print sizes or web resolutions.
- Resolution: This is where you find the DPI (labeled as PPI – Pixels/Inch). The value here indicates the pixel density.
- Units: Ensure the dropdown menu next to “Resolution” is set to “Pixels/Inch” or “Dots/Inch” for clarity.
- Resample: This crucial checkbox determines whether Photoshop adds or removes pixels when you change the dimensions or resolution.
- Unchecked (Resample off): Changing the resolution will adjust the physical print dimensions without changing the total number of pixels. This is useful for seeing how a fixed-pixel image would print at different DPIs.
- Checked (Resample on): Changing the resolution or dimensions will either interpolate (add new) or decimate (remove existing) pixels. This is how you genuinely change the image’s pixel count and, by extension, its effective print quality potential. You can choose different resampling algorithms (e.g., Bicubic Smoother for enlargement, Bicubic Sharper for reduction).
Photoshop’s “Image Size” dialog is not just for checking DPI; it’s a powerful tool for optimizing images for various outputs. For example, a photographer might use it to downsample a high-resolution RAW file into a smaller, web-friendly JPG at 72 PPI for Tophinhanhdep.com’s online galleries, or to ensure a specific print size at 300 DPI for a client. This level of control is indispensable for achieving precise visual design outcomes and preparing images for both digital and print collections.
GIMP: A Free and Powerful Alternative
For those who find Adobe Photoshop’s pricing prohibitive, GIMP (GNU Image Manipulation Program) stands as a robust, free, and open-source alternative. It offers a comprehensive suite of image editing functionalities, including the ability to check and adjust an image’s DPI, making it a valuable tool for digital art, photo manipulation, and preparing images for Tophinhanhdep.com without a subscription.
- Open the Image in GIMP: Launch GIMP and open your image file via
File > Open. - Access “Scale Image”: In GIMP, the primary function for checking and adjusting resolution is found under the
Imagemenu. Click onImagein the top menu bar, then selectScale Image.... - View and Adjust Resolution: The “Scale Image” dialog box will appear, presenting options similar to Photoshop’s “Image Size” dialog:
- Image Size: Displays the current width and height of the image in pixels.
- X resolution / Y resolution: These fields show the current horizontal and vertical resolution (DPI/PPI) of your image.
- Units: Next to the resolution values, there’s a dropdown menu. Ensure it’s set to “pixels/in” (pixels per inch) to view the DPI accurately.
- Quality (Interpolation): Similar to Photoshop’s “Resample” option, GIMP uses “Interpolation” to determine how new pixels are calculated when scaling. Options like “Cubic” or “LoHalo” provide different quality levels for resizing.
- Linking Dimensions: A chain icon typically links the width and height, as well as the X and Y resolutions. Clicking this icon allows you to unlink them for independent adjustments, though this can lead to image distortion.
GIMP provides the necessary tools for creators who need to manage image resolution for various projects, from creating aesthetic backgrounds to preparing images for print. Just like with Photoshop, understanding how to use the “Scale Image” function in GIMP allows you to optimize your images for upload to Tophinhanhdep.com, ensuring they meet the platform’s high standards for quality and versatility. This is particularly useful for contributors to our free stock photo and digital art sections.
Optimizing DPI for Your Tophinhanhdep.com Creations
Understanding and managing DPI is not just a technicality; it’s a creative decision that directly impacts the perceived quality and versatility of your images. At Tophinhanhdep.com, where we showcase a vast array of images from stunning wallpapers to captivating nature photography and abstract art, optimizing DPI is key to ensuring your visual content truly shines, whether viewed on a screen or brought to life in print.
Best DPI Practices for Wallpapers and Digital Art
The ideal DPI for an image often depends on its intended use. For images primarily viewed on screens, such as wallpapers, backgrounds, and general digital art shared online, DPI (or PPI) requirements are typically less stringent than for print.
- Web and Screen Use (72-96 DPI/PPI): For images intended solely for digital display – like the aesthetic wallpapers, abstract backgrounds, or trending styles featured on Tophinhanhdep.com – a resolution of 72 to 96 PPI is generally sufficient. Modern screens have varying pixel densities, but the total pixel dimensions (e.g., 1920x1080 for Full HD, 3840x2160 for 4K) are more critical here. A 72 PPI image with large pixel dimensions will look just as good on a screen as a 300 PPI image with the same pixel dimensions. The lower PPI simply means its “default” print size would be larger at that resolution. The file size is also typically smaller at lower PPI values, which is beneficial for faster loading times on websites and easier sharing.
- Tophinhanhdep.com Recommendation: When uploading wallpapers and aesthetic backgrounds, prioritize high pixel dimensions (e.g., 4K or higher for desktop, appropriate aspect ratios for mobile) over an unnecessarily high PPI value if the primary intent is digital display. Our platform optimizes images for web, but starting with a high-quality source (even if at 72 PPI) ensures crispness.
- Digital Art for Display: For digital art pieces meant for online galleries or portfolios, a similar logic applies. Focus on crisp pixel detail and appropriate dimensions. If there’s a potential for future printing, however, creating the original art at a higher DPI (e.g., 300 PPI) from the outset is a best practice, as it provides maximum flexibility.
Enhancing Print Quality with Optimal DPI
When an image is destined for physical output – be it a framed print of beautiful photography, a poster-sized reproduction of digital art, or a segment of a graphic design project – DPI becomes critically important.
- Standard Print Quality (300 DPI/PPI): For most high-quality prints, including photographs, brochures, magazines, and standard artwork, a resolution of 300 DPI (or 300 PPI in the image file) is the industry standard. This density ensures that the individual dots of ink blend seamlessly to create smooth tones, sharp edges, and fine details. If you’re downloading a high-resolution stock photo or a piece of digital art from Tophinhanhdep.com with the intention of printing it, aim for this resolution.
- Large Format Prints (150-200 DPI/PPI): For very large prints like banners, billboards, or wall murals, where the viewing distance is greater, a slightly lower DPI (e.g., 150-200 DPI) can sometimes be acceptable without noticeable quality loss. However, always consult with your print provider for their specific recommendations.
- Fine Art and High-End Prints (Up to 600 DPI/PPI): For exceptionally detailed fine art reproductions, archival prints, or scenarios where every minute detail must be preserved, resolutions up to 600 DPI may be used. This ensures the highest possible fidelity to the original digital artwork.
Tophinhanhdep.com’s Role in Print Optimization: While Tophinhanhdep.com primarily serves digital content, understanding these DPI principles is vital for our community. Many users might download nature photography or sad/emotional images from our collections to print for personal use or mood boards. We encourage contributors to upload their highest-resolution versions, allowing end-users the flexibility to print their chosen images at optimal DPI. Our image tools can further assist in this process.
By consciously considering the DPI based on your image’s ultimate destination – whether it’s an abstract desktop background or a gallery-ready print – you can ensure that your visuals always convey the intended impact and quality.
Leveraging Tophinhanhdep.com Tools for Image Enhancement
At Tophinhanhdep.com, we are dedicated to providing a holistic experience for digital creators, photographers, and anyone passionate about visual content. Beyond offering a vast collection of images, we equip our users with a suite of powerful image tools designed to help you manage, optimize, and enhance your visual assets, including those related to DPI and resolution.
Our platform understands that while checking DPI is important, the ability to control and improve it is where true image mastery lies. This is especially true for tasks like preparing high-resolution stock photos, crafting flawless digital art, or optimizing images for visual design projects.
- Image Converters: Often, you might have an image in one format (e.g., PNG) but need it in another (e.g., JPEG) for specific uses or platforms. Our image converters not only facilitate format changes but also allow you to specify output resolution and quality, giving you control over the resulting DPI. This is vital when moving images between different stages of your creative workflow, ensuring print-ready quality or web-optimized efficiency.
- Image Compressors: While compression can sometimes affect image quality if not handled carefully, our intelligent image compressors are designed to reduce file size without significant visual degradation. This is crucial for web use, where fast loading times are paramount for wallpapers, backgrounds, and online portfolios. While compression doesn’t directly change DPI, it optimizes the file for its intended digital display, ensuring a smooth user experience when browsing trending styles or thematic collections on Tophinhanhdep.com.
- Image Optimizers: Our image optimizers go beyond simple compression, fine-tuning various aspects of your image files for peak performance and quality. This can involve stripping unnecessary metadata, selecting optimal color profiles, and ensuring that images, especially those in aesthetic or nature photography categories, retain their visual appeal while being efficient for online use.
- AI Upscalers: One of the most revolutionary tools in our arsenal, the AI Upscalers, directly addresses the challenge of low-DPI images. If you have a beautiful photography piece or an old digital art file that lacks sufficient resolution for a desired print size, our AI Upscalers can intelligently add pixels, enhancing both dimensions and perceived DPI without introducing pixelation. This powerful feature allows you to transform standard images into high-resolution assets, making them suitable for larger prints or more detailed graphic design applications, thereby expanding their utility and creative potential on Tophinhanhdep.com.
- Image-to-Text Tools: While not directly related to DPI, our Image-to-Text tools demonstrate our commitment to comprehensive image utility. They help you extract information from images, useful for cataloging stock photos, adding descriptions to sad/emotional images, or documenting creative ideas from mood boards.
By integrating these tools directly into your workflow on Tophinhanhdep.com, you can seamlessly transition from checking an image’s DPI to actively improving or preparing it for any purpose. Whether you’re a seasoned professional or just starting your journey into digital photography and visual design, our platform provides the resources to empower your creativity and ensure the highest quality for all your image collections.
In conclusion, understanding how to check the DPI of an image is a foundational skill in the digital realm. It empowers you to make informed decisions about image quality, print readiness, and overall visual impact. With the methods outlined for Windows and Mac, alongside the sophisticated capabilities of professional software like Adobe Photoshop and GIMP, you’re well-equipped to analyze your images with precision. Furthermore, Tophinhanhdep.com stands as your partner in this journey, offering not only a rich source of image inspiration but also advanced tools like AI upscalers to ensure your high-resolution photography, digital art, and aesthetic backgrounds consistently meet the highest standards. Embrace these insights, leverage our resources, and let your visual creations always shine with optimal quality.