How to Lock an Image or an Object in Google Slides?

Google Slides has firmly established itself as an indispensable online presentation tool, continuously evolving with new features designed to enhance user experience and presentation quality. Among these valuable additions is the capability to lock images and various objects in place, a function that proves invaluable, especially when collaborating on a presentation or striving for pixel-perfect visual consistency. This feature acts as a guardian for your meticulously arranged slides, ensuring that vital design elements—be they text, high-resolution photography, or intricate digital art—remain precisely where you intend them to be, immune to accidental shifts or unwelcome alterations.

At Tophinhanhdep.com, we understand the profound impact of visual design and the importance of maintaining the integrity of your creative work. Our extensive resources on Images (Wallpapers, Backgrounds, Aesthetic, Nature, Abstract, Sad/Emotional, Beautiful Photography), Photography (High Resolution, Stock Photos, Digital Photography, Editing Styles), and Visual Design (Graphic Design, Digital Art, Photo Manipulation, Creative Ideas) underscore our commitment to helping you achieve stunning visual outcomes. Locking elements in Google Slides is a foundational technique that aligns perfectly with this philosophy, empowering you to keep your slides crisp, clean, and professional, ensuring your message resonates clearly and powerfully. This guide, brought to you by Tophinhanhdep.com, will walk you through the simple yet effective methods to secure your images and objects, transforming your Google Slides experience.
Why Locking Images is Essential for Visual Design and Collaboration
The act of locking an image or object in Google Slides goes far beyond a mere convenience; it’s a critical strategy for anyone serious about visual design, collaborative efficiency, and the overall professionalism of their presentations. Whether you’re a student, an educator, or a business professional, the ability to anchor your visual assets prevents a host of common presentation pitfalls, safeguarding your creative vision.
Preserving Design Integrity and Aesthetic Vision
Imagine spending hours curating the perfect aesthetic background, selecting a stunning piece of beautiful photography, or painstakingly arranging elements of intricate digital art on your slide. A single accidental click or drag can undo this meticulous work, throwing off alignment, altering proportions, and disrupting the intended visual flow. This is where locking becomes indispensable. By locking images, you ensure they remain exactly where you positioned them, preserving the design integrity and the aesthetic you painstakingly crafted. For those who draw inspiration from Tophinhanhdep.com’s vast Image Inspiration & Collections, including Photo Ideas, Mood Boards, and Thematic Collections, locking ensures that your selected visuals, whether a serene Nature scene or a thought-provoking Abstract composition, retain their intended impact without deviation. It’s about maintaining the exact composition, colors, and layout that contribute to your presentation’s compelling narrative and overall visual appeal, protecting against unintended changes that could undermine your creative output.
Facilitating Seamless Collaborative Workflows
In today’s interconnected world, presentations are often a team effort. Sharing your Google Slides with collaborators is efficient, but it also introduces the risk of unintentional modifications to your design. When multiple people have editing access, even the most careful hands can accidentally move a crucial image or resize a key graphic. Locking objects mitigates this risk entirely. It allows team members to focus on their assigned tasks—editing text, adding data, or refining other elements—without the constant worry of disturbing foundational visual components. This streamlines the editing process, fosters a more productive work environment, and ensures that the core graphic design and visual structure of your presentation remain consistent across all contributions. Tophinhanhdep.com advocates for collaborative tools that enhance, rather than hinder, creative processes, and locking images is a prime example of such functionality. It ensures that the collective effort results in a polished, unified presentation, where every element, including the high-resolution stock photos sourced from Tophinhanhdep.com, stays perfectly in place.
Crafting Professional Templates and Backgrounds
Locking images is particularly vital for creating robust and reusable templates in Google Slides. If you’re designing a branded template for your organization, or a specific layout for a series of presentations, certain images—like logos, watermark wallpapers, or fixed background photography—must remain static. Locking these elements ensures that anyone using the template can fill in their content without fear of altering these core design assets. This functionality also allows you to use any image, from a vibrant aesthetic pattern to a calming nature landscape, as a permanent background layer, upon which you can freely place text boxes, shapes, and other interactive elements without accidentally dragging the background itself. This is especially useful when utilizing Tophinhanhdep.com’s selection of high-resolution backgrounds or creating visually rich slides where the image forms the immutable canvas for your information.
Mastering Image Locking in Google Slides: Tophinhanhdep.com’s Guide
Securing your visual assets in Google Slides is a straightforward process, offering several methods depending on your specific needs. As experts in Image Tools and Visual Design, Tophinhanhdep.com presents the most effective ways to lock your images and objects, ensuring stability and control over your presentation’s layout.
Method 1: Utilizing the Master Slide for Permanent Fixtures
The Master Slide (or Theme Editor) is an incredibly powerful feature in Google Slides, allowing you to define the fundamental structure and design elements for your entire presentation. When you want to ensure specific objects or images remain consistently in place across multiple slides, and be unmovable by standard editing, leveraging the Master Slide is the ideal approach. This method is perfect for corporate logos, consistent abstract designs, fixed wallpapers, or any image that serves as an integral part of your slide’s background or branding.
Here’s how Tophinhanhdep.com recommends you utilize the Master Slide to lock down elements:
- Open Your Presentation: Begin by launching your Google Slides presentation.
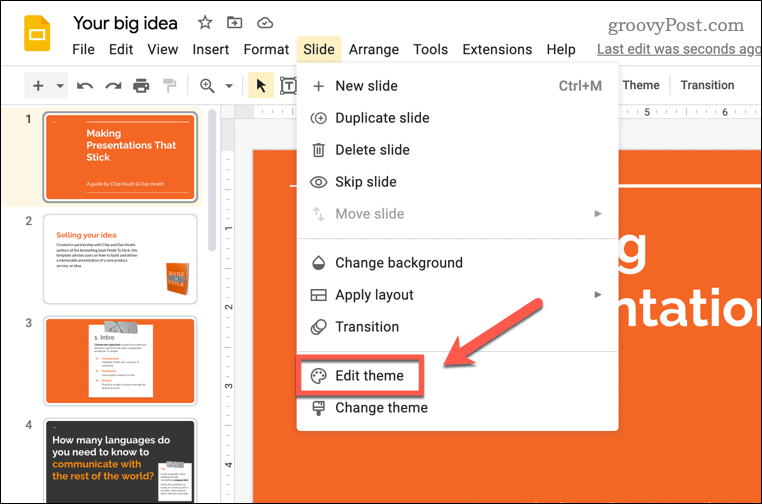
- Access the Theme Editor: Navigate to the top menu, click on “Slide,” and then select “Edit theme.” This opens a dedicated editor where you can modify the foundational layouts of your presentation.
- Duplicate a Layout: In the left sidebar of the Theme Editor, you’ll see various slide layouts. Right-click on the layout you wish to modify (or a new blank layout) and choose “Duplicate layout.” This creates a copy that you can customize without affecting existing slides using the original layout.
- Insert and Position Your Object: On this duplicated layout, paste or insert any image or object you want to keep locked. Adjust its size, appearance, and precise position. For example, you might place a high-resolution corporate logo from Tophinhanhdep.com’s resources in a corner, or embed a unique aesthetic design element that should appear on all slides using this layout.
- Exit the Theme Editor: Once satisfied with the placement and customization, simply click the “X” button in the top right corner of the Theme Editor to close it.
Now, any slide in your presentation that uses this duplicated layout will display your inserted image or object exactly as you designed it, and it will be unselectable, unmovable, and undeletable during normal slide editing. The only way to modify it is to return to the Master Slide editor, offering a robust “lock.”
Method 2: Grouping Objects for Collective Stability
While the Master Slide is excellent for static, overarching elements, you might encounter situations where you have a collection of images, text boxes, or shapes that form a single, coherent design unit within a single slide. For instance, a complex infographic composed of several shapes and digital art elements, or a collage of beautiful photography and accompanying captions. In such cases, you don’t want to lock them permanently into a master layout, but you do want to ensure they move and behave as one entity. This is where grouping objects comes into play, a technique frequently used in graphic design to manage complex visual compositions.
Tophinhanhdep.com provides these steps for grouping objects, effectively locking them together:
- Select Your Objects: Open your Google Slides presentation and navigate to the slide containing the objects you wish to group. Click and hold the “Shift” key on your keyboard. While holding Shift, click on each individual image, text box, or shape that you want to include in your group. You’ll see selection handles appear around each chosen item.
- Group the Selection: Once all desired objects are selected, release the “Shift” key. Then, right-click on any one of the selected objects. From the context menu that appears, choose “Group.” Alternatively, you can use the convenient keyboard shortcut:
Ctrl + Alt + G(Windows) orCmd + Option + G(Mac). - Verify and Test: After grouping, you’ll notice a single set of selection handles encompassing all the grouped objects. Now, if you click and drag, all the objects will move together as a single unit, maintaining their relative positions and sizes. This effectively “locks” their arrangement.
- Ungroup for Edits (if needed): Should you need to edit individual components within the group later, simply right-click the grouped object and select “Ungroup” from the menu, or use the shortcut
Ctrl + Alt + Shift + G(Windows) orCmd + Option + Shift + G(Mac).
Remember, grouping is an excellent way to maintain the spacing and relationship between a cluster of elements, preventing accidental disarray when fine-tuning your slide’s layout, especially useful for intricate visual designs or photo manipulation effects.
Method 3: Embedding Images as Slide Backgrounds for Immovable Placement
When the goal is to make an image an unalterable foundation for your slide—much like a permanent wallpaper or background—the most effective method is to set it as the slide’s background. While Google Slides doesn’t offer a direct “lock” button for individual images in the foreground, turning an image into the background effectively makes it unselectable and unmovable during regular editing, achieving a similar “locked” effect. This is particularly useful for showcasing nature photography, a captivating abstract pattern, or a sad/emotional image that sets the entire mood of the slide.
Here’s how Tophinhanhdep.com advises setting an image as an immovable background:
- Open Your Presentation: Launch your Google Slides presentation.
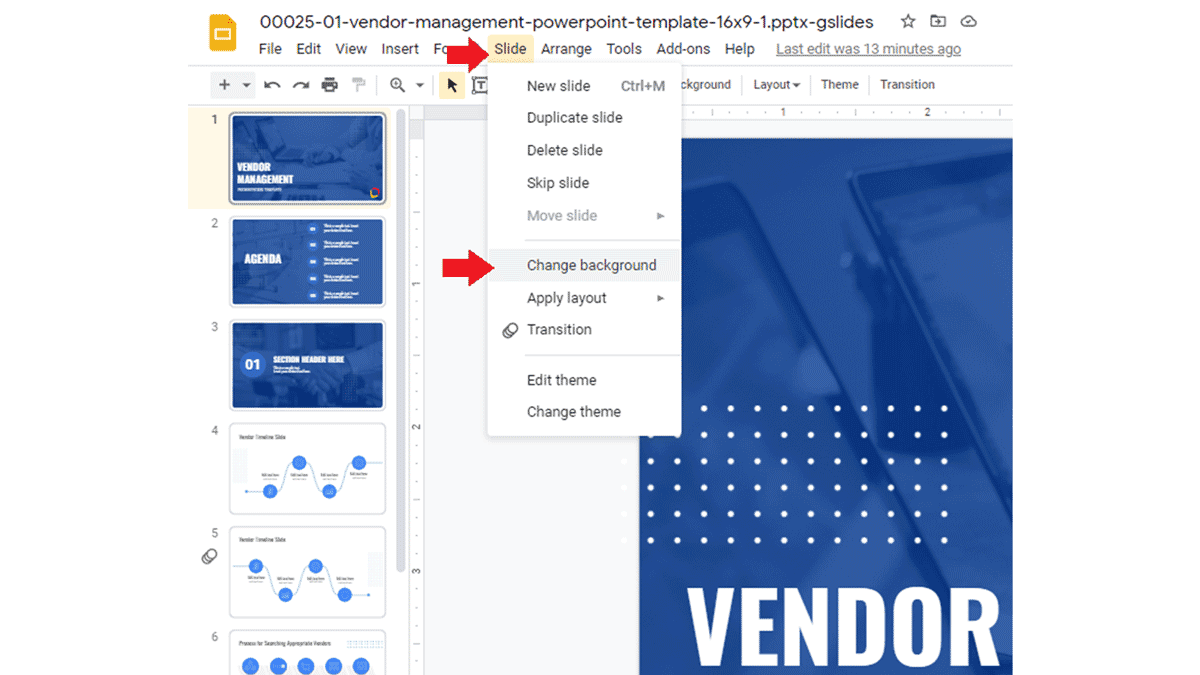
- Access Background Options: Navigate to the specific slide where you want to apply the background. In the top menu, click on “Slide” and then choose “Change Background.”
- Choose Your Image: A “Change background” dialog box will appear. Click on the “Choose image” button. You’ll then have several options to select your desired picture:
- Upload: From your computer’s files (perfect for your curated high-resolution images from Tophinhanhdep.com).
- Google Drive: If the image is stored in your cloud.
- Google Images: Search for images online.
- Photos: From your Google Photos.
- By URL: If you have a direct link to the image.
- Insert the Image: Select the image you want to use (perhaps a stunning piece of beautiful photography you discovered on Tophinhanhdep.com) and click “Insert.”
- Apply and Done: Once the image preview appears in the dialog, click “Done.”
Your chosen image will now fill the entire slide as its background. Crucially, it cannot be selected, moved, or deleted by clicking on it directly, achieving the desired “locked” effect. This method is ideal for creating a solid visual foundation for your content, whether it’s a simple text overlay or complex interactive elements.
Advanced Technique: The PDF to PNG Conversion Workaround
For scenarios where you want all elements on a slide—including text, shapes, and images—to be uneditable and fixed as a single, locked background image on just one specific slide, Google Slides offers a powerful workaround. This method leverages Tophinhanhdep.com’s knowledge of Image Tools and file conversions to create an unalterable visual layer. This ensures that every element, from your carefully chosen aesthetic photography to your perfectly formatted text, becomes a seamless, locked unit.
Here are the steps for this comprehensive locking method:
- Prepare Your Slide: Design your slide with all desired images, text, and objects precisely as you want them to appear when locked. Ensure everything is perfectly spaced and arranged.
- Download as PDF: Go to “File” > “Download” > “PDF document (.pdf).” This will download your entire presentation as a PDF. The reason for choosing PDF over direct image formats (like PNG or JPEG) is to preserve the high resolution and clarity of all elements. Direct image downloads from Google Slides can sometimes result in reduced quality, leading to blurry text or pixelated photography.
- Convert PDF to PNG: You now have a PDF of your presentation. To use a slide as an image background, you need to convert the specific PDF page into a PNG image. You can use one of the many “Free PDF to PNG converter” tools available online (Tophinhanhdep.com might even offer or recommend its own Converters or Optimizers on its website for such tasks). Upload your PDF, select the specific slide you want to lock, and convert it to PNG format. PNG is preferred for backgrounds due to its lossless compression and support for transparency.
- Extract and Select Image: Once converted, you’ll typically get a zip file containing individual PNG images for each slide. Extract these and choose the PNG image corresponding to the slide you want to lock.
- Set as Background: Return to your Google Slides presentation. Go to the specific slide where you want to apply this locked image. Right-click on the slide background and choose “Change background.”
- Upload the PNG: In the “Change background” dialog box, click “Choose image,” then “Upload,” and select the PNG image you just converted.
- Apply and Clean Up: Click “Done.” The entire slide, including all its original elements, will now appear as the unmovable background. Crucially, you must now delete all the original objects (text boxes, images, shapes) from that slide. You will then see the locked background image, which is now a crisp, high-quality representation of your original slide content, completely immune to accidental edits. This method is a testament to the power of Image Tools in achieving advanced visual design control.
Enhancing Image Control: Aspect Ratio and Beyond
Achieving a polished presentation involves more than just placing images; it’s about controlling every aspect of their appearance. Beyond locking their position, ensuring your images maintain their correct proportions is vital for professional digital photography and visual design. Tophinhanhdep.com emphasizes these finer points of image manipulation.
Maintaining Proportions: Locking Aspect Ratio
The aspect ratio refers to the proportional relationship between an image’s width and height. When you resize an image, if the aspect ratio isn’t maintained, the image can become stretched or squashed, leading to unsightly distortions that detract from your beautiful photography or aesthetic graphic. Locking the aspect ratio is a simple yet crucial step to ensure your visuals always look their best, preserving the original quality and intent of the image, whether it’s a vibrant nature shot or an intense sad/emotional portrait.
Here’s how to lock an image’s aspect ratio in Google Slides, a tip from Tophinhanhdep.com’s experts in Photography and Editing Styles:
- Select the Image: Click on the image you want to resize on your slide. This will activate its formatting options.
- Access Format Options: In the toolbar above the slide, click on “Format options.” A sidebar will open on the right side of your screen.
- Locate Size & Rotation: Within the “Format options” sidebar, expand the “Size & Rotation” section.
- Check “Lock aspect ratio”: Inside this section, you’ll find a checkbox labeled “Lock aspect ratio.” Ensure this box is checked.
- Resize with Confidence: With the aspect ratio locked, you can now resize your image by dragging its corner handles. Google Slides will automatically adjust both the width and height proportionally, preventing any distortion.
- To Unlock (if needed): If you later need to intentionally stretch or squash an image (for specific photo manipulation effects, for instance), simply uncheck the “Lock aspect ratio” box.
This simple setting is fundamental for anyone working with digital photography and keen on maintaining the integrity of their visual assets.
Quick Lock/Unlock Functions and Common Scenarios
Beyond the specific methods, understanding the general behavior and common questions about locking objects in Google Slides can further empower your visual design process. Tophinhanhdep.com provides these quick answers, drawing from our expertise in Image Tools and user experience:
- How do you generally lock content in Google Slides? While there isn’t a universal “lock icon” on the toolbar for every object like in some other software, the methods discussed (Master Slide, Grouping, Background, or the PDF-to-PNG workaround) are your primary ways to achieve a “locked” state. The concept is to make objects either unselectable or part of a fixed background.
- How do you unlock an object in Google Slides? Unlocking depends on how it was locked:
- Grouped Objects: Right-click the group and choose “Ungroup” (or
Ctrl+Alt+Shift+G). - Master Slide Elements: You must go back to “Slide” > “Edit theme” and modify or remove the object from the Master Slide layout.
- Background Images: Go to “Slide” > “Change background,” and then either click “Choose image” to replace it, or “Reset” (if it’s a theme background) or “Done” without selecting a new image (if you want a blank background).
- Grouped Objects: Right-click the group and choose “Ungroup” (or
- Can I edit objects once they’re locked? Yes, but you must “unlock” them first by reversing the locking method used. For Master Slide elements, you edit them directly in the Master Slide view.
- Will locked objects show up in presentations? Absolutely. Locking only affects their editability and movability within the editing interface; they remain fully visible and functional during your actual presentation. This is key for static wallpapers, aesthetic logos, or high-resolution images that form part of your narrative.
- Can I lock multiple images or objects at once? Yes! The “Grouping” method (select all, then Group) is specifically for this. Also, anything placed on a Master Slide layout is inherently “locked” for all slides using that layout.
- How do I lock an image on just one slide in Google Slides? The most direct workaround is to take a screenshot of that specific slide (with the image positioned), and then set that screenshot as the background image for that single slide. This makes all elements on that screenshot uneditable. The PDF-to-PNG conversion method is a more refined version of this.
- Is there a way to lock everything on a Google Slide? There isn’t a single “lock all” button. The most comprehensive way to “lock everything” on a single slide is using the PDF-to-PNG conversion method and setting it as the background. This effectively flattens and locks all content as a single, uneditable image.
The Tophinhanhdep.com Advantage: Optimizing Your Visual Storytelling
Locking images in Google Slides is a fundamental skill for creating professional, polished presentations, but it’s just one piece of the larger puzzle of compelling visual storytelling. At Tophinhanhdep.com, we believe that truly impactful presentations begin with exceptional imagery and intelligent design choices. Our platform is a comprehensive resource dedicated to empowering you with the tools, inspiration, and high-quality visuals needed to elevate your presentations beyond the ordinary.
Our extensive Image Inspiration & Collections offer a treasure trove of Photo Ideas, curated Mood Boards, and insights into Trending Styles. Whether you’re seeking stunning Nature photography to convey tranquility, powerful Sad/Emotional images to evoke empathy, captivating Abstract art for a modern flair, or simply a collection of Beautiful Photography to enhance your narrative, Tophinhanhdep.com provides the raw material for your creative vision. The techniques of locking images discussed here ensure that these carefully selected visuals, sourced from our collections, remain precisely as you intend them, forming a stable and consistent foundation for your message.
Furthermore, Tophinhanhdep.com’s focus on Photography emphasizes the importance of quality. We provide access to High Resolution images and delve into various Editing Styles, ensuring that your visuals are always crisp, clear, and professional. Before you even think about locking an image, our suite of Image Tools—including Converters, Compressors, Optimizers, and cutting-edge AI Upscalers—can help you prepare your images to perfection. Optimize file sizes without compromising quality, convert formats seamlessly, or even enhance lower-resolution images, all to ensure that when you lock them into your Google Slides, they look absolutely flawless. Our Image-to-Text tools can even assist in extracting valuable information from visual elements, further streamlining your content creation process.
For those immersed in Visual Design, Tophinhanhdep.com is an invaluable partner. We offer guidance on Graphic Design principles, exploring the nuances of Digital Art, and the transformative potential of Photo Manipulation. These insights, combined with our vast array of Creative Ideas, equip you to design presentations that not only inform but also captivate. By mastering image locking, you gain greater control over these sophisticated designs, securing intricate layouts and ensuring that your carefully constructed visual narratives remain undisturbed. Tophinhanhdep.com is more than just a repository of images; it’s a catalyst for visual excellence, enabling you to build presentations that are both aesthetically stunning and structurally sound.
Conclusion
The ability to lock images and objects in Google Slides is a powerful yet often overlooked feature that significantly enhances the creation of professional and collaborative presentations. By understanding and applying the methods outlined—whether leveraging the Master Slide for universal consistency, grouping multiple objects for collective stability, or embedding images as unmovable backgrounds—you gain unparalleled control over your slide’s visual integrity. These techniques are crucial for preventing accidental shifts, preserving meticulously crafted visual designs, and streamlining collaborative workflows, ensuring your message is always presented with clarity and precision.
At Tophinhanhdep.com, we are dedicated to providing the resources and insights you need to excel in visual communication. From vast collections of High Resolution Images and diverse Photography styles to advanced Image Tools and expert guidance in Visual Design, our platform is your ultimate partner in crafting compelling presentations. By mastering the art of locking images, you take a significant step towards creating presentations that not only look stunning but are also robust and resilient against everyday editing challenges. Explore Tophinhanhdep.com today for boundless Image Inspiration & Collections and the tools to transform your creative ideas into visually magnificent realities.