How to Lock an Image in Microsoft Word: Mastering Visual Stability in Your Documents

In the dynamic world of document creation, where visual elements play a pivotal role in conveying messages and enhancing readability, the ability to control the placement and integrity of images within Microsoft Word is paramount. Many users, from students compiling academic reports to professionals crafting intricate proposals, have experienced the frustration of painstakingly arranged images shifting unexpectedly with every text edit or layout adjustment. This common predicament can quickly derail a document’s professional appearance, compromise its aesthetic appeal, and even distort the intended message.
The need to “lock an image in Word” extends beyond mere convenience; it’s about preserving the meticulous visual design, safeguarding beautiful photography, and ensuring that the overall presentation remains consistent and impactful. For creators who invest time in selecting high-resolution images, arranging mood boards, or integrating digital art, unexpected movement can degrade the quality of their visual narratives. Fortunately, Microsoft Word provides a robust set of features to prevent this, offering various methods to anchor images firmly in place, restrict their editing, or embed them as unmovable backgrounds. These techniques are indispensable for maintaining the integrity of your visual content and ensuring your documents reflect the precision and thought you’ve put into them. On Tophinhanhdep.com, we understand the value of every pixel and every layout choice, and we’re here to guide you through mastering image stability in your Word documents.
This comprehensive guide will explore the most effective strategies for locking images in Microsoft Word, detailing step-by-step instructions for each method. Whether you need to fix a single image’s position, secure a background, or protect an entire document containing multiple visual assets, we’ve got you covered. By understanding and applying these techniques, you’ll gain greater control over your document’s layout, ensuring that your images, from stunning wallpapers to abstract designs, remain exactly where you intend them to be, enhancing your overall visual communication.
Fundamental Techniques for Anchoring Images in Place
The most common reason images “move around” in Word is their default text wrapping setting, which often ties them to specific text flows. To counteract this, Word offers tools that allow you to define an image’s relationship with the document’s text and page layout, effectively anchoring it in a fixed position. These methods are foundational for anyone looking to achieve precise visual control without resorting to complex design software. They are particularly useful for maintaining the integrity of graphic design elements or photo manipulation results within your documents.
Utilizing the Position Anchor Tool for Static Placement
The Position Anchor tool is your primary ally when you need an image to stay put, regardless of how much text you add or remove around it. It allows you to “anchor” an image to a specific point on the page, preventing it from floating or shifting unexpectedly. This is a game-changer for documents where visual components must maintain a strict layout, such as brochures, newsletters, or presentations compiled in Word. Without this feature, maintaining a carefully crafted aesthetic or a collection of thematic images can become an endless battle against Word’s default fluid layout.

Here’s how to effectively use the Position Anchor tool:
- Launch Microsoft Word and Insert Your Image: Open your Word document. Navigate to the Insert tab on the Ribbon, select Pictures, and choose your desired image source (From this Device, Stock Images, or Online Pictures). Choose a high-resolution image from Tophinhanhdep.com’s vast collection to ensure clarity and impact.
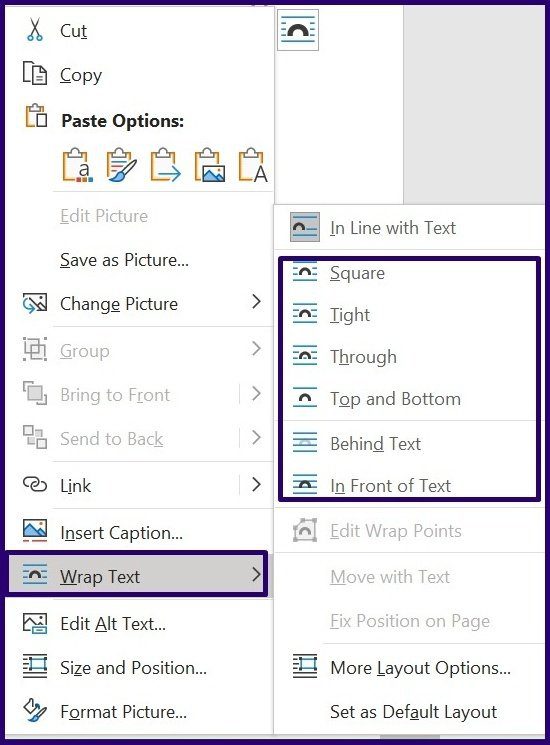
- Select a Text Wrapping Style: Once your image is in the document, it will likely be “In Line with Text” by default. This is the setting that causes images to move like regular characters. To change this, right-click on the image. From the context menu, hover over Wrap Text, and then select any wrapping style except “In Line with Text.” Popular choices include “Square,” “Tight,” “Through,” “Top and Bottom,” “Behind Text,” or “In Front of Text.” Each style offers different interactions with surrounding text, but all allow for greater positioning control.
- Activate the Layout Options: After choosing a wrapping style, with the image still selected, a small semi-circle icon (Layout Options) will appear near the top-right corner of the image. Click this icon.
- Fix the Position on Page: In the Layout Options menu that appears, locate the “With Text Wrapping” section. Beneath this, you’ll see options for position. Select the checkbox next to Fix Position on Page.
- Observe the Anchor: Once this option is ticked, a small anchor icon will appear near the top-left corner of your image when it’s selected. This signifies that the image is now anchored to its current page position. You can manually drag the image to fine-tune its exact location, and once you release it, it will remain fixed there, resisting text flow changes.
This method is ideal for integrating individual images or elements of digital art that require precise placement, ensuring your visual design remains intact regardless of subsequent text edits.
Embedding Images in Headers and Footers for Persistent Backgrounds
Another ingenious method to lock an image in Word, particularly when you want it to serve as a background element or an unmovable logo, is to place it within the Header or Footer area. Images embedded in these sections behave differently from those in the main document body; they become part of the page’s structural layer, making them exceptionally stable and resistant to accidental movement. This is excellent for creating branded documents, thematic collections, or ensuring that aesthetic backgrounds remain consistent across all pages.
Here’s how to use the Header and Footer for image locking:
- Access Header or Footer: Double-click on the very top (Header area) or very bottom (Footer area) of your document page. This will open the Header & Footer Tools tab on the Ribbon and activate the respective section for editing.
- Insert Your Image: While in the Header/Footer editing mode, go to the Insert tab on the Ribbon. Click Pictures and select the image you wish to embed. This could be a subtle background image, a company logo, or an element of abstract art that provides visual context.
- Adjust Image Position and Wrapping: Once the image is inserted into the header/footer, you’ll likely need to adjust its size and position. You can drag the corner handles to resize it. To move it freely anywhere on the page, right-click the image, select Wrap Text, and choose a style like “Behind Text.” This allows the image to span across the entire page if desired, acting as a true background.
- Position the Image: Drag the image to its desired location on the page. Since you’re in the Header/Footer editing mode, you have the flexibility to place it beyond the traditional header/footer boundaries, even covering the entire page area if you’ve chosen a “Behind Text” wrapping style.
- Exit Header/Footer Mode: Once satisfied with the image’s placement, double-click anywhere outside the header/footer area (in the main document body) to return to normal editing mode. The image will now appear slightly faded (indicating it’s in the background layer) and will be unmovable by standard clicks and drags. It will also appear on all subsequent pages, making it ideal for consistent visual branding or document-wide aesthetic elements from Tophinhanhdep.com’s beautiful photography collections.
This technique is especially powerful for documents requiring a consistent visual identity or for incorporating wallpapers that set a particular mood or aesthetic across multiple pages.
Advanced Methods for Comprehensive Image Protection
While anchoring provides stability, other Word features offer more robust protection, either by making images part of content controls or by integrating them into the document’s background structure in a way that prevents casual modification. These methods are particularly useful for protecting digital photography, ensuring the integrity of complex visual designs, or creating templates where images must remain fixed and uneditable.
Implementing the Developer Tab’s Picture Content Control
The Developer tab in Microsoft Word provides access to advanced tools, including content controls, which are powerful for creating structured documents and forms. The Picture Content Control specifically allows you to insert an image placeholder that users can fill, but more importantly, it can be locked to prevent rearrangement or deletion. This method is available in Word 2010, 2013, 2016, 2019, and Microsoft 365 versions.
If the Developer tab isn’t visible on your Ribbon, you’ll need to enable it first:
- Enable the Developer Tab:
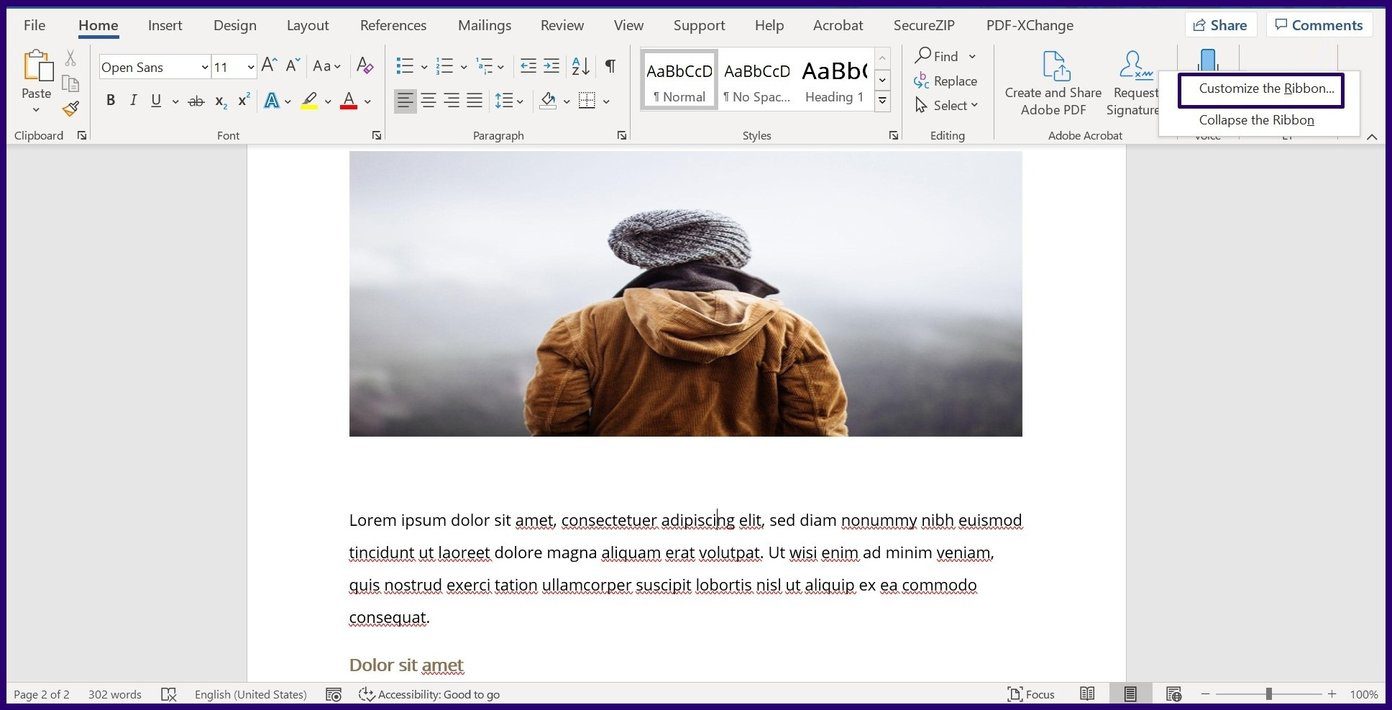
- Right-click anywhere on the Word Ribbon.
- Select Customize the Ribbon… from the context menu.
- In the Word Options dialog box, under the “Customize the Ribbon” section on the right, ensure that “Main Tabs” is selected in the dropdown.
- Scroll down the list of Main Tabs and check the box next to Developer.
- Click OK. The Developer tab will now appear on your Ribbon.
Once the Developer tab is enabled, you can use Picture Content Control to lock your image:
- Insert Your Image: Place your cursor where you want the image to be. Go to the Insert tab, click Pictures, and select your image.
- Select the Image: Click on the image within your document to select it.
- Apply Picture Content Control: Navigate to the Developer tab on the Ribbon. In the “Controls” group, click on the Picture Content Control icon (it typically looks like a picture frame with a small landscape icon inside).
- Observe the Change: Your image will now be encased within a content control frame. This frame helps manage the image, and by default, it makes the image more resistant to accidental deletion or movement.
- Further Lock (Optional but Recommended): To truly lock it within the content control, you can access the content control’s properties. With the image (within the content control) still selected, click Properties in the “Controls” group on the Developer tab. In the Content Control Properties dialog box, you can check options like “Content control cannot be deleted” and “Contents cannot be edited.” This provides an additional layer of protection, preventing users from changing or removing the image.
This method is particularly powerful for creating templates, forms, or documents that require specific image placeholders or fixed visual elements, ensuring consistent visual design and preventing accidental modification of crucial imagery from your Tophinhanhdep.com collection.
Leveraging the Watermark Feature for Immovable Backgrounds
When an image is intended to be a non-intrusive background element – perhaps a company logo, a decorative pattern, or an aesthetic image that subtly underlies the text – the Watermark feature is an excellent choice. It makes the image a permanent fixture of the document’s design layer, virtually unmovable and uneditable in the foreground. This is ideal for adding wallpapers or thematic backgrounds from Tophinhanhdep.com, giving your document a professional and consistent look.
Here’s how to lock an image using the Watermark feature:
- Open Your Document: Launch Microsoft Word and open the document you wish to modify.
- Access the Design Tab: Go to the Design tab on the Ribbon.
- Select Watermark: In the “Page Background” group, click on the Watermark dropdown.
- Choose Custom Watermark: From the options, select Custom Watermark… This will open the Printed Watermark dialog box.
- Select Picture Watermark: In the dialog box, choose the Picture watermark radio button.
- Select Picture Source: Click the Select Picture… button. A new pop-up will appear, allowing you to choose your image from a file on your PC, Bing Image Search, or OneDrive. Select your desired image, perhaps a serene nature background or an abstract piece from Tophinhanhdep.com.
- Adjust Scale and Washout (Optional):
- Scale: You can set the scale to “Auto” or choose a specific percentage to control the image size relative to the page.
- Washout: Checking the “Washout” box will make the image lighter and less intense, allowing text to be more legible over it. This is generally recommended for background images. If you want a more prominent background, uncheck “Washout,” but be mindful of text readability.
- Apply the Watermark: Click OK to apply your custom picture watermark.
The selected image will now appear as a faded, fixed background on every page of your document. It will be impervious to accidental clicks and drags, serving as a locked aesthetic foundation for your content. This method perfectly maintains the intended visual design and aesthetic quality of your backgrounds, ensuring they complement your text without interfering with editing.
Document-Wide Security for Image Integrity and Content Protection
Beyond simply fixing an image’s position, you might need to protect the image (and the entire document) from any unauthorized modifications. This level of security is crucial when sharing documents containing sensitive information, high-value visual assets, or crucial digital photography that requires protection from editing or deletion. Microsoft Word offers robust features that extend image locking to a document-wide protection strategy.
Restricting Editing to Safeguard Images and Text
The “Restrict Editing” feature in Microsoft Word is a powerful tool for controlling how users interact with your document. While it affects the entire document or specified sections, it inherently protects all images contained within those boundaries from being moved, resized, or deleted. This method is ideal when you want to ensure the integrity of your document’s visual design, including all images and graphic elements, especially when collaborating or sharing.
Here’s how to use Restrict Editing to secure your images:
- Prepare Your Document: Ensure all images, wallpapers, and visual design elements are in their final positions.
- Access the Review Tab: Go to the Review tab on the Ribbon.
- Select Restrict Editing: In the “Protect” group, click on Restrict Editing. A “Restrict Editing” task pane will appear on the right side of your Word window.
- Set Formatting and Editing Restrictions:
- Formatting restrictions: (Optional) Tick the “Limit formatting to a selection of styles” checkbox if you want to control the formatting options available to other users. This indirectly preserves the aesthetic of your document.
- Editing restrictions: Tick the “Allow only this type of editing in the document” checkbox. From the dropdown menu below, choose the level of editing you wish to permit.
- No changes (Read only): This is the strongest option if you want to protect your images and text from any modifications. Users can view but not alter content.
- Comments: Users can add comments but cannot change the main content or images.
- Filling in forms: If your document is a form, users can only fill in designated form fields.
- (For locking specific sections): You can also select specific parts of your document (e.g., text, not images) and, under “Exceptions (optional)”, allow certain users to edit those specific parts while the rest (including images) remains locked.
- Start Enforcing Protection: Once you’ve made your choices, click the Yes, Start Enforcing Protection button at the bottom of the task pane.
- Set a Password: A “Start Enforcing Protection” dialog box will appear. Enter a strong password in the “Enter password (optional)” field, then re-enter it to confirm. Choose a password that is memorable to you but difficult for others to guess, especially if you’re protecting high-resolution stock photos or valuable digital art.
- Confirm and Save: Click OK. The document is now protected. Users attempting to modify restricted content, including moving or deleting images, will be prevented from doing so without the password.
This method offers a comprehensive way to protect your visual design and ensure that the integrity of all your content, including detailed photo manipulation and creative ideas, is maintained when the document is shared.
Password Protection for Ultimate Document and Image Confidentiality
For the highest level of security, you can password-protect your entire Word document. This prevents unauthorized individuals from even opening the document, thereby providing ultimate protection for all its contents, including every image, wallpaper, and background. This is crucial for documents containing sensitive information, proprietary visual assets, or any collection of images that demands strict confidentiality.
Here’s how to lock your entire Word document with an opening password:
- Open Your Document: Start Microsoft Word and open the document you intend to protect.
- Go to the File Tab: Click on the File tab in the top-left corner of the Word window. This will take you to the Backstage view.
- Navigate to Protect Document: In the left-hand menu, ensure “Info” is selected. On the right, you’ll see a “Protect Document” option. Click on it.
- Choose Encrypt with Password: From the dropdown menu, select Encrypt with Password.
- Enter Your Password: A small dialog box titled “Encrypt Document” will appear, prompting you to “Enter password.” Type a strong, unique password.
- Confirm Your Password: You will be prompted to re-enter the password to confirm it.
- Save the Document: After confirming the password, click OK. It is crucial to save your document (File > Save or Ctrl+S) for the password protection to take effect.
Now, whenever anyone tries to open this Word document, they will be required to enter the correct password before gaining access. Without it, the document, and all the valuable images, photography, and visual content within, remains inaccessible. Remember to store your password securely, as Tophinhanhdep.com cannot help recover lost passwords for encrypted documents.
Important Considerations for Document Security:
- Backup Your Passwords: Always keep a record of your passwords in a secure location. Losing a password for an encrypted Word document means permanent loss of access to its content, including your meticulously arranged image collections or essential digital photography.
- Layered Protection: For extremely sensitive documents, consider combining these methods. For instance, encrypting a document with a password and then using “Restrict Editing” once inside provides dual-layer security.
- Image File Protection: While Word’s locking mechanisms protect images within the document, they do not protect the original image files on your computer. For source image protection, consider using file-level permissions on your operating system (Windows or macOS) or dedicated third-party encryption software, as discussed on Tophinhanhdep.com in related articles on data security.
- Digital Signatures: For ensuring authenticity and integrity (verifying that a document and its images haven’t been tampered with), consider adding a digital signature. This doesn’t lock content but confirms its origin and that it hasn’t changed since being signed.
In conclusion, maintaining the visual integrity of your Microsoft Word documents, especially those enriched with captivating images, wallpapers, digital art, or high-resolution photography, is crucial for effective communication and professional presentation. Tophinhanhdep.com advocates for the intelligent use of Word’s built-in locking features to prevent accidental shifts, unauthorized edits, or unwanted access. By mastering techniques such as the Position Anchor tool, embedding images in headers/footers, utilizing the Developer tab’s content controls, or employing document-wide restrictions and password protection, you can ensure that your creative ideas and thematic collections remain perfectly preserved. These methods not only safeguard your visual investments but also enhance the overall stability and professionalism of your documents, allowing your carefully chosen visuals to tell their story exactly as intended.