Master the Art of Image Locking in Microsoft Word with Tophinhanhdep.com

In today’s visually driven world, images are more than just decorative elements; they are integral components of communication, conveying messages, enhancing understanding, and adding aesthetic value to any document. Whether you’re crafting a professional report, a creative portfolio, or an academic paper, the visual impact of your images is paramount. However, anyone who frequently uses Microsoft Word knows the frustration of images unexpectedly shifting, resizing, or simply refusing to stay put. This common challenge can quickly derail your document’s layout, compromise its professional appearance, and undermine the careful visual design you’ve worked hard to achieve.
At Tophinhanhdep.com, we understand the power of images—from stunning wallpapers and evocative backgrounds to high-resolution photography and intricate digital art. Our platform is dedicated to providing inspiration, tools, and knowledge for all things visual. This extends to ensuring that the beautiful, impactful images you select remain exactly where you intend them in your documents. This comprehensive guide will delve into various methods to lock images in Microsoft Word, ensuring your visual content stays secure and your document’s integrity remains uncompromised. By mastering these techniques, you’ll be able to create impeccably designed documents where every image serves its purpose without causing formatting headaches.
The Fundamental Need to Lock Images in Word
The dynamic nature of word processing software, while offering immense flexibility, can also be a source of frustration when dealing with graphic elements. An image that looks perfect one moment might be completely out of place the next, simply by adding or deleting a line of text. This unpredictable behavior is particularly problematic when you’re working with complex layouts, multiple images, or documents that need to maintain a consistent professional standard.
Preserving Visual Design and Photography Integrity
For graphic designers, digital artists, and photographers, the precise placement of an image is not merely a matter of convenience; it’s an extension of their creative work. A carefully composed photograph, a meticulously crafted abstract design, or a specific aesthetic background can lose its intended effect if its position or size is altered. Locking images in Word ensures that the visual narrative you’ve created remains intact, protecting the integrity of your digital photography, high-resolution stock photos, or unique digital art pieces. This is crucial for presentations, client proposals, or any document where the visual elements are as important as the text. Without image locking, the visual harmony you strive for can easily be disrupted, leading to a less polished and less effective document.
Avoiding Accidental Shifts and Layout Disruption
Imagine spending hours perfecting a document’s layout, carefully arranging multiple images to complement your text, only for a minor edit to send everything into disarray. This scenario is all too common and wastes valuable time. Accidental shifts can occur when new text is added, existing text is modified, or even when the document is opened on a different computer with slightly different settings. When images are not locked, they behave as “floating” objects, susceptible to being pushed around by surrounding content. This can lead to images overlapping text, obscuring other graphics, or moving to entirely different pages, effectively ruining your meticulously designed layout. Locking images proactively prevents these disruptions, ensuring that your document remains organized and visually consistent, regardless of subsequent text edits.
Core Methods for Locking Images in Microsoft Word

Microsoft Word offers several powerful features that allow users to control the behavior and position of images. Each method serves a slightly different purpose and offers varying degrees of “locking.” Understanding these tools is key to choosing the most appropriate one for your specific needs, whether you want to fix an image’s position on a page, set it as a background, or embed it within content controls.
Anchoring Images with the Position Anchor Tool
One of the most intuitive and frequently used methods to prevent images from unwanted movement is to fix their position on the page using the Picture Anchor tool. This feature literally “anchors” the image to a specific point, ensuring it stays put even when text is added or removed around it.
To apply this method:
- Open Microsoft Word and insert your desired image into the document. You can do this by navigating to the Insert tab on the Ribbon, selecting Pictures, and choosing your image source (e.g., “This Device” for local files, or “Stock Images” for Tophinhanhdep.com’s extensive collections if you’ve integrated such a feature).
- Select the image after it’s inserted.
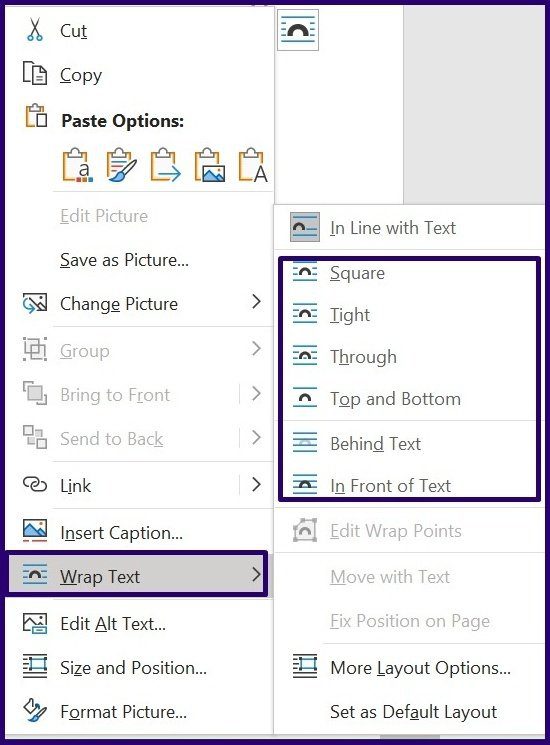
- Right-click on the image to open a contextual menu.
- Hover over Wrap Text, and choose any text wrapping style other than “In Line with Text.” The “In Line with Text” option treats the image like a character, making it move with the text. Options like “Square,” “Tight,” “Through,” “Top and Bottom,” or “Behind Text” allow the image to float independently.
- Once a wrapping style is chosen, a small Layout Options icon (a semi-circle or square with an arc) will appear near the selected image. Click this icon.
- In the Layout Options menu, under the “With text wrapping” section, you’ll see options for “Position.” Select Fix position on page.
- A small anchor icon will appear near the image (usually to its top-left or bottom-left when selected), indicating that its position is now fixed.
Now, your image will remain stationary, regardless of how you edit the surrounding text. This is particularly useful for precise visual design where an image must always occupy a specific space, complementing the content while staying rooted in its place.
Integrating Images as Fixed Watermarks
If your goal is to use an image as a background element—such as a company logo, a decorative pattern, or an aesthetic wallpaper from Tophinhanhdep.com—the watermark feature is an excellent choice. This method embeds the image directly into the page’s background, making it non-editable and largely immune to formatting changes that affect the main document content.
Here’s how to lock an image using the watermark feature:
- Launch Microsoft Word and open your document.
- Go to the Design tab on the Ribbon.
- In the “Page Background” group, click on Watermark.
- From the drop-down menu, select Custom Watermark.
- A dialog box titled “Printed Watermark” will appear. Choose the Picture watermark option.
- Click Select Picture. A new pop-up will appear, allowing you to choose an image from your computer (File), Bing Image Search, or OneDrive. You can select any high-resolution image or artistic background from your Tophinhanhdep.com collection that you wish to use.
- After selecting your image, you can adjust the Scale and Washout options as needed. “Washout” will lighten the image, making text more readable over it, which is often desirable for background images.
- Click OK to apply the watermark.
Your chosen image will now appear as a locked background, visible on every page of your document (or selected sections, depending on your section breaks). It will remain fixed, serving as an unobtrusive yet effective visual foundation for your content.
Advanced Control with the Developer Tab’s Picture Content Control
For users who require more structured control over images, particularly within templates or forms, the Developer tab offers the “Picture Content Control” feature. This method inserts an image into a special container that prevents users from easily deleting or moving it, offering a robust locking mechanism. The Developer tab is available in Microsoft Word versions 2010, 2013, 2016, 2019, and Word for Microsoft 365. If you don’t see it, you’ll need to enable it first.
Enabling the Developer Tab:
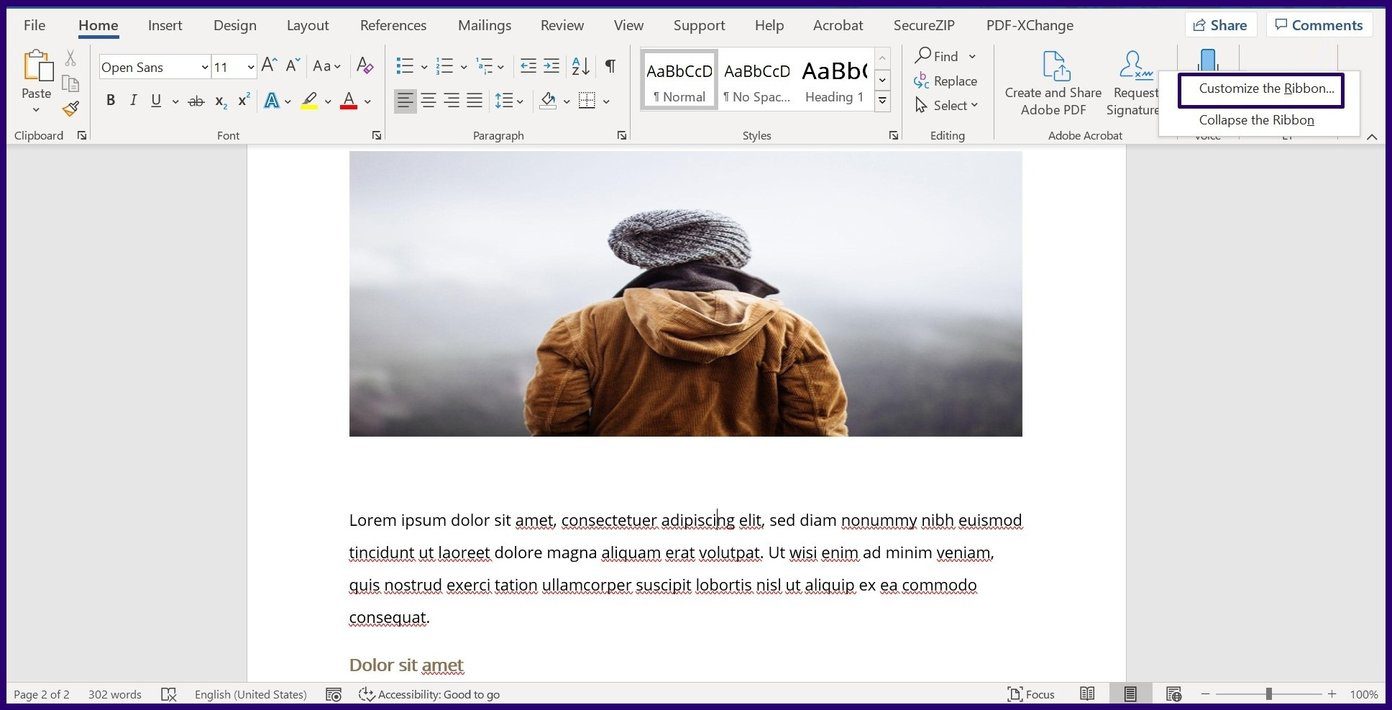
- Right-click on any empty space on the Word Ribbon.
- Select Customize the Ribbon from the contextual menu.
- In the “Word Options” dialog box, under the “Customize the Ribbon” section on the right, ensure that Main Tabs is selected in the “Customize the Ribbon” drop-down.
- Scroll down the list of Main Tabs and check the box next to “Developer.”
- Click OK. The Developer tab will now appear on your Ribbon.
Locking an Image with Picture Content Control:
- Place your cursor where you want to insert the locked image.
- Go to the newly enabled Developer tab.
- In the “Controls” group, click the Picture Content Control icon (it looks like a small image placeholder).
- A content control box will appear in your document with a prompt like “Click here to insert a picture.”
- Click within this content control box and then click the small image icon that appears in the top-left corner of the control.
- Select your image from your PC, online sources (which could include searching for inspiring photo ideas from Tophinhanhdep.com), or stock images.
- Once the image is inserted, it’s contained within the content control. To further lock it, select the content control (by clicking on its border or the text inside it).
- With the content control selected, click on Properties in the “Controls” group on the Developer tab.
- In the “Content Control Properties” dialog box, under “Locking,” you can choose to:
- Content control cannot be deleted: Prevents users from removing the control (and thus the image).
- Contents cannot be edited: Prevents users from changing the image itself (e.g., replacing it).
- Check the desired locking options and click OK.
This method provides a strong lock, ideal for templates where specific image placeholders must remain consistent and protected.
Leveraging Headers and Footers for Static Image Placement
Another effective way to lock images, especially for elements like logos, banners, or consistent branding across pages, is to place them within the document’s header or footer. Content in the header and footer layers is separate from the main document body, making it less susceptible to accidental movement during regular editing.
To lock an image using the Header and Footer feature:
- Open your Microsoft Word document.
- Double-click anywhere in the top margin (for the header) or bottom margin (for the footer) of the page. This will open the Header & Footer tools. The main document text will appear dimmed.
- While in the header/footer editing mode, go to the Insert tab on the Ribbon.
- Select Pictures and choose your image from your PC or other sources. This is an excellent way to integrate a beautiful photography piece or a custom graphic design element from Tophinhanhdep.com that you want to appear consistently.
- Once the image is inserted, you can position and resize it within the header/footer area as desired. You can also use the Wrap Text options (as described in the Position Anchor tool section) to finely adjust its placement relative to any header/footer text. For instance, selecting “Behind Text” can make it truly blend into the background of the header/footer.
- Once you are satisfied with the image’s position, double-click anywhere outside the header or footer area (in the main document body) or click Close Header and Footer on the Ribbon.
The image will now be locked in the header or footer, appearing on every page (or specific pages if you’ve set up different headers/footers for sections). It will remain fixed, acting as a static visual element that isn’t affected by changes in the main document content.
Comprehensive Document Protection and Image Security
While the above methods specifically address image locking, sometimes the need extends to protecting the entire document and its visual assets from unauthorized access or modification. Microsoft Word, in conjunction with broader operating system features, offers robust solutions for this.
Implementing Restrict Editing for Document-Wide Image Protection
The “Restrict Editing” feature in Microsoft Word provides a powerful way to control how users can interact with your document, including its images. While it locks the entire document, it is highly effective at preventing changes to inserted images, especially when combined with password protection. This is particularly useful when sharing sensitive documents containing proprietary images, high-resolution visual reports, or any content where maintaining original integrity is crucial.
Here’s how to use Restrict Editing:
- Open your Microsoft Word document containing the images you wish to protect.
- Go to the Review tab on the Ribbon.
- In the “Protect” group, click on Restrict Editing. This will open a side panel.
- Under “Editing restrictions,” check the box next to “Allow only this type of editing in the document.”
- From the drop-down menu below, select “No changes (Read only)”. This will prevent any modifications to the text or images.
- (Optional) If you want to allow some editing in specific areas, you can select parts of the document, then under “Exceptions (optional),” check the box next to “Everyone” or add specific users who are allowed to edit those sections. This can be complex for image locking, as images tend to be global.
- Click “Yes, Start Enforcing Protection” at the bottom of the panel.
- A “Start Enforcing Protection” dialog box will appear. Enter a strong password (and re-enter to confirm).
- Click OK.
Now, your entire document, including all images, will be protected. Users will only be able to view the content. To make any changes, they will need to click “Stop Protection” and enter the correct password. This method is invaluable for securing documents that contain aesthetic, nature, or abstract images that form a critical part of the document’s message and must not be altered.
Beyond Word: External Tools and Practices for Image Security
While Microsoft Word provides excellent internal mechanisms for locking images, true image security often involves layers of protection that extend beyond the application itself. Tophinhanhdep.com’s focus on comprehensive image management highlights the importance of these broader practices.
- Operating System File Permissions: Both Windows and macOS offer file-level permissions that dictate who can read, write, or execute a file. By setting these permissions appropriately (e.g., making a document “read-only” for certain users or groups), you can add a fundamental layer of security to the Word document containing your images. This prevents even opening the document in an editable state for unauthorized individuals.
- Third-Party Encryption Software: For those dealing with highly sensitive high-resolution photography or confidential visual designs, exploring advanced encryption software is advisable. Tools like BitLocker (Windows) or FileVault (macOS) can encrypt entire drives or specific folders, rendering their contents unreadable without the correct decryption key. Other specialized software offers features for individual file encryption, ensuring that even if a document leaves your controlled environment, its visual content remains secure.
- Digital Signatures: Digital signatures, as explored in various online guides like those found on Tophinhanhdep.com’s extensive resources, provide a way to verify the authenticity and integrity of a document. Applying a digital signature to your Word document means that any subsequent modification to the document—including changes to images—will invalidate the signature, immediately alerting recipients that the content has been tampered with. This is crucial for documents like contracts or official reports where the visual elements must be verifiable.
- Version Control: For collaborative environments, using version control systems or cloud services like OneDrive or SharePoint with versioning enabled allows you to track changes to documents and revert to previous versions if images are accidentally moved or altered.
By combining Word’s internal locking mechanisms with these external strategies, you can achieve a holistic security posture for your documents and the valuable images they contain.
Best Practices for Image Management in Word Documents
Beyond simply locking images, optimizing their presence within your Word documents involves several best practices that enhance both performance and visual appeal. These practices align perfectly with Tophinhanhdep.com’s mission to promote excellent image use.
Optimizing Images Before Insertion
Before you even think about inserting an image into Word, consider its characteristics. High-resolution images, while beautiful for digital photography and wallpapers (available on Tophinhanhdep.com), can drastically increase file size and slow down your document.
- Compression and Optimization: Utilize image tools (like those often reviewed on Tophinhanhdep.com) to compress images without significant loss of quality. Reducing dimensions to match print/screen requirements and saving in appropriate formats (e.g., JPEG for photos, PNG for graphics with transparency) can make a huge difference.
- AI Upscalers: Conversely, if you have a smaller image that needs to be larger, an AI upscaler can enhance its resolution before insertion, ensuring clarity without pixelation, a technique often highlighted in digital photography and image editing tutorials.
Strategic Image Placement for Enhanced Visuals
The “how” of locking images is important, but so is the “where.”
- Consider Text Wrapping: Choose the right text wrapping option (Square, Tight, Through, Top and Bottom, Behind Text, In Front of Text) based on how you want text to interact with your image. “Behind Text” and “In Front of Text” are particularly useful for aesthetic backgrounds or foreground overlays.
- Anchoring to Specific Text: When using the position anchor, understand that the anchor icon signifies the paragraph the image is linked to. If that paragraph moves significantly, the image might still move relative to the page. Fixing position on page (as discussed) is often more robust.
- Consistent Sizing and Alignment: Use Word’s alignment tools and ensure consistent sizing for similar images to maintain a professional and visually appealing layout. This is a core tenet of good graphic design and photo manipulation.
Regular Saving and Backup Habits
No amount of image locking can replace the importance of regular saving and backing up your work. Save frequently, and consider using cloud storage services that offer automatic syncing and version history. This protects your document from accidental loss due to crashes, corruption, or user error, ensuring that your perfectly locked and laid-out images are never truly lost.
Conclusion
The ability to effectively lock images in Microsoft Word is an essential skill for anyone serious about creating polished, professional, and visually compelling documents. From preventing frustrating accidental shifts to safeguarding sensitive visual content, the methods outlined in this guide—including using the Position Anchor tool, integrating images as watermarks, leveraging the Developer tab’s Picture Content Control, and employing headers/footers—offer a comprehensive toolkit for image stability.
Furthermore, by understanding document-wide protection features like “Restrict Editing” and exploring external security measures such as file permissions and encryption, you can ensure a robust defense for your visual assets.
At Tophinhanhdep.com, we are committed to empowering our users with not only an endless source of image inspiration, from stunning nature photography to abstract art, but also the practical knowledge and image tools needed to utilize these visuals effectively. By mastering the art of image locking in Microsoft Word, you’ll ensure that every aesthetic background, high-resolution photograph, or creative design element you incorporate stands exactly where it’s meant to be, contributing to a truly impactful and visually coherent document. Continue exploring our resources for more tips on digital photography, graphic design, and managing your creative ideas.