How to Lock Two Images Together in Docs for Enhanced Visual Design

In today’s visually-driven world, documents are no longer just about text. Whether you’re crafting a professional report, a creative portfolio, an aesthetic mood board, or an engaging presentation, integrating images effectively is paramount. High-resolution photography, abstract designs, nature scenes, or beautiful artistic compositions can transform a mundane document into a captivating experience. However, a common challenge arises when you need to combine multiple images, perhaps to create a collage, present a comparative analysis, or simply arrange a series of digital art pieces. The desire to “lock” or group these images together so they can be treated as a single unit—moved, resized, and formatted cohesively—is a fundamental need for anyone engaged in visual design and photo manipulation within their documents.
Google Docs, a powerful and widely-used online word processor, offers robust functionalities for text, but its image manipulation features can sometimes appear less intuitive than dedicated graphic design software. Many users, particularly those focused on curated image collections or creative ideas for visual content, often find themselves asking: “How do I group images in Google Docs?” or “How can I combine pictures and keep them together?” While Google Docs doesn’t have a direct “group” button for images inserted directly into the document itself, it provides an ingenious workaround through its integrated Drawing tool. This method allows you to merge images seamlessly, treating them as one cohesive object within your document, much like a digital photography collage or a unified graphic design element.
This comprehensive guide from Tophinhanhdep.com will walk you through the precise steps to group images in Google Docs, empowering you to create more professional, aesthetically pleasing, and easily manageable visual content. We’ll explore not only the technical process but also how this skill enhances your ability to work with various image types—from stock photos to digital art—and supports broader visual design principles, aligning perfectly with the core themes of Tophinhanhdep.com, which cover everything from stunning wallpapers and backgrounds to advanced image tools and creative inspiration.

Grouping Images in Google Docs Using the Drawing Tool
Unlike more traditional desktop applications where you might simply select multiple objects and click a “Group” button, Google Docs requires a slightly different approach. The key lies in utilizing the built-in Drawing canvas. This powerful, yet often overlooked, feature acts as a mini-design studio within your document, allowing for more intricate manipulation and combination of visual elements before they are placed into your main text flow. By understanding this mechanism, you unlock a new level of control over your image layouts, essential for any serious visual designer or photography enthusiast.
Initiating the Drawing Canvas
The journey to grouping your images begins by opening this dedicated creative space. Think of it as preparing your digital workspace for a small-scale photo manipulation project.
- Open Your Google Docs Document: Navigate to the specific Google Docs file where you intend to group your images. Ensure your cursor is placed roughly where you’d like the grouped image to appear. While you can always move it later, starting in the right general area can save minor adjustments.
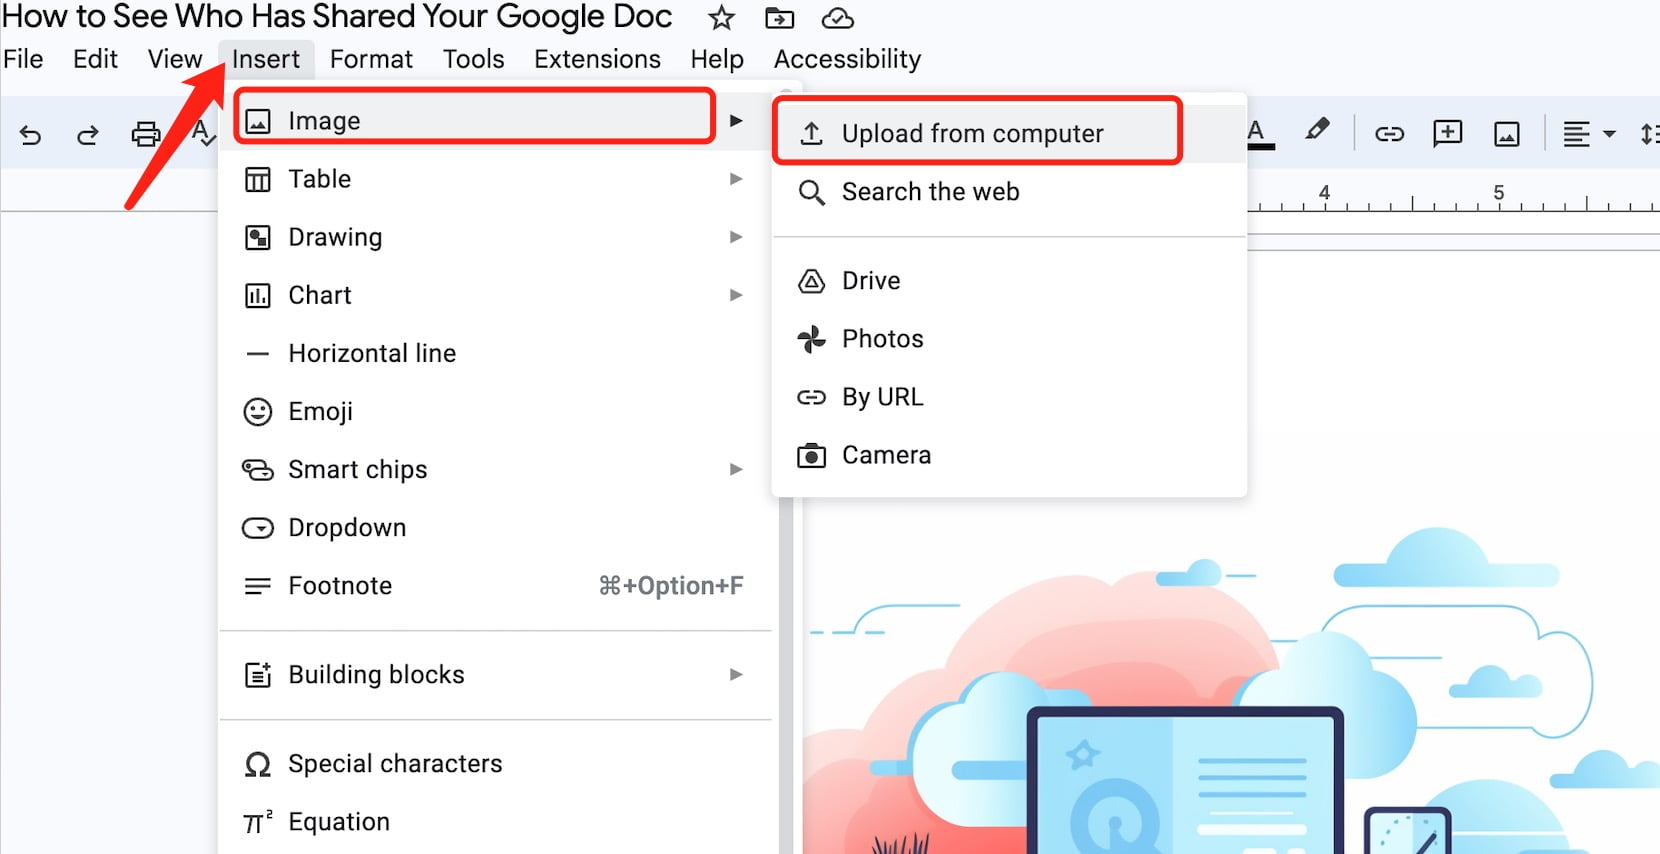
- Access the Drawing Tool: In the top menu bar, click on
Insert. From the dropdown menu, hover overDrawing, and then selectNew. This action will open a fresh, blank drawing window, which serves as your canvas for combining images. This drawing window is integrated directly into Docs, meaning you don’t need to navigate to a separate application; it’s all part of your Tophinhanhdep.com-enhanced workflow.
Adding and Arranging Your Images
Once the Drawing canvas is open, it’s time to bring in your visual assets. This is where your chosen images—be they beautiful photography, abstract art, or thematic collections—come to life within the grouping context.
- Insert Images onto the Canvas: On the toolbar at the top of the Drawing window, you’ll see an icon that looks like a mountain or landscape (the
Imageicon). Click on it. A pop-up will appear, offering various options for uploading your images:- Upload from computer: Ideal for local files, including high-resolution images or digital photography.
- Search the web: Handy for quickly finding stock photos or inspiration.
- Drive/Photos: If your images are stored in Google Drive or Google Photos, this is a quick way to access them.
- By URL: If you have an image link, you can paste it directly.
- Camera: For instant capture. Choose your preferred method and upload your first image. Repeat this process for every image you wish to include in your group.
- Resize and Arrange: As each image appears on the canvas, you’ll have the flexibility to manipulate it individually.
- Resizing: Click on an image, and drag the corner handles to adjust its size proportionally. If you hold down the
Shiftkey while dragging, it will maintain its aspect ratio, which is crucial for preserving the integrity of your photography or digital art. - Moving: Click and drag an image to position it exactly where you want relative to the other images on the canvas. This is where your creative ideas for composition truly come into play, whether you’re building a symmetrical grid or an artistic overlap.
- Basic Customizations: The toolbar on the Drawing canvas also offers tools to add borders, crop images, or make other minor adjustments. These tools allow for a degree of photo manipulation directly within the canvas, helping you refine the visual design of your grouped element.
- Resizing: Click on an image, and drag the corner handles to adjust its size proportionally. If you hold down the
The Grouping Action
With your images perfectly arranged and pre-edited to your liking, the next critical step is to formally “lock” them together into a single, movable unit. This is the essence of combining multiple visuals for easy management.
- Select All Images: After you’ve arranged all your images, you need to select them simultaneously.
- Method 1 (Keyboard Shortcut): Click on any one image on the canvas to select it. Then, press
Ctrl + A(orCmd + Aon Mac) on your keyboard. This will select all objects on the canvas. - Method 2 (Manual Selection): Click on the first image. Then, hold down the
Shiftkey (orCtrl/Cmdkey) on your keyboard and click on each subsequent image you want to group. This allows for selective grouping if you have other elements on the canvas you don’t want to include. You’ll know they’re selected when you see bounding boxes around all of them, often with a combined border indicating a multi-selection.
- Method 1 (Keyboard Shortcut): Click on any one image on the canvas to select it. Then, press
- Execute the Group Command: Once all desired images are selected:
- Right-Click Method: Right-click on any of the selected images. From the context menu that appears, choose the
Groupoption. - Keyboard Shortcut: Alternatively, you can use the keyboard shortcut
Ctrl + Alt + G(orCmd + Option + Gon Mac) to group them instantly. The bounding boxes will now merge into a single, unified outline, indicating that your images are successfully grouped and will now behave as one object.
- Right-Click Method: Right-click on any of the selected images. From the context menu that appears, choose the
Integrating Your Grouped Visual into the Document
Your meticulously arranged and grouped image is now ready to be placed into your Google Docs document. This final step ensures your creative ideas and visual designs are integrated seamlessly.
- Save and Close: In the top right corner of the Drawing canvas window, click the
Save and Closebutton. Your newly grouped image will automatically be inserted into your Google Docs document at the cursor’s original position. - Positioning for Free Movement (Optional but Recommended): By default, Google Docs often inserts images “In line with text,” which restricts their movement. To gain complete freedom in positioning your grouped image—a crucial capability for advanced visual design and photo manipulation—follow these optional steps:
- Click on the newly inserted grouped image to select it.
- Below the image, a small floating toolbar will appear. Locate the
Image optionspanel (often represented by a square icon with lines around it or a three-dot menu leading to “All image options” then selecting “Wrap text”). - From the options presented (often
In line with text,Wrap text,Break text,Behind text,In front of text), selectIn front of text. This setting allows you to drag the grouped image anywhere on the page without disrupting your document’s text flow, making it invaluable for creating dynamic layouts. - For even greater control, you can choose
Fix position on pageinstead ofMove with textwithin theImage optionssidebar. This ensures your grouped image stays exactly where you place it, irrespective of text edits above or below.
- Final Resize and Drag: With the “In front of text” option selected, you can now freely resize the entire grouped image using its corner handles and drag it to the precise location you desire within your document. This flexibility is key for integrating high-resolution photography or complex visual designs into your overall document aesthetic.
Enhancing Your Grouped Images for Visual Impact
Grouping images is a powerful foundational skill, but it’s just the beginning. To truly leverage this technique for stunning visual design and effective communication, you’ll want to refine and strategically place your grouped visuals within your document. This section delves into how to edit your grouped images and integrate them seamlessly, elevating your document’s overall aesthetic and professional appeal, consistent with the high standards of Tophinhanhdep.com.
Editing and Fine-Tuning Your Image Group
The beauty of the Drawing tool method is its flexibility. Even after grouping and inserting your images, you’re not locked into the final product. You can always revisit and refine your composition.
- Re-opening for Edits: If you decide you need to adjust individual images within the group, add another element, or change the overall arrangement, simply select the grouped image in your Google Docs document. A small floating toolbar will appear below it. Click the
Editbutton (often represented by a pencil icon orImage optionssidebar, thenEdit). This action will reopen the Drawing canvas with your grouped image loaded. - Ungrouping for Individual Adjustments: Once back in the Drawing canvas, you’ll need to
Ungroupthe images to work on them individually. Select the grouped object (it will have a single bounding box), right-click on it, and chooseUngroupfrom the context menu. The images will revert to being individual, selectable objects. - Making Changes: Now you can:
- Resize or Crop: Adjust the size or crop individual images as needed. This is perfect for ensuring consistent styling across your aesthetic photography collection.
- Add Borders or Effects: Use the Drawing canvas tools to apply borders, change colors, or add other simple graphic design elements to individual images.
- Rearrange: Drag and drop images to new positions to refine your collage or visual arrangement.
- Add More Images/Text: You can insert additional images or even text boxes into the canvas to further enhance your grouped visual. This is particularly useful for creating complex layouts or integrating captions directly within the visual unit, akin to digital art compositions.
- Re-group and Save: After making all your desired changes, remember to re-select all the images (using
Ctrl+AorShift+click), right-click, andGroupthem again. Then, clickSave and Closein the top right corner of the Drawing window. The updated group will replace the original in your Google Docs document, maintaining your document’s visual integrity.
Strategic Placement and Text Wrapping
Once your images are grouped, their integration into the document’s text flow becomes a critical aspect of visual design. Proper placement ensures your document is not only informative but also aesthetically pleasing and easy to read.
- Understanding Text Wrapping Options: Google Docs provides several text wrapping options that dictate how text flows around your images.
In line with text: The image is treated like a large character in a line of text, making it difficult to move freely. This is generally not ideal for grouped images intended for complex layouts.Wrap text: Text flows around the perimeter of the grouped image. You can adjust the margin (spacing) between the image and the text. This is a good option for incorporating images into narratives without breaking the reading flow.Break text: Text stops above the image and resumes below it, essentially treating the image as a separate paragraph.Behind text: The image is placed behind the text, allowing for subtle background elements or watermarks, a common technique in creative graphic design.In front of text: The image floats freely above the text, making it the most versatile option for precise placement and photo manipulation, especially for showcasing prominent visual content. For most creative and flexible layouts,In front of textorWrap textare your best choices, accessible via the floating toolbar or theImage optionssidebar.
- Fixing Position on Page: For grouped images that serve as key visual elements, like a title graphic or a fixed-position collage, consider selecting
Fix position on pagewithin theImage optionssidebar. This ensures your grouped visual remains exactly where you placed it, regardless of any text additions or deletions elsewhere in your document. This consistency is vital for professional visual design and ensuring your carefully arranged photography or digital art remains undisturbed. - Layering within the Drawing Tool: While
In front of textgives you overall layering control, remember that within the Drawing canvas itself, you can layer individual images on top of each other. Use the “Order” option (right-click on an image, thenOrder) to send images forward or backward. This subtle photo manipulation technique is excellent for creating depth in collages or overlaying text onto an image within the grouped object.
Why Grouping Matters for Your Visual Projects
The ability to group images in Google Docs is more than just a technical trick; it’s a fundamental skill that significantly enhances your capabilities across various aspects of visual creation and document design, aligning perfectly with the diverse offerings of Tophinhanhdep.com.
Photography and Visual Design Efficiency
For anyone working with digital photography or engaged in graphic design, grouping images streamlines the workflow immensely. Imagine creating a mood board with trending styles, showcasing a thematic collection of nature photography, or presenting a series of abstract art pieces.
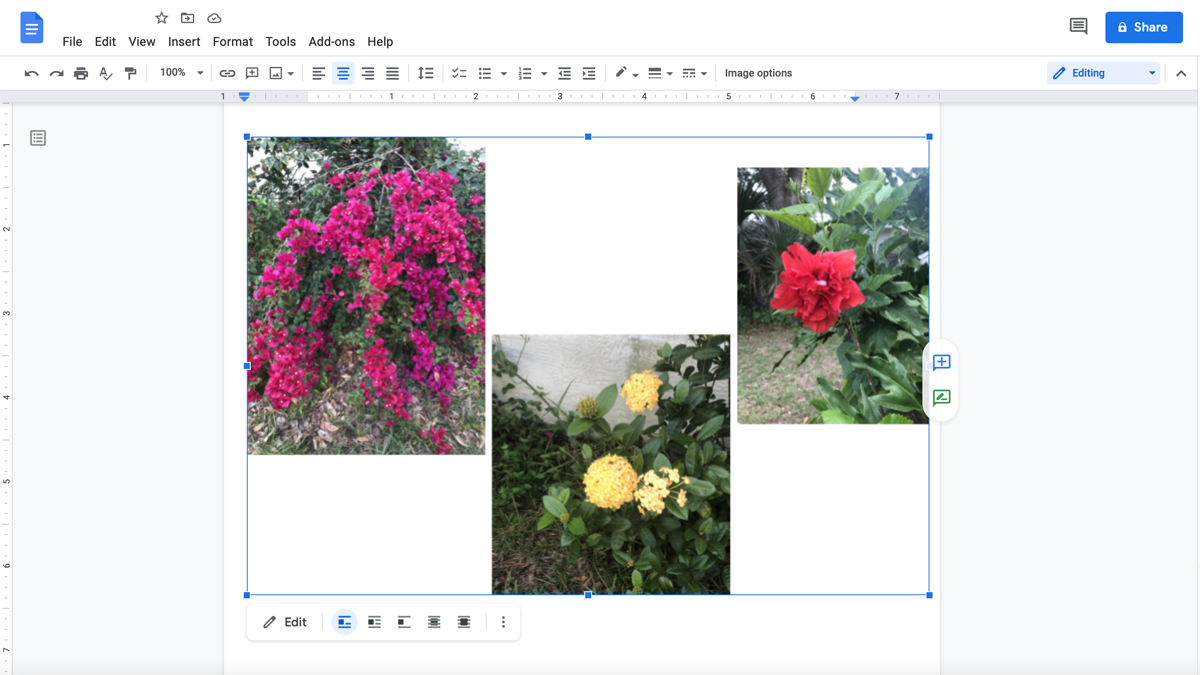
- Collages and Montages: Grouping allows you to easily arrange multiple beautiful photography shots into a cohesive collage, treating the entire composition as a single entity. This is invaluable for visual storytelling or creating engaging backgrounds.
- Comparative Analysis: If you’re comparing high-resolution stock photos or different editing styles, grouping them side-by-side or one above the other ensures they stay together when you move them, making your analysis clearer and more professional.
- Aesthetic Layouts: Achieving a specific aesthetic requires precision. Grouping ensures that once you’ve perfected the spacing and alignment of several images, they remain locked in that configuration, preserving your creative ideas and design intent.
Streamlined Image Tools Integration and Optimization
While Google Docs itself isn’t an advanced image editor, the act of grouping images facilitates better integration with external image tools and optimization strategies, which are key areas for Tophinhanhdep.com users.
- Pre-Processing for Quality: Before grouping, you can use Tophinhanhdep.com’s recommended image tools like compressors or AI upscalers to ensure individual images are of optimal quality and file size. Once grouped, the combined visual unit benefits from this foundational preparation.
- Unified Handling for Export: When you export your Google Docs document to a PDF or another format, the grouped images are treated as a single graphical element. This often results in a cleaner export than if individual images were haphazardly placed, potentially leading to better compression and a more optimized final file.
- Design Consistency: For visual designs that incorporate multiple images, grouping maintains consistency. If you later decide to convert the document’s images or apply a specific editing style to the entire visual component, having them grouped simplifies the process, ensuring no individual element is accidentally misaligned or overlooked.
Elevating Image Inspiration and Collections
Tophinhanhdep.com is a hub for image inspiration and curated collections. Grouping images within Google Docs directly supports these goals:
- Curated Mood Boards: Grouping multiple images, textures, and color palettes on a drawing canvas allows you to build sophisticated digital mood boards directly within a document. This is perfect for design projects, concept development, or simply compiling aesthetic backgrounds.
- Thematic Collections: Whether it’s a collection of wallpapers, abstract art, or sad/emotional photography, grouping images that belong to a specific theme helps present them as a unified collection rather than disparate elements.
- Presenting Creative Ideas: For graphic designers or digital artists, grouping different iterations of a logo, different photo manipulation attempts, or various digital art concepts allows for a coherent presentation of creative ideas to clients or colleagues, facilitating feedback and decision-making.
By mastering image grouping, you transform your Google Docs into a more versatile platform for managing, presenting, and integrating all forms of visual content, from high-resolution images to intricate graphic designs, all within a unified and controllable framework.
Troubleshooting and Best Practices: Ensuring Seamless Visual Integration
Even with a clear understanding of the steps, working with images in Google Docs, especially grouping them, can sometimes present minor hurdles. Knowing how to troubleshoot common issues and adopting best practices will ensure a smooth, efficient workflow for all your visual design projects, from arranging aesthetic wallpapers to presenting high-resolution photography.
Common Issues and Quick Solutions
- Images Not Selecting Together:
- Problem: You’re trying to select multiple images, but only one is highlighted, or
Ctrl+Aisn’t working as expected. - Solution: Ensure you are within the Drawing canvas when attempting to select and group. Images inserted directly into the main Google Docs document cannot be grouped this way. If you’re on the canvas, double-check that you’re holding
Shift(orCtrl/Cmd) correctly while clicking each image, or thatCtrl+Ais indeed being pressed on the active Drawing window.
- Problem: You’re trying to select multiple images, but only one is highlighted, or
- “Group” Option is Grayed Out:
- Problem: You’ve selected multiple images on the Drawing canvas, but the “Group” option in the right-click menu is unavailable.
- Solution: This usually means not enough items are selected (you need at least two). Verify that two or more images have clear bounding boxes around them after your selection attempt. If you’re selecting text boxes and images, ensure they are all on the Drawing canvas.
- Grouped Image Moves Unpredictably in Docs:
- Problem: After saving and closing the Drawing, your grouped image jumps around the document when you type or edit text.
- Solution: This is almost always due to the text wrapping setting. Select the grouped image, and from the floating toolbar or
Image optionssidebar, change the setting toIn front of textor, for fixed placement,Fix position on page. This gives you complete control over its location independent of text flow.
- Loss of Image Quality After Grouping/Saving:
- Problem: Your high-resolution photography looks blurry or pixelated after being grouped and inserted into Docs.
- Solution: Google Docs can sometimes compress images. Always start with the highest resolution images possible. Before inserting into the Drawing, you might use Tophinhanhdep.com’s image optimizers or AI upscalers if your original images are low quality. Avoid resizing images too drastically larger than their original resolution within the Drawing canvas, as this will inevitably lead to pixelation. Once grouped, try to maintain a reasonable display size.
Best Practices for Optimal Results
- Prepare Images Beforehand:
- Resolution and File Size: For high-resolution photography and digital art, ensure your images are already at the desired resolution and, if possible, optimized for web use (smaller file size but good quality) before uploading to the Drawing canvas. Tools like Tophinhanhdep.com’s compressors can help with this.
- Consistent Aspect Ratios: If you’re creating a grid or a uniform collage, pre-cropping images to consistent aspect ratios (e.g., all squares, all 16:9) before inserting them will save significant time and effort within the Drawing tool and contribute to a more professional visual design.
- Editing Styles: Apply any specific editing styles or filters to individual images using external photo manipulation software before bringing them into Docs. This ensures consistency and quality that Docs’ internal tools might not offer.
- Utilize the Drawing Canvas’s Full Potential:
- Layers and Order: Don’t forget the layering capabilities within the Drawing tool. Use
Order(right-click ->Order) to bring elements forward or send them backward, crucial for complex collages or overlaying text on images. - Shapes and Lines: The Drawing canvas isn’t just for images. You can add shapes, lines, and text boxes directly into your group. This is excellent for creating infographics, annotated images, or unique graphic design elements that combine visuals and text seamlessly.
- Zoom In: For precise arrangement of small elements or fine-tuning alignment, use the zoom feature within the Drawing canvas.
- Layers and Order: Don’t forget the layering capabilities within the Drawing tool. Use
- Save and Iterate:
- Frequent Saving: Although Google Docs autosaves, when working in the Drawing canvas, ensure you click
Save and Closeperiodically if you’ve made significant changes, especially before exiting the browser or moving to another task. - Duplicate and Experiment: If you’re unsure about a design change, duplicate the grouped image in your document (or even the entire document) and experiment. This allows you to explore different creative ideas without fear of losing your original work.
- Frequent Saving: Although Google Docs autosaves, when working in the Drawing canvas, ensure you click
- Consider Accessibility and Aesthetics:
- Alt Text: Once the grouped image is in your document, remember to add descriptive
Alt textvia theImage optionspanel. This is vital for accessibility and SEO, ensuring your visual content is understandable even if it doesn’t load or for users with screen readers. - Balance: While grouping offers great flexibility for photo manipulation and visual design, always aim for balance. Don’t overcrowd your document with too many grouped images, and ensure the visuals enhance, rather than detract from, your message.
- Alt Text: Once the grouped image is in your document, remember to add descriptive
By following these troubleshooting tips and best practices, you can confidently integrate and manage grouped images within Google Docs, creating documents that are not only functionally robust but also visually stunning, reflecting the quality and attention to detail that Tophinhanhdep.com advocates for in all aspects of image and visual content creation.
Conclusion: Mastering Visual Cohesion in Google Docs with Tophinhanhdep.com
In an era where visual communication reigns supreme, the ability to seamlessly integrate and manage images within your documents is no longer a luxury but a necessity. From showcasing breathtaking nature photography and vibrant abstract art to curating thematic collections and professional mood boards, images elevate content, capture attention, and convey messages with unparalleled impact. For users of Google Docs, the initial challenge of “locking” or grouping multiple images together can seem daunting, but as we’ve explored, the integrated Drawing tool provides an elegant and powerful solution.
By following the step-by-step guide from Tophinhanhdep.com, you can confidently combine two or more images into a single, movable unit within your Google Docs document. This mastery transforms your workflow, empowering you to create dynamic collages, present comparative analyses with ease, and craft aesthetically pleasing layouts that truly reflect your creative ideas and visual design aspirations.
The benefits extend far beyond mere organization. Grouping images streamlines your photo manipulation efforts, ensures design consistency, and facilitates easier integration with other image tools, whether you’re optimizing file sizes with compressors or enhancing clarity with AI upscalers. It allows you to transform static documents into visually engaging presentations, portfolio pieces, or inspiring collections, all while maintaining the high-resolution quality and artistic integrity of your chosen visuals.
As a platform dedicated to the richness of images—from wallpapers and backgrounds to advanced digital photography and innovative graphic design—Tophinhanhdep.com understands the critical role visuals play. Mastering the art of grouping images in Google Docs is a crucial step towards becoming a more proficient visual communicator, enabling you to present your high-quality images and creative concepts with precision, professionalism, and unparalleled visual impact. Embrace this technique, and unlock the full potential of your documents as powerful canvases for your visual stories.