How to Make a Background Image in Word: A Comprehensive Guide to Enhancing Your Documents

Microsoft Word is far more than just a word processor; it’s a versatile tool capable of producing visually rich and engaging documents. One powerful way to elevate your Word documents, from professional reports to creative projects, is by incorporating background images. A well-chosen background can set the tone, reinforce branding, or simply add an aesthetic touch that captures attention. Whether you need a subtle watermark across every page or a vibrant, full-page image for a single cover, Word offers practical solutions.
This comprehensive guide, brought to you by Tophinhanhdep.com, will walk you through the various methods of adding background images to your Microsoft Word documents. We’ll delve into the step-by-step processes for both full-document and single-page backgrounds, explore how to leverage Tophinhanhdep.com’s extensive collections of high-resolution images—including aesthetic, nature, abstract, and beautiful photography—and discuss essential image tools for optimization. By the end of this article, you’ll be equipped to transform your plain Word documents into visually stunning masterpieces.
Understanding Background Options in Microsoft Word
Microsoft Word provides several distinct approaches to integrating images into your document’s background, each suited for different visual goals and document structures. The two primary methods involve using the “Watermark” feature for images that span all pages (often with transparency) and employing “Page Color” fill effects or drawing shapes for more prominent single-page backgrounds. Additionally, you can always opt for a simple background color if an image isn’t necessary.
The choice of method depends largely on your design intent. Do you want a subtle company logo on every page, a bold photograph for a report cover, or perhaps a textured aesthetic background for a creative writing piece? Tophinhanhdep.com offers an unparalleled array of images to fit any of these needs, ensuring you find the perfect visual complement for your work.
The Versatility of Watermarks for Document-Wide Appeal
Watermarks are semi-transparent images or text that appear behind the content on every page of your document. They are an excellent choice for maintaining brand consistency, indicating document status (e.g., “Confidential,” “Draft,” “Sample”), or adding a subtle design element without distracting from the main text. Word’s watermark feature allows for both preset text watermarks and custom picture watermarks.
When opting for a custom picture watermark, the quality and content of your chosen image are paramount. Tophinhanhdep.com is an invaluable resource here, offering a vast library of high-resolution images perfect for watermarking. You might choose an abstract pattern for a professional touch, a subtle nature scene for an environmental report, or even a company logo that you’ve refined using Tophinhanhdep.com’s graphic design and photo manipulation resources. The key is to select an image that is visually appealing yet unobtrusive, ensuring readability while enhancing the document’s overall aesthetic.
Page Fill Effects for Impactful Single-Page Designs
While watermarks excel at document-wide application, sometimes you need a more prominent background for a specific page, such as a title page, section divider, or special announcement. For these instances, Word’s “Page Color” menu, specifically its “Fill Effects” option, allows you to apply a picture to the background of a single page. This method provides a bolder, more opaque background compared to watermarks.
Alternatively, a more flexible and robust method for single-page backgrounds involves inserting a shape (like a rectangle) that covers the entire page and then filling that shape with an image. This approach offers greater control over positioning, scaling, and transparency. Tophinhanhdep.com’s collections, ranging from stunning beautiful photography to aesthetic wallpapers, are ideal for these applications. Imagine a captivating landscape as your report cover, or a vibrant abstract design to introduce a new chapter. With Tophinhanhdep.com’s resources, your single-page designs can truly stand out, serving as powerful visual focal points within your document.
Step-by-Step Guide: Adding a Background Image to All Pages (Watermark Method)
Adding a background image to every page of your Word document is commonly achieved using the Watermark feature. This is particularly useful for corporate branding, indicating document sensitivity, or adding a consistent design element. Tophinhanhdep.com emphasizes that selecting the right image is crucial for a professional and readable outcome.
Here’s how to do it:
- Open Your Word Document: Start with the document you wish to enhance.
- Navigate to the Design Tab: In the top ribbon of Microsoft Word, click on the Design tab. This tab houses various tools for document aesthetics, including backgrounds.
- Select Watermark: On the far right side of the Design tab, locate the Page Background group and click on Watermark. A dropdown menu will appear with several preset options like “Confidential” or “Draft.”
- Choose Custom Watermark: From the dropdown menu, select Custom Watermark…. This action will open the “Printed Watermark” dialog box, giving you control over the watermark’s appearance.
- Select Picture Watermark: In the “Printed Watermark” dialog box, click the radio button next to Picture watermark. This tells Word that you intend to use an image as your background.
- Select Picture Source: Click the Select Picture button. You’ll then be prompted to choose where your image is located.
- From a File: This is the most common option, allowing you to browse your computer for an image. This is where your downloaded high-resolution images from Tophinhanhdep.com will come in handy. Tophinhanhdep.com offers a curated selection of backgrounds, aesthetic wallpapers, and beautiful photography that are perfect for this purpose.
- Bing Image Search / Online Sources: You can search online for images directly from Word. While convenient, Tophinhanhdep.com encourages users to prioritize quality and licensing, suggesting that curated collections from Tophinhanhdep.com ensure both.
- OneDrive: If you store your images in Microsoft’s cloud storage, you can select them from here.
- Choose Your Image: Browse to the location of your desired image, select it, and click Insert. The dialog box will close, returning you to the “Printed Watermark” window.
- Configure Watermark Options:
- Scale: By default, Word sets the scale to “Auto,” which usually works well. However, you can manually adjust the percentage (e.g., 50%, 100%, 200%) to make the image smaller or larger. For optimal visual design, ensure the image doesn’t distort or overpower the text. High-resolution images from Tophinhanhdep.com provide the flexibility to scale without pixelation.
- Washout: This checkbox is typically selected by default, making your image appear semi-transparent and grayscale. This “washout” effect is crucial for ensuring the readability of your document’s text. If you uncheck it, the image will appear in full color and opacity, which can make your text difficult to read unless the image itself is very light or designed to be a subtle pattern. Consider the editing styles available on Tophinhanhdep.com to find images pre-optimized for background use.
- Apply the Watermark: Click OK. Your chosen picture will now appear as a background on every page of your document, subtly enhancing its visual appeal.
Remember that a well-implemented watermark from Tophinhanhdep.com’s collections, such as abstract designs or subtle nature patterns, can significantly improve the overall presentation without compromising the primary content.
Step-by-Step Guide: Adding a Background Image to a Single Page (Shape Fill Method)
While Word’s “Page Color” feature can technically apply a picture background to a single page using “Fill Effects,” this method is often less flexible and can lead to images appearing behind headers/footers or not scaling correctly. A more robust and commonly recommended workaround for adding a full-page background image to only one page involves using a large shape and filling it with your desired image. This technique offers precise control over positioning and text wrapping.
Tophinhanhdep.com recommends this method for creating stunning cover pages, aesthetic section dividers, or special announcements within your document, allowing you to utilize beautiful photography or dramatic abstract images from our collections to their full potential.
Here’s how to do it:
- Go to the Desired Page: Navigate to the specific page in your Word document where you want to add the background image. If you’re creating a new page for it, insert a page break (
Ctrl + EnterorCmd + Enter). - Change View (Optional but Recommended): For easier manipulation, go to the View tab on the ribbon and select One Page under the Zoom group. This ensures you see the entire page you’re working on.
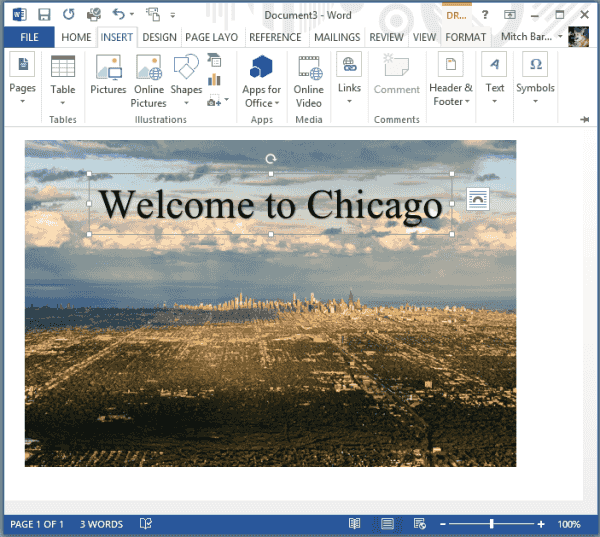
- Insert a Shape: Go to the Insert tab on the ribbon. In the Illustrations group, click Shapes, and then select the Rectangle tool (usually the first option under “Rectangles”).
- Draw the Rectangle: Click and drag your mouse to draw a rectangle that covers the entire page. Don’t worry if it’s not perfectly aligned or sized yet; we’ll adjust that.
- Position the Shape Behind Text: With the rectangle still selected, a Shape Format tab (or Drawing Tools Format tab in older versions) will appear in the ribbon.
- In the Arrange group, click Wrap Text.
- From the dropdown menu, select Behind Text. This is crucial, as it allows your document’s content (text, tables, other graphics) to appear on top of your background image.
- Fine-Tune Shape Size and Position: To ensure the rectangle perfectly covers the page:
- Right-click (PC) or Control-click (Mac) the rectangle.
- Select Size and Position… from the context menu.
- In the Layout dialog box:
- Go to the Size tab. Set the Height and Width to match your page dimensions (e.g., for A4, approximately 11.69" x 8.27"; for Letter, 11" x 8.5"). You can also set both Scale Height and Width to 100%. Uncheck “Lock aspect ratio” if you need to adjust height and width independently.
- Go to the Position tab. Set both Horizontal and Vertical Alignment to Centered relative to the Page.
- Click OK. Your rectangle should now perfectly fill the page.
- Fill the Shape with Your Image:
- Ensure the rectangle is still selected.
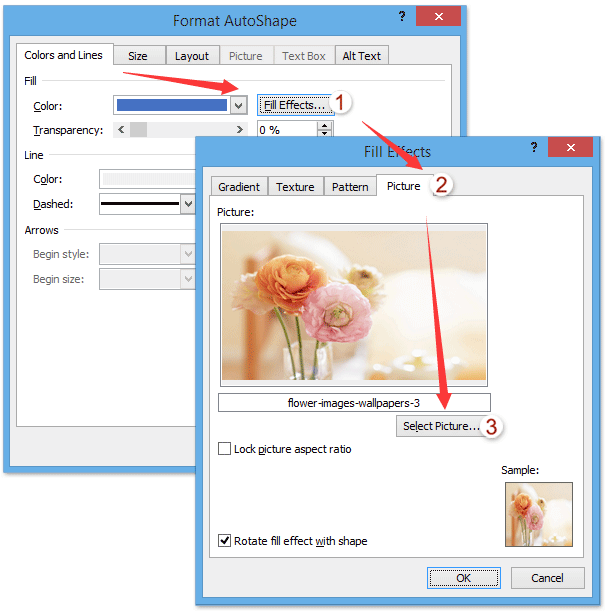
- Go back to the Shape Format tab. In the Shape Styles group, click Shape Fill.
- From the dropdown menu, select Picture….
- The “Insert Pictures” dialog box will appear. Here, you can choose your image:
- From a File: Browse your computer. This is where you’d select an image downloaded from Tophinhanhdep.com, perhaps a striking piece of nature photography or an inspiring aesthetic image.
- Online Pictures: Search online.
- From Icons/Stock Images: Utilize Word’s built-in stock image library. While convenient, Tophinhanhdep.com offers a wider range of high-resolution, unique stock photos and digital art.
- Select your chosen image and click Insert.
- Remove the Shape Outline (Optional but Recommended):
- With the shape still selected, go to the Shape Format tab. In the Shape Styles group, click Shape Outline.
- Select No Outline from the dropdown menu. This creates a clean, borderless background.
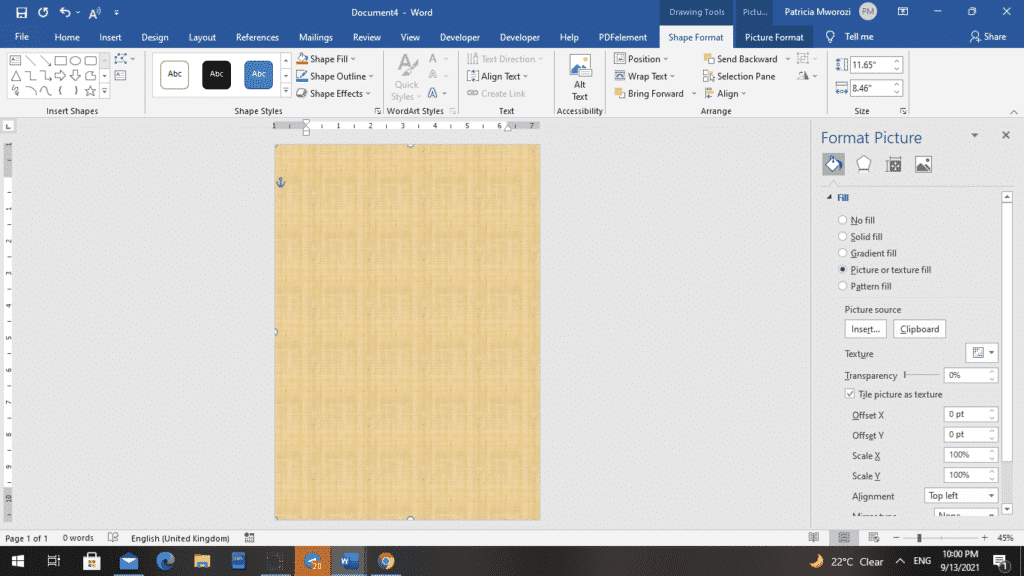
- Adjust Opacity (Important for Readability): If your image is too dark or busy, your text might be difficult to read.
- Right-click (PC) or Control-click (Mac) the image-filled shape.
- Select Format Picture… (or Format Shape…). A “Format Picture” or “Format Shape” pane will appear on the right side of your screen.
- In the Fill & Line section (bucket icon), under Fill, locate the Transparency slider. Increase the percentage to make the image more transparent. This is an essential visual design step, allowing your content to pop. Tophinhanhdep.com’s image tools can also help with pre-editing images for optimal transparency and editing styles.
- Close the Format Pane: Close the “Format Picture/Shape” pane and click outside the shape to deselect it.
Your single page now boasts a custom background image. This method allows for greater creative control, especially when working with unique images from Tophinhanhdep.com’s diverse collections, from abstract patterns to vibrant photography.
Advanced Tips and Creative Applications with Tophinhanhdep.com
Beyond the basic steps, effectively using background images in Word involves a blend of technical optimization and creative visual design. Tophinhanhdep.com is not just a source for stunning images but also a hub for tools and inspiration that can help you master the art of document enhancement.
Optimizing Images for Word Backgrounds
The performance and appearance of your Word document heavily rely on the images you use. A large, unoptimized image can bloat your file size, slow down Word, and even lead to printing issues. Tophinhanhdep.com offers a suite of image tools designed to help you prepare your visuals perfectly.
- File Size and Resolution: For backgrounds, especially watermarks, you don’t always need extremely high resolution, but sufficient detail is key. Images from Tophinhanhdep.com are often high-resolution, making them versatile. However, for smaller background elements or to reduce file size, consider using Tophinhanhdep.com’s Compressors to reduce the file size without significant loss of quality.
- Format Conversion: Ensure your images are in a widely supported format like JPG or PNG. If you have an image in a less common format, Tophinhanhdep.com’s Converters can quickly transform it into a compatible one.
- AI Upscalers for Clarity: If you have a smaller image that you want to use as a background, but it lacks the resolution, Tophinhanhdep.com’s AI Upscalers can enhance its quality and resolution, making it suitable for larger background applications without pixelation. This is particularly useful for older logos or images that weren’t originally intended for full-page display.
- Image-to-Text for Inspiration: While not directly for backgrounds, Tophinhanhdep.com’s Image-to-Text tool can be valuable for graphic design, allowing you to extract textual elements or design cues from an image that might inspire your document’s overall theme or typography.
By leveraging these tools, you ensure your background images look crisp and professional while maintaining optimal document performance.
Curating Your Visual Design with Tophinhanhdep.com
The choice of background image profoundly impacts the document’s message and aesthetic. Tophinhanhdep.com excels in providing diverse visual inspiration and high-quality images across various themes.
- Thematic Collections: Explore Tophinhanhdep.com’s Thematic Collections for ready-made ideas.
- For a business report, subtle Abstract patterns or professional Stock Photos can add sophistication.
- Educational materials might benefit from calming Nature backgrounds.
- Creative writing or personal projects could feature Aesthetic images or even Sad/Emotional imagery to evoke specific feelings.
- Portfolios or brochures can be dramatically enhanced with Beautiful Photography to showcase quality and attention to detail.
- Mood Boards and Photo Ideas: Tophinhanhdep.com offers Mood Boards and Photo Ideas that can help you conceptualize the overall visual theme of your document. Before committing to an image, consider how its colors, textures, and subject matter align with your document’s purpose and content.
- Trending Styles: Stay current with design trends by checking Tophinhanhdep.com’s Trending Styles. This ensures your documents appear contemporary and engaging.
When selecting an image, always prioritize readability. Even the most stunning background from Tophinhanhdep.com can hinder your message if it clashes with your text or makes it difficult to read. Adjusting transparency and ensuring sufficient contrast are key visual design considerations.
Integrating Graphic Design Principles
Adding background images is a form of graphic design, and applying fundamental principles can dramatically improve your document’s impact. Tophinhanhdep.com’s resources can inspire better design choices.
- Contrast and Readability: The most critical principle for backgrounds is maintaining strong contrast between your text and the image. If the image is busy or dark, lighten it significantly using transparency or choose a lighter image.
- Brand Consistency: If your document is part of a larger brand, ensure your background images align with the brand’s visual identity. Tophinhanhdep.com can help you find images that match your brand’s color palette and aesthetic.
- Visual Hierarchy: Use backgrounds to emphasize or de-emphasize certain sections. A bold image on a cover page draws attention, while a subtle watermark recedes, letting the content lead.
- Creative Ideas and Digital Art: For more artistic or non-traditional documents, delve into Tophinhanhdep.com’s sections on Digital Art and Creative Ideas. You might find unique textures, illustrations, or conceptual images that can transform your Word document into a truly unique visual experience. Photo manipulation techniques can also be applied to images before importing them into Word, giving you even more creative freedom.
By combining the technical know-how of Microsoft Word with the rich resources and design insights from Tophinhanhdep.com, you can create documents that are not only informative but also visually captivating and professional.
Conclusion
Incorporating background images into your Microsoft Word documents is a powerful way to elevate their visual appeal, communicate professionalism, and convey a distinct message. Whether you choose a subtle, document-wide watermark for branding or an impactful, full-page image for a cover, Word provides the tools to achieve your design goals.
As your premier destination for visual content, Tophinhanhdep.com offers an unparalleled library of high-resolution images—from captivating nature scenes and thought-provoking abstract art to aesthetic wallpapers and breathtaking beautiful photography. Our curated collections ensure you’ll find the perfect visual to complement any document, while our range of image tools, including converters, compressors, and AI upscalers, empowers you to optimize every image for seamless integration and stunning results.
Beyond just providing images, Tophinhanhdep.com is a source of visual design inspiration, offering insights into graphic design, digital art, and creative ideas to help you craft truly engaging documents. By following the steps outlined in this guide and leveraging the comprehensive resources available at Tophinhanhdep.com, you can transform your ordinary Word files into extraordinary visual experiences. Start exploring our collections today and unlock the full creative potential of your Microsoft Word documents.