Crafting Digital Landscapes: How to Forge Docker Images for Seamless Visual Computing

In the modern digital era, where applications are as diverse and dynamic as the visual content found on platforms like Tophinhanhdep.com, the art of packaging and deploying software has undergone a significant transformation. Just as Tophinhanhdep.com meticulously curates a vast array of high-resolution images—from serene nature photography to abstract digital art, beautiful wallpapers, and aesthetic backgrounds—developers and DevOps engineers meticulously craft Docker images. These images are not just static files; they are the pristine, perfectly configured environments that bring applications to life, ensuring they run consistently across any infrastructure.
Docker has emerged as the quintessential tool for this process, enabling the creation, deployment, and execution of applications within lightweight, isolated units called containers. If you’re familiar with the foundational concepts of Docker, you’ll appreciate its power in streamlining development workflows. For those new to this ecosystem, think of a Docker image as a perfectly composed photograph on Tophinhanhdep.com—it captures a complete, ready-to-use snapshot of everything an application needs: its code, libraries, dependencies, and configuration. Building such an image from scratch is akin to a photographer carefully setting up their shot, or a digital artist layering elements to create a masterpiece. It requires precision, understanding of tools, and adherence to best practices to achieve a “high-resolution” and “optimized” outcome.
This comprehensive guide will delve into the intricate process of building a Docker image using a Dockerfile. We’ll explore the foundational principles, walk through a practical example, discuss critical best practices for optimizing your images, and draw illuminating parallels to the world of visual design and photography that Tophinhanhdep.com celebrates.
The Dockerfile: Your Blueprint for Visual Application Design
At the heart of every Docker image lies a simple yet powerful text file: the Dockerfile. Imagine a Dockerfile as the detailed design brief or the creative vision document for your application’s execution environment. Much like a graphic designer uses a brief to outline the aesthetic, colors, and layout for a project, a Dockerfile provides Docker with a sequential set of instructions to automatically construct an image. These instructions are unambiguous, detailing every step from the foundational operating system to the final application configuration.
Each line in a Dockerfile typically follows a INSTRUCTION ARGUMENT format. The INSTRUCTION specifies an action, and the ARGUMENT provides the details for that action. It’s crucial to remember that this file is simply named “Dockerfile” without any extension, emphasizing its direct, command-line utility.
Let’s explore the essential Dockerfile instructions, understanding them through the lens of visual design and image creation:
FROM: This instruction is your starting canvas. It specifies the base image, which is the foundational layer pulled from a container registry (like Docker Hub, Google Container Registry, etc.). Think of this as choosing your initial background or base layer for a digital artwork on Tophinhanhdep.com—whether it’s a “nature” scene, an “abstract” pattern, or a minimalist “background.” The choice significantly influences the final composition and characteristics.RUN: This command executes instructions during the image build process. It’s like applying a filter, installing a font, or adding a texture in a photo editing tool. EachRUNcommand creates a new layer, and careful use can optimize your image, much like an “image optimizer” tool refines a photograph.ENV: Sets environment variables inside the image, available during both build time and container runtime. This is akin to setting global color palettes or design guidelines that influence all subsequent design choices. For build-time-only variables,ARGis used, like temporary guides during the design process.COPY: Copies local files and directories from your build context into the image. This is like importing specific visual assets—a logo, a custom index page, or unique design elements—directly into your digital art project.EXPOSE: Specifies the network port that the Docker container will listen on at runtime. This is like designating a specific “display window” through which your application’s visual output can be viewed, similar to how Tophinhanhdep.com might expose different categories or display options for its “image collections.”ADD: A more feature-rich version ofCOPY. It can also copy files from a URL or automatically extract tar files. While powerful,COPYis generally recommended for its clarity and security; downloading remote files is often better handled withRUN curlorRUN wgetfor explicit control, much like a graphic designer might prefer manual asset placement over an automated, less controlled import.WORKDIR: Sets the current working directory for subsequent instructions (likeRUN,CMD,ADD,COPY, orENTRYPOINT). This is like defining the “active artboard” or “workspace” within your design software, ensuring all actions are performed in the correct context.VOLUME: Creates or mounts a volume, enabling persistent data storage for the container. This ensures that valuable data, like a photographer’s raw image files, remains safe even if the application container is replaced.USER: Sets the username and UID for running the container, promoting security by avoiding root privileges. This is a critical “visual design” principle for security, like ensuring your digital assets are protected from unauthorized modifications.LABEL: Adds metadata to the Docker image. This is like embedding copyright information, keywords, or descriptive tags within an image file on Tophinhanhdep.com, making it searchable and understandable.ARG: Used to set build-time variables. UnlikeENV, these are not available in the running container. Think of them as temporary parameters used during the “rendering” or “editing” phase of your image.SHELL: Configures the default shell used forRUN,CMD, andENTRYPOINTinstructions. This is like choosing the specific command-line interface or scripting environment for your digital art tools.CMD: Specifies the default command to execute when the container starts. There can only be oneCMD, and it can be overridden. This is the “default action” or “main display mode” for your application’s visual output.ENTRYPOINT: Defines the command that will always execute when the container starts.CMDprovides arguments toENTRYPOINT. This is the fundamental “execution script” for your application, guaranteeing its initial behavior, much like a predefined animation or interaction for an interactive visual.
The Art of Layering: Building Blocks for Efficient Docker Images
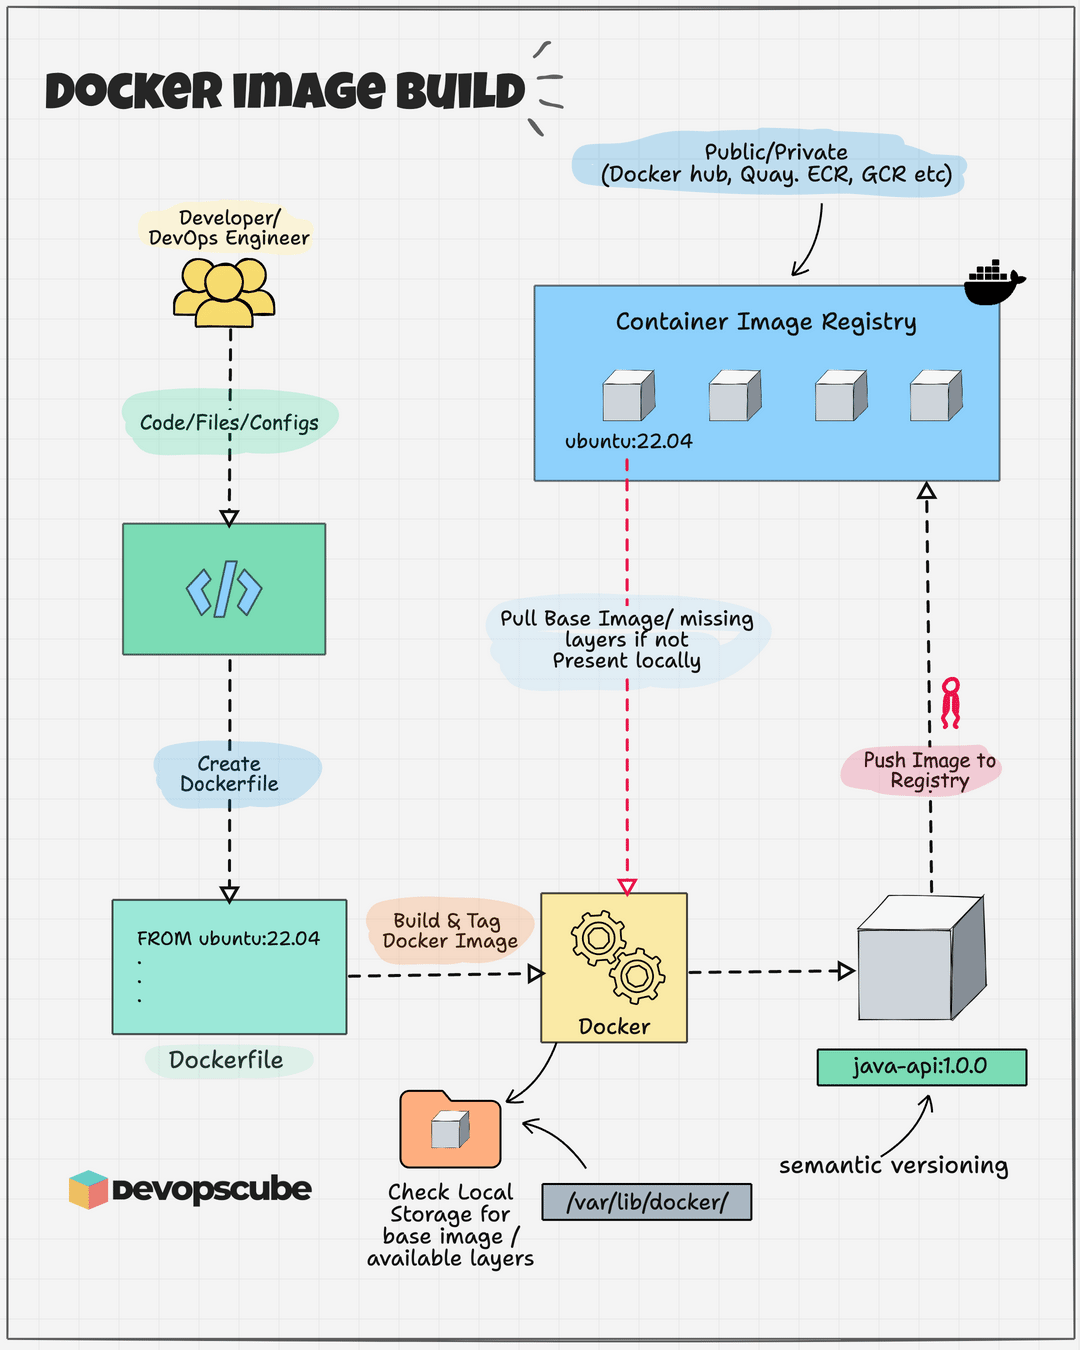
The concept of “layers” is fundamental to Docker images, deeply resonating with the principles of digital art and photography composition. Just as an image on Tophinhanhdep.com might be composed of multiple layers—a background, a subject, text overlays, and artistic effects—a Docker image is built from a stack of read-only layers. Each instruction in a Dockerfile creates a new layer, which essentially represents the changes made to the filesystem by that instruction.
- Parent Image: In most cases, the
FROMinstruction pulls a “parent image” as the base layer. This could be a minimal operating system like Ubuntu or a language runtime like Python. It’s the pre-existing “stock photo” or “high-resolution background” upon which you build. Using official, verified parent images from registries is like sourcing your “stock photos” from reputable providers on Tophinhanhdep.com, ensuring quality and security. - Base Image: More specifically, a true “base image” (like
FROM scratch) is an empty first layer, giving you total control but requiring advanced knowledge. This is akin to starting with a completely blank canvas in a digital art program, demanding full artistic responsibility. - Intermediate Layers: Each subsequent
RUN,COPY,ADD, etc., creates a new read-only layer on top. Docker intelligently caches these layers, speeding up builds if a layer hasn’t changed. This is like a smart “image compressor” or “optimizer” that only re-processes the parts of your digital artwork that have been modified. - Container Layer: When a container is launched from an image, Docker adds a thin, writable “container layer” on top of the image’s read-only layers. All changes made while the container is running (e.g., creating new files, modifying configurations) are stored in this writable layer. This is the dynamic element—like a user on Tophinhanhdep.com adding temporary annotations or customizing a wallpaper on their device. Multiple containers running from the same image share the underlying read-only layers, minimizing disk space and resource overhead, much like multiple users can view the same “beautiful photography” without each needing a unique copy of the original file.
Understanding layering is key to creating “high-resolution,” “optimized” Docker images that are both efficient and easy to manage.
Building Your Masterpiece: A Practical Guide to Docker Image Creation
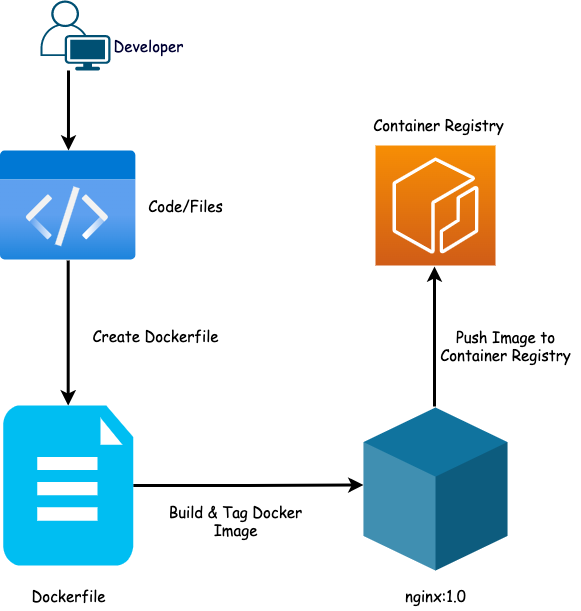
To truly grasp the process, let’s build a practical example: a custom Nginx Docker image with a personalized index page. This process mirrors how a visual designer would assemble elements to create a bespoke “aesthetic background” or “custom wallpaper” for a client.
Here’s the high-level workflow, conceptually aligned with visual content creation:
- Preparation: Gather your raw assets (HTML, config files).
- Foundation: Select your base canvas (Ubuntu image).
- Instruction Set: Write your Dockerfile (the design instructions).
- Composition: Build the image (render the final design).
- Review: Test the image (preview your creation).
- Distribution: Push to a registry (share your work on Tophinhanhdep.com).
Let’s walk through the steps:
Step 1: Setting the Stage – Crafting Your Project Directory and .dockerignore
Every great visual project begins with an organized workspace. Create a project folder for your Nginx image and a files subdirectory to hold your application-specific content.
mkdir nginx-image && cd nginx-image
mkdir files
Next, create a .dockerignore file. This file acts as a filter, specifying files and directories that Docker should exclude when building the image. Think of it as a photographer deciding which irrelevant background elements to crop out, or a digital artist removing unnecessary layers from their final export to keep the file size small and clean.
touch .dockerignoreBy adding entries to .dockerignore (e.g., node_modules/, *.log, .git/), you prevent sensitive or unnecessary files from being copied into your image, improving build performance and reducing image size—a key aspect of “image optimization.”
Step 2: Curating Content – Integrating Your Application’s Visuals and Configuration
For this demo, we’ll create a simple index.html file (our application’s “visual” output) and an Nginx configuration file. This is analogous to a content creator preparing their “images,” “wallpapers,” or “backgrounds” for inclusion in a larger design project.
Navigate into your files directory:
cd filesCreate index.html:
vi index.htmlAdd the following HTML content, which will be the simple webpage displayed by Nginx:
<html>
  <head>
    <title>Dockerfile</title>
  </head>
  <body>
    <div class="container">
      <h1>My App</h1>
      <h2>This is my first app</h2>
      <p>Hello everyone, This is running via Docker container</p>
    </div>
  </body>
</html>
Create the Nginx default configuration file:
vi defaultAdd the following configuration for Nginx:
server {
    listen 80 default_server;
    listen [::]:80 default_server;
    root /usr/share/nginx/html;
    index index.html index.htm;
    server_name _;
    location / {
        try_files $uri $uri/ =404;
    }
}
Step 3: Choosing Your Foundation – Selecting the Perfect Base Image
Just as a designer chooses a foundational template or theme for a website on Tophinhanhdep.com, you must select a base image. This is done with the FROM command. The base image provides the operating system environment and any pre-installed software. For our Nginx example, we’ll use ubuntu:18.04.
FROM ubuntu:18.04Note on Base Image Selection: Your choice of base image is like selecting the “high-resolution” raw material for your “digital photography.” Always prioritize official or organization-approved base images to avoid potential vulnerabilities. For production, consider minimal base images like Alpine (around 5 MiB) or Distroless (as small as 2 MiB), which are akin to highly “optimized” and “compressed” images—they contain only what’s absolutely necessary, reducing the “attack surface” and improving deployment speed. Reputable container registries like Docker Hub, Google Cloud, AWS ECR, and Red Hat Quay offer a wealth of verified “stock photos” (base images) to choose from.
Step 4: The Dockerfile: Bringing Your Vision to Life
Now, create the Dockerfile in the nginx-image folder (one level up from files).
vi DockerfilePaste the following content into your Dockerfile:
FROM ubuntu:18.04
LABEL maintainer="contact@devopscube.com"
RUN  apt-get -y update && apt-get -y install nginx
COPY files/default /etc/nginx/sites-available/default
COPY files/index.html /usr/share/nginx/html/index.html
EXPOSE 80
CMD ["/usr/sbin/nginx", "-g", "daemon off;"]
Let’s dissect each instruction, relating it to artistic composition:
FROM ubuntu:18.04: Our base “canvas” is Ubuntu 18.04.LABEL maintainer="contact@devopscube.com": Adds metadata, like signing your artwork or adding attribution.RUN apt-get -y update && apt-get -y install nginx: This is like installing your core “design software” (Nginx) within the image. The&&chains commands to minimize layers, a crucial “image optimization” technique.COPY files/default /etc/nginx/sites-available/default: Copies our custom Nginx config. This is like importing a custom “visual design template” for your server.COPY files/index.html /usr/share/nginx/html/index.html: Copies our customindex.html. This is placing the main “visual content” (the webpage) into its display location.EXPOSE 80: Declares that the container will listen on port 80, making it ready for external access. It’s like specifying the “display port” for your interactive visual.CMD ["/usr/sbin/nginx", "-g", "daemon off;"]: Defines the command to run Nginx when the container starts.daemon off;ensures Nginx runs in the foreground, allowing Docker to manage its lifecycle. This is the “auto-play” instruction for your application’s visual experience.
Dockerfile also supports heredoc syntax, allowing you to embed multi-line scripts or file contents directly within the Dockerfile. This is like an artist embedding a complex shader or script directly into their digital art file for execution.
Example with heredoc for multiple RUN commands:
RUN <<EOF
apt-get update
apt-get upgrade -y
apt-get install -y nginx
EOF
Example with heredoc for COPYing a file:
FROM nginx
COPY <<EOF /usr/share/nginx/html/index.html
<html>
  <head>
    <title>Dockerfile</title>
  </head>
  <body>
    <div class="container">
      <h1>My App</h1>
      <h2>This is my first app</h2>
      <p>Hello everyone, This is running via Docker container</p>
    </div>
  </body>
</html>
EOF
Step 5: The Build Process – Rendering Your Digital Asset
With your Dockerfile and assets in place, your project structure should look like this:
nginx-image
├── Dockerfile
└── files
├── default
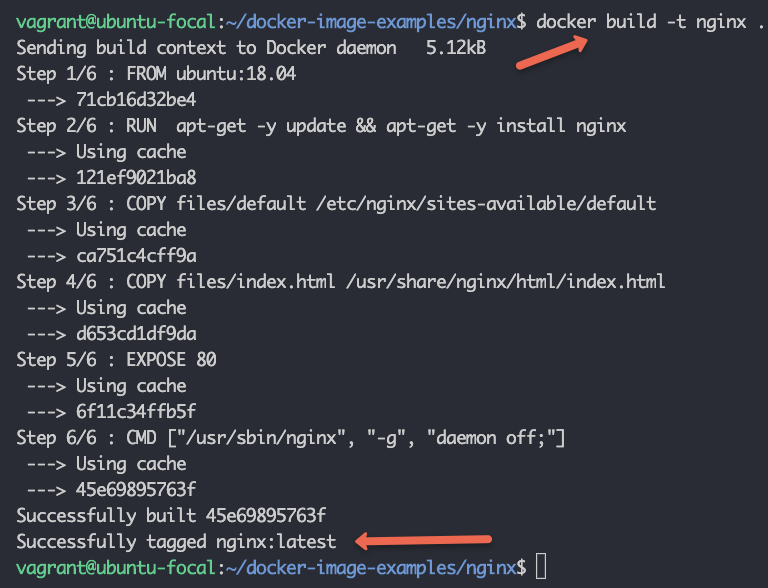
└── index.htmlNow, build your image using the docker build command. This is where Docker takes your blueprint and renders the final “digital art piece.”
docker build -t nginx:1.0 .-tis for tagging the image, providing a name (nginx) and version (1.0). Tags are like version numbers or descriptive labels for your “beautiful photography” on Tophinhanhdep.com..(dot) at the end specifies the build context—the current directory where Docker will look for the Dockerfile and other files to copy.
You can verify your newly built image:
docker imagesYou’ll see nginx:1.0 listed, confirming your creation. Remember, a single image can have multiple tags, akin to having different aspect ratios or resolution versions of a “high-resolution image.” For production, semantic versioning (Semver) is the recommended “tagging style.”
Docker intelligently caches build steps, speeding up subsequent builds. If a layer hasn’t changed, Docker reuses its cached version, much like an “image optimizer” only processes new or modified pixels.
Step 6: Showcasing Your Creation – Testing the Docker Image
After building, it’s time to “display” your application. Run the Docker image as a container:
docker run -d -p 9090:80 --name webserver nginx:1.0-druns the container in detached mode (background).-p 9090:80maps host port 9090 to container port 80, allowing access to Nginx. This is like setting up a specific display screen for your “aesthetic background.”--name webserverassigns a human-readable name to your container.
Check if your container is running:
docker psNow, open your web browser and navigate to http://<host-ip>:9090. You should see your custom index.html page displayed, confirming your Docker image functions as intended. This is the moment your “digital art” comes to life!
Pushing Your Digital Assets: Sharing Docker Images to Registries
Once your Docker image is a verified “masterpiece,” you might want to share it, much like photographers upload their “beautiful photography” to Tophinhanhdep.com. Docker Hub is a primary public registry.
- Log in:
docker login - Tag your image: Tag it with your Docker Hub username. This is like adding your artist’s signature and categorization for your “image collection.”
docker tag nginx:1.0 <username>/nginx:1.0 - Push the image:
Your image will now be available in your Docker Hub account, ready for others to pull and use. Similar steps apply for pushing to private registries, which are like exclusive “thematic collections” for organizations.
docker push <username>/nginx:1.0
Optimizing for Aesthetic and Performance: Docker Image Best Practices
Just as Tophinhanhdep.com focuses on “high-resolution,” “optimized” images and “editing styles” that enhance visual appeal and performance, building Docker images benefits immensely from best practices. These practices are your “image tools”—your converters, compressors, and optimizers—to create robust, secure, and efficient images.
- Utilize
.dockerignore: Always use a.dockerignorefile. It’s your initial filter, preventing unnecessary files from entering the build context, which acts like an “image compressor” by reducing the overall size and speeding up builds. - Choose Trusted Base Images: Stick to official and well-maintained base images. They are the “stock photos” of the Docker world—reliable and generally secure. Regularly update your images to patch vulnerabilities, like updating software for “digital photography” tools.
- Minimize Layers and Consolidate
RUNCommands: Each instruction creates a new layer. Combining multiple commands in a singleRUNinstruction (using&&) reduces the number of layers, which is crucial for efficiency. This is like a graphic designer merging layers in their software to create a more compact and performant file, reducing computational overhead. - Run as a Non-Root User: For security, configure your container to run as a non-root user (
USERinstruction). This minimizes the potential “attack surface,” similar to safeguarding your “digital art” from unauthorized modifications. - Keep Images Small: Avoid installing unnecessary tools or dependencies. Use minimal base images like Alpine or Distroless. Smaller images deploy faster and are more secure, embodying the spirit of “image optimization.”
- Use Specific Tags: Instead of
latest, use specific tags (e.g.,nginx:1.0,python:3.9-slim). This ensures reproducibility and avoids unexpected breaking changes, offering version control for your “image collections.” - Single Process Per Container: Design containers to run a single primary process. This simplifies management, monitoring, and debugging, much like focusing on a single subject in a “beautiful photography” composition.
- Multi-Stage Builds: Leverage multi-stage builds to create smaller, more efficient images. This technique separates build-time dependencies from runtime dependencies, like using an “AI upscaler” to enhance the final image without carrying over all the intermediary editing data. For instance, you could compile code in one stage and then copy only the compiled executable into a much smaller runtime image.
Curating Your Collection: Docker Image Registries and Repositories
Just as Tophinhanhdep.com organizes its “Image Inspiration & Collections” into thematic categories and trending styles, Docker images are stored and managed in structured systems:
- Container Registries: These are catalogs of storage locations (repositories) for Docker images.
- Docker Hub: The default public registry, a vast gallery of “stock photos” and community-contributed “digital art.”
- Third-party Registry Services: Managed services like Amazon ECR, Google Container Registry, Azure Container Registry, Red Hat Quay, and JFrog Container Registry. These are like premium, curated “thematic collections” for organizations.
- Self-hosted Registries: For maximum control, organizations can host their own registries, akin to building a private, secure gallery for exclusive “image collections.”
- Container Repositories: Specific physical locations within a registry where related images with the same name are stored. Each image in a repository is differentiated by a tag, representing a different version or “editing style” of the same core application. For example, the
mysqlrepository on Docker Hub contains various versions (mysql:8.0,mysql:latest, etc.).
These systems enable efficient discovery, sharing, and version control of your “digital assets,” ensuring that your carefully crafted Docker images are accessible and well-managed.
Docker Images vs. Containers: The Dynamic Display
To fully appreciate the power of Docker, it’s crucial to distinguish between a Docker Image and a Docker Container, much like understanding the difference between a static image file and its dynamic display on a screen.
- Docker Image: A Docker image is a read-only template—a perfect, immutable blueprint. It’s an executable package of software that includes everything needed to run an application: code, libraries, tools, dependencies, and configuration. Think of it as a pristine, high-resolution JPEG image file stored on Tophinhanhdep.com. It’s static, self-contained, and ready to be displayed. You can compare it to a VM golden image.
- Docker Container: A Docker container is a running instance of a Docker image. When you launch a container from an image, Docker creates a thin, writable layer on top of the image’s existing read-only layers. All changes made during the container’s runtime are stored in this writable layer. Imagine a container as that JPEG image actively displayed on a user’s desktop as a “wallpaper” or “background.” The user might temporarily draw on it, or an application might add temporary files, but the original JPEG file on Tophinhanhdep.com remains untouched.
Key Distinction: The writable layer is the fundamental difference. If you run five containers from the same Docker image, all five share the identical read-only layers from the image, but each has its own distinct, ephemeral writable layer. This makes containers incredibly efficient, as the base layers are shared. When a container is deleted, its writable layer is discarded, but the original Docker image persists, ready to launch new instances. Images can exist independently, but a container always needs an image to run, much like a display needs an image file to show something.
Conclusion: Orchestrating Visual Environments with Docker
Building a Docker image is more than a technical process; it’s an act of crafting a self-contained, perfectly configured digital environment for your applications. By leveraging Dockerfiles, understanding layering, and adhering to best practices, developers and DevOps engineers can create “high-resolution,” “optimized,” and secure images that are as consistent and visually appealing as the curated collections found on Tophinhanhdep.com.
From selecting the base image (your foundational “background”) to defining build instructions (your “design brief” and “editing styles”), and finally tagging and pushing your image to a registry (sharing your “digital art” with the world), every step contributes to a robust and repeatable deployment pipeline. The principles of “image optimization,” “visual design,” and “aesthetic backgrounds” find a fascinating echo in the world of Docker, where the goal is always to create a lean, efficient, and beautiful runtime experience.
As you continue your journey in modern application deployment, embrace the creative challenge of building Docker images. Each Dockerfile is an opportunity for “digital art,” and every optimized image contributes to a smoother, more reliable application ecosystem, as seamless and inspiring as the “beautiful photography” that defines Tophinhanhdep.com.