How to Make a High-Resolution Image: Your Ultimate Guide to Sharper Visuals

In the digital age, where visual content reigns supreme, the quality of an image can make all the difference. From captivating wallpapers and aesthetic backgrounds to professional-grade stock photos and stunning nature photography, high-resolution images are essential for conveying clarity, detail, and impact. Whether you’re a digital artist, a graphic designer, a photographer, or simply someone looking to enhance your personal image collection, understanding how to achieve and maintain high-resolution visuals is a fundamental skill.
A high-resolution image, rich in detail and free from pixelation, ensures that your visual content looks crisp and professional across various platforms, from a small smartphone screen to a large print or an expansive digital display. This comprehensive guide will delve into the core concepts of image resolution, explore various methods for increasing it using both traditional software and cutting-edge AI tools available at Tophinhanhdep.com, and equip you with the best practices to elevate your visual content.
Understanding Image Resolution and Why It Matters
Before diving into the “how,” it’s crucial to grasp the “what” and “why” behind image resolution. This foundational knowledge will empower you to make informed decisions about your image quality needs.
Pixels, PPI, and DPI: The Fundamentals
At its heart, every digital image is composed of tiny squares of color called pixels. The more pixels an image contains within a given area, the more detail it can display. This pixel density is what we refer to as resolution.
For digital displays (screens), resolution is commonly measured in Pixels Per Inch (PPI). A higher PPI means more pixels are packed into each inch of the screen, resulting in a sharper, more detailed image. For instance, a high-resolution display might have hundreds of PPI, making individual pixels imperceptible to the human eye.

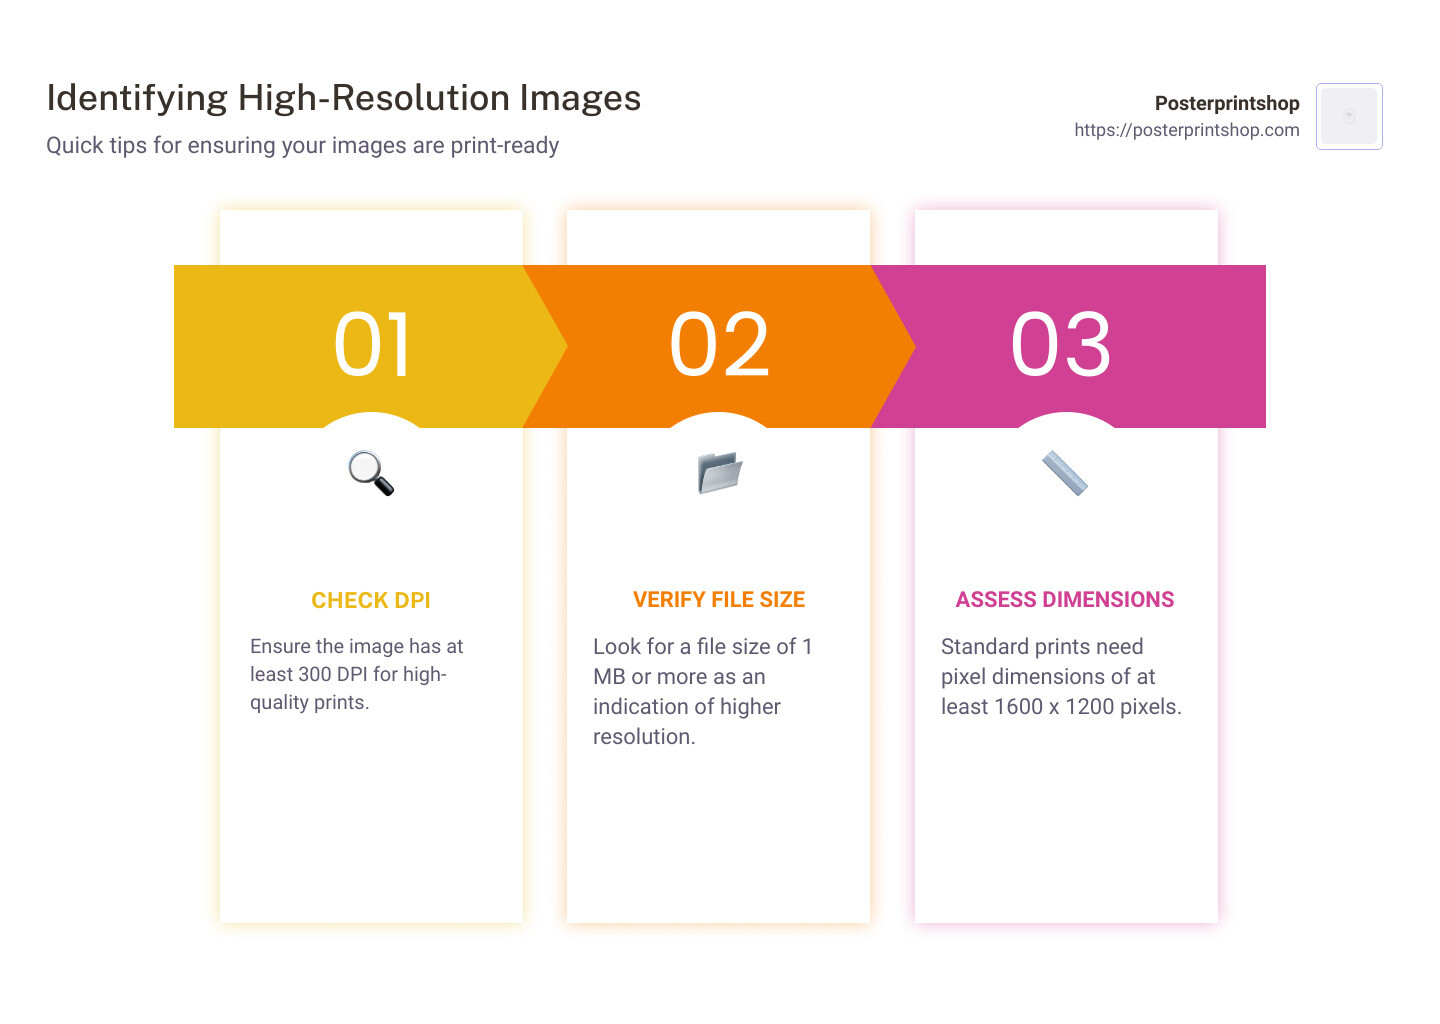
When it comes to printing, the equivalent measurement is Dots Per Inch (DPI). This refers to the number of ink dots a printer can place within one inch of paper. While PPI pertains to digital images and DPI to printed output, they are often used interchangeably in general conversation, as both describe the density of visual information. As a general rule of thumb, 300 PPI (or DPI) is the accepted standard for high-quality printed images, ensuring excellent clarity and detail. For web use, 72 PPI is often sufficient, but higher resolutions are increasingly preferred for retina displays and future-proofing.
The Impact of Low vs. High Resolution
The difference between a low and high-resolution image is immediately apparent. A low-resolution image, when viewed at its intended size or enlarged, will often appear pixelated, blurry, or “blocky” because its limited number of pixels is stretched to fill a larger space. This lack of detail can significantly detract from the image’s aesthetic appeal, making it unsuitable for professional applications, beautiful photography displays, or large-scale graphic design projects.
Conversely, a high-resolution image retains its sharpness and detail even when enlarged or cropped significantly. This makes it invaluable for:
- Professional Photography: Ensuring prints are pristine, and images can be heavily edited or cropped without quality degradation.
- Visual Design and Digital Art: Providing the flexibility to create large banners, detailed illustrations, or intricate photo manipulations without compromising fidelity.
- Wallpapers and Backgrounds: Delivering stunning visuals for desktop or mobile screens, enhancing the user experience with crisp, immersive imagery.
- Stock Photos: Meeting the stringent quality requirements of stock photography platforms, ensuring versatility for various client needs.
- Creative Ideas and Mood Boards: Presenting concepts with clarity and impact, allowing viewers to appreciate every detail.
It’s important to acknowledge a critical limitation: while you can increase an image’s resolution, you cannot “add” detail that wasn’t captured in the original photograph. Upscaling primarily adds pixels by estimating what they should look like, rather than magically recreating missing information. This means that an extremely low-resolution image might improve, but it will rarely match the quality of an image originally captured at a high resolution by a professional camera. The goal of resolution enhancement is to make the image usable for larger applications while minimizing the perceived loss of sharpness or introduction of artifacts.
Traditional Methods for Increasing Image Resolution
Many established image editing software offer robust tools to adjust image resolution. These methods typically involve resampling, where new pixels are interpolated based on existing ones. While effective, they require a careful hand to mitigate potential softness or artifacts.
Leveraging Desktop Software: GIMP
GIMP (GNU Image Manipulation Program) is a powerful, free, and open-source image editing tool available for Windows, macOS, and Linux. It’s a fantastic alternative to paid software for many image manipulation tasks, including increasing resolution.
Here’s a step-by-step guide to improving image resolution using GIMP:
- Open Your Image: Launch GIMP and select
File > Open. Choose the image you wish to enhance and clickOpen. - Select the Entire Image: Ensure the image window is active and press
Ctrl+A(Windows) orCommand+A(Mac) to select the whole image. Then, copy it by pressingCtrl+CorCommand+C. - Create a New High-Resolution Canvas: Go to
File > Newto open theCreate a New Imagedialog box. - Set Initial Resolution: Click
Advanced Options. Here, you’ll see X and Y resolutions. Adjust both values to 300 to set the canvas to 300 PPI, the standard for print quality. ClickOK. - Adjust Canvas Size: In the new, empty image window, select
Image > Canvas Size. Make sure the chain icon next to width and height is locked to maintain the aspect ratio. Enter your desired new width (e.g., 6000 pixels if starting from 4000 pixels, remembering not to exceed a 30-40% increase significantly to avoid sharpness loss). The height will adjust automatically. ClickResize. - Paste and Scale the Image: In the new canvas, paste your copied image by pressing
Ctrl+VorCommand+V. It will appear in its original size, likely smaller than the new canvas. - Scale the Pasted Image: In the
Layersdialog, selectFloating Selection (Pasted Layer). Then, from theToolboxdialog, select the Scale tool (it might be nested under another tool). Click on the pasted image. In theScaledialog box, ensure the chain icon is locked and enter the new width value you used for the canvas. ClickScale. - Anchor Layer and Export: Once satisfied with the scaled image, select the
Anchor Layericon in the Layers dialog to merge the floating selection with the background. Finally, to export your high-resolution image, selectFile > Export. Choose your desired format (e.g., JPEG, PNG) and set the compression level to zero for the best quality. ClickExport.
Native Tools: macOS Preview
For macOS users, Preview is a surprisingly versatile built-in application for basic image editing, including resolution adjustment. It’s a quick and easy solution for straightforward tasks.
- Open Image in Preview: Locate your image file, right-click it, and select
Open with > Preview. - Access Adjustment Tools: Click the
Markup Toolbaricon (looks like a pen tip). - Adjust Size: Select the
Adjust Sizeicon (often represented by three nested boxes). - Set New Dimensions: In the dialog box, ensure the lock icon is closed and
Resample Imageis selected. Adjust the width to your desired amount (the height will adjust proportionally). ClickOK. - Save/Export: Your image will be resized. Select
File > Saveto overwrite the original orFile > Exportto save it as a new file.
Professional-Grade Editing: Adobe Photoshop
Adobe Photoshop is the industry standard for image manipulation, offering unparalleled control and advanced algorithms for resolution enhancement. It is a cornerstone of digital photography and graphic design workflows.
- Open Image: Launch Photoshop and open your image via
File > Openor by dragging it into the application. - Access Image Size: Go to
Image > Image Sizeor use the shortcutAlt + Control + I(Win) orOption + Command + I(Mac). This opens theImage Sizepanel. - Enable Preserve Details 2.0: Before making changes, navigate to
Edit > Preferences > Technology Previews(Windows) orPhotoshop > Settings > Technology Previews(Mac). Ensure “Enable Preserve Details 2.0 Upscale” is checked. This advanced algorithm helps retain original details during enlargement. - Configure Image Size Settings:
- Dimensions: Ensure the dimensions are set to “pixels.”
- Resample: Make sure the
Resampleoption is checked. This is crucial for adding new pixels. - Interpolation Method: From the dropdown menu next to
Resample, selectPreserve Details 2.0. This is Photoshop’s most effective method for intelligent upscaling, aiming to maintain sharpness and detail. Other useful options includeBicubic Smootherfor general enlargement orAutomaticif you prefer Photoshop to choose. - Resolution: Enter your desired resolution. For print, aim for 300 PPI. For digital use, you can increase pixel dimensions to meet specific requirements (e.g., a larger wallpaper).
- Reduce Noise (Optional but Recommended): In the
Image Sizepanel, you’ll find aReduce Noiseslider. When upscaling, some noise or artifacts might become more apparent. Adjust this slider carefully (e.g., 4-10%) to smooth out imperfections without losing too much detail. - Apply High Pass Filter for Sharpening (Optional Enhancement): After resizing, you can further enhance sharpness:
- Duplicate your image layer (
Ctrl+JorCommand+J). - Go to
Filter > Other > High Pass. Adjust theRadiusvalue until the edges of your image are subtly highlighted, avoiding over-sharpening. ClickOK. - Change the blending mode of this duplicated layer to
Overlayin the Layers panel. This will blend the sharpening effect into the image, making it appear crisper.
- Duplicate your image layer (
- Save or Export: Once you’re satisfied,
File > Save Asto save a new version, orFile > Export > Export Asto choose specific formats and compression settings for web or print.
The Power of AI: Smart Upscaling Tools for Optimal Resolution
While traditional software excels, Artificial Intelligence (AI) has revolutionized image upscaling. AI-powered tools leverage advanced algorithms and deep machine learning to generate new pixels far more intelligently than older interpolation methods, often delivering superior results without noticeable quality degradation. This makes them ideal for breathing new life into older or lower-resolution images, transforming them into high-resolution visuals suitable for wallpapers, aesthetic compositions, and detailed photography.
How AI Upscalers Work
Unlike conventional resampling that simply interpolates pixels based on their immediate surroundings, AI upscalers are trained on vast datasets of images. They learn patterns, textures, and structures, enabling them to “hallucinate” or intelligently predict how new pixels should appear to create a high-resolution version. This often involves techniques like Super-Resolution Convolutional Neural Networks (SRCNN), which process input data to ensure optimal performance.
The more images an AI upscaler processes, the more it learns, leading to increasingly flawless and optimized performance. This means AI tools can not only enlarge images but also often correct common issues like pixelation, blur, and even JPEG artifacts, resulting in a cleaner, sharper output closer to original high-quality digital photography.
Tophinhanhdep.com’s Dedicated AI Image Enhancement Tools
Tophinhanhdep.com offers advanced AI-powered tools specifically designed for image enhancement and resolution increase. These tools are built upon state-of-the-art AI technology, providing robust features for users seeking to improve their visuals drastically.
With Tophinhanhdep.com’s AI-driven enhancement capabilities, you can expect features such as:
- Significant Magnification without Loss of Quality: Enlarge your photos by up to 1000% (or 600% as seen with similar tools) without introducing pixelation or blur. This is especially beneficial for turning smaller images into stunning wallpapers or background images.
- Intelligent Detail Retention: Utilize AI to retain crucial details and sharpness, even when significantly increasing image size. Features like “face recognition” can specifically refine facial details, making it perfect for portrait photography that needs upscaling.
- Correction of Imperfections: Automatically fix common image flaws such as pixelation, blur, and color/lighting issues, including the removal of unwanted JPEG artifacts. This transforms a compromised low-res image into a clean, high-resolution asset.
- User-Friendly Interface: Designed for ease of use, these tools often feature simple drag-and-drop functionality, allowing even beginners to achieve professional results without the steep learning curve of complex editing software. This makes creating high-resolution abstract art or detailed nature photos accessible to everyone.
These dedicated AI tools are a game-changer for digital photography and visual design, offering a fast and effective way to achieve impressive resolution increases.
Online AI Solutions for Quick Enhancements
For those who prefer not to download software or need a quick online solution, Tophinhanhdep.com also provides browser-based AI upscaling tools. These online platforms offer remarkable convenience for rapid image enhancement.
Features of Tophinhanhdep.com’s online upscalers:
- Web Browser Accessibility: Access powerful AI enhancement directly through your web browser, with no installation required. This is ideal for quick tasks like converting a low-res image for a mood board or instantly improving a photo for social media.
- One-Click Resolution Increase: Many online tools simplify the process to just a few clicks: upload, choose desired scale (e.g., 2x, 4x, 8x), and download. The AI handles the complex processing automatically.
- Versatility: Beyond basic upscaling, Tophinhanhdep.com’s online image tools might include converters, compressors, and optimizers, offering a comprehensive suite for various image management needs.
- Free Tiers and Premium Features: While some online AI upscalers may offer a limited number of free images, premium versions often unlock higher processing limits, faster speeds, and additional features, providing a scalable solution for both casual users and professionals.
These online AI solutions are perfect for visual designers and photographers who need efficient tools to enhance images for a thematic collection or to quickly adapt existing content to trending styles requiring higher resolution.
Best Practices for Achieving and Maintaining High-Resolution Images
While various tools can help increase resolution, adopting best practices is key to maximizing quality and ensuring your images consistently meet high standards.
Start with the Highest Quality Possible
The golden rule of image resolution is to always start with the highest quality image available. If you’re engaged in digital photography, always shoot at your camera’s highest resolution settings. This provides maximum original data, giving you the most flexibility for editing, cropping, and upscaling later. No amount of upscaling can perfectly recreate detail that was never captured. For graphic designers, aim to acquire stock photos or design assets that already boast high resolution.
Avoid Excessive Upscaling
Remember the “bigger doesn’t mean sharper” principle. While AI tools are powerful, there’s a limit to how much you can enlarge an image before quality noticeably degrades. Traditional methods, in particular, tend to show a loss of sharpness when dimensions are increased by more than 30-40 percent. Even with advanced AI, pushing an image too far can introduce artificial-looking textures or artifacts. Always review the upscaled image by zooming in to assess its quality before final use.
Optimal Settings for Print
When preparing images for print, adhere to the 300 PPI/DPI standard. Ensure your image dimensions (in pixels) are sufficient for the intended print size at this resolution. For example, a 10x8 inch print at 300 PPI requires an image that is 3000x2400 pixels. Adjusting to these specifications before sending to print will prevent pixelation and ensure a crisp final product, which is vital for beautiful photography or compelling graphic design.
File Formats and Compression
The file format you choose and the compression levels you apply can significantly impact the final quality and resolution of your images:
- JPEG/JPG: Excellent for photographs due to its efficient compression, but it’s a “lossy” format, meaning some data is discarded during compression. Always save JPEGs at the highest quality setting (lowest compression) to preserve detail.
- PNG: A “lossless” format ideal for images with sharp lines, text, or transparent backgrounds (e.g., logos, digital art). It retains all image data but can result in larger file sizes than JPEGs.
- TIFF/TIF: Another lossless format, often preferred by professionals for archiving high-resolution photography and graphic design work. TIFFs are uncompressed or use lossless compression, resulting in very large file sizes but maximum quality retention.
When exporting your high-resolution images, especially from tools like GIMP or Photoshop, pay close attention to the compression sliders. For maximum quality, always opt for the least compression, even if it means a larger file size. Tophinhanhdep.com’s image converters and optimizers can help you manage these formats and sizes effectively.
Utilizing Tophinhanhdep.com’s Comprehensive Image Tools
To streamline your workflow and ensure consistent quality, leverage Tophinhanhdep.com’s full suite of image tools. Beyond AI upscalers, these might include:
- Converters: Easily switch between different image formats while maintaining optimal resolution.
- Compressors: Reduce file sizes for web use without drastically sacrificing visual quality, a crucial step for optimizing website performance and user experience.
- Optimizers: Fine-tune various image parameters for specific applications, ensuring your high-resolution images are perfectly tailored for their purpose.
These tools, combined with the techniques discussed, empower you to create, manage, and distribute high-resolution images that truly stand out, enhancing everything from your personal aesthetic collection to your professional stock photos and digital art projects.
Conclusion
Achieving high-resolution images is no longer the exclusive domain of professional studios with expensive software. With the advent of powerful, user-friendly tools like GIMP, the robust capabilities of Adobe Photoshop, and especially the revolutionary AI upscalers available at Tophinhanhdep.com, anyone can transform their visual content.
Understanding the interplay of pixels, PPI, and DPI, knowing when to apply traditional resampling, and harnessing the intelligence of AI algorithms are crucial skills in today’s visually-driven world. By integrating these techniques and adhering to best practices, you can ensure that your images, whether they are stunning wallpapers, intricate digital art, or essential stock photos, always appear crisp, detailed, and impactful across all mediums. Explore the comprehensive image tools at Tophinhanhdep.com today to unlock the full potential of your visual creations and elevate your photography and design to new heights.