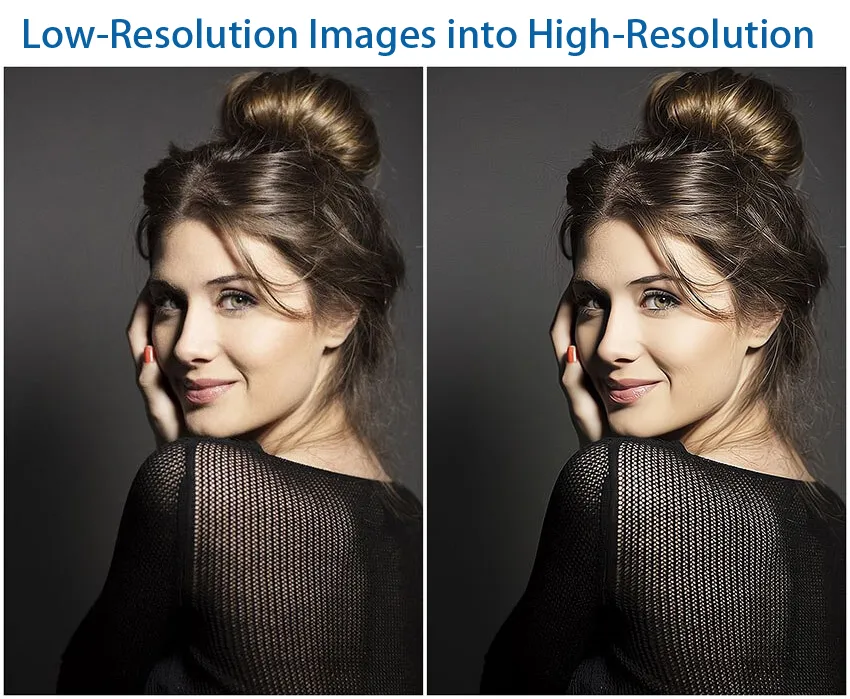
How to Make a High-Resolution Image from a Low-Resolution One

In the vibrant world of digital imagery, where stunning visuals dominate everything from personal social media feeds to professional marketing campaigns, encountering a low-resolution image can be a significant roadblock. Whether it’s an old cherished photograph, a product shot, or a graphic element, a pixelated or blurry image simply doesn’t convey the desired impact on today’s high-definition screens and print media. The good news is, thanks to remarkable advancements in technology, especially artificial intelligence, transforming a low-resolution image into a crisp, high-resolution masterpiece is not only possible but increasingly accessible.
At Tophinhanhdep.com, we understand the critical role high-quality visuals play in all aspects of digital engagement. From breathtaking wallpapers and backgrounds to professional stock photos and intricate digital art, clarity and detail are paramount. This comprehensive guide will walk you through the essential concepts of image resolution, the groundbreaking methods available for upscaling, and practical techniques to enhance your low-resolution images, ensuring they meet the demands of any display or print application.
Understanding Image Resolution: The Foundation of Visual Clarity
Before diving into the “how-to,” it’s crucial to grasp what image resolution truly means and why it’s so vital. Understanding these fundamentals will empower you to make informed decisions when enhancing your visuals.
What is Image Resolution? Pixels, PPI, and DPI
At its core, a digital image is composed of tiny squares of color called pixels. The resolution of an image refers to the total number of these pixels, typically expressed as width by height (e.g., 1920x1080 pixels). More pixels generally mean more detail and a clearer image, especially when viewed on larger screens or printed.
Two key metrics are used to describe pixel density:
- Pixels Per Inch (PPI): This measures the density of pixels within a digital image. A higher PPI indicates that there are more pixels packed into each inch of the image, leading to finer detail and less visible pixelation when zoomed in. For digital displays, common resolutions range from 72 PPI (older web standards) to 300 PPI or higher for retina displays.
- Dots Per Inch (DPI): Similar to PPI, DPI refers specifically to the density of ink dots a printer can place on one inch of paper. For high-quality prints, a standard of 300 DPI is often recommended, ensuring sharp and clear results. While PPI relates to digital images and DPI to physical prints, they often correlate, with a high-PPI image generally translating to a high-DPI print.
A low-resolution image, therefore, is one with a low pixel count or low pixel density. When you zoom in on such an image, or try to display it on a large screen or print it, the individual pixels become noticeable, resulting in jagged edges and a blurry, pixelated appearance.
Why High Resolution Matters in the Digital Age
The importance of high-resolution images has never been greater. In a world saturated with visual content, clarity and detail are key to capturing attention and conveying professionalism.
- Enhanced Display Quality: Modern screens, from smartphones to 4K monitors and televisions, boast incredibly high pixel densities. Low-resolution images appear fuzzy and unappealing on these displays, detracting from the overall user experience. High-resolution images, conversely, look sharp and vibrant.
- Professionalism and Credibility: For businesses, photographers, and content creators, high-resolution images are non-negotiable. They reflect attention to detail, quality, and a commitment to professional standards. Whether showcasing product details, an aesthetic landscape, or intricate digital art, a clear image builds trust and engagement.
- Flexibility in Use: High-resolution images offer greater versatility. They can be scaled down for web use without losing quality, cropped extensively, or enlarged for print without significant degradation. This flexibility is crucial for graphic design, photo manipulation, and creating diverse visual assets.
- Printing Quality: As mentioned, printing high-quality pictures absolutely requires a high-resolution source. A low-resolution image printed will result in a blurry, pixelated output, regardless of the printer’s capabilities.
Differentiating Resolution from Image Quality
While resolution is a crucial component of how an image looks, it’s not the sole determinant of image quality. Quality encompasses other factors like color accuracy, brightness, contrast, sharpness, and the absence of noise or artifacts. An image can have a high resolution (many pixels) but still be of poor quality if it was poorly lit, out of focus, or contains significant digital noise from the capture process.
Conversely, a low-resolution image, even if originally well-exposed and in focus, will still appear pixelated when enlarged. The process of upscaling a low-resolution image primarily increases its pixel count. While advanced techniques can enhance perceived quality by sharpening and reducing noise, they cannot perfectly recreate data that was never captured in the first place. Tophinhanhdep.com’s tools aim to bridge this gap by intelligently adding detail, but understanding this distinction is vital for managing expectations.
Harnessing the Power of AI for Seamless Upscaling with Tophinhanhdep.com
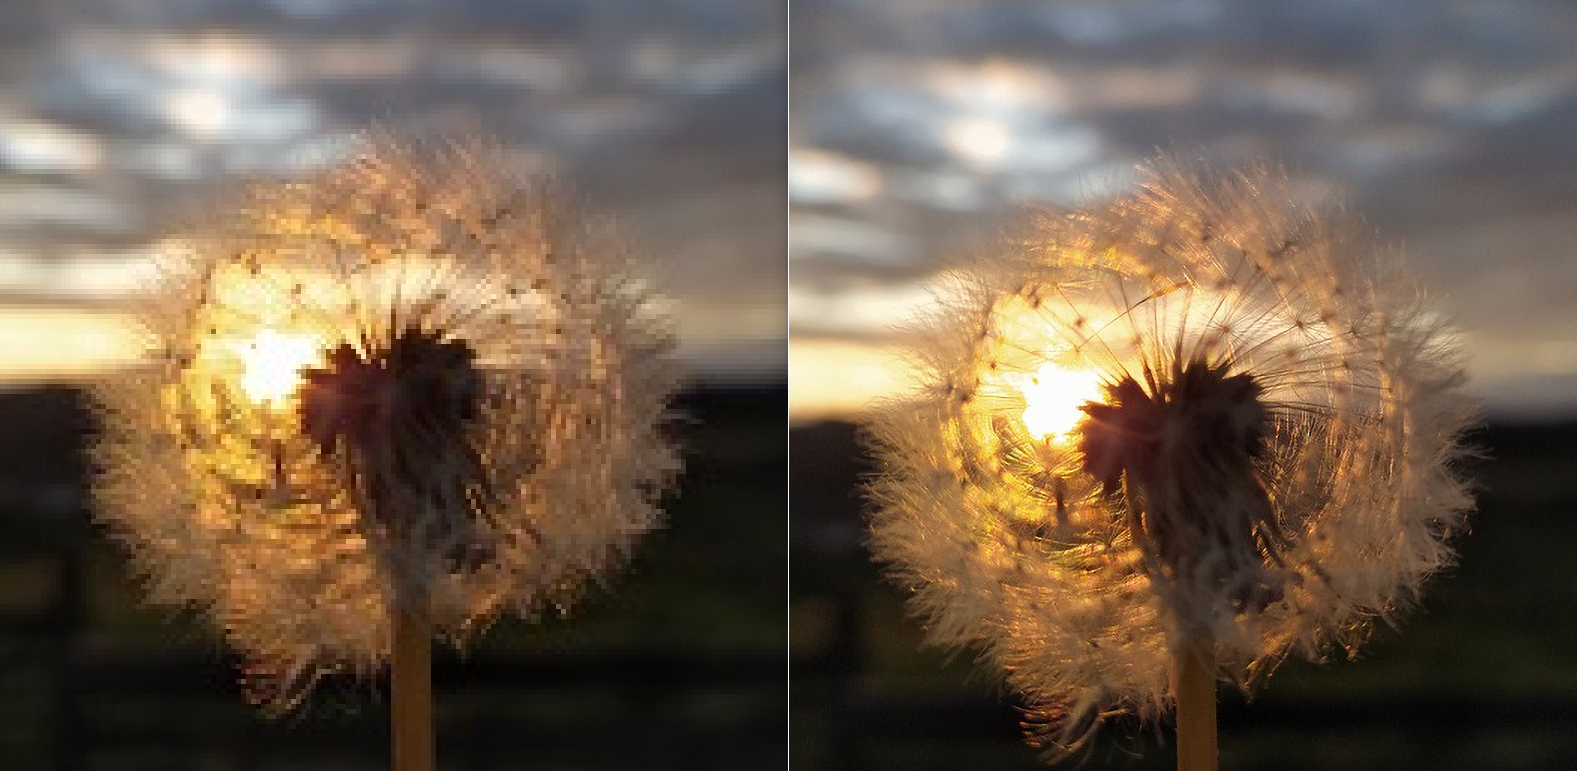
The most revolutionary development in converting low-resolution images to high-resolution ones is the advent of Artificial Intelligence (AI). AI-powered upscalers have transformed what was once a tricky, quality-compromising process into a remarkably effective solution.
The AI Advantage: Beyond Traditional Interpolation
Traditional upscaling methods, such as bilinear, bicubic, or Lanczos interpolation, primarily function by estimating new pixel values based on the average of surrounding pixels. While these methods can increase image dimensions, they don’t truly “add” new detail. Instead, they often result in a larger but blurrier, interpolated image, sometimes even exacerbating pixelation or introducing artifacts.
AI-based upscaling, however, operates on a fundamentally different principle. Trained on vast datasets of both low-resolution and corresponding high-resolution images, AI models learn to recognize patterns, textures, and structures within images. When presented with a low-resolution image, an AI upscaler doesn’t just average pixels; it intelligently predicts what missing details should look like. This “Super Resolution” technology allows Tophinhanhdep.com’s AI tools to:
- Add new, realistic details: The AI can reconstruct intricate elements that were lost in the original low-resolution image.
- Remove quality issues: Choppy edges become smoother, and digital noise is often reduced, leading to a cleaner, sharper output.
- Preserve original integrity: The goal is to enhance resolution without introducing distortions or artificial-looking textures.
This intelligent interpolation makes AI upscaling a game-changer for digital photography, graphic design, and converting old, small images into usable, high-quality assets.
Exploring Tophinhanhdep.com’s AI Upscaling Tools
At Tophinhanhdep.com, we offer a suite of cutting-edge AI upscaling tools designed to cater to various needs, from quick online conversions to more advanced desktop and mobile enhancements. Our platform integrates the latest AI models to ensure optimal results across different image types, including real-life photos, anime, illustrations, and even intricate graphics.
Our AI upscalers are engineered to:
- Support diverse formats: Compatible with popular image formats like JPEG, PNG, BMP, TIFF, and WebP, ensuring flexibility for all your images.
- Offer significant magnification: Enlarge your images by up to 800% (or even 400% with multiple passes to reach 8K) while maintaining remarkable clarity and detail.
- Prioritize user experience: Featuring intuitive interfaces, real-time previews, and straightforward controls.
- Ensure data privacy: Uploaded photos are securely processed and often deleted from our servers permanently after use.
A Step-by-Step Guide to Using Tophinhanhdep.com’s Online AI Upscaler
For those seeking a quick and efficient way to convert low-resolution images to high-resolution without installing software, our online AI upscaler is an ideal choice.
How to Convert Low-Resolution Images to High-Resolution Online:
- Visit Tophinhanhdep.com/image-upscaler: Navigate to our dedicated AI Image Upscaler tool.
- Upload Your Photo: Click the “Upload Photo” button or simply drag and drop your desired image onto the designated area. Our system supports various image formats, ensuring broad compatibility.
- Select Magnification: Once uploaded, our AI will automatically begin processing, often providing an initial 2x upscaled version. You can then choose your desired output resolution from options like 2x, 4x, 6x, or 8x magnification on the right side of the page. The real-time preview will show you the impressive enhancement.
- Save Your High-Resolution Image: After you’re satisfied with the enhanced picture effect, click the “Save” button to download your new high-resolution image directly to your computer. You can then click “New Image” to process another photo if needed.
For users who require more robust features or prefer desktop applications, Tophinhanhdep.com also provides powerful desktop image upscalers compatible with both Windows and Mac operating systems. These desktop versions often offer additional controls, batch processing capabilities, and advanced AI models for specialized enhancements. Similarly, our mobile applications, available for both iPhone and Android, allow you to retouch and upscale your low-resolution photos anytime, anywhere, directly from your smartphone.
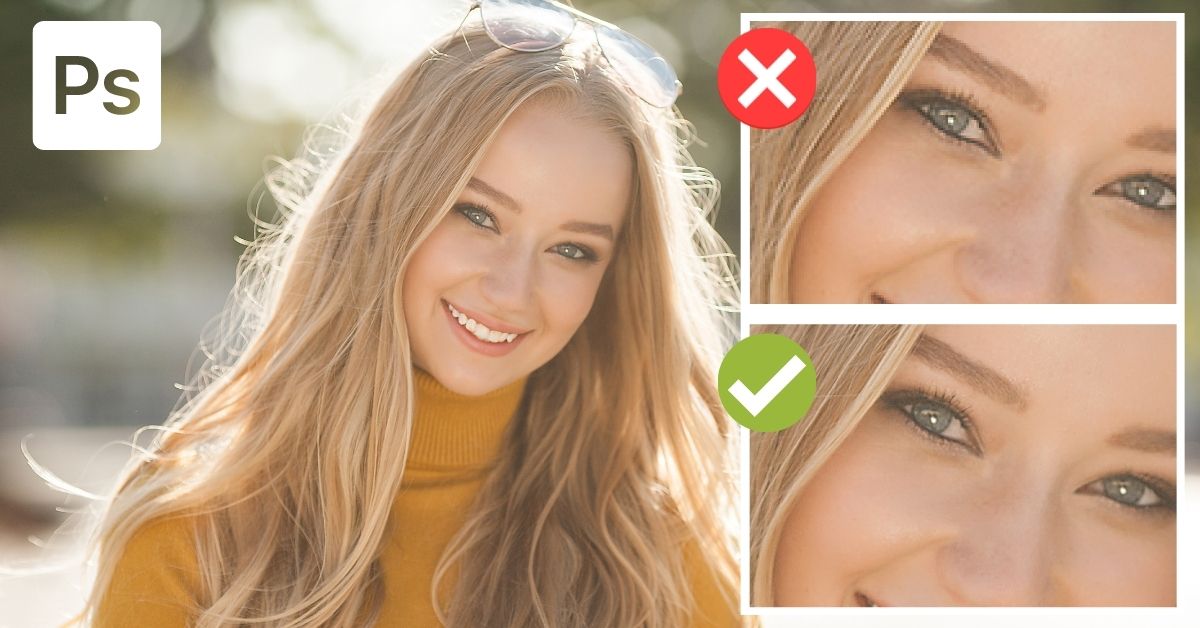
Advanced Manual Enhancement Techniques Using Tophinhanhdep.com’s Integrated Editing Tools
While AI upscalers offer remarkable convenience and efficiency, manual editing tools, such as those integrated into Tophinhanhdep.com’s advanced photo editor (emulating professional software like Photoshop), provide granular control for refining and perfecting your images. This section delves into these powerful techniques for those who want to take their image enhancement a step further.
Preparing Your Image for Upscaling in Tophinhanhdep.com’s Editor
Before increasing resolution, a few preparatory steps can significantly improve the final outcome:
- Open Your Image: Launch Tophinhanhdep.com’s professional editing interface (or your preferred desktop software). Open your low-resolution image.
- Duplicate Layer (Optional but Recommended): To non-destructively work on your image, duplicate the original layer. This allows you to revert to the original if needed and compare changes.
- Enable Advanced Upscale Options: Within Tophinhanhdep.com’s settings (similar to Edit > Preferences > Technology Previews in Photoshop), ensure that advanced upscale options like “Preserve Details 2.0” are enabled. These settings are crucial for retaining original details during the resolution change.
Adjusting Image Size and Mastering Interpolation Methods
The core of manual resolution conversion lies within the “Image Size” dialogue (accessible via Image > Image Size or a similar menu in Tophinhanhdep.com’s editor).
- Review Current Dimensions: The Image Size panel displays current dimensions (e.g., 1000 pixels horizontally, 667 pixels vertically) and resolution (e.g., 72 PPI).
- Set Dimensions to Pixels: Ensure your dimensions are set to “pixels” for accurate resolution adjustment.
- Enable Resample and Choose Interpolation: This is the most critical step for manual upscaling.
- Resample: Check this option to allow the software to change the number of pixels in the image.
- Interpolation Method: Tophinhanhdep.com offers various methods, each suited for different image types and goals:
- Automatic: The software interprets the image and selects the best resampling method.
- Preserve Details (and Preserve Details 2.0): These are highly recommended for enlargement as they attempt to keep the original details intact, using intelligent algorithms to add new pixel data. “Preserve Details 2.0” is an enhanced version offering superior results.
- Bicubic Smoother (Enlargement): Uses complex polynomial calculations to add pixels, often resulting in a smoother appearance. Good for general photo enlargement.
- Bicubic Sharper (Reduction): Best for reducing image size while maintaining sharpness.
- Bicubic (Smooth gradients): Considers pixel gradients for smoother transitions.
- Nearest Neighbor (Hard Edges): Copies adjacent pixels. This is a less precise method and generally not recommended for photographic upscaling as it can make pixelation more apparent. It’s often used for pixel art or simple graphics.
- Bilinear: Calculates new pixels based on two linearly positioned pixels. Less precise than bicubic methods. For converting low-res photos to high-res, Preserve Details 2.0 is usually the optimal choice, as it balances detail preservation with intelligent upscaling.
- Increase Image Resolution: In the “Resolution” box, input your desired PPI (e.g., change from 72 PPI to 300 PPI). As you increase the PPI, the dimensions in pixels will also increase, reflecting the new high-resolution output. Constrain Proportions should remain checked to avoid distorting the image.
- Apply Changes: Click “OK” to apply the resolution changes.
Combating Noise and Sharpening Details for Professional Results
Upscaling, even with advanced methods, can sometimes introduce or emphasize digital noise. Simultaneously, a touch of sharpening can make the enhanced details pop.
- Reduce Noise: Within the Image Size panel, look for a “Reduce Noise” slider (or find a dedicated Noise Reduction filter under Filter > Noise). Adjust this slider cautiously. A value between 2-10% is often a good starting point. Excessive noise reduction can lead to a loss of fine detail, making the image look plasticky.
- Sharpening with the High Pass Filter (Optional but Recommended): After resizing, applying a sharpening filter can dramatically improve perceived clarity. Tophinhanhdep.com’s editing suite offers various sharpening tools, but the High Pass filter is a favorite among professionals:
- Duplicate the Layer: Again, work on a duplicate layer (Ctrl+J / Cmd+J).
- Apply High Pass Filter: Go to Filter > Other > High Pass.
- Adjust Radius: Your canvas will temporarily turn gray, highlighting the edges. Increase the “Radius” value until the image edges are clearly defined but not over-emphasized. A radius between 1.0 and 3.0 pixels is common, depending on the image size. Click “OK.”
- Change Blending Mode: In the Layers panel, change the blending mode of this High Pass layer to “Overlay,” “Soft Light,” or “Hard Light.” “Overlay” is often a good default, as it sharpens mid-tones and boosts contrast in highlights and shadows, making details stand out without harshness. You can then adjust the layer’s opacity to fine-tune the sharpening effect.
Creative Touches: Content-Aware Fill and Color Adjustments
For images that still have pixelated or blurry areas after upscaling, or require a final polish, Tophinhanhdep.com’s advanced editing features (akin to Photoshop’s) can be invaluable:
- Content-Aware Fill: If specific areas look problematic, use selection tools to highlight them. Then, go to Edit > Content-Aware Fill. This powerful feature analyzes surrounding pixels and intelligently fills the selection, often blending seamlessly.
- Final Touches and Fine-Tuning: Utilize adjustment layers (e.g., Curves, Levels, Vibrance, Saturation) to fine-tune color, contrast, and overall visual aesthetics. Apply these adjustments non-destructively, and use layer masks for selective editing to refine specific areas.
The Realities of Upscaling: Quality, Limitations, and Best Practices
While the methods discussed above can work wonders in transforming low-resolution images, it’s essential to approach upscaling with realistic expectations. Understanding the inherent limitations and adopting best practices will ensure you achieve the best possible results.
The Difference Between Captured and Upscaled Detail
It’s crucial to remember that upscaling, even with the most advanced AI, cannot perfectly recreate photographic data that was never captured by the camera’s sensor. When an image is upscaled, pixels are added based on existing information or intelligent predictions. While AI can “hallucinate” convincing new details, these are reconstructions, not true original data.
Consider an image originally captured at 1 megapixel versus an image upscaled to 30 megapixels. The 30-megapixel image originally captured by a high-end camera contains far more authentic detail, texture, and nuance than the upscaled 30-megapixel image. Factors like focus, exposure, and lens quality during the original capture define the true image quality. Therefore, while upscaling can dramatically improve the perceived resolution and clarity of a low-res image, it won’t magically make it indistinguishable from a professionally captured high-resolution photograph.
This is why, while Tophinhanhdep.com’s tools can vastly improve your low-resolution images, they are not a silver bullet for transforming extremely poor-quality source material into gallery-worthy art. The better the initial low-resolution image (even if small), the better the upscaling result will be.
Optimizing Images for Print and Digital Display
The ideal resolution for your image depends heavily on its final destination.
- Digital Displays (Web, Social Media, Screens): For most digital uses, a resolution of 72 PPI is often considered the minimum, though modern displays benefit greatly from higher PPIs (e.g., 150 PPI or 300 PPI for retina screens). The key is the overall pixel dimensions. An image that is 1920 pixels wide will look great on a Full HD monitor, regardless of its PPI setting, as long as it has enough pixels. AI upscalers are perfect for preparing images for high-definition digital display.
- Printing: For high-quality prints, 300 DPI is the gold standard. This density ensures that individual ink dots are imperceptible, resulting in a smooth, sharp output. For very large prints viewed from a distance (like billboards), a lower DPI (e.g., 150 DPI) might be acceptable, but for standard prints, stick to 300 DPI. When preparing an image for print using Tophinhanhdep.com’s tools, ensure the final output resolution (PPI, which translates to DPI for printing) matches the requirements for your desired print size. For example, a 24x20-inch canvas print at 300 PPI would require an image of 7200x6000 pixels.
Tophinhanhdep.com provides solutions for both scenarios, offering various export options to suit your needs.
When to Seek Original High-Resolution Sources
Despite the incredible capabilities of AI upscaling and manual editing, there are times when seeking the original high-resolution source is the absolute best solution. If you’re working on a critical project, a large-scale print, or require the utmost fidelity for graphic design or photo manipulation, always prioritize finding the original. Upscaling is a powerful workaround, but it should complement, not entirely replace, the acquisition of truly high-resolution source material when possible.
In conclusion, transforming low-resolution images into high-resolution masterpieces is no longer a pipe dream. With Tophinhanhdep.com’s advanced AI upscaling tools and comprehensive manual editing features, you have the power to breathe new life into your visuals. Whether you’re enhancing aesthetic wallpapers, refining product photos, or preparing images for print, our platform equips you with the tools and knowledge to achieve professional-grade results. Embrace the future of image enhancement and elevate your visual content to new heights with Tophinhanhdep.com!