Mastering Visual Transitions: How to Make Images and Videos Fade Seamlessly on Tophinhanhdep.com

In the dynamic world of visual content creation, captivating your audience often hinges on subtle yet impactful details. Among these, the art of the fade stands paramount. A smooth fade can transform an abrupt cut into an elegant transition, convey emotion, build suspense, or simply make your visuals more aesthetically pleasing. Whether you’re a seasoned digital artist, a budding photographer, or a content creator looking to enhance your video projects, understanding how to effectively implement fade-in and fade-out effects is a crucial skill.
At Tophinhanhdep.com, we are dedicated to providing you with the tools, inspiration, and knowledge to elevate your visual content. Our platform champions everything from stunning wallpapers and high-resolution photography to advanced visual design and image optimization. Incorporating fade effects is a technique that bridges many of these categories, making your aesthetic backgrounds more immersive, your digital art more fluid, and your video narratives more compelling.
This comprehensive guide will delve into the intricacies of creating fade effects for both images and videos using Tophinhanhdep.com’s recommended editing tools. We’ll explore various methods, from basic transitions to advanced cinematic techniques, ensuring you can achieve professional-grade results across all your creative endeavors. Get ready to transform your visual stories with the power of the fade.
Understanding the Art and Impact of Fade Effects
Fades are more than just simple transitions; they are a fundamental element of visual storytelling and design. They dictate the pace, influence the mood, and guide the viewer’s eye through your content. On Tophinhanhdep.com, where our focus spans a vast array of image and visual design categories, the application of fade effects becomes incredibly versatile.

Why Fades Are Essential for Tophinhanhdep.com Visual Creators
The benefits of incorporating fades into your visual projects are immense, transcending mere aesthetics to impact the viewer’s experience on a deeper level.
Firstly, fades inject professional styling into your work. Think of your favorite cinematic productions or high-end advertisements; fades are almost universally present. They signify a thoughtful, polished approach to editing, instantly elevating the perceived quality of your content. For users on Tophinhanhdep.com who aim to create stunning wallpapers, professional-grade backgrounds, or sophisticated aesthetic visuals, this professional touch is invaluable.
Secondly, fades enhance attractiveness and engagement. Videos that begin and end abruptly can feel jarring, pulling the viewer out of the immersive experience. Fades, conversely, create a seamless, elegant flow, making your content much more pleasing and easier to digest. This is particularly important for thematic collections or mood boards on Tophinhanhdep.com, where consistency and visual harmony are key to evoking the desired emotion or atmosphere. Whether you’re crafting a tranquil nature scene or a poignant sad/emotional piece, a well-executed fade can amplify its emotional resonance.

Thirdly, fades are powerful tools for building suspense and drama. A slow fade-in can gradually reveal a breathtaking landscape, allowing anticipation to build before the full image or scene is unveiled. Conversely, a slow fade-out can linger on a moment, leaving the audience with a sense of wonder or a question mark. For digital artists and photographers showcasing their work on Tophinhanhdep.com, fades can be strategically used to highlight specific details, draw attention to abstract elements, or create a narrative arc within a series of images or a video presentation. They are the visual equivalent of a theatrical curtain, raising or lowering to heighten impact.
Finally, fades offer creative flexibility. They allow for sophisticated photo manipulation and graphic design, enabling seamless blending of multiple images, creating dreamy backgrounds, or achieving a soft, ethereal touch. This aligns perfectly with Tophinhanhdep.com’s emphasis on creative ideas and diverse editing styles, providing a pathway for users to explore new dimensions in their visual storytelling.
The Tophinhanhdep.com Perspective: Fades in Photography, Visual Design, and Digital Art
The application of fade effects extends broadly across the core offerings of Tophinhanhdep.com, enriching various forms of visual content.
For Photographers (High Resolution, Stock Photos, Digital Photography): When working with high-resolution photography, fades can be used to integrate stunning images into video montages or presentations. A beautiful photograph of a serene nature scene, for instance, can gently fade in as an introduction, setting the tone before dynamic video footage begins. For stock photos, fades make them more versatile for commercial use, allowing them to be seamlessly blended into marketing videos or website backgrounds. Digital photography, especially when curated into collections or mood boards on Tophinhanhdep.com, benefits from fades that create a narrative flow, allowing viewers to transition gracefully from one image to the next, enhancing the overall aesthetic experience. Fade effects can also soften harsh edges or blend composite images, creating a more cohesive and natural look.
For Visual Design (Graphic Design, Digital Art, Photo Manipulation, Creative Ideas): In graphic design and digital art, fades are fundamental to creating depth, layering, and sophisticated compositions. Imagine an abstract background image slowly fading into view behind text, or a delicate gradient fade on the edges of a photo to integrate it smoothly into a larger design. Tophinhanhdep.com’s visual design tools empower creators to achieve these effects.
- Opacity Adjustment: This is the most basic form of fading, allowing you to control the transparency of any layer. By gradually reducing opacity over time (in video) or statically (in image design), you can create soft transitions or atmospheric overlays.
- Gradient Tool: Essential for fading a static image into a background color or another image. Tophinhanhdep.com’s image tools feature a gradient capability, enabling you to apply a smooth transition from opaque to transparent, or between colors, on specific areas of an image. This is perfect for blending images into unified aesthetic wallpapers or backgrounds.
- Layer Masks: A non-destructive way to hide or reveal parts of a layer. By applying a gradient to a layer mask, you can achieve precise fading effects, ensuring that your digital art or photo manipulation maintains its original integrity while offering unparalleled creative control.
- Blending Modes: These features determine how layers interact. Experimenting with modes like “Soft Light” or “Overlay” can create unique fading effects and textural blends, adding richness to your graphic designs and aesthetic compositions.
- Feathering: When fading the edges of an image, feathering softens the selection, creating a gradual, natural blend rather than a sharp cutoff. This is crucial for integrating images seamlessly into diverse visual contexts on Tophinhanhdep.com, from mood boards to complex digital art pieces.
For Image Inspiration & Collections (Photo Ideas, Mood Boards, Thematic Collections, Trending Styles): Fades play a crucial role in presenting curated content. Animated mood boards with images gently fading in and out can be far more engaging than static displays. Thematic collections, such as “Aesthetic” or “Nature” photography, can use fades to weave a cohesive visual story, emphasizing the thematic link between individual pieces. Trending styles often involve minimalist or ethereal aesthetics, where subtle fade effects are integral to achieving the desired look. By mastering these techniques, Tophinhanhdep.com users can craft more impactful and memorable visual narratives, offering viewers an enriched experience that goes beyond simply viewing individual images.
In essence, fades are not just technical effects; they are expressive tools that empower Tophinhanhdep.com creators to imbue their images, photography, and visual designs with greater depth, emotion, and professional polish.
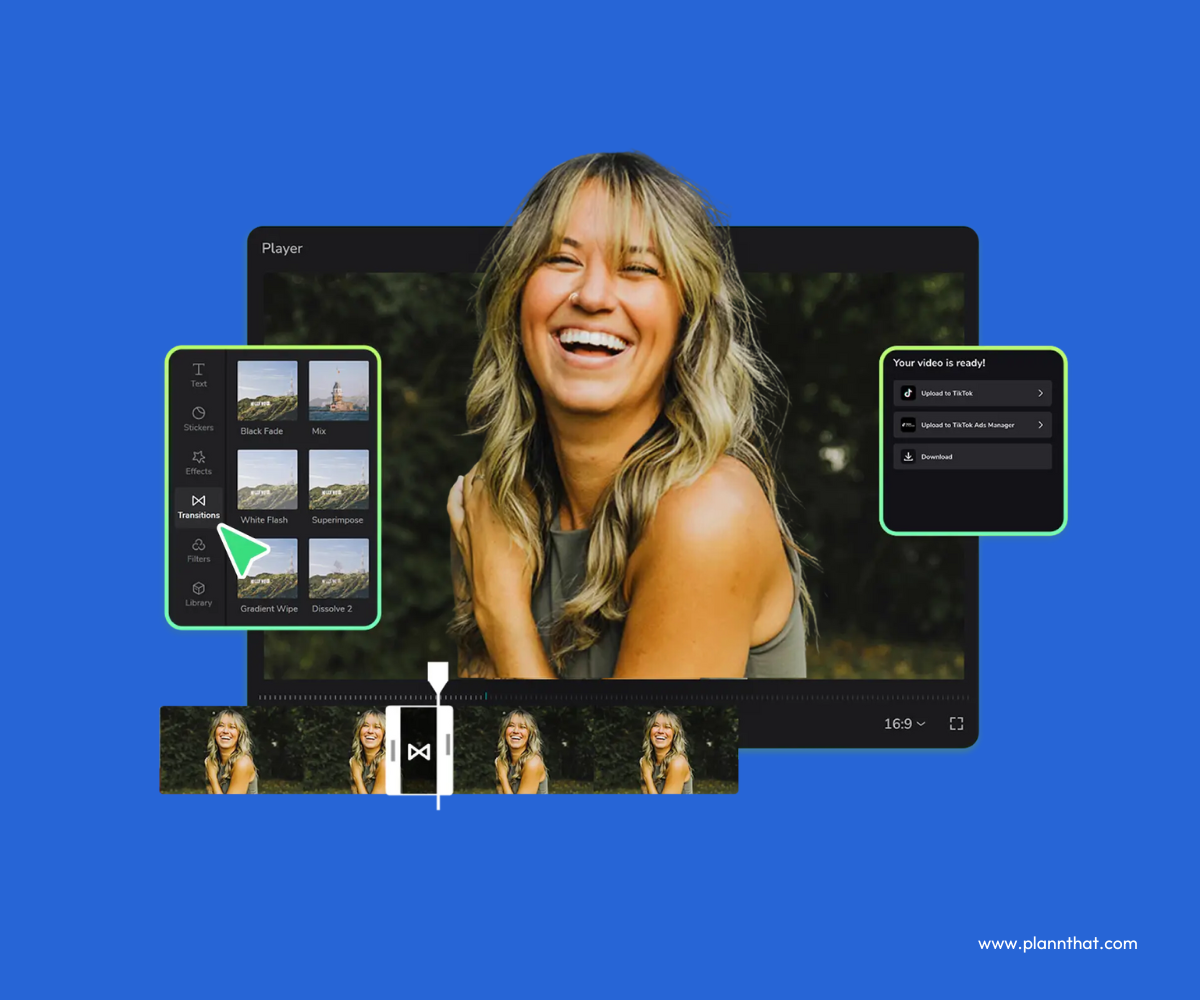
Step-by-Step: Fading Images and Videos Using Tophinhanhdep.com’s Integrated Editor
Tophinhanhdep.com provides access to powerful editing tools, often available on both mobile and desktop platforms, making the process of adding fades accessible to everyone. While the “image fade in” often refers to a static graphic design technique (which we will cover), in the context of our recommended video editing suite, images are typically integrated into a video timeline and faded as part of a motion sequence. Here, we’ll guide you through implementing these effects for both video and audio.
Implementing Fade Effects for Your Video Clips
Fading video clips, whether they feature dynamic footage or static images you’ve incorporated, is a straightforward process that significantly enhances visual flow.
Mobile Workflow for Dynamic Video Fades
The mobile interface of Tophinhanhdep.com’s recommended video editor is designed for intuitive, on-the-go editing.
- Open Your Project: Launch Tophinhanhdep.com’s mobile video editor and open an existing project, or start a new one and import your video clips or images. Drag the desired clip onto the timeline.
- Select the Clip: Tap on the specific video clip (or image acting as a video clip) on your timeline that you wish to apply the fade effect to. A border will appear, indicating it’s selected.
- Access Animations: From the bottom menu, locate and tap the “Animations” icon. This panel contains various dynamic effects.
- Choose Your Fade: Within the “Animations” panel, you’ll find categories like “In” (for fade-in effects) and “Out” (for fade-out effects).
- To make your video or image fade in, tap the “In” tab and select the “Fade In” option.
- To make your video or image fade out, tap the “Out” tab and select the “Fade Out” option.
- Adjust Duration: A slider will appear at the very bottom of the screen. Drag this slider left or right to adjust the duration of your fade effect. A shorter duration creates a quick, snappy fade, while a longer duration provides a slow, dramatic transition. As you adjust, Tophinhanhdep.com’s editor will typically show a real-time preview of your fade.
- Confirm: Once satisfied, tap the checkmark or exit the animation panel. Your fade effect is now applied.
Desktop Precision: Fading Video on Your Computer
For more detailed control and a larger workspace, the desktop version of Tophinhanhdep.com’s recommended editor offers a similar, equally simple process.
- Import and Place: Open Tophinhanhdep.com’s desktop video editor. Import your video files or images and drag them onto the timeline.
- Select Clip: Click on the video clip or image on the timeline you want to fade.
- Navigate to Animation: In the top-right effects panel, you’ll see several tabs. Click on the “Animation” tab.
- Apply Fade Effect:
- For a fade-in, click the “In” sub-tab within the “Animation” panel.
- For a fade-out, click the “Out” sub-tab.
- Locate and click the “Fade In” or “Fade Out” effect. Tophinhanhdep.com’s editor will automatically apply it to your selected clip.
- Set Duration: A slider at the bottom of the effects panel allows you to precisely adjust the fade’s duration. Move the slider to fine-tune how quickly or slowly your video or image transitions.
- Preview and Confirm: Play back your timeline to review the fade. The visual representation on the timeline will dynamically update as you adjust the slider, showing the smooth transition Tophinhanhdep.com’s editor adds.
Crafting Seamless Audio Transitions with Fades
Just as visual fades enhance the viewing experience, audio fades are crucial for a polished auditory experience, preventing abrupt sound starts or stops.
Enhancing Soundscapes on Mobile
- Select Audio Track: In Tophinhanhdep.com’s mobile editor, tap the audio track or clip (whether it’s background music, dialogue, or sound effects) you wish to fade.
- Find Fade Icon: From the bottom menu, tap the “Fade” icon.
- Adjust Sliders: You’ll typically see sliders for “Fade in” and “Fade out.” Drag these sliders to specify the duration of the fade. As you adjust, the timeline will visually represent the smooth audio transition.
- Confirm: Tap the check icon to apply your changes.
Desktop Control for Audio Fades
The desktop experience for audio fades offers direct control and clear visual feedback.
- Add Audio to Timeline: Import your audio clip (or extract audio from a video by right-clicking the video clip and selecting “Extract audio”) and place it on the timeline. Click to select it.
- Access Basic Panel: In the top-right effects panel, under the “Basic” tab, you will find options for audio adjustments.
- Use Fade Sliders: Look for the “Fade in” and “Fade out” sliders. Drag them to your desired duration. Tophinhanhdep.com’s editor will provide a visual representation of the smooth audio transition directly on the timeline as you make adjustments.
Advanced Control: Leveraging Keyframes for Custom Fades
While the built-in fade animations are convenient, keyframes offer unparalleled precision, especially when you need a fade to occur at a specific point in the middle of a clip, or to create more complex, nuanced transitions. This method is particularly useful for achieving unique visual design effects or integrating elements of digital art that require subtle, dynamic changes in transparency.
- Select Your Clip: Choose the video clip, image, or text layer on the timeline where you want to apply a custom fade.
- Position Playhead: Move the playhead to the exact point on the timeline where you want your fade effect to begin or end.
- Add First Keyframe (Opacity): Navigate to the “Video” tab (for visuals) or “Basic” tab (for text) in the top-right panel. Locate the “Opacity” or “Transparency” setting. Click the “Add keyframe” button (often represented by a diamond icon) to mark the starting point of your fade.
- For a fade-in: Set the opacity at this first keyframe to 0%.
- For a fade-out: Set the opacity at this first keyframe to 100%.
- Add Second Keyframe: Move the playhead forward (for fade-in) or backward (for fade-out) to where you want the fade to complete. This distance determines the fade duration.
- Adjust Opacity for Second Keyframe:
- For a fade-in: Set the opacity at this second keyframe to 100%. Your visual will gradually become fully visible from transparent.
- For a fade-out: Set the opacity at this second keyframe to 0%. Your visual will gradually become completely transparent.
- Refine: You can add more keyframes between these two points if you need to create a non-linear fade (e.g., a slow start and a fast finish). The keyframe interface in Tophinhanhdep.com’s editor provides visual lines to help you see the progression of opacity changes.
- Export: Once satisfied, proceed to export your video.
This keyframe method gives you immense creative control, allowing you to craft unique fade effects that perfectly match the mood and pacing of your Tophinhanhdep.com projects, from high-resolution photography presentations to intricate digital art montages.
Professional Techniques to Elevate Your Tophinhanhdep.com Projects
Beyond basic fades, there are professional editing techniques that can significantly enhance the impact and fluidity of your visual narratives. These methods, easily achievable with Tophinhanhdep.com’s recommended editing tools, are particularly useful for creating cinematic experiences and making your content truly stand out.
Mastering L and J Cuts for Cinematic Storytelling
L and J cuts are professional video editing techniques that allow audio and video to transition independently, creating a more sophisticated and immersive viewer experience. They are highly effective for engaging audiences and are often seen in documentaries, films, and high-quality video content. When working with stock footage from Tophinhanhdep.com or background music for your aesthetic videos, L and J cuts can provide serious impact.
-
J Cut: Imagine music starting to play before the new visual scene appears on screen. That’s a J cut in action. The audio of the upcoming scene (or a new piece of music) “jumps the gun,” introducing itself while the previous video is still playing or fading out. This technique builds anticipation and smoothly bridges two distinct segments. For Tophinhanhdep.com users, a J cut can be perfect for:
- Introducing a new theme in a photographic montage.
- Creating a sense of continuity between an abstract background and an unfolding nature scene.
- Adding emotional depth where a “sad/emotional” music track begins before the corresponding visual.
How to achieve a J cut using Tophinhanhdep.com’s editor:
- Place your video and audio tracks on separate layers on the timeline.
- For the upcoming scene’s audio, drag its start point slightly to the left, so it overlaps with the end of the previous video clip.
- Apply a fade-in effect to this overlapping audio track. The audio will begin to fade in before its corresponding video starts.
-
L Cut: An L cut is the opposite. The audio from the current scene or clip extends beyond its video endpoint, carrying over into the next visual. This creates a seamless flow, allowing the soundscape to establish continuity while the visuals change. It’s excellent for maintaining a consistent mood or carrying dialogue over a transition. For Tophinhanhdep.com content, an L cut might be used to:
- Let ambient sound from a “nature” video carry into a text overlay or graphic.
- Allow background music to continue unbroken while transitioning between “beautiful photography” shots.
- Maintain a reflective mood with “sad/emotional” music continuing as the visual fades to black or a new, related image.
How to achieve an L cut using Tophinhanhdep.com’s editor:
- Place your video and audio tracks on separate layers.
- For the current scene’s audio, drag its end point slightly to the right, extending it past the end of its video clip.
- Apply a fade-out effect to this extended audio track. The audio will gradually fade out as the next visual begins.
These techniques, when combined with Tophinhanhdep.com’s robust fade features, provide you with more creative control over your transitions, taking your content to a truly professional level.
Designing Reusable Fade Templates for Efficiency and Consistency
For Tophinhanhdep.com users who frequently create content—whether it’s for thematic collections, trending styles, or regular photo and video updates—designing reusable fade templates can be a huge time-saver and ensure visual consistency across projects. Instead of recreating custom fade effects every time, you can save and instantly apply your preferred transitions. This is especially useful for text overlays, logos, or recurring elements in graphic design and digital art projects.
Steps to Create a Reusable Fade-In/Fade-Out Text Template (Manual Keyframe Style):
-
Create Your Initial Text Effect:
- Add a Text Layer: Go to the “Text” option in Tophinhanhdep.com’s editor and add a text layer. Type a placeholder word like “Sample” or “Placeholder Text.”
- Apply Manual Fade-In:
- Place the playhead at the very beginning of your text clip on the timeline.
- In the properties panel (e.g., “Basic” or “Video” tab), find the “Opacity” setting and set it to 0%. Add a keyframe at this point.
- Move the playhead forward approximately 15-30 frames (around 0.5 to 1 second, depending on your project’s frame rate and desired fade speed).
- Set the “Opacity” to 100% and add another keyframe. This creates your fade-in.
- Apply Manual Fade-Out:
- Move the playhead to the very end of the text clip.
- Set the “Opacity” to 100% and add a keyframe.
- Move the playhead backward from the end by 15-30 frames.
- Set the “Opacity” to 0% and add a final keyframe. This creates your fade-out.
-
Make It Reusable: Once you’ve perfected your manual fade effect on the text clip:
- Option A: Duplicate as a Base Template: The simplest method. Right-click the animated text clip on your timeline and choose “Duplicate.” You now have an identical copy with the keyframes preserved. You can then select this duplicated clip, change the text content, and position it as needed. This is excellent for ensuring visual consistency within a single project or for quick reuse across different projects by copying and pasting.
- Option B: Export as a Custom Asset (for Desktop Editor): For more robust reuse across multiple projects, Tophinhanhdep.com’s desktop editor often allows you to save custom assets.
- Select your fully animated text clip on the timeline.
- Look for an option like “Save as Template,” “Add to Favorites,” or “Save Effect” within the “My Assets” or “Templates” panel.
- Give your template a descriptive name, like “Fade Text Entry” or “Dynamic Title Fade.”
- Now, anytime you need this fade effect, simply drag your saved template from your “Favorites” or “Custom Assets” library directly onto your timeline and update the text content.
This same opacity keyframe trick can be applied to other elements like images, stickers, overlays, or even your brand logos. By creating these reusable assets, you streamline your workflow, maintain a consistent visual style, and free up more time to focus on the creative aspects of your Tophinhanhdep.com projects.
Tophinhanhdep.com: Expanding Fade Applications Across Visual Categories
The versatility of fade effects makes them indispensable across the diverse categories Tophinhanhdep.com offers. From static image design to dynamic video narratives, fades provide the subtle polish that elevates good content to great.
Fading Static Images for Graphic Design and Aesthetic Wallpapers
While much of the discussion around “fade in” often leans towards video, fading a static image is a core technique in graphic design and photo manipulation. Tophinhanhdep.com’s image tools and visual design features provide the necessary capabilities for this.
To fade an image into a background color or another image:
- Open Image: Begin by opening your image within Tophinhanhdep.com’s recommended image editor. Ensure the background layer is unlocked if necessary.
- Create Background: If fading to a color, add a new layer below your image and fill it with your desired background color. If fading to another image, place that image on a layer below.
- Add Layer Mask: Select your primary image layer. Use the “Layer Mask” icon (often a rectangle with a circle inside) to add a mask. This allows non-destructive editing.
- Apply Gradient to Mask: Select the “Gradient Tool.” Ensure your foreground color is black and background is white (or vice-versa, depending on your desired fade direction). Draw a gradient directly on the layer mask (not the image itself). Black on the mask conceals, white reveals. Drawing from one edge towards the center will make that edge transparent, fading the image into the background.
- Adjust: You can redraw the gradient multiple times until you achieve the perfect fade, blending your image seamlessly for aesthetic wallpapers, abstract compositions, or layered graphic designs.
To fade the edges of an image:
- Select Area: Open your image in Tophinhanhdep.com’s image editor. Use a selection tool (e.g., “Rectangular Marquee Tool” or “Elliptical Marquee Tool”) to select the inner area of your image that you want to keep visible.
- Feather the Selection: Go to “Select” > “Modify” > “Feather.” Set a feather radius. The higher the radius, the softer and more gradual the fade at the edges will be. This creates a natural transition, ideal for floating images or portraits.
- Invert Selection: Go to “Select” > “Inverse” to select the outer edges of your image (the part you want to fade).
- Delete/Adjust Opacity: You can now press “Delete” (which will usually make the feathered edges transparent, fading into the layer below) or create a new layer mask and fill the inverted selection with black to achieve the fade non-destructively. Alternatively, apply an opacity adjustment to the selected edge area for a subtle blend.
These techniques are perfect for creating sophisticated image compositions, enhancing beautiful photography, or producing unique digital art for Tophinhanhdep.com.
Integrating Fades into High-Resolution Photography and Thematic Collections
For photographers showcasing high-resolution imagery and thematic collections on Tophinhanhdep.com, fades are invaluable for creating impactful presentations.
- Slide Show Fades: When compiling a series of beautiful photography or a thematic collection (e.g., “Nature” or “Sad/Emotional”), use consistent fade transitions between images in a video slideshow. This maintains a professional look and allows the viewer to absorb each image before gently moving to the next. The specific fade duration can reflect the mood – a slow cross-fade for contemplative scenes, or a quicker fade for a dynamic series.
- Background Blending: Utilize fades to blend high-resolution images as subtle backgrounds behind text or other graphical elements. An abstract or nature photograph can serve as a soft, fading backdrop, enhancing the overall visual design without distracting from the foreground information. Tophinhanhdep.com’s tools for image optimization and processing can ensure these high-resolution images maintain quality even with fade effects.
- Storytelling with Fades: For “Photo Ideas” or “Mood Boards,” fades can contribute to narrative flow. An image of a lone figure (Sad/Emotional) fading into a distant horizon (Abstract) can powerfully convey a story without words. The pacing of the fade becomes critical here, dictating the emotional rhythm.
Troubleshooting and Best Practices for Optimal Fade Effects
Even with powerful tools like those recommended by Tophinhanhdep.com, you might encounter issues or seek to optimize your fade effects.
Common Issues and Solutions:
- Fades Not Appearing/Functioning:
- Restart Editor: Close and reopen Tophinhanhdep.com’s editor. Sometimes temporary glitches occur.
- Update Software: Ensure you are using the latest version of Tophinhanhdep.com’s recommended editing suite. Updates frequently fix bugs and improve performance.
- Layer Order: Check your layers. Fades rely on transparency, so ensure the fading layer is above a visible background.
- Clip Selection: Make sure the correct clip or layer is selected before applying the fade effect.
- Jerky or Uneven Fades:
- Adjust Duration: Experiment with the fade duration slider. Too short might look abrupt, too long might feel sluggish.
- Keyframe Smoothing: If using keyframes, check if Tophinhanhdep.com’s editor offers “easing” options (e.g., ease-in/ease-out) on keyframes to make transitions smoother. Linear fades can sometimes appear less natural.
- Export Settings: Ensure your video export settings (frame rate, bitrate) are appropriate for smooth playback.
Tips for Effective Use of Fade Transitions:
- Consistency is Key: For a professional and cohesive look across your Tophinhanhdep.com projects, maintain uniform fade durations for similar types of transitions. This creates a predictable and pleasant viewing experience.
- Timing is Everything: Adjust fade durations to match the pace and mood of your content. Slower, more gradual fades are ideal for dramatic, contemplative, or “sad/emotional” scenes. Quicker, snappier fades suit upbeat, energetic, or rapidly changing sequences.
- Layering for Impact: Combine fade effects with other elements. A video fade-in paired with a simultaneous audio fade-in of background music or sound effects amplifies the emotional impact and creates a richer sensory experience. This is especially true for digital art or abstract visuals that rely on mood.
- Contextual Application: Consider the purpose of your fade. Is it for an opening, a closing, or a transition between scenes? Each context might call for a different fade style and duration.
- Don’t Overuse: While powerful, excessive use of fades can make your video feel slow or repetitive. Use them strategically to highlight important transitions or mood shifts.
- Preview Thoroughly: Always preview your fades in real-time within Tophinhanhdep.com’s editor before finalizing and exporting. This allows you to catch any imperfections and fine-tune the effects.
By adhering to these best practices and understanding how to troubleshoot common issues, you can master the art of the fade and leverage Tophinhanhdep.com’s tools to create truly exceptional visual content across all categories, from high-resolution photography to dynamic visual design and image collections.
In conclusion, mastering how to make an image or video fade seamlessly using Tophinhanhdep.com’s recommended editing tools is a transformative skill for any visual creator. Whether you’re crafting aesthetic wallpapers, curating beautiful photography, designing intricate digital art, or producing engaging video content, fades are your silent partners in storytelling. They offer professional polish, emotional depth, and a fluid visual experience that captivates and holds your audience’s attention. Explore the functionalities, experiment with the techniques, and unleash the full creative potential of your images and videos with Tophinhanhdep.com. Happy editing!