How to Make an Image Higher Resolution

In today’s visually-driven world, the clarity and quality of images are paramount. Whether you’re curating stunning wallpapers, designing captivating backgrounds, or showcasing breathtaking photography, a high-resolution image makes all the difference. Low-resolution images, characterized by blurriness or pixelation, can detract significantly from the aesthetic appeal and professional perception of your content. For creators and enthusiasts utilizing platforms like Tophinhanhdep.com, ensuring your images are crisp, detailed, and ready for any display — from mobile screens to large prints — is crucial.
The good news is that transforming a low-resolution image into a higher-resolution masterpiece is more accessible than ever. Thanks to advancements in software, artificial intelligence, and mobile applications, you no longer need to be a digital wizard to enhance your visuals. This comprehensive guide will delve into the fundamental concepts of image resolution, explore a diverse array of tools and techniques for upscaling, and provide practical, step-by-step instructions to elevate your image library. Prepare to unlock the full potential of your images, ensuring they always look their best on Tophinhanhdep.com and beyond.
The Core Concepts of Image Resolution

Before diving into the “how-to,” it’s essential to understand what image resolution truly means and why it’s so critical for achieving top-tier visuals.
Pixels, PPI, and the Illusion of Detail
At its heart, a digital image is a mosaic of tiny squares called pixels. Each pixel holds a specific color, and when arranged together, they form the complete picture. The resolution of an image refers to the total number of pixels it contains, typically expressed as width x height (e.g., 1920x1080 pixels). The more pixels an image has, the more detailed information it can hold.
However, resolution isn’t just about the sheer number of pixels; it’s also about their density. This is where PPI (Pixels Per Inch) comes into play for digital images and DPI (Dots Per Inch) for printed images.
- PPI (Pixels Per Inch): This metric tells you how many pixels are packed into a single inch of a digital image. A higher PPI means pixels are closer together, resulting in a smoother, more detailed image. While screen displays typically render images at around 72 PPI, the actual resolution (pixel dimensions) is what determines how good an image looks on various screens.
- DPI (Dots Per Inch): This is the printing equivalent of PPI, indicating how many ink dots a printer lays down per inch. For high-quality prints, a standard of 300 DPI is generally recommended to ensure sharp, continuous tones without visible individual dots.
It’s important to grasp that merely increasing an image’s size doesn’t automatically make it “sharper.” When you enlarge a low-resolution image without proper techniques, you’re essentially just making the existing pixels bigger, which often leads to pixelation and a noticeable loss of clarity. This is the common pitfall of “bigger doesn’t mean sharper.” Advanced upscaling methods, especially those leveraging AI, aim to intelligently add new pixel information to create the illusion of genuine detail rather than simply stretching existing data.
Why High Resolution Matters for Your Visuals
For anyone engaged with visual content, particularly on a platform like Tophinhanhdep.com, high resolution isn’t just a technical specification—it’s a gateway to impactful visual experiences.
- Stunning Wallpapers and Backgrounds: High-resolution images ensure that wallpapers and backgrounds appear crisp and vibrant on any screen size, from a compact smartphone to a sprawling desktop monitor. Users expect immersive aesthetics, and pixelated images fall short.
- Professional Photography and Digital Art: Whether showcasing beautiful photography, intricate digital art, or abstract compositions, high resolution preserves the artist’s intent. Every subtle detail, color gradient, and texture comes through, allowing viewers to appreciate the true essence of the work.
- Versatility in Visual Design: For graphic design, photo manipulation, and various creative projects, high-resolution images offer flexibility. Designers can crop, resize, and integrate these images into diverse layouts without compromising quality, making them ideal for developing creative ideas and mood boards.
- Ready for Print and Beyond: If you ever decide to print your images – perhaps a nature landscape or an aesthetic abstract piece – starting with or achieving high resolution is non-negotiable. It prevents the unsightly blockiness that occurs when low-resolution images are scaled up for physical output. For stock photos, high resolution is a baseline requirement.
- Enhancing User Experience: Ultimately, high-quality, high-resolution images contribute to a superior user experience. They are more engaging, memorable, and convey a sense of professionalism that resonates with an audience seeking premium visual content.
Desktop Powerhouses for Image Upscaling
When it comes to serious image resolution enhancement, desktop software offers unparalleled control and a robust feature set. These tools are ideal for photographers, graphic designers, and anyone working with high-resolution images for professional or advanced creative projects.
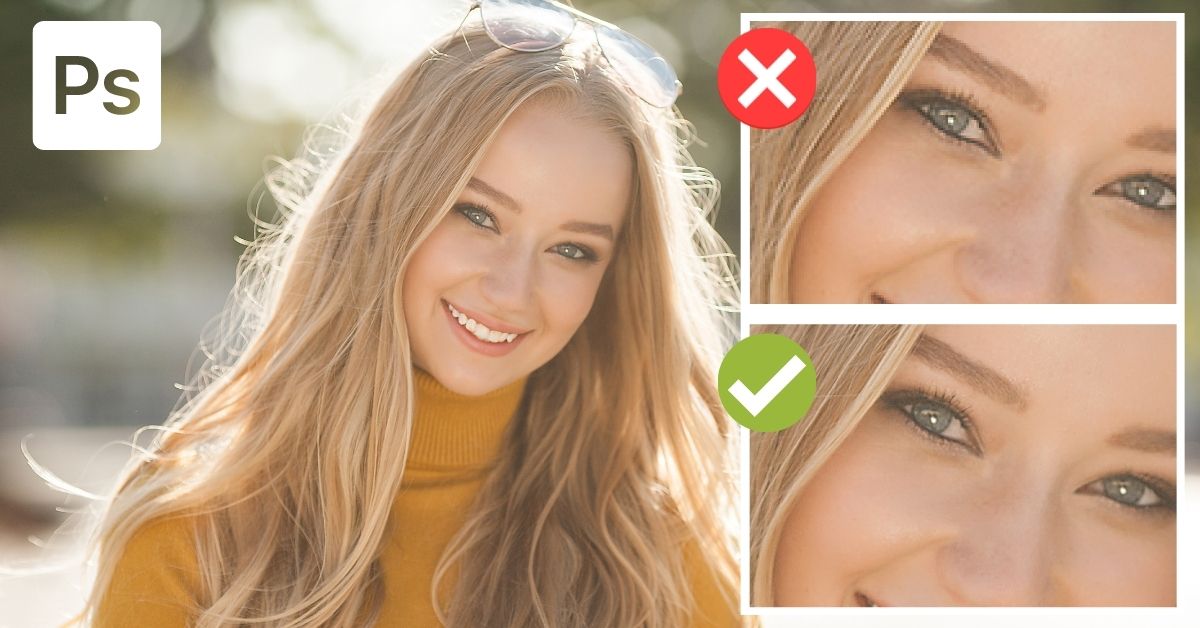
Adobe Photoshop: Precision and Control
Adobe Photoshop stands as the undisputed industry standard for image manipulation, and its capabilities for increasing image resolution are comprehensive. While it’s a powerful tool, its resampling features are surprisingly intuitive.
Here’s a step-by-step guide to increasing image resolution in Photoshop:
- Open Your Image: Launch Photoshop and open the image you wish to enhance by going to
File > Open. - Enable Preserve Details 2.0 (Optional but Recommended): For optimal results, especially with significant upscaling, ensure this feature is enabled. Go to
Edit > Preferences > Technology Previews(on Mac,Photoshop > Preferences > Technology Previews) and check “Enable Preserve Details 2.0 Upscale.” Click OK. - Access Image Size: Go to
Image > Image Size(or use the shortcutAlt + Control + Ion Windows,Option + Command + Ion Mac). - Configure Settings: In the Image Size dialog box:
- Dimensions: Ensure the units are set to “Pixels.”
- Lock Aspect Ratio: Click the chain icon between Width and Height to lock them together. This prevents distortion when you change values.
- Resample: Make sure the “Resample” checkbox is ticked. This tells Photoshop to add or remove pixels when resizing.
- Interpolation Method: From the dropdown menu next to “Resample,” choose
Preserve Details 2.0(if enabled in preferences) orBicubic Smoother (enlargement). These algorithms are designed to create new pixels while minimizing artifacts.
- Increase Resolution/Dimensions:
- Resolution (PPI): For print-ready images, change the “Resolution” value to
300pixels/inch. For web use, 72 or 150 PPI is often sufficient, but the critical factor is the pixel dimensions. - Width/Height: Alternatively, or in conjunction, you can directly increase the “Width” or “Height” pixel dimensions. Since the aspect ratio is locked, the other dimension will adjust proportionally.
- Resolution (PPI): For print-ready images, change the “Resolution” value to
- Reduce Noise (If Available): If your image has visible noise, especially after upscaling, use the “Reduce Noise” slider (if available with your chosen interpolation method, particularly Preserve Details 2.0) to fine-tune the result. Use sparingly to avoid over-smoothing.
- Apply Changes: Click “OK” to apply the new resolution and close the Image Size panel.
- Optional Sharpening with High Pass Filter: Even with resampling, images can benefit from a final sharpening touch.
- Duplicate your image layer (
Control + JorCommand + J). - Go to
Filter > Other > High Pass. Adjust theRadiusuntil edges are visible but not overly prominent (usually 1-3 pixels for subtle enhancement). Click OK. - In the Layers panel, change the blending mode of the duplicated layer to
Overlay. This will enhance details without introducing harshness.
- Duplicate your image layer (
- Save/Export: Go to
File > Export > Export AsorFile > Save As. Choose your desired format (e.g., JPEG for web, TIFF for print) and adjust quality settings (e.g., move JPEG quality slider to maximum for best results).
While Photoshop is incredibly powerful, remember that it cannot magically invent detail that wasn’t there initially. The quality of the original image remains a significant factor in the final outcome.
GIMP and macOS Preview: Accessible Desktop Options
Not everyone has access to Photoshop, but there are excellent free and built-in options for desktop users to increase image resolution. These tools are perfect for users on Tophinhanhdep.com who need reliable photo editing without a subscription.
GIMP: The Open-Source Powerhouse
GIMP (GNU Image Manipulation Program) is a free, open-source alternative to Photoshop, available for Windows, macOS, and Linux. It offers a broad range of features, including robust image resizing capabilities.
Here’s a streamlined approach using GIMP:
- Open GIMP: Launch the application and open your image (
File > Open). - Access Scale Image Dialog: Go to
Image > Scale Image. - Adjust Dimensions and Resolution:
- Lock Aspect Ratio: Click the chain icon between “Width” and “Height” to ensure proportional scaling.
- Enter New Dimensions: Type your desired width or height in pixels. The linked dimension will adjust automatically.
- Adjust Resolution: Set your desired X and Y resolution (e.g.,
300pixels/inch for print). - Interpolation: Under “Quality,” for the “Interpolation” method, choose
Cubic (Lanczos3)orNoHalofor good results in upscaling.
- Scale: Click the “Scale” button to apply the changes.
- Export: When satisfied,
File > Export As. Choose your format (e.g., PNG, JPEG), name your file, and set the compression level (move the slider to0for best quality if exporting as JPEG).
GIMP’s versatility makes it a strong choice for users looking to create or modify images for Tophinhanhdep.com without financial investment.
macOS Preview: Quick Edits for Mac Users
For Mac users, the built-in Preview application offers a surprisingly handy and straightforward way to adjust image dimensions and resolution. It’s perfect for quick fixes without needing to download external software.
- Open Image in Preview: Locate your image file, right-click (or Control-click) it, and select
Open With > Preview. - Access Adjust Size Tool: From the menu bar, go to
Tools > Adjust Size. Alternatively, click theMarkup Toolbaricon (a pen in a circle) and then theAdjust Sizeicon (three nested boxes). - Set Dimensions and Resolution:
- Lock Aspect Ratio: Ensure the padlock icon is closed (locked) next to Width and Height.
- Resample Image: Make sure the “Resample Image” checkbox is selected.
- Adjust Width/Height: Enter your desired width or height in pixels or choose a percentage. The other dimension will update proportionally.
- Resolution: You can also adjust the
Resolution(e.g., to 300 pixels/inch) if your goal is for print.
- Apply and Save: Click “OK” to resize the image. Then,
File > Saveto overwrite the original orFile > Exportto save it as a new file, choosing your preferred format and quality.
Preview is an excellent option for basic upscaling before uploading images to Tophinhanhdep.com, particularly for wallpapers or simple backgrounds.
The Revolution of AI and Online Resolution Enhancement
Traditional image scaling often involves complex algorithms that essentially “guess” how new pixels should be added. While effective to a degree, this can lead to a loss of natural detail. This is where Artificial Intelligence (AI) has revolutionized image upscaling, alongside the convenience of online tools.
AI Upscalers: Smarter Than Simple Stretching
AI upscalers leverage machine learning models trained on vast datasets of images. Instead of merely interpolating pixels, they analyze patterns, textures, and structures within an image to intelligently synthesize new details, making the enlarged image look far more natural and sharp. These tools are game-changers for improving existing photography, aesthetic backgrounds, or even digital art that started at a lower resolution.
Topaz Gigapixel AI
Topaz Gigapixel AI is a leading dedicated AI image upscaling software that can enlarge images by up to 600% (or even more with custom settings) without significant quality degradation. It’s a powerful tool for professional photographers and designers who demand the highest quality for high-resolution photography.
- Download and Open: Obtain a copy of Gigapixel AI (a free trial is often available) and open your image by dragging and dropping it into the interface or using the “Open” button. Note: It primarily supports
.png,.tiff, and.jpeg(RAW files need conversion first). - Select Upscaling Factor: In the right-hand panel, choose your desired scaling factor (e.g., 2x, 4x, 6x, or a custom percentage). You can scale by width, height, or a general scale factor.
- Apply AI Enhancements: Gigapixel AI uses sophisticated algorithms. You can typically choose “Auto” for general corrections or “Manual” to fine-tune settings like “Suppress Noise,” “Remove Blur,” and “Face Refinement.” The “Face Refinement” feature is particularly effective for portraits, preserving detail in faces even at high magnifications.
- Preview and Compare: The software provides a real-time split-screen preview, allowing you to compare the original image with the upscaled version.
- Save & Export: Once satisfied, click “Save.” Choose your desired output format, filename, save directory, and color profile. For best results, avoid excessive compression during export.
Topaz Gigapixel AI is an invaluable asset for Tophinhanhdep.com users who need truly high-resolution images for large prints or pristine digital displays.
Wondershare Fotophire Maximizer
Part of the Fotophire Toolkit, Wondershare Fotophire Maximizer offers another robust desktop solution for AI-powered image enlargement, claiming to zoom pictures up to 1000% without pixelation or blur.
- Open Fotophire Maximizer: After installation, launch the program and select “Photo Maximizer.”
- Import Image: Click “Open” or drag and drop your image into the workspace.
- Adjust Settings: Use the “Maximizer” panel to adjust image size by width, height, megapixels, or resolution. The software’s algorithms work to maintain quality during enlargement.
- Real-Time Preview: Monitor the changes in real time.
- Save: Once you’re happy with the enhanced resolution, save your image.
This tool is a strong contender for Tophinhanhdep.com users focusing on creating detailed aesthetic wallpapers and backgrounds.
Instant Boosts with Online Tools
For quick, hassle-free resolution increases without software installation, online AI upscalers are an excellent choice. They are particularly useful for one-off tasks or when you’re on a device without your usual editing software.
Let’s Enhance
Let’s Enhance is an AI-powered online image upscaler that goes beyond simple resizing. It can fix pixelation, remove blur, correct colors and lighting, and eliminate JPEG artifacts.
- Visit Website & Upload: Go to the Let’s Enhance website. You can drag and drop your image directly or click the upload button.
- Create Account: You’ll need to create a free account to use the service, which typically grants you a certain number of free images (e.g., 10 images) to process.
- Select Options: Once uploaded, choose your desired upscaling factor (e.g., 2x, 4x, 8x) and select enhancement types (e.g., Photo, Digital Art, Smart Enhance).
- Process and Download: The AI will process your image. Once complete, you can preview the result and download your higher-resolution file.
Let’s Enhance is perfect for Tophinhanhdep.com users looking for quick fixes for images in their thematic collections or for improving photo ideas for mood boards.
Wondershare PixCut
Wondershare PixCut is another convenient online tool, primarily known for background removal, but it also offers a free online image upscaler for one-click resolution enhancement.
- Navigate to Tool: Go to the PixCut website, select “Tools,” and click on “Enlarge Image.”
- Upload Picture: Upload the image you want to make higher resolution.
- Automatic Enlargement: PixCut automatically processes and enlarges the image using its algorithms.
- Download: Once the process is finished, simply download the resulting higher-resolution image.
PixCut provides a simple and fast solution for Tophinhanhdep.com users needing to quickly boost image quality for web display or social media sharing.
Enhancing Resolution on Your Mobile Devices
The convenience of mobile devices means a lot of content creation and consumption happens on the go. Fortunately, there are excellent applications that allow you to increase image resolution directly from your smartphone, catering to the needs of photographers and visual artists who primarily work with their mobile cameras.
iOS and Android Applications
Mobile apps simplify the process, offering intuitive interfaces designed for touchscreens. They are ideal for quick edits before uploading to Tophinhanhdep.com or sharing on social media.
Image Size for iPhone (iOS)
Image Size is a popular free app for iOS that provides straightforward image resizing capabilities.
- Install and Open: Download “Image Size” from the App Store and open it. Grant access to your Photos app when prompted.
- Select Image: Tap the white box (image picker) and choose the photo you want to resize from your library.
- Lock Aspect Ratio: Tap the chain icon to lock the Width and Height values, ensuring proportional scaling.
- Set New Dimensions: Enter your desired
Widthvalue (e.g., to increase pixels). TheHeightwill adjust automatically. Tap “Done.” - Check Output Quality: Tap the gear icon for additional options. Ensure the “Output Quality” slider is set to 100 percent to maintain maximum fidelity.
- Print Correction (Optional): If planning to print, you can use the
+ (Plus)icon to increase the “Print size correction factor” to smooth out potential pixelation. - Save: Tap the save arrow icon to save your new, higher-resolution image to your device.
This app is fantastic for iOS users managing their collection of beautiful photography or aesthetic backgrounds directly from their phones for Tophinhanhdep.com.
Android Apps: Photo & Picture Resizer and More
Android users also have a wealth of options available, ranging from dedicated resizers to more comprehensive photo editors. Popular choices mentioned include Photoshop Express, Picsart AI Photo Editor, and Photo & Picture Resizer.
Let’s focus on Photo & Picture Resizer as a representative example, based on its ease of use for resolution enhancement:
- Install and Open: Download “Photo & Picture Resizer” from the Google Play Store and launch the app.
- Choose Photos: Select the image you wish to resize from your Android device.
- Select Output Dimension: You can choose from a list of preset dimensions or select “Custom” to manually enter your desired
WidthandHeightvalues. - Automatic Resolution Adjustment: The app will automatically process the image, increasing its resolution according to the new dimensions you’ve set.
- Save: The resized photo is typically saved automatically to a separate folder within your phone’s internal memory.
These mobile tools empower Tophinhanhdep.com users to prepare high-quality images directly from their devices, making it easier to contribute to thematic collections, update wallpapers, or share new photo ideas instantly.
Best Practices for Superior Image Quality and Beyond
While increasing resolution is a powerful technique, it’s part of a broader strategy for achieving and maintaining excellent image quality. To truly elevate your visual content for Tophinhanhdep.com and any other platform, consider these best practices.
- Start with the Best Possible Source: The most effective way to obtain high-resolution images is to capture them that way in the first place. Invest in digital photography techniques that ensure optimal focus, exposure, and composition. A well-captured image provides abundant data, making any subsequent upscaling efforts more successful. For stock photos, always seek out the highest native resolution available.
- Judicious Use of Sharpening Tools: Most image editing software (like Photoshop and GIMP) includes sharpening features. While useful, over-sharpening can introduce artifacts and an unnatural look. Use these tools sparingly, focusing on areas that genuinely need a boost in detail, rather than applying a blanket sharpen to the entire image.
- Understand File Formats and Compression: The choice of file format significantly impacts image quality and resolution maintenance.
- JPEG: Ideal for web, but uses lossy compression. Save JPEGs at the highest quality setting to minimize data loss. Repeated saving can degrade quality.
- PNG: Excellent for web graphics with transparency; uses lossless compression, preserving detail.
- TIFF/RAW: Best for archival, print, and professional editing as they use lossless compression or retain all original sensor data. Always save your master files in a lossless format.
- Optimize for Specific Use Cases:
- For Web: While high resolution is good, excessively large file sizes can slow down website loading. Use image optimizers (often integrated into image tools) to strike a balance between quality and file size for wallpapers, backgrounds, and web galleries.
- For Print: Always aim for 300 PPI/DPI. Communicate with your print service provider about their specific resolution requirements.
- Efficient Storage and Management: High-resolution images inherently mean larger file sizes. As your collection of beautiful photography, digital art, and thematic images grows, implement robust storage solutions. Cloud storage, external hard drives, and well-organized folders are essential for managing your visual assets effectively.
Conclusion
The journey to making an image higher resolution is diverse, offering a spectrum of tools and techniques to suit every need and skill level. From the granular control of professional desktop software like Adobe Photoshop and GIMP to the intelligent processing of AI upscalers like Topaz Gigapixel AI and Let’s Enhance, and the convenience of mobile apps, achieving stunning visual clarity is more accessible than ever before. Online platforms like Wondershare PixCut further democratize this process, offering quick solutions with just a few clicks.
For Tophinhanhdep.com, where the visual experience is paramount, mastering these techniques empowers you to curate, create, and share images that truly stand out. Remember that while tools can work wonders, starting with the best possible original image is always the foundation of superior quality. By understanding the principles of resolution, choosing the right tools for your specific task, and following best practices for image optimization, you can elevate your wallpapers, backgrounds, photography, and digital art to new heights. Experiment with these methods, unlock the hidden potential in your image library, and continue to inspire with breathtaking visuals.