Mastering Image Resolution: How to Transform Low-Quality Photos into Stunning High-Res Visuals

In an era dominated by visual content, the quality of an image can dramatically impact its effectiveness, whether it’s for professional use, personal enjoyment, or captivating an audience. From vibrant wallpapers and aesthetic backgrounds to showcasing intricate product details or creating breathtaking digital art, high-resolution images are paramount. Yet, we often encounter scenarios where an otherwise perfect capture is marred by low resolution, appearing pixelated, blurry, or simply inadequate for its intended purpose. The good news is that advancements in digital photography and artificial intelligence have opened up remarkable possibilities for transforming low-resolution images into high-resolution masterpieces. Tophinhanhdep.com, a leading resource for images, photography, and visual design tools, is here to guide you through the process, offering insights into both traditional software techniques and cutting-edge AI solutions.
This comprehensive guide will delve into the intricacies of image resolution, explore why quality matters across various applications, and provide actionable steps to elevate your images. We’ll discuss the foundational concepts, compare different upscaling methodologies, walk through detailed tutorials using popular editing software, and highlight the power of AI-driven tools that Tophinhanhdep.com frequently features. Whether you’re a photographer aiming for pristine prints, a graphic designer needing sharp visuals, or simply someone looking to enhance a cherished memory, understanding how to convert low-resolution images to high-resolution is an invaluable skill in your digital toolkit.
Understanding Image Resolution: The Foundation of Visual Quality
Before embarking on the journey of upscaling, it’s crucial to grasp what “resolution” truly signifies in the context of digital imagery. Far more than just a number, resolution is the bedrock upon which all visual quality is built, directly influencing how crisp, detailed, and impactful an image appears.
Pixels, PPI, and DPI: Decoding the Technical Jargon
Every digital image is fundamentally composed of tiny, colored squares known as pixels. These pixels, when viewed collectively, form the intricate details and colors we perceive. The resolution of an image refers to the total number of pixels it contains, typically expressed as width by height (e.g., 1920x1080 pixels). A higher pixel count generally translates to more detail and a smoother appearance.

Beyond raw pixel dimensions, two other critical metrics define image resolution:
- Pixels Per Inch (PPI): This metric is primarily relevant for digital screens and displays. PPI indicates the density of pixels within a given inch of an image. For instance, an image displayed at 72 PPI means there are 72 pixels packed into every linear inch. A higher PPI value signifies a greater pixel density, resulting in a smoother, more detailed image on screen. When an image has a very low PPI, the individual pixels become noticeable, leading to a “pixelated” or “blocky” appearance, making it hard to discern fine details. Conversely, an image with 300 PPI or more will appear seamless and sharp because the pixels are too dense to be individually perceived.
- Dots Per Inch (DPI): While often used interchangeably with PPI, DPI specifically refers to print resolution. It measures the density of ink dots that a printer can place within a linear inch of paper. Similar to PPI, a higher DPI (typically 300 DPI for high-quality prints) means more ink dots per inch, leading to a sharper, more vibrant, and professional-looking printed image. Low DPI values will result in blurry, jagged, or muddy prints, as the printer has fewer dots to recreate the image details.
Understanding the distinction and interplay between pixels, PPI, and DPI is fundamental. A low-resolution image, by definition, lacks sufficient pixel data, meaning it has a low pixel count and/or low PPI/DPI, making it unsuitable for enlargement or high-quality reproduction.
Why High Resolution Matters in Today’s Digital World
In the diverse landscape of Tophinhanhdep.com’s content, the need for high-resolution images is a recurring theme across various categories:
- Images (Wallpapers, Backgrounds, Aesthetic, Nature, Abstract, Sad/Emotional, Beautiful Photography): For visual content like wallpapers or backgrounds, a high-resolution image ensures it looks crisp and vibrant on modern high-definition screens, from smartphones to large monitors. Aesthetic and beautiful photography, particularly nature or abstract shots, relies on intricate details and smooth gradients to convey emotion and visual appeal, which can only be achieved with ample resolution. A low-res image would fail to do justice to the original artistic intent.
- Photography (High Resolution, Stock Photos, Digital Photography, Editing Styles): Professionals in digital photography and those creating stock photos absolutely require high resolution. High-res files allow for cropping, resizing, and various editing styles without compromising quality. They are the standard for client work and online marketplaces, representing quality and versatility.
- Visual Design (Graphic Design, Digital Art, Photo Manipulation, Creative Ideas): Graphic designers and digital artists frequently work with images that need to be scaled for different mediums—from small web banners to large format prints. High resolution provides the flexibility to manipulate photos, combine elements, and produce creative designs with clarity and impact. Low-res source material severely limits creative possibilities.
- Printing: As discussed, printing demands high DPI for sharp, professional results. Whether it’s a large canvas print of a beautiful landscape or merchandise design, starting with or converting to high resolution is non-negotiable for a quality output.
- Product Display: For e-commerce and product showcases, high-resolution images are critical for displaying product details clearly. Customers need to zoom in and examine textures, stitching, or fine print, which low-resolution images simply cannot support.
In essence, high resolution isn’t merely a technical specification; it’s a gateway to versatility, professionalism, and the full realization of an image’s potential across all digital and print applications.
The Science and Art of Upscaling: Traditional vs. AI Approaches
The desire to enlarge an image while maintaining or improving its quality has long been a challenge for photographers and designers. Historically, simply increasing the pixel dimensions of a low-resolution image often led to unsatisfactory results. However, modern techniques, especially those powered by artificial intelligence, have dramatically changed what’s possible.

The Limitations of Simple Resizing
Traditional image upscaling methods, such as Bilinear, Bicubic, and Nearest Neighbor interpolation, fundamentally operate by estimating the values of new pixels based on the surrounding existing pixels.
- Nearest Neighbor: This is the simplest method, essentially copying the color of the nearest existing pixel. While fast, it produces very blocky, jagged edges and is generally unsuitable for photos, though it can be useful for pixel art.
- Bilinear: This method takes a weighted average of the four nearest pixels. It results in a smoother image than Nearest Neighbor but often introduces blurriness, as it doesn’t add any new detail, merely interpolates between existing ones.
- Bicubic: A more sophisticated method, Bicubic interpolation considers a larger neighborhood of pixels (16 surrounding pixels) and uses complex polynomial equations to calculate the values of new pixels. This produces smoother tonal transitions and sharper edges than Bilinear but can still result in a somewhat soft or blurry image when significantly upscaled, as it’s still guessing rather than creating true detail.
The core limitation of all traditional interpolation methods is that they don’t “invent” or “recover” missing information. They merely spread out the existing pixel data, often leading to a larger image that is still fundamentally blurry or pixelated when viewed up close. This is why a simple resize in basic image editors usually doesn’t deliver the desired “high-resolution” quality. The data that defines true sharpness, fine textures, and subtle details simply wasn’t captured in the original low-resolution image, and traditional methods can’t magically conjure it.
The Revolution of AI Upscaling
The advent of Artificial Intelligence, particularly deep learning and neural networks, has revolutionized image upscaling. AI-powered upscaling, as often explored on Tophinhanhdep.com’s “Image Tools” section, goes far beyond simple pixel interpolation. These advanced algorithms, often referred to as “Super Resolution” models, are trained on vast datasets of both low-resolution and corresponding high-resolution images. Through this training, the AI learns to recognize patterns, textures, and structures, and then intelligently “predicts” what missing details should look like when an image is enlarged.
Key characteristics of AI upscaling include:
- Detail Reconstruction: Unlike traditional methods that only interpolate, AI can genuinely reconstruct lost details, making edges sharper, textures more pronounced, and overall clarity significantly improved. It can “fill in the gaps” with plausible, high-frequency information.
- Noise Reduction and Artifact Removal: Many AI upscalers simultaneously denoise images and remove compression artifacts, common issues found in low-quality or heavily compressed files. This results in a cleaner, smoother high-resolution output.
- Specialized Models: Some AI tools offer specialized models for different types of images (e.g., real-life photos, anime, text, architectural drawings). This allows the AI to apply its learned patterns more effectively, yielding optimal results for specific content. Google’s SR3 (Super-Resolution via Repeated Refinements) and CDM (Cascaded Diffusion Models), for example, demonstrate how diffusion models can progressively add and remove noise, using a low-resolution input as a reference to generate stunning high-resolution outputs, even from incredibly small starting images.
- Scalability: AI upscalers can often enlarge images by significant factors (e.g., 2x, 4x, 6x, 8x, or even more) while maintaining impressive quality, making them incredibly powerful for transforming tiny images into print-ready sizes.
While AI upscaling isn’t a silver bullet that can turn a completely unrecognizable image into a perfect one (the quality of the initial low-res image still sets a baseline), it represents a monumental leap in the ability to genuinely enhance image resolution and quality. Tophinhanhdep.com continually features and reviews these cutting-edge “AI Upscalers” as essential “Image Tools” for anyone serious about visual quality.
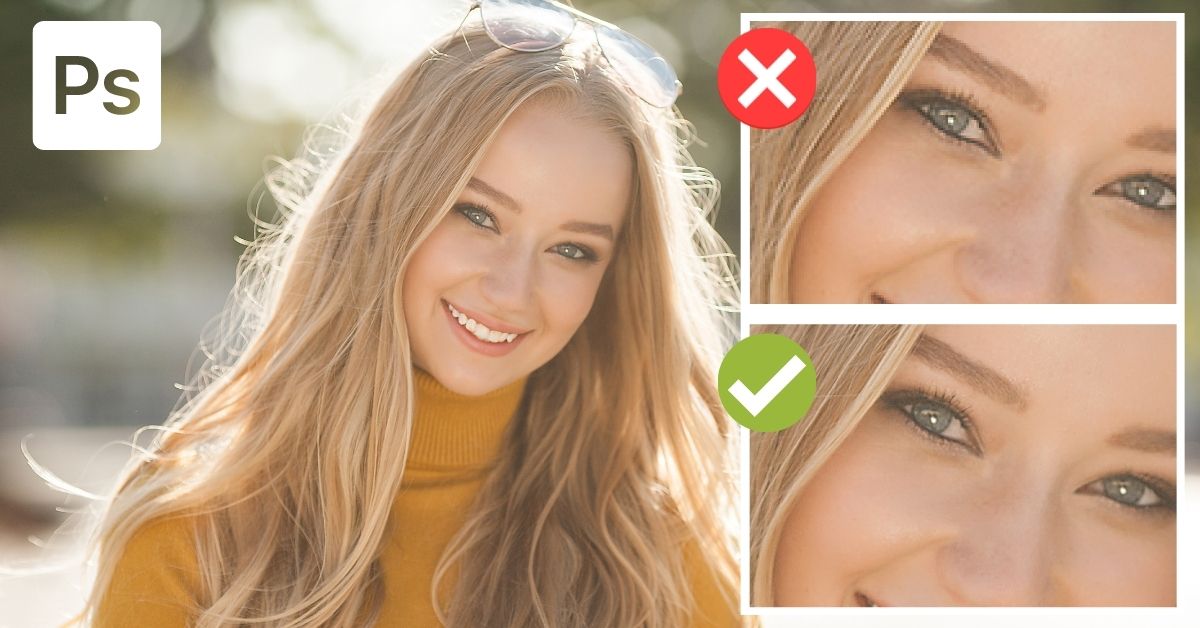
Step-by-Step Guide: Upscaling Images Using Professional Software (e.g., Photoshop)
For those who prefer a hands-on approach with granular control, professional editing software like Adobe Photoshop offers robust tools to convert low-resolution images to high-resolution. While AI upscalers automate much of the process, understanding these manual techniques provides a deeper insight into image manipulation and can be particularly effective for fine-tuning. Tophinhanhdep.com often provides tutorials for various “Editing Styles” and “Photo Manipulation” techniques within its “Visual Design” and “Photography” sections.
Here’s a detailed walkthrough for enhancing resolution in Photoshop:
Preparing Your Workspace: Essential Photoshop Settings
Before diving into the Image Size panel, a crucial preliminary step ensures Photoshop leverages its most advanced upscaling algorithms:
- Enable Preserve Details 2.0 Upscale: Go to
Edit > Preferences > Technology Previews(orPhotoshop > Preferences > Technology Previewson Mac). - Check the Box: Make sure “Enable Preserve Details 2.0 Upscale” is checked. This option utilizes a more recent and efficient algorithm (introduced in 2018) designed to retain original image details during resolution changes. Click
OKto confirm.
This setting significantly improves the outcome by instructing Photoshop to use its intelligent upscaling capabilities.
Navigating the Image Size Panel: Key Parameters for Enhancement
The Image Size panel is your central hub for adjusting resolution. Access it by going to Image > Image Size or using the shortcut Alt + Control + I (Win) or Option + Command + I (Mac).
Within this panel, pay close attention to the following settings:
- File Size and Dimensions: At the top, you’ll see the current image file size and its pixel dimensions (e.g., 1000 pixels horizontally by 667 pixels vertically). Ensure your dimensions are set to “pixels” for accurate resolution adjustment.
- Resample Option: This is critical. Make sure the “Resample” box is checked. Resampling instructs Photoshop to change the number of pixels in the image. If unchecked, changing resolution would only alter the print size without adding or removing pixels, effectively compressing or stretching existing pixels.
- Interpolation Method: Next to “Resample,” you’ll find a dropdown menu for “Interpolation” (or “Resample Method”). This tells Photoshop how to add or remove pixels. For upscaling low-resolution images to high-resolution while preserving details, the best choices are:
- Preserve Details 2.0: This is the preferred method, leveraging the advanced technology you enabled in the preferences. It attempts to maintain sharpness and detail as it enlarges the image.
- Preserve Details (enlargement): An older version, still effective but generally surpassed by 2.0.
- Bicubic Smoother (enlargement): A traditional, high-quality method that attempts to smooth pixels, making the image appear better. It’s precise but can take longer. Other bicubic options (Bicubic, Bicubic Sharper) are more suited for general resizing or reduction.
- Avoid Nearest Neighbor and Bilinear for upscaling photos, as they lead to pixelation and blur, respectively.
Refining the Details: Noise Reduction and Sharpening Techniques
After selecting “Preserve Details 2.0” and ensuring “Resample” is checked, you can proceed to increase the resolution.
- Increase Image Resolution: In the “Resolution” box (measured in PPI), enter a higher value. A common target for high-quality prints is 300 PPI. You’ll observe the image preview updating to show fewer pixelated blocks. The ideal resolution depends on your final output; 300 PPI is excellent for most prints, while 72-150 PPI might suffice for web-only images, though starting higher offers more flexibility.
- Reduce Noise: The “Reduce Noise” slider in the Image Size panel helps mitigate the digital noise that can become more apparent when an image is enlarged. Start with a low value (e.g., 4-10%) and adjust based on how much noise is present in your image and how much reduction it needs without losing too much detail.
- Apply the High Pass Filter (Optional but Recommended): After clicking
OKin the Image Size panel and applying the resolution changes, you’ll notice an improvement, but further sharpening can make a significant difference. This technique, a favorite for many photo manipulation experts featured on Tophinhanhdep.com, subtly brings out details:- Duplicate Layer: Duplicate your image layer (
Control + Jon Windows,Command + Jon Mac). Work on the duplicated layer to preserve the original. - Apply High Pass: With the duplicated layer selected, go to
Filter > Other > High Pass. - Adjust Radius: In the High Pass dialog, increase the
Radiusvalue until you see only the edges and details of your image highlighted against a gray background. Be careful not to overdo it, as too high a radius can create halos or an artificial look. Start with a small radius (e.g., 1-3 pixels) and adjust until the desired level of detail is visible. ClickOK. - Change Blending Mode: Go to the
Layerspanel and change the Blending Mode of the High Pass layer toOverlay(or Soft Light, Hard Light, Linear Light, Vivid Light, depending on desired intensity). This blends the sharpened edges back into the image, giving it a much crisper appearance without affecting colors or tones too dramatically. You can further adjust the opacity of this layer to fine-tune the sharpening effect.
- Duplicate Layer: Duplicate your image layer (
By following these steps, you can significantly enhance the resolution and sharpness of your images in Photoshop, making them suitable for larger prints, digital displays, and complex graphic design projects. While these methods are powerful, remember that they still operate within the constraints of the original data; a truly professional camera’s high-megapixel capture will always retain more original data than an upscaled image.
Leveraging AI-Powered Tools for Effortless High-Resolution Conversion
While Photoshop offers robust manual control, the rise of AI-powered “Image Tools” has democratized high-resolution conversion, making it accessible even to those without advanced editing skills. Tophinhanhdep.com often showcases a curated selection of these “AI Upscalers” for their efficiency and impressive results. These tools streamline the process, often requiring just a few clicks to achieve remarkable transformations.
Tophinhanhdep.com’s Recommended AI Upscalers: A Comparison
The market is rich with AI image upscalers, each offering unique features, pricing models, and specialties. When Tophinhanhdep.com evaluates these tools, we look for several key attributes:
- Ease of Use: Most AI upscalers are designed for simplicity, often involving a drag-and-drop interface and minimal settings. This makes them ideal for quick conversions.
- Quality of Output: The core metric is how well the AI reconstructs details, sharpens edges, and removes noise. Some excel in specific areas (e.g., facial refinement, anime art).
- Scaling Options: Tools typically offer various magnification levels (e.g., 2x, 4x, 6x, 8x), allowing users to choose the appropriate enlargement for their needs.
- Batch Processing: For users with many images to process, batch upscaling is a significant time-saver.
- Additional Features: Many tools include integrated denoising, blur removal, and artifact correction, further enhancing the overall image quality.
- Supported Formats and Size Limits: Compatibility with common formats (JPEG, PNG, TIFF) and limits on file size or dimensions can vary.
- Pricing: While some offer free tiers for limited use, most robust AI upscalers operate on a subscription or credit-based model.
Instead of listing specific external tools, Tophinhanhdep.com emphasizes the types of AI upscalers available and what to look for when choosing one from our “Image Tools” section:
- General-Purpose AI Upscalers: These are versatile tools capable of enhancing a wide range of photos, from landscapes to portraits. They intelligently fill in details and reduce pixelation, making them suitable for most users looking to improve everyday photos for wallpapers, backgrounds, or sharing. Many of these offer simple online interfaces.
- Specialized AI Upscalers: Some tools feature advanced AI models specifically trained on particular datasets, such as “real-life” images, “anime/cartoon” art, or even “text.” These specialized models achieve superior results for their intended content by understanding the unique characteristics and patterns of those image types. This is particularly useful for digital artists or those working with specific thematic collections.
- Desktop Software vs. Online Services: Tophinhanhdep.com recognizes that both have their place. Online services are convenient and often free for limited use, perfect for quick conversions. Desktop software, while requiring installation, often provides more powerful processing, batch capabilities, and offline access, making them preferred by professionals for high-resolution photography and graphic design workflows.
- AI Image Enhancers: Beyond simple upscaling, many tools now integrate AI to perform other enhancements like color correction, exposure adjustment, and dynamic range optimization, turning a low-res image not just into high-res, but also into a more aesthetically pleasing or “beautiful photography” piece.
When selecting an AI upscaler from Tophinhanhdep.com’s recommended “Image Tools,” consider your primary use case, the type of images you’re working with, your budget, and the desired level of control. The beauty of these tools lies in their ability to transform seemingly unusable low-resolution images into stunning high-resolution visuals with unprecedented ease.
Maximizing Your High-Resolution Images: Applications and Best Practices
Converting a low-resolution image to high resolution is just the beginning. The true value lies in how these enhanced visuals can be applied to enrich your projects, presentations, and personal collections. Tophinhanhdep.com’s extensive categories—from “Images” to “Visual Design” and “Image Inspiration & Collections”—all benefit immensely from high-quality source material.
The Impact of Resolution on Print and Digital Display
High-resolution images are foundational for achieving professional results across various mediums:
- Large-Scale Prints: As previously discussed, a print-ready image ideally requires 300 DPI. Upscaled images, especially those processed with AI, can now meet these demanding specifications. This means cherished low-res photos can be transformed into stunning large canvas prints for home decor, featured in photography exhibitions, or used for merchandise design without noticeable pixelation. The difference between a 72 PPI and a 300 PPI image, when printed on a 24x20-inch canvas, is stark—the higher PPI delivers crisp details and smooth transitions, while the lower PPI results in a blurry, blocky mess.
- High-Definition Digital Displays: With the proliferation of 4K, 5K, and even 8K monitors and TVs, low-resolution images can appear jarringly pixelated. High-resolution upscaling ensures that your digital wallpapers, background images, and shared photos look sharp and immersive on any screen. This is crucial for aesthetic appeal and professional presentations.
- Web and Mobile Optimization: While web images often prioritize smaller file sizes, starting with a high-resolution image allows you to meticulously downsize and optimize it for various web contexts, ensuring clarity at different screen resolutions. This is part of the broader “Image Optimizers” category Tophinhanhdep.com provides.
- Stock Photography and Digital Assets: For creators contributing to stock photo libraries or building digital asset collections, high resolution is a non-negotiable standard. It ensures versatility for buyers, allowing them to use the image across diverse projects without quality concerns, thus enhancing its commercial value.
Beyond Upscaling: Complementary Visual Design Strategies
Upscaling is a powerful technique, but it thrives when integrated into a broader visual design workflow. Tophinhanhdep.com champions a holistic approach to image quality, intertwining upscaling with other “Visual Design” and “Photography” best practices:
- Photo Manipulation and Digital Art: For graphic designers and digital artists, a high-resolution base image provides the canvas for intricate photo manipulation and creative ideas. Adding text, combining elements, applying filters, or creating complex digital art pieces are all more effective when the source image maintains its fidelity upon enlargement. The clarity offered by upscaled images allows for finer details and more sophisticated compositions.
- Creative Freedom and Inspiration: Knowing that you can confidently upscale a low-resolution image opens up a world of creative possibilities. It means you’re no longer limited by the initial quality of an image you might want to use for a mood board, a thematic collection, or trending styles. This expanded freedom directly feeds into the “Image Inspiration & Collections” aspect of Tophinhanhdep.com, allowing designers and enthusiasts to work with a wider range of visuals.
- Image Editing Styles: Post-processing, including color grading, sharpening (beyond what upscaling offers), contrast adjustments, and applying various editing styles, benefits from a high-resolution canvas. These enhancements can be applied with greater precision and yield superior results when working with rich pixel data.
In conclusion, the ability to convert low-resolution images to high resolution is a game-changer for anyone engaged with visual media. Whether you choose the meticulous control of professional software like Photoshop or the effortless power of AI upscalers recommended by Tophinhanhdep.com, the goal remains the same: to unlock the full potential of your images. By understanding the principles of resolution, embracing the capabilities of modern tools, and applying these techniques thoughtfully, you can transform ordinary, pixelated visuals into extraordinary, stunning high-resolution assets that truly stand out in any context. Happy editing, and may your images always shine with exceptional clarity!