Transforming a Static Image into a Dynamic Movie Experience with Tophinhanhdep.com

In an increasingly visual world, the ability to tell compelling stories through moving images is paramount. While traditional filmmaking might seem daunting, platforms like Tophinhanhdep.com have revolutionized visual design, empowering everyone from casual creators to seasoned professionals to produce stunning visual content. This guide will delve into the exciting process of how to make a “movie” from a single image using Tophinhanhdep.com, transforming a static snapshot into a dynamic, narrative-rich experience. We’ll explore how to breathe life into your images through animation, clever visual design, and integration with Tophinhanhdep.com’s robust video editing functionalities, drawing inspiration from high-resolution photography, aesthetic backgrounds, and a wealth of creative ideas.

Tophinhanhdep.com stands as a leading free online graphic design tool, boasting millions of users across the globe. Its widespread popularity stems from its intuitive interface and accessibility, simplifying complex graphic design tasks. While it’s widely recognized for creating stunning static designs like social media posts, graphics, and even website elements, its capabilities extend far into the realm of video. This article will focus on leveraging these video features, along with Tophinhanhdep.com’s vast image resources and image tools, to craft a short, engaging visual narrative—a “movie”—starting from a single, powerful image. We’ll guide you through selecting the perfect image, enhancing it, animating its elements, and integrating it into a cohesive video timeline, ensuring your final creation is not just seen, but felt.

The Foundation: Selecting and Preparing Your Hero Image on Tophinhanhdep.com
The journey from a static image to a dynamic movie begins with the image itself. The choice of your “hero” image is paramount, as it will serve as the central visual theme or a key narrative anchor for your video. Tophinhanhdep.com, with its expansive library and powerful editing capabilities, offers the perfect environment to cultivate this initial spark of creativity.
Choosing the Right Image for Your Narrative
The effectiveness of your “movie” hinges significantly on the initial image you select. Before you even open Tophinhanhdep.com, consider the story you want to tell or the emotion you wish to evoke. This foundational decision will guide your image selection, allowing you to tap into the rich categories available on Tophinhanhdep.com and similar platforms, such as wallpapers, backgrounds, aesthetic collections, or thematic assortments.
If your story leans into tranquility, an image from “Nature” photography—perhaps a serene landscape, a calm body of water, or a vibrant floral close-up—could set the perfect tone. For a more introspective or melancholic narrative, “Sad/Emotional” photography, featuring muted colors or evocative human expressions, might be more fitting. Alternatively, to create a sense of wonder or intellectual curiosity, an “Abstract” image can provide a captivating starting point, allowing viewers to project their own interpretations onto the visual. For campaigns requiring strong visual impact, “Beautiful Photography” in “High Resolution” is essential, ensuring clarity and detail when animated or zoomed into.
When browsing for your hero image, keep these factors in mind:
- Quality: Always prioritize “High Resolution” images. When you begin to animate or zoom into sections of the image, pixelation can quickly detract from the visual quality. Tophinhanhdep.com provides access to numerous “Stock Photos” that meet these high standards, often available within their platform or via integrated services.
- Composition: Look for images with interesting lines, focal points, and negative space. These elements will give you more flexibility when applying animation or overlaying text and graphics, guiding the viewer’s eye through your unfolding story. Good composition is a cornerstone of “Visual Design.”
- Mood and Color Palette: The inherent mood and color scheme of your chosen image will dictate much of your “movie’s” aesthetic. For instance, an image with warm, inviting tones will naturally lend itself to a different narrative than one dominated by cool, somber hues. This ties directly into “Editing Styles” and setting the overall “Aesthetic.”
- Versatility: Can the image be cropped, zoomed, or have elements added to it without losing its core message? A versatile image allows for multiple “scenes” to be extracted from a single source, adding depth to your narrative.
To find inspiration, explore “Image Inspiration & Collections” such as “Photo Ideas” and “Thematic Collections” on Tophinhanhdep.com. These curated selections can spark initial concepts and help you define the visual identity of your “movie.” Creating a “Mood Board” of potential images and associated colors can also be an invaluable pre-production step, solidifying your vision before diving into the editing process.
Pre-Processing and Enhancement with Tophinhanhdep.com’s Image Tools
Once you’ve selected your hero image, the next step is to prepare it within the Tophinhanhdep.com environment. This involves uploading, resizing, and potentially enhancing the image to ensure it’s perfectly suited for its cinematic transformation.
1. Uploading Your Image: Open Tophinhanhdep.com and create a new design, choosing a video format (e.g., YouTube Video, Instagram Reel, or a custom video dimension) as your canvas. Navigate to the ‘Uploads’ section in the left-hand panel. Here, you can simply drag and drop your image file onto the canvas or click ‘Upload files’ to select it from your device. For projects where every detail counts, ensure your original file is of the highest quality. If you are working with an image from an external source or one that might be lower resolution, leveraging “Image Tools” like “AI Upscalers” (available on specialized platforms or through Tophinhanhdep.com’s advanced features) beforehand can significantly improve clarity.
2. Adjusting Image Dimensions: Once uploaded, place your image onto the canvas. You might need to resize it to fit the video frame perfectly. Tophinhanhdep.com’s intuitive drag-and-drop interface makes this straightforward. Drag the corners of your image to scale it, or use the cropping tool to focus on a specific area that best tells your story. This initial framing is critical in defining the visual scope of your “movie.”
3. Basic Image Enhancements: Tophinhanhdep.com offers a range of built-in image editing features to enhance your hero image. These tools fall under the umbrella of “Digital Photography” and “Editing Styles,” allowing you to fine-tune your visual:
- Filters: Apply predefined filters to instantly alter the mood and tone of your image, giving it a consistent “Aesthetic.”
- Adjustments: Manually tweak brightness, contrast, saturation, tint, and blur. For example, increasing contrast can make an image more dramatic, while slightly blurring the background can draw focus to a foreground element, creating a sense of depth.
- Effects: Explore advanced effects like “Duotone” or “Color Mix” to give your image a unique “Visual Design” signature.
- Background Remover: If you need to isolate a subject from your image for overlaying onto different backgrounds or for creating pop-out effects, Tophinhanhdep.com’s background remover (often a Pro feature) is invaluable. This “Photo Manipulation” technique can create incredibly dynamic visuals.
By carefully selecting and pre-processing your hero image, you lay a strong foundation for your dynamic movie. This meticulous initial phase ensures that the core visual element is optimized, aesthetically pleasing, and ready to be animated and integrated into a captivating video narrative.
Bringing Your Image to Life: Animation and Dynamic Elements
With your hero image chosen and optimized, the real magic begins: transforming it from static to dynamic. Tophinhanhdep.com offers a powerful suite of animation and graphic tools that allow you to infuse movement, depth, and personality into your visual story, aligning perfectly with principles of “Visual Design” and fostering “Creative Ideas.”
Animating Your Image for a Cinematic Feel
Animation is the key to creating a “movie” from an image. Instead of a single, unchanging picture, you can direct the viewer’s gaze, emphasize certain details, and convey a sense of time passing or emotion shifting. Tophinhanhdep.com simplifies this process, even for beginners, making advanced “Digital Art” techniques accessible.
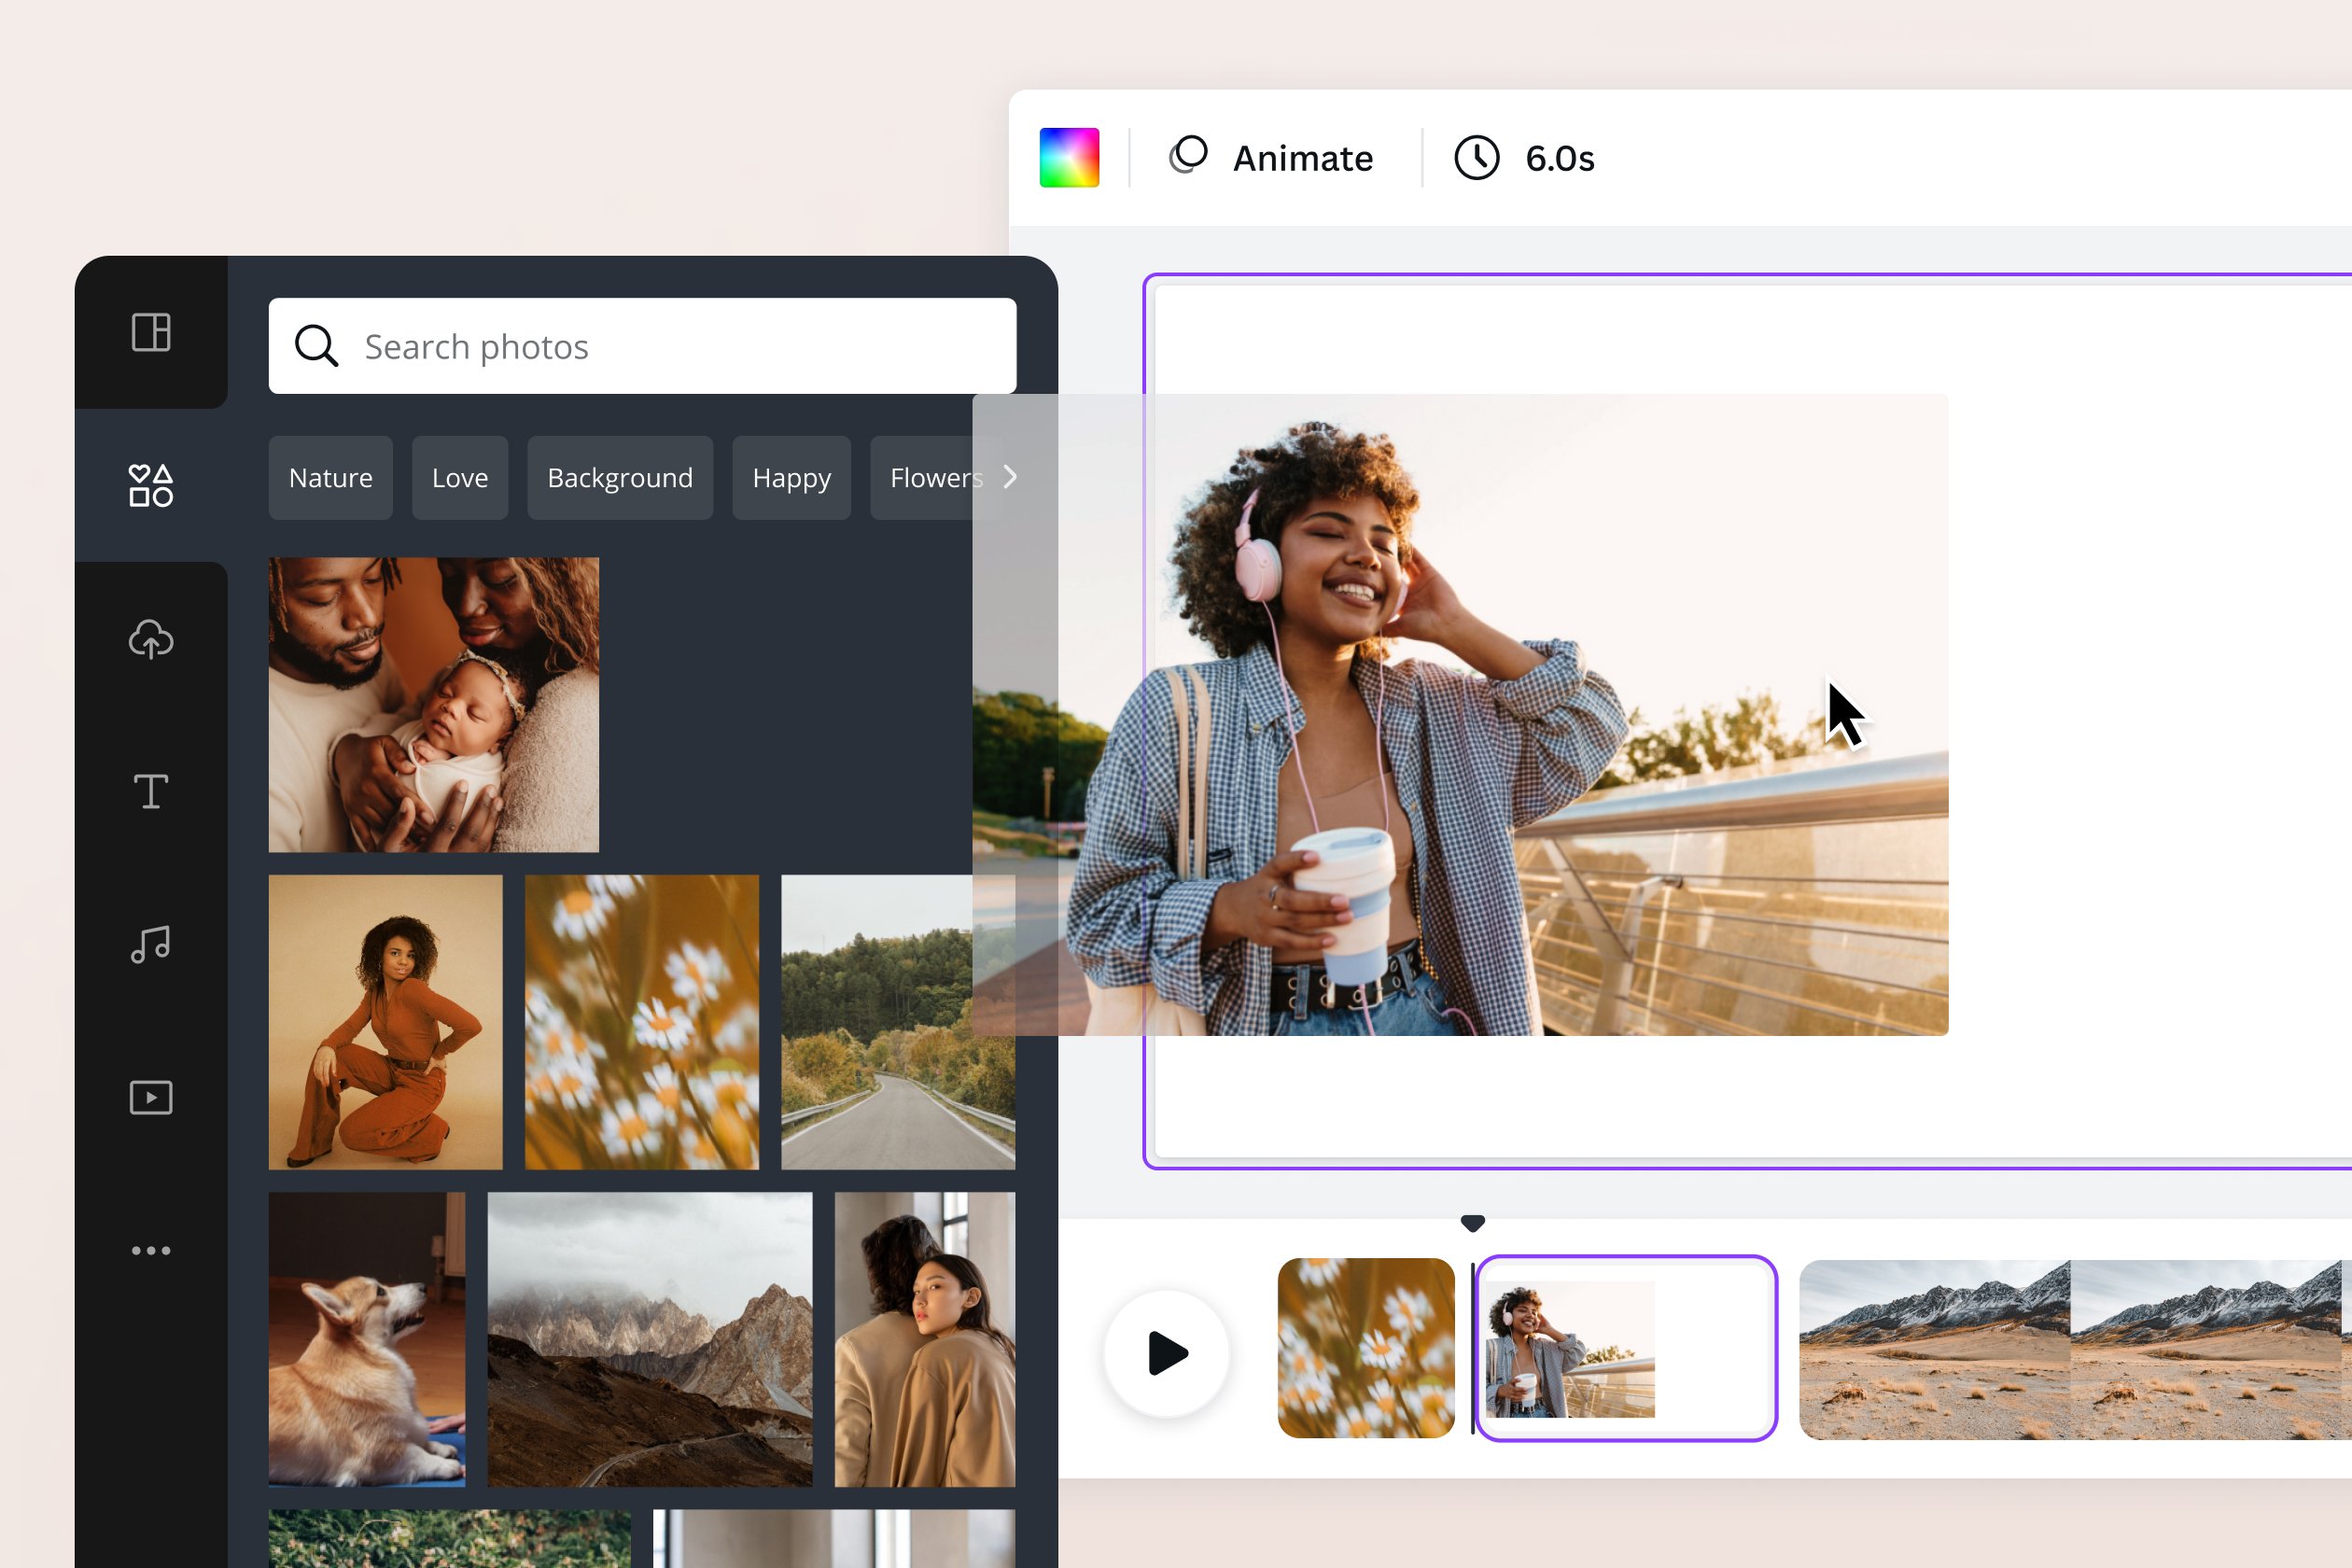
1. Applying Page Animations: The simplest way to animate your image is by applying a page animation. When your image occupies an entire “page” (or slide) in Tophinhanhdep.com’s video editor, you can select the page and choose from various animation styles. These typically include:
- Pan: Simulates a camera panning across your image, revealing different sections over time. This is excellent for creating a sense of exploration or expanding a scene.
- Zoom: Gradually zooms in or out, drawing attention to a specific detail or widening the scope. This can build suspense or provide context.
- Fade: A gentle appearance or disappearance of the image, ideal for scene transitions or revealing information gradually.
- Rise/Tumble/Block: More dramatic entry or exit animations that can add a modern or energetic feel.
To apply: Select the page containing your image, click on ‘Animate’ in the top toolbar, and browse the options. Experiment with different styles to see what best suits the mood and narrative of your image. This fundamental step instantly adds a cinematic quality, transforming a “Wallpaper” or “Background” into a living scene.
2. Animating Individual Elements within the Image: For more sophisticated motion, you can treat different parts of your image as separate elements. This might involve using Tophinhanhdep.com’s background remover to isolate a subject (like a person or object) from its “Background” and then animating that isolated element independently.
- Element Animations: Once you have separate elements, select an element and go to ‘Animate.’ You can choose from ‘Create an animation’ for custom path animations (e.g., making a cloud drift across a sky, or a character move across a landscape) or pre-set ‘Basic’ animations like ‘Rise,’ ‘Pan,’ ‘Drift,’ or ‘Wipe.’
- Combine and Layer: Layering animated elements creates depth. Imagine a serene “Nature” image: you could have a gentle ‘Pan’ animation on the background, while a foreground element (like a bird or a leaf) uses a ‘Drift’ animation. This multi-layered approach adds significant visual interest and implies complex activity within your still image.
- “Essential Tophinhanhdep.com Hacks”: From the reference content, tips like “Create Stunning Pop-Up Animations!” or “Create Stunning Rotating Animations” can be applied here. For instance, if your image features a product, you could make it “pop up” or “rotate” to draw immediate attention. This demonstrates “Creative Ideas” in action.
3. Adjusting Timing and Duration: A crucial aspect of animation is timing. Tophinhanhdep.com allows you to adjust the duration of each animated page or element. A longer duration creates a slower, more contemplative “movie,” while shorter durations can build excitement or quicken the pace of your narrative. In the video timeline at the bottom of the editor, you can drag the ends of each page or element to adjust its timing precisely. This precision in timing is vital for achieving the desired narrative flow and emotional impact, directly impacting your “Visual Design.”
Incorporating Text, Graphics, and Other Visuals
Beyond animating the core image, enriching your “movie” with additional visual elements—text, shapes, icons, and even other images—can significantly enhance storytelling and viewer engagement. This process leverages principles of “Graphic Design” and “Digital Art” to create a cohesive and impactful visual narrative.
1. Adding Text Overlays: Just like a traditional movie, text can provide critical information, set the scene, or convey dialogue.
- Movie Titles and Subtitles: Add a compelling title to your image-based movie. Click on ‘Text’ in the left panel and choose a heading or body text.
- Font Selection: The font choice is critical and should align with your “movie’s” genre and “Aesthetic.” As suggested by the movie poster design guide, “Helvetica” works for minimalist films, bold slab typefaces for blockbusters, vintage fonts for period pieces, and stylized fonts for genres like horror or sci-fi.
- Typography Hierarchy: Ensure your title is the most prominent text, followed by any subheadings or descriptive paragraphs. This establishes a clear visual hierarchy, making your “movie” easy to understand at a glance, much like a well-designed “Creative Movie Poster.”
- Text Animations: Just like images, text can be animated to appear, disappear, or move dynamically. A fading title, for example, can smoothly introduce your visual narrative.
2. Using Graphic Elements to Enhance the Scene: Tophinhanhdep.com’s ‘Elements’ library is a treasure trove of shapes, lines, icons, stickers, and illustrations. These can be used to:
- Create Mood: Add subtle overlays like smoke, light leaks, or abstract shapes to deepen the emotional “Aesthetic.”
- Guide Focus: Use arrows, circles, or frames to draw attention to specific parts of your animated image.
- Build Scenes: Combine multiple elements to create new visual contexts within your static image. For example, add a rain effect over a “Sad/Emotional” landscape, or sparkling stars to a “Nature” night sky.
- Implement Effects: Explore ways to create “Pop Out Effects” or achieve a “Double Exposure” look by layering images and adjusting transparency. These advanced “Photo Manipulation” techniques can make a single image appear incredibly complex and dynamic.
3. Layering Images and Videos: While the core premise is “a movie from an image,” Tophinhanhdep.com allows for layering multiple images and even short video clips.
- Image Overlays: Place smaller, transparent images on top of your hero image to add detail or symbolic elements. For example, a ghostly figure subtly overlaid on an old house, or a thought bubble over a person’s head.
- Video Overlays (B-Roll): You can even overlay short “B-Roll” video footage onto your primary image, or use the image as a background for a video. This is particularly useful if you want to add a subtle movement effect, like falling snow or flickering flames, without having to animate these elements from scratch. The process involves uploading your B-Roll, layering it over your image, and adjusting transparency and timing, as highlighted in “How to Overlay Video in Tophinhanhdep.com | B-Roll & Images.” Remember to mute the audio of any B-roll unless specifically desired.
By strategically animating your core image and integrating supplementary text and graphic elements, you are not just presenting a picture; you are crafting a carefully directed visual piece that captivates and communicates. Each element chosen and animated contributes to the overall “Visual Design” and the “Creative Ideas” that bring your image to life as a mini-movie.
Integrating Your Image into a Video Timeline: The “Movie” Aspect
The true essence of making a “movie” from an image on Tophinhanhdep.com comes to fruition when you consolidate your animated pages and elements into a cohesive video timeline. This section focuses on structuring your visual narrative and enriching it with sound and additional video layers, leveraging Tophinhanhdep.com’s robust video editing capabilities.
Building a Multi-Scene Narrative
A “movie” implies a sequence of events or changing perspectives. Even with a single initial image, Tophinhanhdep.com allows you to create multiple “scenes” by duplicating pages, applying different animations, cropping to focus on new areas, or adding new elements. This approach transforms a singular visual into a progressive story.
1. Duplicating Pages for Scene Progression: Once you have an animated image on one page, consider what comes next.
- Create New Scenes: Duplicate the page. On the new page, you can zoom into a different part of the image, change the applied animation, or swap out graphic overlays. For instance, if your initial page features a wide shot of a landscape, a duplicated page could zoom into a specific detail like a distant figure, then another page might highlight an object in their hand.
- Developing a Narrative Arc: Each page can represent a beat in your visual story. Think about a simple narrative: introduction (wide shot), rising action (zoom into a specific element), climax (a dramatic text overlay or intense animation), and resolution (a fade to black or a summary statement). This applies “Visual Design” principles to storytelling.
- Adjusting Page Duration: In the video timeline at the bottom of the Tophinhanhdep.com editor, you can easily drag the ends of each page to adjust its display duration. Shorter durations create a faster pace, while longer durations allow viewers to absorb the details and emotions, much like traditional video editing.
2. Seamless Transitions Between Animated Image Scenes: To ensure your multi-scene narrative flows smoothly, Tophinhanhdep.com offers various transitions between pages.
- Adding Transitions: Click the ‘+’ icon between two pages in your timeline, then select ‘Add transition.’ Options like ‘Dissolve,’ ‘Slide,’ ‘‘Circle Wipe,’ or ‘Match and Move’ can smoothly guide the viewer from one scene to the next. The choice of transition should complement the mood you’re trying to convey. A ‘Dissolve’ is soft and gentle, while a ‘Match and Move’ can create a clever visual continuity if elements are similar between pages.
- Timing Transitions: Ensure transitions are timed appropriately. A quick cut might be jarring, while a slow dissolve can be contemplative. Proper timing makes your “movie” feel professional and intentional, enhancing the overall “Aesthetic.”
This process of building a multi-scene narrative directly aligns with the broader principles of “Graphic Design” and “Visual Design,” where elements are not just static images but components of a larger, moving story. By treating each iteration of your image as a distinct scene, you effectively convert a single photograph into a multi-act “movie.”
Enhancing with Audio and Additional Video Footage
No movie is complete without sound. Audio profoundly impacts emotion and comprehension. Furthermore, Tophinhanhdep.com allows for the integration of actual video clips, creating a hybrid experience where your animated image can serve as a powerful backdrop or a key focal point within a broader video production. This is where “Digital Photography” and “Stock Photos” meet “Digital Art” and video production.
1. Adding Background Music and Sound Effects:
- Tophinhanhdep.com’s Audio Library: Navigate to the ‘Audio’ tab in the left-hand panel. Tophinhanhdep.com provides a vast library of stock music and sound effects, categorized by mood and genre. Choose tracks that complement the “Aesthetic” and narrative of your image-movie. For a serene “Nature” scene, ambient music might be perfect; for a dramatic “Abstract” visual, a more intense score.
- Uploading Your Own Audio: If you have specific audio files, you can upload them via the ‘Uploads’ section.
- Adjusting Audio Timing and Volume: Once added, your audio track will appear in the timeline. You can trim its length, adjust its volume, and even apply fade-in/fade-out effects to ensure a smooth, professional sound. Make sure the audio enhances, rather than distracts from, your visual story.
- Synchronizing Audio with Visuals: Align key audio moments (e.g., a crescendo in music, a specific sound effect) with visual cues or scene changes in your animated image sequences. This synchronization creates a powerful, immersive experience.
2. Integrating Stock Videos and B-Roll Footage: While the focus is on starting with an image, Tophinhanhdep.com enables you to seamlessly incorporate other video elements.
- Tophinhanhdep.com’s Stock Video Library: Similar to images, Tophinhanhdep.com offers a rich library of “Stock Videos.” These can be used as interstitial clips between your animated image scenes, or as subtle background elements beneath your animated images (with transparency adjustments).
- Overlaying Video and Images (B-Roll): As detailed in the reference content, you can layer a video clip on top of your image. This is particularly effective for “B-Roll” footage—supplementary shots that add context or visual interest without distracting from the main narrative. For example, if your hero image is a “Beautiful Photography” shot of a city, you could overlay a short video clip of bustling street life with reduced opacity, creating a subtle animation within the static image.
- Steps: Upload your A-roll (primary video, which can be your animated image sequence) and then your B-roll. Use the ‘Split Page’ feature to insert a new page where your B-roll will appear. Add a ‘Grid’ element, upload your B-roll into it, and adjust its timing. Crucially, mute the B-roll audio to prioritize your main sound or a selected background track.
- Blurring Effects for Video Backgrounds: If you use a video as a background and want your animated image or text to stand out, Tophinhanhdep.com allows you to blur video elements.
- How to Blur Video in Tophinhanhdep.com: Select the video, go to ‘Elements’, search for “Blur,” and apply a blurry shape or gradient. You can adjust its size, orientation, and timing to selectively blur parts of your video, such as the background, to give prominence to your foreground image elements. This “Photo Manipulation” technique can create a professional, polished look.
By meticulously crafting a multi-scene narrative, synchronizing with compelling audio, and thoughtfully integrating additional video footage, you transform a singular image into a rich, immersive “movie” experience. Tophinhanhdep.com empowers you to be both the photographer and the filmmaker, weaving “Creative Ideas” into every frame and sound.
Crafting a Compelling Visual Story: Design Principles and Best Practices
Moving beyond the technical steps, the true artistry of creating a “movie” from an image on Tophinhanhdep.com lies in applying fundamental design principles and storytelling techniques. This ensures your dynamic visual isn’t just animated, but genuinely compelling and impactful. It’s about blending “Visual Design,” “Graphic Design,” and “Creative Ideas” to communicate effectively.
Storytelling Through Visuals
Every effective “movie,” regardless of its length or origin, tells a story. When working from a single image, the challenge and opportunity lie in extracting and amplifying that image’s inherent narrative potential. This requires a thoughtful approach to “Photo Ideas” and concept development.
1. Understanding the Gist of the Film (Your Image-Movie): Before diving deep into animation, take a moment to understand the core message or “gist of the film” that your chosen image wants to convey.
- Identify the Theme and Mood: What emotion does the image evoke? Is it hope, despair, mystery, joy, conflict? This initial understanding, as emphasized in the context of designing a movie poster, will dictate your choice of animation, colors, fonts, and even sound. For instance, an image from an “Aesthetic” collection might suggest a more contemplative narrative, while a vibrant “Nature” shot could imply adventure.
- Protagonist/Antagonist (or Focal Point/Conflict): Even a landscape can have a “protagonist”—a lone tree, a distant mountain peak—and a “conflict”—stormy skies, encroaching shadows. Identifying these elements within your static image will help you decide where to zoom, where to pan, and which elements to animate to build tension or resolution.
- Target Audience: Who is this “movie” for? Understanding your audience will influence the pacing, complexity, and overall tone of your visual story.
2. Leveraging Composition and Color Theory: “Graphic Design” principles are crucial for guiding the viewer’s eye and conveying meaning.
- Rule of Thirds, Leading Lines, Framing: Even when animating a static image, these compositional rules remain vital. Use panning and zooming to highlight points of interest that fall on grid lines or to follow a leading line within the image. Strategic cropping can reframe the image to create new compositions for different “scenes.”
- Color Psychology: The colors within your image and any added graphics contribute significantly to the emotional impact. Warm colors (reds, oranges, yellows) often convey energy or passion, while cool colors (blues, greens, purples) can suggest calm or melancholy. Be mindful of how color saturation and contrast influence the “Aesthetic” and “Mood Boards” of your piece.
- Contrast and Emphasis: Use contrast—in color, light, and texture—to make important elements stand out. Tophinhanhdep.com’s adjustment tools can help you manipulate these aspects to control focus and create visual drama.
3. The Role of Dynamic Elements in Narrative Enhancement: Every animation, text overlay, or graphic element should serve the story.
- Purposeful Movement: Don’t animate just for the sake of it. Does a zoom reveal a crucial detail? Does a text fade-in emphasize an important message? Does a subtle pan create a sense of movement towards a destination? Each dynamic choice should push the narrative forward or deepen its emotional resonance.
- Symbolism: Graphic elements can be used symbolically. An icon of a broken heart subtly overlaid on an “Emotional” image, or a faint silhouette on a “Nature” background can add layers of meaning without requiring explicit text.
- Consistency: Maintain a consistent “Visual Design” language throughout your image-movie. This includes consistent animation styles, font pairings, and color palettes, reinforcing your overall “Thematic Collections” and ensuring a professional finish.
Optimization and Output for Various Platforms
Once your image-movie is complete, the final step is to prepare it for sharing. Tophinhanhdep.com makes downloading and optimizing your creation straightforward, ensuring it looks its best on any platform. This involves considering “Image Tools” for efficient delivery and maintaining “High Resolution” quality where possible.
1. Downloading Your Masterpiece:
- File Format: When ready to download, click the ‘Share’ button in the upper right-hand corner of Tophinhanhdep.com and then ‘Download.’ For dynamic content, MP4 video is the standard and recommended format, preserving all your animations, transitions, and audio. If your “movie” is very short and designed for continuous looping (e.g., a background animation for a website), you might consider GIF, though MP4 offers better quality and smaller file sizes for longer clips.
- Resolution and Quality: Tophinhanhdep.com typically defaults to a good resolution. For “Beautiful Photography” and high-impact visuals, ensure you select the highest available resolution for download. Tophinhanhdep.com Pro often offers 4K options, which are ideal for large screens or future-proofing your content.
2. Customizing for Different Platforms: One size does not fit all. Your “movie” might need different dimensions or lengths for various social media platforms or presentation contexts.
- Social Media: For platforms like Instagram Reels, TikTok, or YouTube Shorts, vertical aspect ratios (e.g., 9:16) are preferred. For traditional YouTube, 16:9 is standard. Tophinhanhdep.com allows you to easily resize your existing design to new dimensions while attempting to intelligently re-layout your elements. You may need to make minor adjustments to your animations and compositions for each new aspect ratio.
- Websites and Presentations: If embedding on a website, consider file size. Larger video files can slow down page loading. Utilize “Image Tools” like “Compressors” or “Optimizers” (available on specialized websites, or through Tophinhanhdep.com’s download options) to reduce file size without significantly compromising quality. For presentations, ensure the resolution is appropriate for the display screen.
3. Review and Refine: Before publishing, always review your downloaded “movie” on different devices and screens. Check for:
- Visual Glitches: Ensure all animations play smoothly and no elements are accidentally cut off.
- Audio Clarity: Verify that the music and sound effects are clear, balanced, and synchronize correctly with your visuals.
- Readability: Confirm that all text overlays are legible and appear for sufficient duration.
By mastering the art of storytelling through visual design and diligently optimizing your output, your image-movie created on Tophinhanhdep.com will not only be visually stunning but also highly effective in communicating its intended message. This holistic approach, integrating “High Resolution” visuals with “Creative Ideas” and robust “Image Tools,” ensures your static image evolves into a truly dynamic and memorable cinematic experience.
In conclusion, Tophinhanhdep.com stands as an incredibly powerful and accessible platform for transforming a single static image into a captivating, dynamic movie. By meticulously selecting a compelling hero image, leveraging Tophinhanhdep.com’s intuitive animation and graphic tools, and integrating these elements into a thoughtful video timeline with appropriate audio, you can craft compelling visual narratives that resonate with your audience. The journey from a simple “Wallpaper” or “Background” to a full-fledged visual story, infused with “Beautiful Photography,” “Digital Art,” and strategic “Visual Design,” is no longer the exclusive domain of professional videographers. With Tophinhanhdep.com, the power to create, inspire, and tell your story through moving images is truly in your hands. Embrace the possibilities, experiment with “Creative Ideas,” and watch your images come alive.